
Fix QuickBooks Error 15223: Know Its Causes & Solutions
Jul 21, 2026
Admin |
Estimated Read Time : 5 MIN
The QuickBooks error 15223 in QuickBooks indicates that it occurs during updates for QuickBooks Desktop or its payroll services. It could be due to issues with the digital signature or Internet Explorer settings.
QuickBooks Error Code 15233: The QuickBooks Desktop update did not complete successfully.
QuickBooks Error 15223: Cannot connect to QuickBooks Desktop Payroll.
In this guide, we have covered the causes of the error and concrete solutions to fix the QuickBooks error. You can also bookmark this guide for further use.
Common Causes Behind the QuickBooks Pro Error 15223
Incorrect Browser settings: You must have an outdated digital signature in your browser settings.
Damaged or corrupt company file: You must have corrupt Windows files or damaged QuickBooks-related files.
QuickBooks Components may be damaged: There could be damaged components.
Not enough admin rights: The QuickBooks users must not have sufficient admin rights.
Third-party interruption: Windows firewall or antivirus must block the connection to QuickBooks servers.
Incomplete installation: You must not have installed the QuickBooks application properly.
Solution to fix the Error Code 15223 of QuickBooks
Resolve QuickBooks Error 15223
Open Internet Explorer.
Click on the Gear icon.
Select Internet Options.
Navigate to the Advanced tab.
In the Security tab, locate Use TLS 1.0, TLS 1.1 and Use TLS 1.2.
Ensure that Use TLS 1.0 is unmarked, while Use TLS 1.1 and Use TLS 1.1 must be marked as checked.
Click on Apply and hit OK. Retry the update.
If you still receive the error, uninstall and install QuickBooks Desktop in Selective Startup mode, and then try the update again.
Check and confirm if the error is fixed. If not, we would like you to follow these steps,
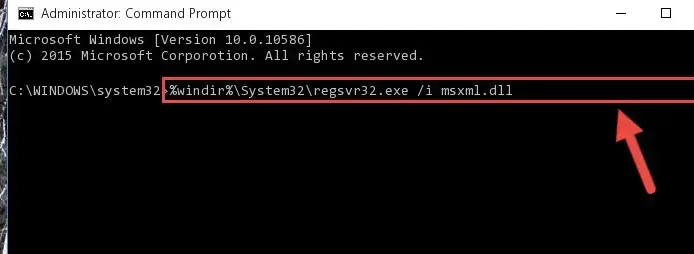
Register .dll files
Click on the Windows Start menu.
Type Run in the search box.
Or,
Press the Windows key + R key on your keyboard.
Copy the registered file: regsvr32 /s %SystemRoot%\system32\softpub.dll.
Paste it in the blank field and click OK.
If you do not receive any notification, it means the file is being registered successfully.
In case you have received any message regarding it, confirm that you have copied the register file as it appears.
Repeat this step again and copy regsvr32 /s %SystemRoot%\system32\WinTrust.dll.
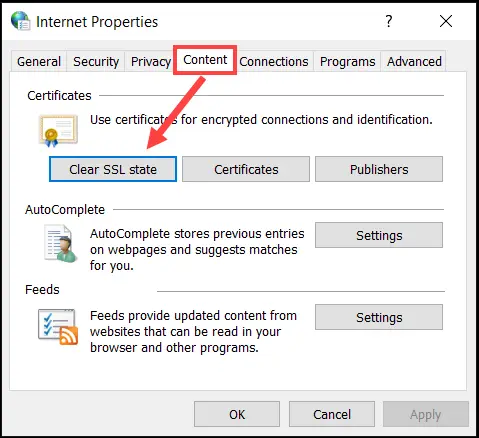
Clean the Internet Explorer SSL state
Open Internet Explorer.
Click on the Gear icon > Internet Options.
Navigate to the Content tab and choose Clear SSL state.
Restart your PC and launch QuickBooks.
Now, try the update again.
Configuring Windows Firewall Settings
Windows Firewall is a must and a basic requirement for the smooth functioning of QuickBooks.
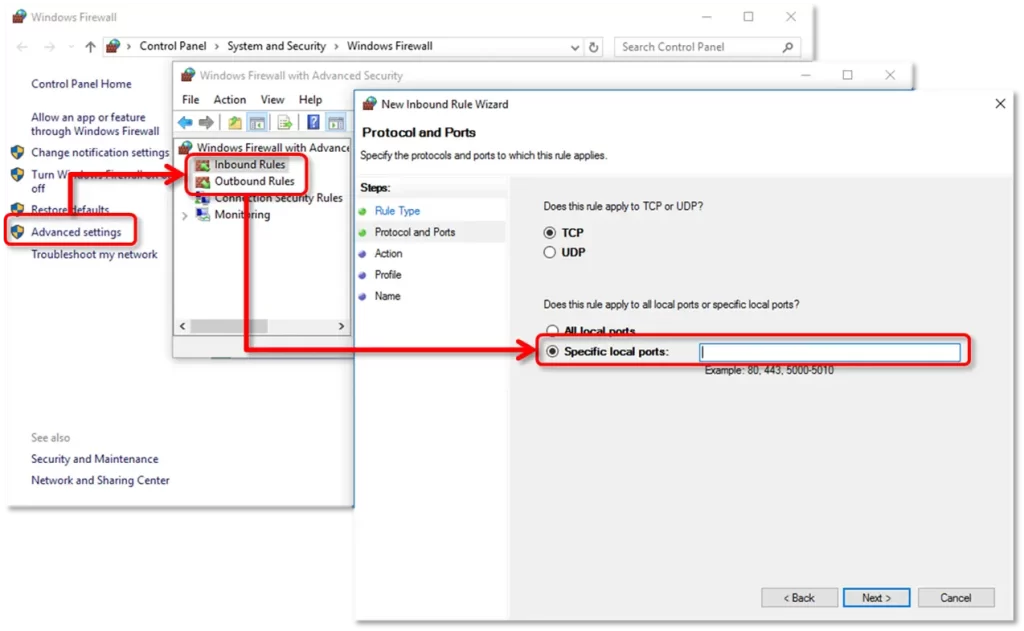
Type “Firewall” in the search box.
Open the “Windows Firewall” and click on “Settings”.
Click on “Advanced Settings” to create inbound and outbound rules.
For Creating Inbound rules:
Right-click on Inbound rules and choose “New Rule”.
In the drop-down menu, click on “Program > Next”.
Choose “This Program Path”.
Now browse “QuickBooks executable file (qbw32.exe or QBDBMgrN.exe).”
Select the file and click “Next”.
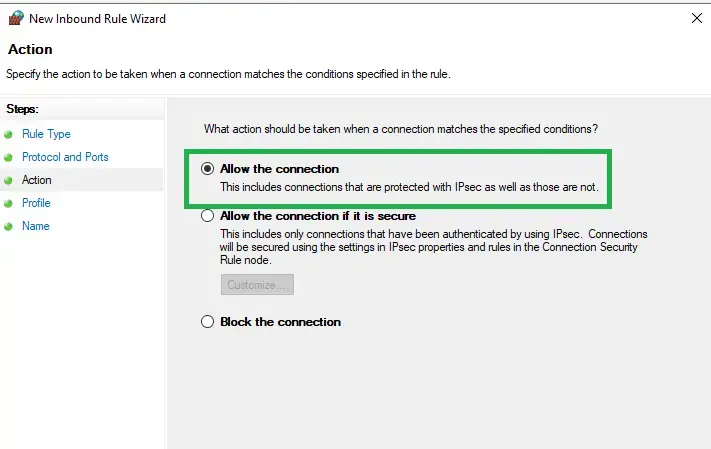
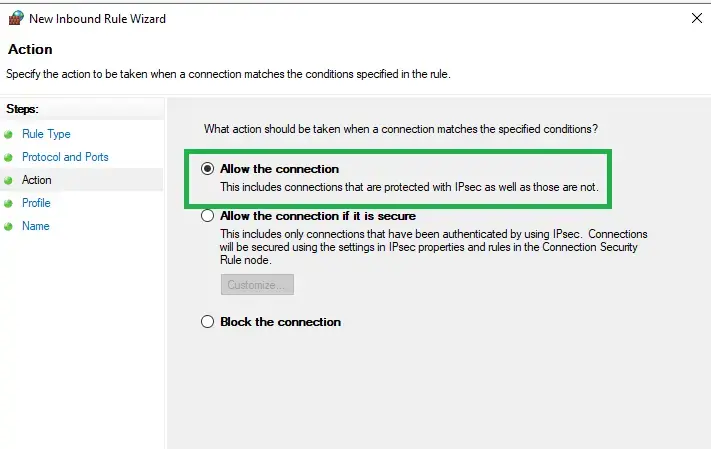
Proceed with the “Allow the connection” and make sure all profiles are checked.
Then, click “Next” and name the rule with format QBFirewallException_qbw32.exe and “Finish” it.
5. To create an outbound rule: Follow the same steps mentioned above and just click on “Outbound Rules” this time.
6. Add Port Exceptions:
The first step is to right-click on Inbound or Outbound Rules.
Now choose “New Rule” and click on “Port > Next”.
Click on the “TCP” section and enter the port numbers aligned with the QuickBooks version you are using. It could be 56728, 55378, or 8019.
If you are using QuickBooks 2020 or a later version, you need to use the “Dynamic Port” along with 8019. Follow the further on-screen instructions and finally click on “Allow the connection”.
7. Follow the same steps for other QuickBooks executable files and ports. Now, you can restart the PC.
Get your dynamic port number
Click on Next after you enter the port number.
Click on Allow the connection and hit Next.
Again, click on Next when prompted and ensure that all profiles are marked as checked.
Now, create a new rule and give it a name in the format QBPorts(Year).
QuickBooks error 15223 is a common issue that occurs during the update process of QuickBooks software. It typically indicates that the software is unable to verify the digital signature of the update file.
What are the common causes behind the error?
Incorrect Browser settings: You must have an outdated digital signature in your browser settings.
Damaged or corrupt company file: You must have corrupt Windows files or damaged QuickBooks-related files.
QuickBooks Components may be damaged: There could be damaged components.
Not enough admin rights: The QuickBooks users must not have sufficient admin rights.
Third-party interruption: Windows firewall or antivirus must block the connection to QuickBooks servers.
Incomplete installation: You must not have installed the QuickBooks application properly.
How can I fix QuickBooks Error 15223?
To resolve the QuickBooks error 15223 code, you can use the following steps:
Check your internet connection.
Update your Windows firewall settings to allow QuickBooks.
Make sure that your antivirus software is not blocking the update.
If needed, reinstall QuickBooks to repair any corrupted files.
Will QuickBooks Error 15223 affect my data?
No, QuickBooks error 15223 does not affect your company data or files. It primarily prevents you from updating the software. As far as data is concerned, your data remains safe and intact during the error occurrence.
How can I prevent QuickBooks Error 15223 in the future?
To prevent QuickBooks error code 15223 in the future, ensure the following:
Your software must remain updated to the latest version,
Regularly check your internet settings and configure your firewall or antivirus software to allow QuickBooks access.
On your system, perform routine maintenance to keep it running smoothly.
About The Author
Lana Creston is an experienced technical and accounting writer with a total of 9 years of experience. She currently works on QuickBooks accounting and technical guides at QuickBookSupportNet. Lana has a passion for reading and writing about various technical topics, especially exploring new accounting methods and software, while continuously expanding her expertise in the ever-evolving field of finance and technology.
Effortlessly handle data tasks or get expert assistance with:
Data Automation
Conversion & Migration
Integration
Tax Filing & Compliance
QuickBooks Desktop 2023 is ending — Upgrade QuickBooks Desktop 2023 to 2024 for continued performance and support.