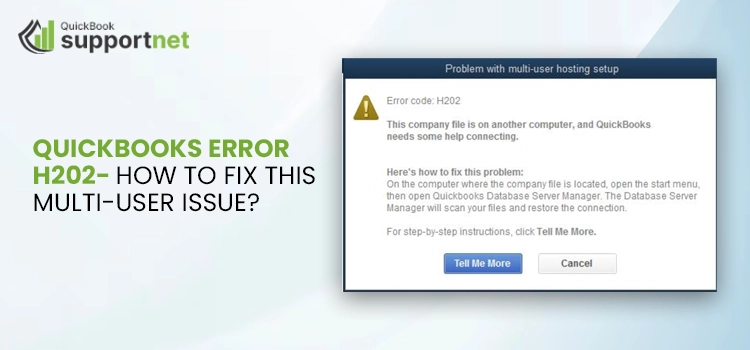
Do you often encounter the QuickBooks error H202 message while trying to enter or switch to the QuickBooks multi-user mode? If so, don’t panic. It’s a common issue that troubles a number of users like you. However, with simple and manual troubleshooting methods, you can easily get rid of this multi-user error. Typically, this error arises if the multi-user connection on your server computer is disabled.
Sometimes, multiple users try to access the same company file, but if the required multi-user hosting settings are tuned off or misconfigured, it might trigger the error H202. Now, you must be wondering about how to permanently stop the occurrence of this error. If so, continue reading this post.
In this blog, we will discuss all the possible reasons for facing the QuickBooks error H202, what signs a user can notice, and quick troubleshooting methods. Let’s start!
What’s the QuickBooks Error H202 All About?
A number of QuickBooks users search for queries daily, such as “I am facing error H202 in QuickBooks.” Well, users like you may encounter this error on their QuickBooks Desktop while trying to connect with the company file, which is saved on another computer. It’s a common error from the H-series error category and can occur anytime out of nowhere. One of the most possible reasons for facing this issue is the misconfigured or disabled multi-user hosting settings on the server computer.
Typically, users encounter the following QuickBooks error H202 message on their screen:
“This company file is on another computer, and QuickBooks needs some help connecting.“
or
“Problem with multi-user hosting setup. QuickBooks could not open the file in multi-user mode. (H202)“
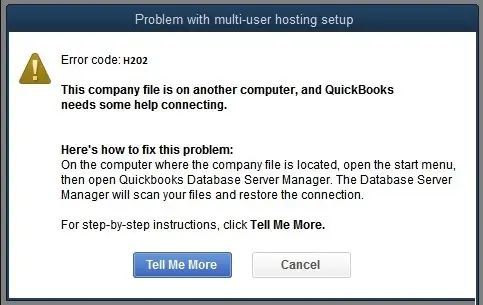
This specific error can significantly hamper your overall workflow and productivity by preventing you and your team from accessing the same company file. To get better insights into the error, you must know about all the possible reasons behind this multi-user Problem.
Why Do Users Encounter H202 Error in QuickBooks Desktop?
Certainly, any type of communication problem between your computer server and the QuickBooks software can trigger multi-user hosting issues. Have a look at the penned-down reasons for facing the multi-user H202 error in QuickBooks Desktop:
Certainly, any type of communication problem between your computer server and the QuickBooks software can trigger multi-user hosting issues. Have a look at the penned-down reasons for facing the multi-user H202 error in QuickBooks Desktop:
- Issues related to IP address
Often, QuickBooks Desktop software fails to search the host system’s main IP address. This type of Problem can prominently trigger multi-user hosting issues like error code H202.
- Firewall or Antivirus Restrictions
Security programs such as Windows Firewall Defender or antivirus programs block services of web-based applications like QuickBooks in order to secure the Windows system from unexpected threats. As a result, these firewalls or antivirus programs can also restrict users from accessing the company file in QuickBooks multi-user mode.
- Incorrect Hosting Settings
As briefed above, one of the prime reasons for facing the multi-user H202 error in QuickBooks Desktop is the incorrect or misconfigured hosting settings. Always make sure to turn on the multi-user hosting settings in QuickBooks while trying to access or work on the company file saved on another computer.
- Conflicts of DNS Server
The DNS server is responsible for the streamlined communication between your server computer and any web-based application such as QuickBooks. Unfortunately, if the DNS settings are disabled or facing conflicts, it could also bring multi-user issues like error code H202 in your QuickBooks Desktop software.
- Corrupt or Missing Network Data (.ND) File
The network data (.ND) files help users easily access a QuickBooks company file in multi-user mode or on a network. In addition, these files contain essential data and play a vital role when a user tries to work on the same company file from different locations. But, if these files are missing or corrupted, users may encounter the QuickBooks error H202 message.
- Turned-off QuickBooks Services
Essential services such as QuickBooks Database Server Manager must be active and enabled while you try to run QuickBooks in the multi-user mode. However, the inactive or disabled QBDBSM service won’t let you run QuickBooks multi-user mode and restrict you from accessing the company file.
How to Recognize the Occurrence of QuickBooks Error Code H202?
Take a look at the below-given signs, which will help you identify the QuickBooks error code H202:
- One of the obvious signs is the error message H202 itself that arrives when users try to switch to QuickBooks multi-user mode.
- Apparently, users won’t be able to switch from the single-user mode to the multi-user mode, which again indicates the occurrence of the error code H202.
- Another sign is the unexpected QuickBooks shutdown or crashing.
- Frequent freezing of the QuickBooks Desktop software is also a notable sign of the error code H202.
- You can also identify the QuickBooks error code H202 when you’re unable to access the company file, which is saved on another computer system.
7 Methods to Resolve Error H202 QuickBooks Desktop
After learning what mainly triggers the error H202 QuickBooks Desktop, now let’s quickly discuss how to resolve this error. We suggest you carefully perform the methods below as per the instructions. So, let’s try the first method:
Solution Method 1 – Access the QuickBooks File Doctor Tool from the Tool Hub
The File Doctor Tool is a free QuickBooks utility that is designed to address specific issues related to the QuickBooks company file and network data. Using this tool, we can fix the root causes triggering the multi-user error H202 in your QuickBooks Desktop. Here’s the complete procedure:
- You must begin this method by first installing the QuickBooks Tool Hub
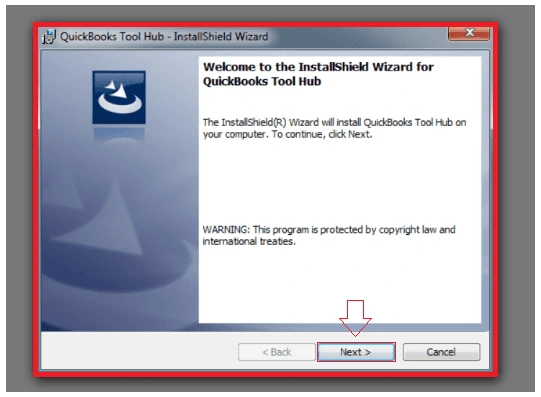
- Before you begin the installation, ensure no background Windows applications and related processes are running on your computer.
- After this, you must go to your internet browser and then visit the official Intuit website.
- From here, move to the QuickBooks product download page, and then click the download link of the QuickBooks Tool Hub.
- Once you click this link, the installer or setup file of the QuickBooks Tool Hub will start downloading. This download process may take a while, so wait accordingly.
- When you’re done with the download process, now move to your browser’s download section. From here, move the downloaded installation file QuickBooksToolHub.exe to your computer’s desktop location.
- Next, close all the running tabs, and then open this setup or installation file. Within this file, you will see some on-screen prompts. You must start performing these prompts and then choose the Next button.
- By this, you will get another window of license agreement. Now, you must carefully read the given terms & conditions and then agree to the same.
- After this, again click the Next button and then hit the Install button. The installation will take a few moments, so wait accordingly.
- Once the installation of the QuickBooks Tool Hub is over, now close all the tabs and refresh your Windows system.
- Afterward, double-click the QuickBooks Tool Hub icon to open it. Once it opens, navigate to the left-side panel and move to the Company File Issues tab.
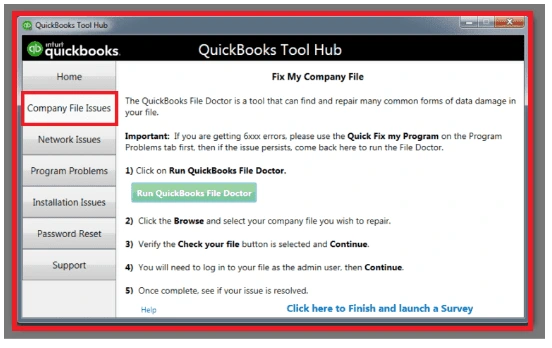
- Next, open this tab, and here you will see the QuickBooks File Doctor Tool. Click this tool to run, and then you will be asked to upload the company file facing the H202 QuickBooks error.
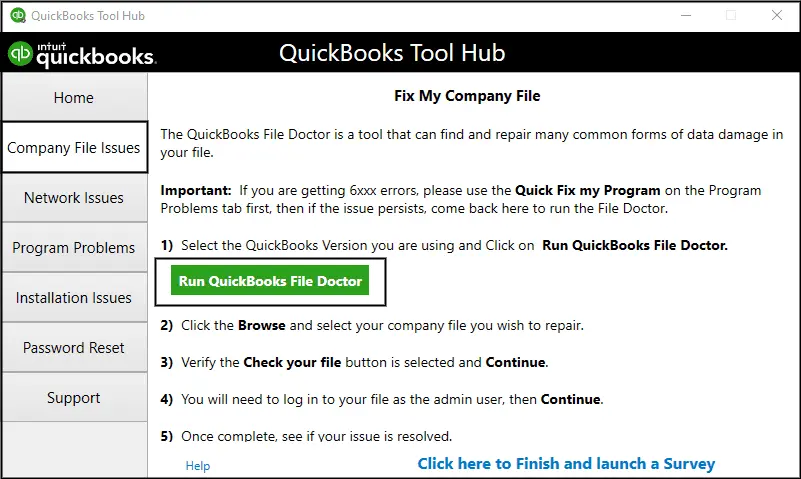
- Also, you must enter the admin credentials and then proceed to run the tool to fix the error.
- Finally, when the tool finishes the file-repairing process, click the Finish tab and close all the open windows.
- Now, verify the resolved multi-user H202 error. However, if the error is still active, perform the following method.
Solution Method 2 – Verify the Active QuickBooks Database Server Manager
We have already discussed above that the inactive or disabled QuickBooks database server manager could be a notable reason for facing the multi-user errors in QuickBooks Desktop. So, perform the instructions below and continue verifying this active service:
- Firstly, open the installed QuickBooks Tool Hub on your computer, ensuring no background process or window is running on the system.
- Move to the left-side panel, and then choose the Network Issues tab. Within this tab, you will find the QuickBooks Database server manager.
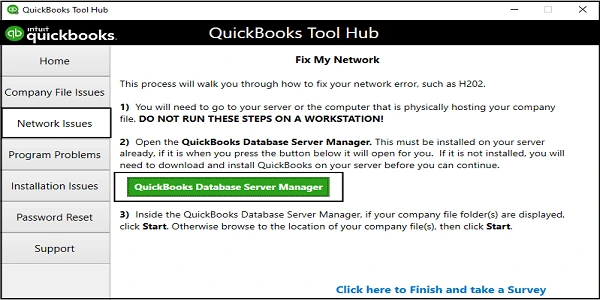
- Double-click this server manager to open, and click the Browse button to search for the company files saved within the server.
- Next, click the Start Scan tab and begin the QuickBooks company file scanning process. Once the scanning successfully ends, choose the Close tab.
- Following this, move to the File menu of the QuickBooks window, and then from the drop-down menu, opt for the Switch to multi-user mode.
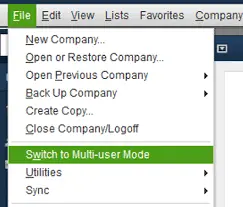
- Lastly, try to access the company file and verify the resolved H202 QuickBooks error.
Solution Method 3 – Configure the QuickBooks Hosting Settings
When you choose to run QuickBooks in the multi-user mode, ensure to configure the hosting settings. To do so, simply follow the penned-down instructions:
- Begin this quick method by first moving to the File menu within the QuickBooks window.
- From the drop-down menu, you must opt for the Utilities button. Next, from the given list, click the host multi-user option.
- If you see the option stating, Stop Hosting multi-user access, choose the same, and then hit the Yes button.
Solution Method 4 – Add Server to the Windows Host File
If the methods have failed to resolve the H202 error QuickBooks enterprise, now try adding the server to the Windows host file. For this, carefully use the prompts below:
- Start this method by first closing all the open tabs and running windows on your computer system.
- Next, navigate to the C:\Windows\System32\Drivers\Etc or C:\Windows\System64\Drivers\Etc on your server computer.
- After this, search for the hosts file within this folder, and then open the Notepad. Within the Notepad, you must enter the IP address along with the name of the server computer.
- Once done, now try running your QuickBooks enterprise software in multi-user mode. Now, if the issue is resolved, you will be able to open and access the company file in multi-user mode. However, if you still encounter the same H202 error in QuickBooks, you must configure the firewall settings.
Solution Method 5 – Correct the Configuration of System Firewall Settings
The Firewall Defender and antivirus software settings can block the communication between your QuickBooks Desktop software and the server computer. As a result, it prevents users from accessing the company file in QuickBooks multi-user mode. For this, perform the below given quick method and correct the configuration:
- Initiate this method by first creating exceptions in the System Firewall settings. Afterward, make the required changes to the Firewall settings.
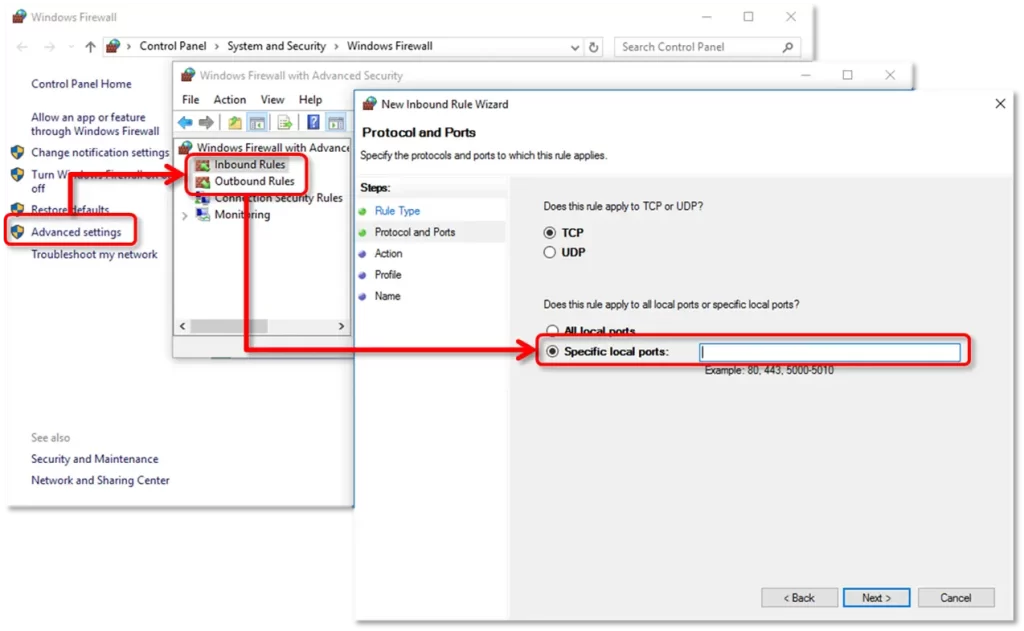
- Next, open the QuickBooks Desktop software, and from the File menu, choose the Switch to multi-user mode button.

- Finally, retry running the QuickBooks company file in the multi-user mode.
Related Blog- Do This If Windows Firewall is Blocking QuickBooks Desktop
Solution Method 6 – Ensure QBCFMonitorService is Running on the Server Computer
The active QuickBooks services, such as QBCFMonitorService, ensure users access and open the company file in QuickBooks multi-user mode. If this service is not running on your server or host computer, you may face the H202 error QuickBooks. Now, perform the penned-down instructions to run the QBCFMonitorService:
- Simply initiate this method by first opening your Windows Start Menu on the server computer by tapping the Windows button on your keyboard.
- In the next step, type “run” into the search bar and click the Enter Key. By this, you will get the Run window on your computer screen. Alternatively, to open this Run Window, you can simultaneously press the Windows + R buttons on your keyboard.
- Once you get the Run window on your computer, continue entering the services.msc in the bar. Following this, press the Enter key.
- Afterwards, you must look for the QuickBooksDBXX from the list that appeared. Once you find the service, now double-click the same and choose the Automatic option while deciding the Startup Type.
- Here, you need to ensure that the Service status is either running or started. If not, choose the Start option.
- Next, choose the Recovery tab, and then again hit the Restart the Service option. You must select these alternatives from the drop-down menus, including First failure, Second failure, and Subsequent failures.
- Afterwards, hit the Apply option and then choose the OK button. Finally, you must try running the QuickBooks in multi-user mode and accessing the company file.
Solution Method 7 – Check for Network Issues on the Server Computer
This method will help you check the network issues on your server computer. Sometimes, the network connectivity issues on the server computer are another major issue facing the multi-user QuickBooks error code H202. Carefully undertake the stepwise method below:
1 – Enable the Network Discovery on your Server Computer
- On the server computer and other workstations, you must open the Windows Start menu, and then enter “network” in the given search bar.
- Next, you must open the Network and sharing center. Afterward, you must select the change advanced sharing settings.
- After this, you must select the change advanced sharing settings, and ensure to select the Turn On network discovery within the Network Discovery and File tab from the Printer Sharing sections.
2 – Get the Name of your Server Computer
- Firstly, you must open the Windows Start menu on your computer, and then enter “run” within the Search bar.
- Next, the Run window will appear on your computer system, where you must enter “cmd” in the run box. Immediately after this you must hit the Enter key.
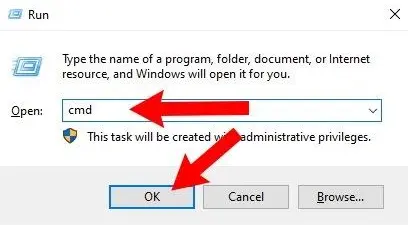
- By this, you will get the command window on your screen. Afterward, enter ipconfig/all into the command window, and then hit the Enter key.
- Now, within the Windows IP configuration section, you must search for the Host name. Right after this, move to the right-side of the section, and then look for the server’s name.
- After finding the server’s name, move to the next step, which is testing the network connectivity.
3 – Test Network Connectivity on the Server
Now, in this step, you must go back to the workstations where you must test the server. For this, simply open the Run window on your computer.
Next, within the run window, enter cmd to open the command window. Afterwards, continue to ping the server.
Following this, enter the ping_server name and hit the Enter key. Once done, you must perform all the above steps on all the workstations. Consider “C:\Documents and Settings\Administrator>ping servername_”
The Final Words!
We understand how tough it is to handle QuickBooks operations with the continuous occurrence of the QuickBooks error H202. Hopefully, the above-given methods have helped you resolve this error. However, if you still encounter the same Problem and need professional help, consider connecting with our QuickBooks IT professionals at +1(866) 500-0076. Alternatively, you can also reach out to our technicians via the Live Chat Support option.
Frequently Asked Questions
While facing the error H202, QuickBooks users encounter an error message, stating, “This company file is on another computer, and QuickBooks needs some help connecting” or “Problem with multi-user hosting setup. QuickBooks could not open the file in multi-user mode. (H202)“
The below-given reasons could be responsible for facing the multi-user H202 error in QuickBooks:
• Issues related to IP address
• Firewall or Antivirus Restrictions
• Incorrect Hosting Settings
• Conflicts of DNS Server
• Corrupt or Missing Network Data (.ND) File
You must consider the following instructions to avoid the occurrence of the error H202 in QuickBooks:
• Regularly check and install the latest QuickBooks Desktop updates.
• Include QuickBooks in the Windows Firewall Defender program exception list.
• Make sure the QuickBooks Database server manager service is active on your system.
• The error message H202 is itself a notable sign of this multi-user error H202.
• Unable to open or access the company file stored on another computer.
• Frequent crashes of QuickBooks while trying to run it in the multi-user mode.

