Bookkeeping or reconciliation is easier if bank transactions are automatically uploaded to the software. Connecting an American Express account or credit card directly to QuickBooks saves time and reduces the risk of errors or duplicate entries, simplifying bookkeeping, expense tracking, and account reconciliation. However, you may experience the QuickBooks American Express not syncing issue due to browser issues, connection failures, and more, which we will cover in detail below. From covering the detailed steps to resolve the AMEX connection in QuickBooks Desktop & Online to the manual method for uploading the transaction, we will cover everything.
Why is American Express Not Syncing with QuickBooks?
If QuickBooks American Express not syncing, it’s usually caused by connection issues between QuickBooks and the AMEX bank feed. The problem can happen in both QuickBooks Online (QBO) and QuickBooks Desktop. Below are the most common reasons and how to fix them quickly:
For QuickBooks Online
- General connectivity issues when syncing American Express with QuickBooks Online.
- Unread notifications, alerts, and security updates from your bank that might require you to perform certain operations before downloading the bank feeds.
- Cookies and caches in your browser.
- Incompatible browser with QuickBooks.
For QuickBooks Desktop
- General connectivity issues between QuickBooks Desktop and AMEX.
- Automatic bank feed might interrupt the bank connection.
- The incorrect financial institution, or the directory, might be outdated.
Quick Fixes for QuickBooks Not Syncing with American Express
Here’s a quick guide to fix QuickBooks not syncing with American Express in both QuickBooks Desktop & Online— this is a common issue, and most of the time it’s easy to resolve.
Section A: Fix American Express Syncing Issues in QuickBooks Online
If your American Express (Amex) transactions aren’t syncing with QuickBooks Online (QBO), the issue is usually related to a broken connection, authentication error, or system update. Follow these steps to quickly resolve the problem.
1. Disconnect and reconnect your American Express business account to QB Online
Disconnecting or reconnecting the American Express business account to QuickBooks Online refreshes the connection and resolves connectivity issues, memory leaks, and more.
a. Disconnect from QuickBooks Online
| Note: Before disconnecting, check the “for review” tab for any remaining transactions and note the date of the last downloaded transaction. This will help prevent duplicate downloads when you reconnect your account. |
- Follow this link to complete the steps in the product.
- In your American Express account, choose one of the files.
- Select the Edit icon.
- Choose Edit account details.
- Mark the checkbox for Disconnect this account on save.
- Finally, click Save.
b. Let’s Reconnect the QBO with the American Express Business Account
Follow this link to complete the steps in product
- Click on Connect account.
- Note: If you have already connected to an account, choose Link account.
- Use the URL or the name to find your bank, or choose it from the list.
- Note: If you cannot find the bank, you can upload the bank transactions manually using the steps below.
- Enter the banking user ID or password to sign in and click Continue.
- From the Enter account type drop-down, select the bank account you are trying to connect to, then choose the dates to get the transactions from the drop-down.
- Note: Some banks allow you to download only the recent transactions from the last 90 days. Meanwhile, others can go back as far as 24 months.
- Select your QuickBooks account
- If this is the first time you are connecting to a bank:
- Select Add new under the Enter account type drop-down.
- In the Account Type drop-down, choose either the Cash and cash equivalents or the Credit card. Only if you selected the Cash and cash equivalents account, select Savings or Bank in the Detail Type.
- Name the account and click Save and Close.
If you want to connect to a different bank, choose the account to connect to from the list of existing accounts.
- Select Connect and click Done.
- Move back to the Bank transactions page and click Update. This will automatically download your bank transactions.
2. Look for any messages, notifications, or broken pages
Notifications on your bank’s website can stop QuickBooks from downloading transactions if the site is under maintenance or facing issues. Visit your bank’s website to check for messages, alerts, or updates, and verify that there are no display problems.
If you’ve updated any bank details, such as your account number, username, or password, make sure to update them in QuickBooks as well. Failing to do so can cause connection errors. Also, ensure your QuickBooks program is updated to the latest version.
Here’s how to update your bank information in QuickBooks:
- From the left menu, select Banking.
- Click Edit in the top corner of your bank account, then select Edit sign-in info.
- Update your changes and save them.
After reviewing updates, alerts, or notifications, confirm that you can connect American Express to QuickBooks Desktop successfully. If the problem continues, move on to the next troubleshooting step.
3. Connect AMEX Account to QBO in Private Window
To prevent using cached files that might be damaged, outdated, or corrupted and cause sync issues, sign in to QBO using your AMEX account through a private browser window.
Follow the steps below to open a private window in your preferred browser:
a. Google Chrome
Windows: Press Ctrl + Shift + N.
Mac: Press Command + Shift + N.
b. Mozilla Firefox
Windows: Press Ctrl + Shift + P.
Mac: Press Command + Shift + P.
c. Microsoft Edge
Windows: Press Ctrl + Shift + P.
Mac: Press Command + Shift + P.
d. Safari
Mac: Press Command + Shift + N.
After that, try syncing American Express with QuickBooks again. If the problem continues, proceed to the next troubleshooting method.
4. Clear the browser’s cache and cookies
In QuickBooks Online, clearing the browser’s cache and cookies will remove the expired or outdated files and folders to improve the temporary glitches, internet issues, website preferences, and more. Doing this will help you secure the AMEX Connect with QuickBooks Online.
5. Use Other Compatible Browser
Intuit recommends using Google Chrome to access QuickBooks for the best experience and smooth integration. However, if you face browser-related issues, you can use other supported browsers to sync QuickBooks and American Express transactions. Follow the steps below using another compatible browser on your device.
| Note: QuickBooks generally supports the latest and two previous versions of any browser. Make sure you are using an updated version, as older versions may not be supported. Also, Intuit no longer supports Internet Explorer. |
Both mobile and desktop versions work with the browsers listed below:
- Google Chrome: Use version 78 or newer
- Samsung: version 10 or the newer one
- Microsoft Edge: 79 version or newer
- Safari: the 12 version or newer (Mac only)
- Opera: version 68 or newer
- Mozilla Firefox: version 76 or newer.
Note: On Mac OS, the Firefox PDF plugin is required to preview and print forms.
Workaround: Manually upload AMEX Transactions in a CSV format
Here’s how you can upload the AMEX transactions manually in a CSV format:
a. Choose a start date
To avoid entering duplicates, you need to know the date of the oldest existing transaction currently in the account:
- Follow this link to complete the steps in the product.
- Find the account you want to upload the transactions into. Then select Account history.
- Find the oldest transaction, then write down the date.
Note: Usually, the oldest transaction is the opening balance.
b. Get transactions from your bank
- Sign in to your bank or credit card’s website.
- Follow the on-screen instructions to download CSV files of your transactions from your bank on the computer. The steps vary as per your financial institution.
- Make sure the date range of the transactions you are downloading begins at least one date before the oldest transaction.
- Download your transactions.
- When done, save the file somewhere you can easily find, such as your computer’s desktop.
| Tip: Your bank might also offer a few file formats. If possible, only choose the QuickBooks Online data (QBO) format, as this format is specifically for QuickBooks Online. However, other file formats are also supported, including CSV files. |
c. Review the file size and format
Review the file you are downloading and make sure it’s in the correct format before uploading it to QuickBooks Online. Below are a few things to check to avoid the errors:
Note: QuickBooks has a file size limit of 350 KB. If the file size is too big, shorten the data range and download transactions in smaller batches.
- In the file, remove any zeroes (0) and leave those cells blank.
- If any transactions show numbers in the Description column, fix them.
- Go to the Credit or Debit column header and remove the word “amount” as they should only say “Credit” and “Debit”.
- All dates should follow the same format. Intuit recommends using the dd/mm/yyyy format.
- For Mac users – save the file as a Windows CSV file.
- Some banks also add the day of the week in the Date column (for example, 20/11/2018 TUE). You must remove the day of the week by splitting the date and the day of the week into separate columns.
CSV file formats
If you’re uploading a CSV file to QuickBooks, keep it in a 3-column or 4-column format.
| CSV format | Description |
| 3-column format | Has a Date, Description, and Amount column. |
| 4-column format | Has a Date, Description, Credit, and Debit column. |
d. Manually upload the transactions
- Follow this link to complete the steps in the product.
- Choose the blue tile for the account you are uploading transactions into.
- Select Upload from under the Link account drop-down.
Note: If you haven’t connected your bank to online banking, click on Upload transactions.
- In the Select account drop-down, choose the account you wish to upload the transactions into.
Note: If you are a new user to QuickBooks, you might not have an account to upload the transactions into. If you don’t see one, click on + Add new from the drop-down to create a new bank account.
- Upload the account statement file from your computer.
- Follow the steps on your screen to match the columns on the file with the correct fields in QuickBooks and select Continue.
- Select the transactions you are importing and click Continue.
- Click Yes to confirm.
- Select Done.
Note: QuickBooks Online has a line limit of 1,000 per upload.
e. Categorise and reconcile the transactions
Now that your transactions are in QuickBooks, it’s time to match and categorise them. The transactions go into your accounts after you review them.
QuickBooks Online also enters certain details automatically if you set up any banking rules, or if it recognises transaction descriptions.
You should also reconcile the transactions you uploaded to ensure that all transactions are recorded correctly in QuickBooks. Once done, you can utilize all your bank transaction data for different business projects seamlessly.
Section B: Fix American Express Syncing Issues in QuickBooks Desktop
Look at the steps below to resolve the issues why QuickBooks American Express not syncing and get your transactions automatically on your program:
1. Refresh the connection for Express Web Connect online banking
Refresh the connection of the AMEX bank with your QuickBooks to resolve the general connectivity issues and “Maximum connection retries exceeded.”
a. Prepare to switch to Express Web Connect
Make sure to use an up-to-date version of QuickBooks Desktop and create a backup of your company file.
- Go to the File menu.
- Choose Switch to Single-user Mode.
- Select Company > My Company.
- Sign in to your Intuit Account if you haven’t already.
Note: Create an Intuit account if you haven’t yet or recover using your user ID and password.
- Delete all the pending online payments or checks.
- Add and match the transactions you downloaded previously.
b. Turn off bank feeds for your account
Before updating the Bank Feeds connection, disconnect all the related accounts to make sure you don’t have any discrepancies. When done, we will set them up in the next step.
c. Set up an account for Bank feeds
You must set your bank account to download the bank transactions in QuickBooks:
- Go to the Banking menu.
- Choose Bank Feeds, then Set Up Bank Feed for an Account.
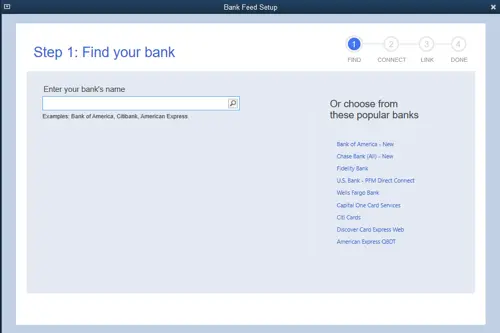
- Name your bank and click Next.
- Note: Use the updated bank name shown in the Account reconnection required list and move to step 4.
- The My Company sign-in page will open.
- Sign in using the Intuit Account user ID.
- Enter the account info for online banking and click Connect. QuickBooks will connect you to the bank’s server.
- Note: Your bank will prompt you to enter the one-time password (OTP).
- Choose the account(s) you want to connect to QuickBooks and click Connect.
- Select Close.
Note: Chase will require authentication and may open an external browser. Once you’ve signed in, return to QuickBooks.
d. Download transactions with Express Web Connect
Everything is set. Next time you use the bank feeds, the latest transactions will be downloaded automatically.
Note: Once the setup is complete, you might see transactions from the previous day that need to be reviewed and categorized. Don’t forget to remove the duplicate transactions.
- Go to Banking.
- Select Bank Feeds and click on Bank Feeds Center.
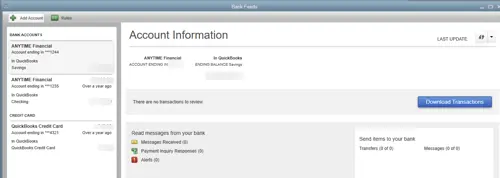
- Choose the account you want to download.
- Click on Download Transactions.
- When done, choose the Transaction List to process your transactions.
Note: You can select the Add Account drop-down (v), then Manage accounts to view any connection/bank errors.
| The existing Fidelity account connections in QuickBooks Desktop will be discontinued after July 2022, and you will not even be able to add new ones. However, you will still be able to connect the Fidelity accounts to QuickBooks Online. |
2. Update the Financial Directory
Ensure the Financial Directory contains accurate, current, and relevant financial data. Let’s see how you can update the financial directory both automatically and manually:
Before getting started:
- Create a backup of your company file.
- Update QuickBooks Desktop to the latest version.
- Make sure you use the supported version of QuickBooks
a. Automatic update
QuickBooks will automatically process the financial directory update for you.
- Go to Banking at the top.
- Select Bank Feeds, then Bank Feeds Center.
- Click on Refresh account(s) or select Sync all for this bank from the drop-down.
b. Manual update
To manually update your bank, ensure you update each file location for every QuickBooks version you use.
- Locate the fidir.txt file on your system.
| Product | File Location |
| Enterprise | C:\ProgramData\Intuit\QuickBooks Enterprise Solutions XXXX\Components\OLB\branding\filist |
| Pro/Premier | C:\ProgramData\Intuit\QuickBooks XXXX\Components\OLB\branding\filist |
- Right-click fidir.txt and select Rename.
- Replace .txt with .old, then click outside of the field to save the name change.
- Choose the QuickBooks version you use to get the latest file.
- When downloaded, save it on your desktop.
- Go to your Desktop and right-click on fidir.txt file.
- Select Copy.
- Locate the file folder and open it.
- Right-click on the same folder and Paste.
- Exit and open QuickBooks Desktop again.
The Financial Institution list is now up-to-date.
3. Verify the Financial Institution’s website
If QuickBooks fails to access the bank’s server or if the server is down, it means your ‘QuickBooks American Express not syncing 2025.’ To resolve this, make sure the financial institution’s website is accurate by following the steps below:
a. Link your American Express bank account
You must check the bank’s URL to verify the proper connection and link your bank account seamlessly.
- Make sure the American Express URL that QuickBooks uses is correct.
- Open QuickBooks.
- Go to Bookkeeping and select Transactions.
- Hit on Bank Transactions.
- Click on Link Account to connect to the bank. You just need to add the link to your bank account.
- Select American Express and copy the URL from the bank’s website.
- Then, log in to your account using the same URL.
Once the account is linked, move to the next step.
b. Check for pending notification and security requirements
Check for pending notifications, announcements, security requirements, and more with the steps below.
- Go to your bank’s website and make sure you have no pending notifications, alerts, or messages.
- Now, check for display issues as QuickBooks might block the bank’s website from downloading the transactions.
- Check the website for any announcements of new security requirements. If so, review these announcements, notifications, or messages first, then download the transactions.
Now, proceed to the next step below.
c. Refresh the Bank Feeds in QB
As the final step, refresh your bank feeds in QuickBooks Desktop by following these steps—
- Navigate to the Bookkeeping menu.
- Select Transactions, and then choose Bank Transactions.
- Click the Refresh button.
- Once completed, your American Express account will successfully sync with QuickBooks Desktop.
Conclusion
In conclusion, linking American Express with QuickBooks automatically downloads transactions and streamlines reconciliation. If “QuickBooks American Express not syncing,” you may need to perform a manual update. However, these steps will help you resolve the issue and restore the connection.
For additional support, it is advised to contact QuickBookSupportNet professionals at +1(866)500-0076. Speak to an expert today!
Frequently Asked Questions
- Does QuickBooks sync with American Express?
Yes, you can sync QuickBooks with American Express. For this, a stable connection between QuickBooks and the bank is necessary to retrieve your transactions automatically. If you fail to connect AMEX to QuickBooks, you must use the manual method to upload your transactions.
- Why is my QuickBooks not syncing with AMEX?
QuickBooks may fail to sync with AMEX due to general connection issues, security updates on the bank’s end, an incorrect financial institution, an incompatible browser with QuickBooks Online, and other reasons that vary between Desktop and Online.
- Why are my AMEX transactions not showing?
After a secure connection of QuickBooks with AMEX, your transaction will automatically upload to QuickBooks. However, if the AMEX transactions are not showing, it could be stuck, or due to delayed processing, merchant settlement delays, or a technical glitch.
- How do I sync American Express to QuickBooks Online?
To sync American Express to QuickBooks Online, select Connect, choose the American Express user type, and sign in using the American Express user ID and password. Select the account you want to connect with and choose the account type from the drop-down. Finally, click Connect to sync your account.
- How do I fix American Express not connecting to QuickBooks?
To fix American Express not connecting to QuickBooks Online, try refreshing the connection by disconnecting and reconnecting the bank, clearing your cache and cookies, or using a different, compatible browser. Also, check the bank updates, notifications, or a private window. As a workaround, you can also manually upload the transactions.