QuickBooks Form 940: E-File, E-Pay, and Print Tax Forms

Home > Blogs > QuickBooks Form 940: E-File, E-Pay, and Print Tax Forms
  • Oct 11, 2025   |
  •   |
  • Estimated Read Time : 5 MIN

Are you a new business owner or QuickBooks user looking for guidance on filing the unemployment tax return via QuickBooks Form 940?

Form 940 is the Employer’s Annual Federal Unemployment Tax Return, which means your contribution as an employer to the state unemployment funds. These taxes are not taken out of your employees’ paychecks. It helps the federal government monitor what’s going into unemployment programs across the country.

Below, we will learn more about the tax form 940, how to e-file, e-pay, and get a printed copy in both Quickbooks Desktop and QuickBooks Online. 

What is QuickBooks Form 940? 

If you are a business required to be subject to annual Federal Unemployment Tax Act (FUTA) tax, QuickBooks Form 940 is for you! The 940 is an annual federal tax form used to report wages subject to FUTA and taxes paid for it. This form is separate from the 941, 944, and 943 forms. 

Together with state unemployment tax systems, the FUTA tax provides funds for paying unemployment compensation to workers who have lost their jobs. IRS recommends businesses not collect or deduct FUTA tax from their employees’ wages.

This form is available and supported by all of our QuickBooks Online Payroll and QuickBooks Desktop Payroll products.

Create and Print Your Payroll Tax Payment with QuickBooks Form 940 (Desktop) 

The steps below will help you create and print the unemployment tax form 940 in QuickBooks Desktop. If you need help with tax filing, contact QuickBooks accounting experts at +1(866)500-0076. 

1. Create and print your payroll tax payment

Create and print an electronically paid payroll tax payment by following the steps below:

a. Set up a scheduled payment

Scheduled payments in QuickBooks help you keep track of when your payroll taxes are due so you don’t miss a payment. You can set up scheduled payments even if you can’t use e-payments in QuickBooks.

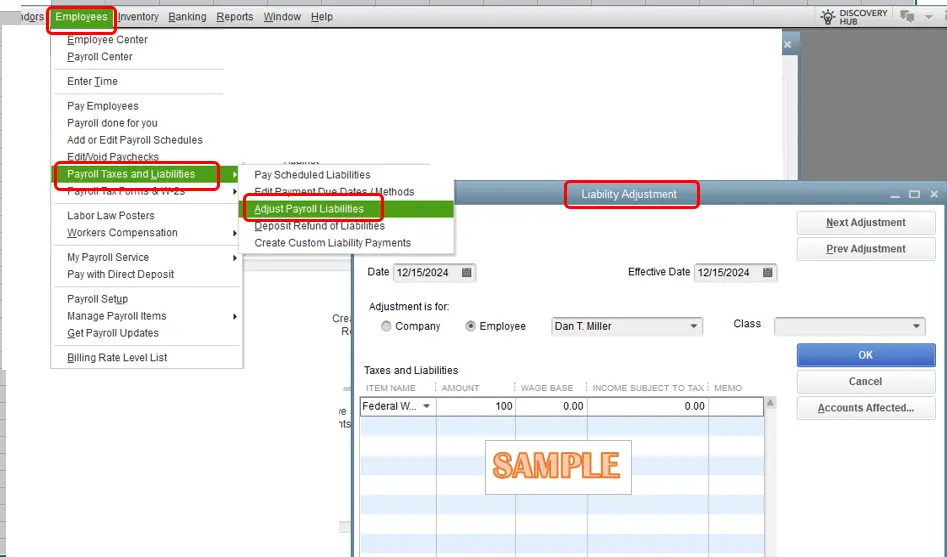
  • Go to Employee and select Payroll Taxes and Liabilities.
select Payroll Taxes and Liabilities
  • Choose Edit Payment Due Dates/Methods
  • Hit on Schedule payments
  • Select the state tax you are scheduling first and click Edit.  
  • Choose Check under Payment method
  • Type your state account number. 
  • Select the Payment Frequency provided by the state agency to you. 
  • Repeat steps 3-6 for each state tax.
  • When done, click Continue.
  • Choose the bank account you are tracking payments in QuickBooks and click Edit. This must match the bank account you used when registering with the IRS and state agencies.
  • When done, click Finish.  

b. Create and print your tax payment

For Federal tax payments, you can record the payment in QuickBooks. You’ll send the payment electronically through the IRS website. 

For state tax payments, you can create and print the check to send to the state agencies. 

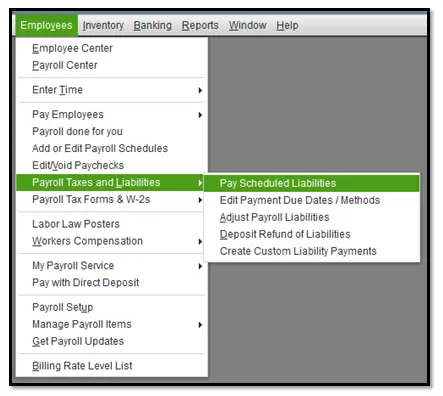
  • Go to Employees at the top. 
  • Choose Payroll Taxes and Liabilities.
  • Hit on Pay Scheduled Liabilities.
Hit on Pay Scheduled Liabilities
  • Choose the tax you want to pay from the list, then click on View/Pay. Here, you can review the taxes and amounts due. 
  • Select Save & Close
  • Finally, click on Print Checks.

Read More – Print Form 1099 and 1096 in QuickBooks Desktop

2. Prepare and print your payroll tax forms

Did you pay your taxes and need a copy of your payroll tax form? Follow the steps below:

a. Pay or record all tax payments

Before preparing the tax form, ensure you pay all related taxes in QuickBooks; otherwise, you will see amounts due on the form. To learn how to create your tax payment and print the check, see the steps above. 

b. Prepare and print or save your payroll tax form

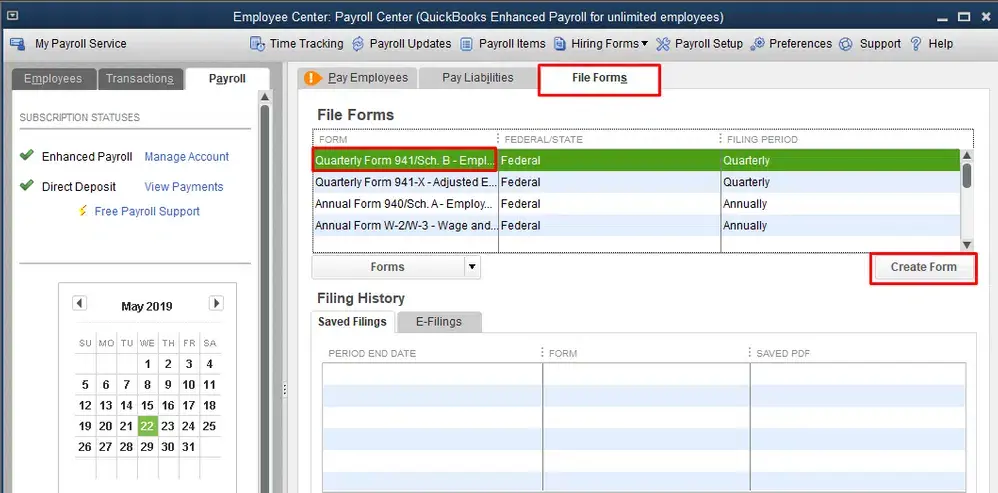
  • Go to Employees at the top.
  • Choose Payroll Tax Forms and W-2s
  • Click on Process Payroll Forms.
  • Choose the federal or state form you want to create from the list.
  • Select Create Form.
Select Create Form
  • Under the drop-down, choose the Filing Period and click OK.
  • Finish the Interview for your form.
  • Fill in the sections highlighted in green and review any pre-filled information on the form.
  • Click Next and review all pages of the form. 
  • When done, click Check for Errors
  • Now, QuickBooks will automatically identify any errors on the form. You will be required to resolve these before printing and saving the form.
  • When you are ready to print and save your form, click Save as PDF or Print for Your Records
  • Finally, click Save and Close.

c. Send the form to the tax agency

After filing and printing the form, review the instructions page to find out where to send your tax form. 

3. Create an SUI file

QuickBooks allows you to create an SUI file in QuickBooks instead of the quarterly tax form and upload it to the following state agencies:

Alabama, Colorado, Indiana, Massachusetts, Michigan, Minnesota, Mississippi, Missouri, Nebraska, New Hampshire, Ohio, Pennsylvania, South Carolina, Vermont

Here’s how to create an SUI file and upload it: 

  • Go to Employees
  • Choose Payroll Tax Forms and W-2s. 
  • Hit on Create State SUI E-file.
  • Click Continue twice.
  • Under the Select State drop-down list, select your state.
  • Hit on Get QuickBooks Data and OK
  • Correct the errors and add any missing information to the file.
  • Go to the Add-Ins tab.
  • Choose the QuickBooks Payroll State SUI E-file drop-down.
  • Click on Start Interview.
  • Choose the I understand that I must review my data and answer the following questions option.
  • Click Next
  • Note down the file name and location. This is the file that you will be sending to the state. Then, select Next
  • Answer the required questions and make sure all the information is accurate. 
  • Click Next until you see the End of Interview window.
  • Select Create State File, then OK
  • Click Yes to save the Excel workbook to keep your records. You will not be sending this file to the state. 
  • Locate the file QuickBooks saved for you in Step 8 and go to your state agency website to upload the file.

Read More – Print Your W-2 and W-3 Forms in QuickBooks

Pay and File Payroll Taxes and Forms Electronically in Payroll in QuickBooks Online 

Maintain compliance and avoid taxes when filing and paying Form 941 in QuickBooks Online by following the steps below.

a. E-pay your taxes

We’ll send you emails when your taxes are due. Remember

  1. The IRS and state agencies have different processing times. E-payments may need to be submitted up to 5 business days in advance.
  2. Ensure sufficient funds are available when payroll taxes are due, and create the tax payment on time.
  3. If you made a tax payment outside of QuickBooks, see “Record prior tax payments” for guidance.
  • Follow this link to complete the steps in the product.
  • Choose Payments.
  • A list of taxes due now will appear under Action Needed, and the Taxes due later will show in Coming Up. Choose the Filter to find the specific tax you want to pay faster. 
  • Hit Pay on the tax you wish to pay.

Note: The IRS can accept the late payment, but some might block you. You might need to contact the state to make the late payment. 

  • Make sure the Bank Account is selected, and correct the payroll account from the chart of accounts in QuickBooks. This won’t impact the actual bank account you use. 
  • Review your payment date. You can choose a different date before the processing deadline if required. 
  • Choose E-pay
  • To review the payments that have been made, select Payment history.

b. E-file your tax forms

We’ll send reminders when tax forms are due.

  1. 941 and state unemployment tax forms are due quarterly.
  2. 943, 944, 940, and some state withholding forms are due at year-end.
Note: Some taxes and forms, like state unemployment, are e-paid and e-filed together in Step 2.
  • Ensure all related taxes are paid before filing the form (see Step 1).
  • Follow this link to complete the steps in the product.
  • Go to Filings.
  • Your forms will be listed under Action Needed, with upcoming forms shown in Coming Up. Use the Filter to quickly find a specific form.
  • Select the File next to the form you want to file.
  • Confirm the File Electronically box is checked.
  • Hit Submit.
  • You’ll see the filed form under Done and can print it if needed.

Missing a past form? Make sure to file on time. If it’s missing, you may have missed the deadline. To get your payroll details, run the Payroll Summary or Payroll Tax and Wage Summary reports.

Conclusion 

Filing QuickBooks form 940 allows you to contribute to the government’s unemployment programs to help those who lost their jobs until they get another opportunity, which isn’t deducted from your employees’ paycheck. The above steps help you stay compliant and avoid penalties.

However, if you require professional guidance, dial +1(866)500-0076 to connect with a QuickBooks ProAdvisor and consult on your issues. Talk to an expert now!

Frequently Asked Questions 

Where do I find Form 940 in QuickBooks?

Find the Form 940 in QuickBooks Online: 

  • Go to Taxes > Payroll Tax.
  • Select Annual Tax Forms under the Forms section.
  • Click on the 940 link.
  • Select View.
  • Click Print on the ViewPdfForm page.

How to edit Form 940 in QuickBooks Online?

Here’s how to edit Form 940 in QuickBooks Online: 

  • Go to Taxes > Payroll Tax.
  • Select the Payments tab.
  • Choose Record tax payments.
  • Adjust the Date range > Details > Edit payment.
  • Modify the tax payment and click Update payment.

How do I print tax forms from QuickBooks?

For QuickBooks users with a payroll subscription, the process of printing tax forms like W-2s and 1099s is integrated into the software. The specific steps vary slightly depending on whether you are using QuickBooks Online or QuickBooks Desktop. Explore our website for the specific tax form or tax payments. 

How do I contact QuickBooks support?

To contact QuickBooks support, please provide your personal information, such as your email or mobile number, on the Contact Us page. Or you can simply reach out to us on +1(866)500-0076. 

Can you electronically file 941?

Yes, you can file Form 941 electronically on the official IRS site as well as with your favorite payroll software, such as QuickBooks Desktop or QuickBooks Online.