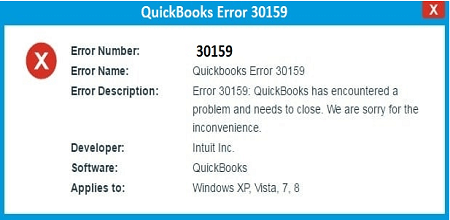
QuickBooks error 30159 is a payroll-related issue that usually occurs during payroll updates, preventing the system from verifying your payroll subscription or processing payments. This error triggers a warning message that states,
“Error 30159: We’re having a problem verifying your account status. Contact Us for help resolving the issue.”

An incomplete or outdated QuickBooks installation is a common cause of this, as are corrupted system files and other issues we will discuss below. Let’s explore this detailed guide to see why the error occurs and the different methods to troubleshoot it.
What Causes Payroll Error 30159 in QuickBooks?
See what causes error code 30159 when verifying the payroll subscription in QuickBooks Desktop. Let’s explore each of them one by one:
- Make sure to verify the payroll subscription correctly
- Inactive payroll subscription
- The Paysub.ini file might be corrupted or outdated
- Billing information for payroll subscription might not be updated
- Outdated QuickBooks Desktop
- Incorrect payroll service key
- Possible data damages or network connectivity issues
- Malicious software can cause the problem
- Damages or corruption to the Windows files or folders
- Incorrect EIN
- Incorrect QB installation
Top 11 Methods to Troubleshoot QuickBooks Error 30159 Quickly
If you reactivated the payroll subscription and it fails during verification, with QuickBooks error 30159 displayed on your screen, proceed with the troubleshooting steps outlined below. Perform the detailed steps carefully:
1. Verify the QuickBooks Desktop Payroll subscription
You must check whether your payroll service subscription is active or inactive. To verify the payroll subscription, follow the steps mentioned below:
- Close the company file and restart your computer.
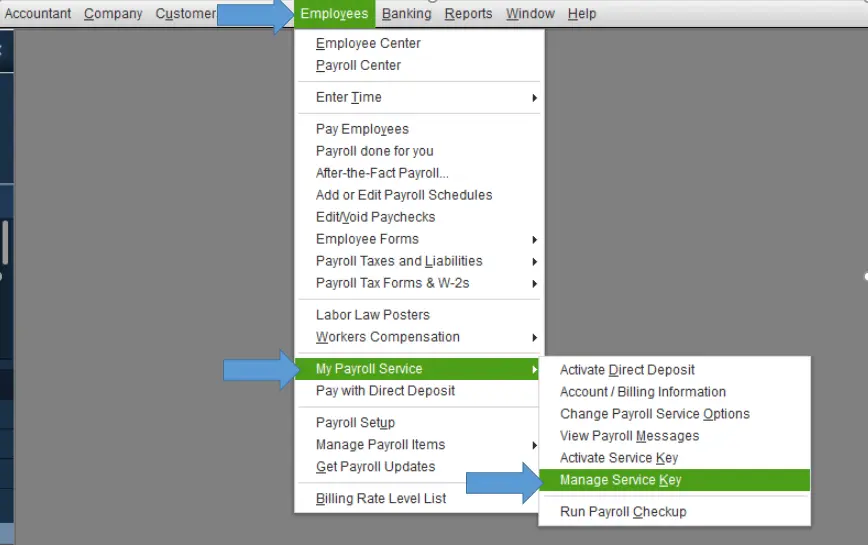
- Open QuickBooks Desktop and go to the Employees menu.
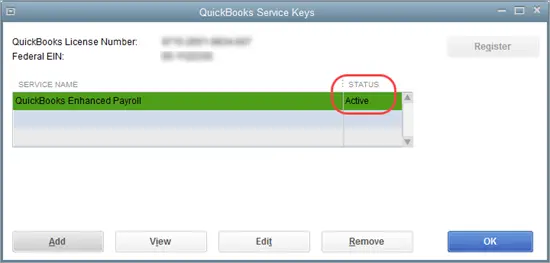
- Choose My Payroll Service, then Manage Service Key.

- Make sure the QuickBooks Desktop payroll subscription is Active.
- Now, click Edit and verify the service key. If it’s incorrect, enter the service key carefully.
- Hit Next and uncheck the box for Open Payroll Setup, then select Finish.
- This will update the payroll services.
- When done, try to run the payroll services again.
2. Reactivate the Payroll subscription
There are two different ways to reactivate your payroll subscription. Let’s look at both in the steps below:
a. Through your company file
The easiest way to enable payroll services is directly from your QuickBooks Desktop company file.
- Open your QuickBooks Desktop company file.
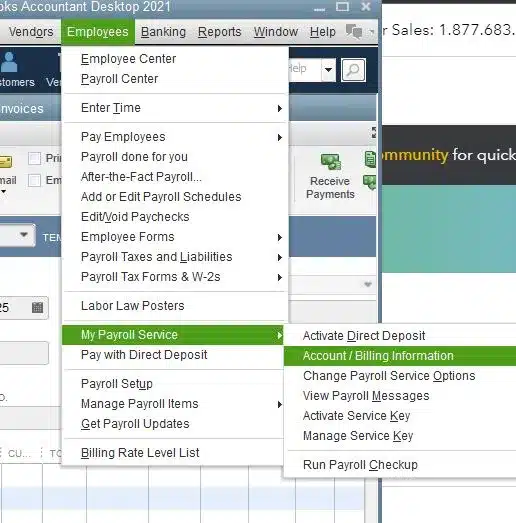
- Go to Employees at the top and choose My Payroll Service.
- Hit on Account/Billing Info.

- Sign in to your Intuit Account. This will open the QuickBooks Account page.
- Select Resubscribe under Status.
- Adhere to the on-screen steps to reactivate your payroll service.
b. Through your Intuit account
Another way to reactivate your payroll service is to use the web.
- Sign in to your Intuit account using the credentials as you normally would.
- Select Resubscribe under Status.

- Follow the steps on your screen to reactivate your payroll services.
Note: This may take up to 24 hours to reactivate your subscription to complete fully. Once the reactivation is complete, the subscription status is Active.
3. Rename the Paysub.ini file
Rename the Paysub.ini file to ensure it is updated and not interfering with payroll processing.
- Open File Explorer.
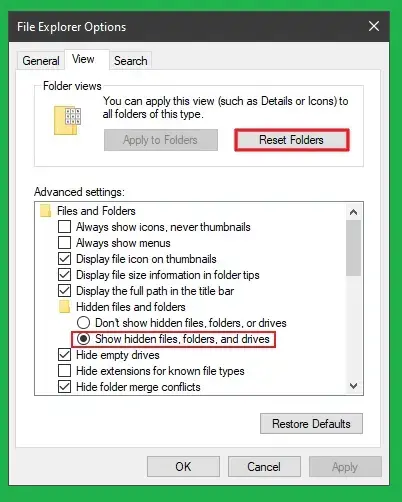
- Locate the QuickBooks file folder and look for Paysub.ini.
- If you don’t see the file, open the display hidden files or folders.

- Type Paysub.ini in the search field.
- Right-click on the file and click on Delete.
- Add .OLD at the end of the file name to rename the file.
- When done, try to run the payroll again.
4. Update the Billing information for payroll subscription
Sometimes, you may fail to update the billing information for payroll subscription. Make sure the information is updated with these steps:
- Sign in to your QuickBooks Desktop.
- Keep in mind that only the authorized users can update billing info.
- Go to the Employees tab.
- Choose My Payroll Service > Account/Billing Information.
- Sign in using the Intuit Account login credentials. Make sure to verify the information. If you don’t find the name list, reach out to us.
- Click on Billing Detail.
- Depending on your contact role, the level of information may vary greatly. If you don’t find any information under the Billing Details box, it means you are not the current billing contact or authorized user. To modify the holder or the billing contact, reach out to us on +1(866)500-0076.
- Choose Edit billing info.
- Enter the new billing information and click on I Agree.
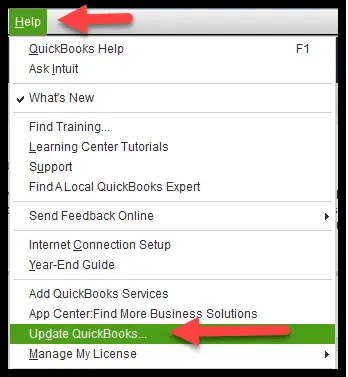
5. Get the QuickBooks Updates as an admin

Keeping QuickBooks updated is crucial for smooth performance, enhanced security, bug fixes, and more. Interruptions during QuickBooks processes can prevent you from opening company files or completing tasks. Ensure you update QuickBooks to the latest version available.
6. Edit or re-enter the payroll service key
First, you will need to obtain a service key. You will receive it via email. If you do not have a service key, use the automated Service Key Retrieval tool.
To proceed, you will need to sign in using the Intuit Account. If you failed to retrieve your service key using this tool, reach out to us. This automated tool might not work if:
- You will find multiple payroll orders in our system for your company.
- You might have purchased the payroll product from a retail store, or
- The business phone number you provided did not match the one Intuit® has on file.
Open the QuickBooks Service Keys window. In case you do not see a payroll service on your company file, go to Employees > Payroll > Enter Payroll Service Key.
If you already have a payroll service in your company file, go to Employees > My Payroll Service > Manage Payroll Service.
In the redirected QuickBooks Service Keys window:
- Click Add if no payroll service is listed.
- Click Edit, if you see a payroll service listed.
- Again, click Edit, if you see a payroll service listed.
- Click Edit, and note down the service key.
- Remove the payroll service key in QuickBooks Desktop.
- Select Next.
- Click OK when the Payroll Update message appears.
- Verify the Service Status shows ACTIVE and then click OK.

7. Run QuickBooks File Doctor
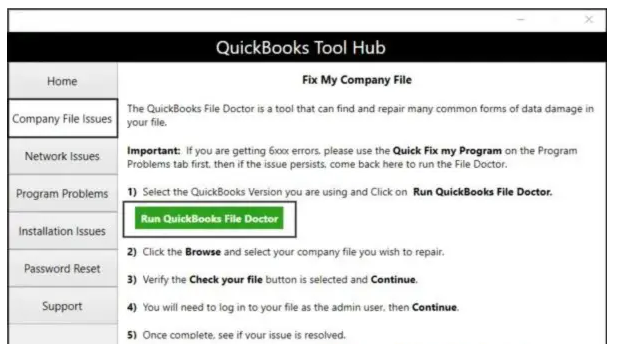
QuickBooks File Doctor verifies the company file, repairs detected data damage, and potential network connectivity issues.
Note: Download and install QuickBooks Tool Hub (1.6.0.8) in the latest version. For the best experience, we recommend using QB Tool Hub on Windows 11, 64-bit.
- Select Company File Issues in the left pane.
- Click on Run QuickBooks File Doctor. The tool can take up to a minute or more to open wait until then.

Note: If QuickBooks File Doctor fails to open, search for QuickBooks Desktop File Doc and open it manually.
- Choose your company file from the drop-down in QuickBooks File Doctor. If you don’t see the company file, click on Browse to find the company file.
- Choose Check your file (middle option only) > Continue.
- Type the QuickBooks admin password to allow access and click Next.
The scan time depends on your company file size, which can take up to 10-15 minutes. It may even be unsuccessful even after fixing the issues. When the scan finishes, launch QuickBooks and the company file.
8. Restore the System and Run the Windows Malicious Software Removal Tool
Learn how to restore the system and then run the Windows Malicious Software Removal tool using the steps below:
- Press the Windows logo key.
- Go to All Programs > Restore.
- Go to the Restore My Computer tab in the window and hit Next.
- Choose the latest system restore point and click Next.
- Select the confirmation window.
- Restart your computer.
- Download and install the Windows Malicious Software Removal Tool to proceed.
- Go to the Scan tab.
- Choose the Fix error option.
- When done, reboot your computer.
9. Run System File Checker
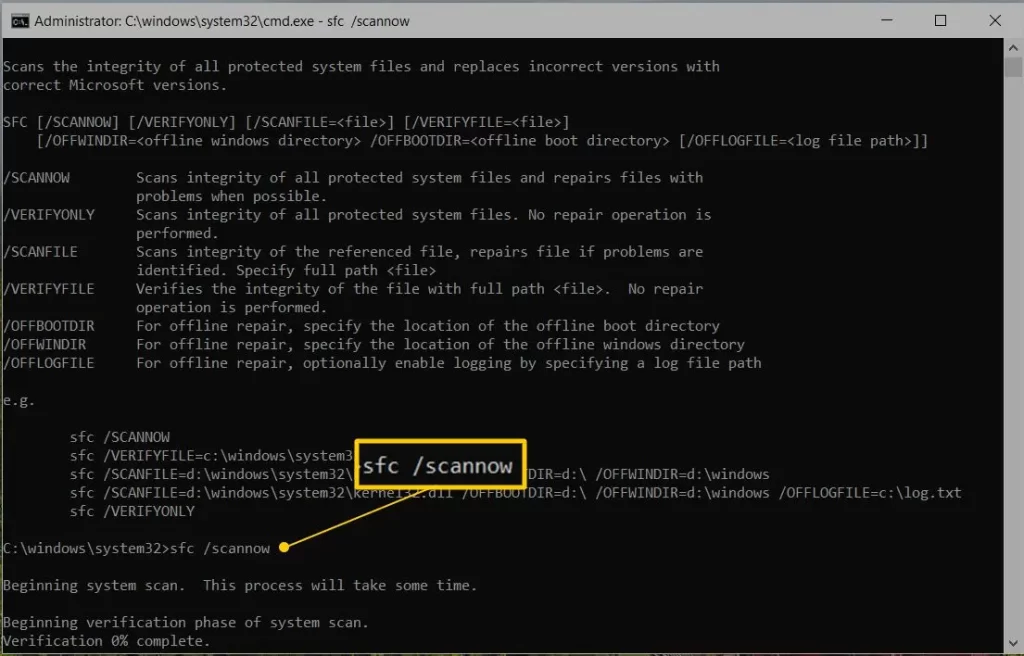
System File Checker is a utility that scans Windows files and quickly repairs potential corruption or damage.
- Press the Windows+X keys together.
- In the Quick Link menu, select Command Prompt (Admin).
NOTE: You can also run the System File Checker (SFC) from Windows PowerShell (Admin).
- Click Yes on the User Account Control (UAC) prompt.
- Type SFC /scannow in the command prompt.

- Press the Enter key.
- The System File Checker utility will verify the integrity of Windows system files and run a quick repair on them.
- When done, reboot your computer.
10. Update EIN (Employer Identification Number)
QuickBooks Desktop Payroll Basic, QuickBooks Desktop Payroll Standard, and QuickBooks Desktop Payroll Enhanced
- Go to Company at the top.
- Choose My Company.
- Click Edit from Company Information.
- In the left menu, select Company Identification.
- Enter the new EIN in the Federal Employer Identification No. field and select OK.
11. Reinstall QuickBooks Desktop in Selective Startup
Third-party applications, like antivirus and anti-spyware programs, can interfere with the QuickBooks installation. To prevent issues such as error 30159, install QuickBooks Desktop in Selective Startup mode. This minimizes conflicts and ensures a smoother installation process.
Before you start, make sure
- Save a backup copy of your company file
- Note down the QuickBooks Desktop product and license info
a. Switch to Selective Startup
To make sure no third-party processes and applications get in your way, switch to Selective Startup. If you are not comfortable performing the steps, consult an IT expert or reach out to us.
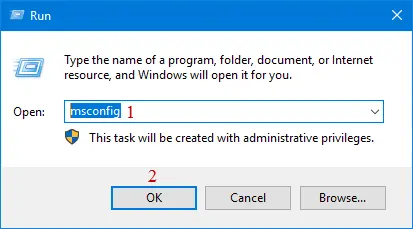
- Press the Windows+R keys together on your keyboard.
- Type msconfig in the Run prompt.
- Click OK.
- Go to the General tab.
- Choose Selective startup and Load system services.
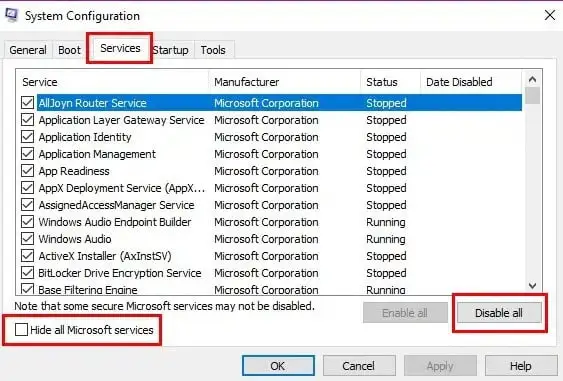
- Go to the Services tab.
- Select the Hide all Microsoft Services checkbox.

- Hit on Disable all.
- Uncheck the box for Hide all Microsoft services.
- In the list, choose the Windows Installer service.
- Click OK.
- Select Restart in the System Configuration window.
b. Uninstall or install QuickBooks Desktop
- Reinstall QuickBooks Desktop.
- Press the Windows+R keys together on your keyboard.
- Type msconfig in the Run command. Then, click OK.

- Go to the General tab.
- Choose Normal startup and click OK.
- Select Restart on the System Configuration window.
Conclusion
So, this is the end of this detailed article covering what causes QuickBooks error 30159 and quick methods to troubleshoot it. We hope this information has helped resolve the error and ensure the payroll subscription is verified successfully.
If you encounter an error or have any queries, you must contact QuickBooks professionals. Dial +1(866)500-0076 to talk to an expert now!
Frequently Asked Questions
- What causes the 30159 error in QuickBooks Payroll?
QuickBooks error 30159 is caused by issues such as incorrect or inactive payroll subscriptions, corrupted QuickBooks company files, outdated software, or problems with Windows system files and configuration.
- How do I fix a QuickBooks payroll error?
To fix a QuickBooks payroll error, try running QuickBooks as an admin, updating the software, or using the QuickBooks Tool Hub for general issues.
For specific issues, such as incorrect paychecks, you can manually edit them in the Employee Center.
- How do I fix my QuickBooks Desktop payroll subscription status?
To fix your QuickBooks Desktop payroll subscription status, first, try restarting QuickBooks and updating the program. If that doesn’t work, manually resubscribe by going to Employees > Payroll > Send Payroll Data, and then selecting Resubscribe under Status.
- What is payroll subscription verification error 30159?
Error code 30159 occurs when trying to verify the payroll subscription or the Windows system files. You may also see a warning message, “We’re having a problem verifying your account status.“