Effective record-keeping, cost-efficiency, and physical copies of checks allow businesses to issue payments quickly on demand, eliminate manual handwriting, and incorporate company branding.
This also enhances payment processing through QuickBooks Desktop or Online, offering better fraud prevention features. To help businesses print physical checks, we’ve created a detailed step-by-step guide for both QuickBooks Desktop and Online.
Whether you’re a small business or a larger enterprise, these instructions will help streamline your check-printing process, ensuring accuracy, security, and efficiency. Read on for a comprehensive guide on how to print checks in QuickBooks Online & Desktop with ease.
Let’s Create, Modify, and Print Checks in Your QuickBooks Desktop
Checks are written orders to a bank to pay the person who deposits the check in the amount stated on the check. They are treated the same as cash.
a. Write a check
In QuickBooks Desktop, you can write regular checks or other check forms as mentioned in the steps below.
i. Regular checks
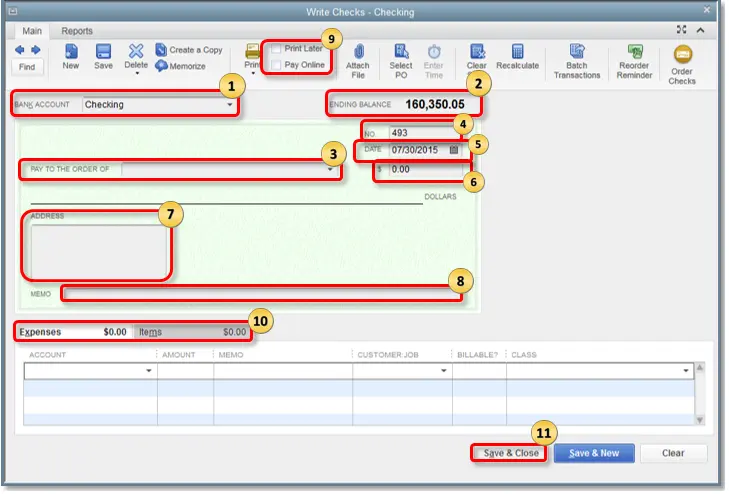
In QuickBooks Desktop, regular checks can be used to pay for fixed assets, inventory, non-inventory parts, services, other charges, or any tracked expenses. You can also use them to fund a petty cash account or pay credit card bills. To write checks, go to the Banking menu and choose Write Checks.
- Bank Account: The account from which the funds will be withdrawn.
- Ending Balance: The current balance of the bank account as of the check’s issue date.
- Pay to the Order of: The name of the payee or the recipient of the check.
- No.: This number is automatically assigned by QuickBooks based on the check number preferences.
- Date: The date the check is issued.
- Amount: The total amount in numbers; the written dollar amount will appear automatically below the payee field.
- Address: The payee’s address, populated from the payee setup.
- Memo: An optional field for notes or details like account info, payment period, or purpose.
- Print Later or Pay Online: Select Print Later if you plan to print the check later, or Pay Online if it’s an online payment.
- Expenses or Items Tab.
- Use the Expense tab for charges like shipping, liabilities, or other expenses unrelated to items.
- Use the Item tab to choose an item from the drop-down menu.
- Select Save & Close.
ii. Other check forms
- Bill Payment Check: Choose the Pay Bills option in QuickBooks Desktop to generate this cheque.
- Sales Tax Checks: Pay your sales tax liabilities with a cheque.
- Paycheck: It’s a check issued to an employee in payment for their salary or wages.
- Payroll Liability Checks: A check is created and issued by an employer to pay or remit payroll taxes deducted from employees or amounts owed to your company as a result of your payroll. This also includes deductions for 401(k) contributions, health insurance contributions, union dues, and child support.
b. Delete or void a check
Before proceeding, it’s important to understand the difference between deleting and voiding a check.
Voiding a check sets the amount to $0.00, and VOID appears in the Memo field. You can re-enter a voided check if needed, allowing you to maintain a record in QuickBooks. Deleting a check removes the transaction entirely from QuickBooks, as if it never occurred. This action is permanent, but you can always re-enter a deleted check. |
i. Void a written check
- Go to the Banking menu.
- Select Use Register.
- Choose the account you used to write the check in the drop-down.
- Select the check in the Bank Register.
- Navigate to the QuickBooks Edit menu.
- Hit on Void Check.
- Finally, click Record.
ii. Void a blank check
- Check a $0.00 amount check.
- In the Expenses section, write a payee name and assign an account.
- Go to the Edit menu and then Void Check.
iii. Delete a check
- Go to the Banking menu.
- Select Use Register.
- Choose the account you used to write the check in the drop-down.
- Select the check in the Bank Register.
- Go to the QuickBooks Edit menu.
- Hit on Delete Check.
- Finally, select Record.
c. Print checks
- From the Write Checks window, click the Print icon, then choose:
- Cheque: To print a single check. You’ll be prompted to enter a Printed Check Number.
- Batch: To print multiple checks marked for Print Later. You’ll be taken to the Select Checks to Print window. Choose the check you wish to print and click OK.
- In the Print Checks window:
- Choose your Printer name and Printer type.
- Under Check Style, pick whether you want a Voucher, Standard, or Wallet style.
- If your pre-printed checks include your company name and address, uncheck the box for Print company name and address.
- Double-check that all other settings are correct.
- Click Print.
Purchase secure checks that are compatible with QuickBooks from Intuit Marketplace.
Currently, QuickBooks does not support printing Magnetic Ink Character Recognition (MICR) fonts. To obtain a printed MICR copy, consider using third-party software available in the Intuit Marketplace.
d. Memorize a check
- In the check window, click Memorize (or press Ctrl+M).
- Select the reminder option.
- In the “How Often” field, select the frequency, such as monthly, weekly, daily, etc.
- In the “Next Date” field, pick the next payment date.
- In the “Number Remaining” field, enter how many payments you want to schedule.
- In the “Days In Advance To Enter” field, specify the number of days before payment that the program should record or remind you. Use 0 to post on the selected date.
- Click OK to memorize the transaction, returning to the “Write Checks” window.
- If it’s an auto-pay check, uncheck Print Later.
Note: If Print Later is checked, you will see it in the Print Check queue on the selected date.
(Optional) For auto-pay, make sure to modify the check number to Autopayment or Epay.
- Click Save & Close.
e. Print the check register
- Open the Edit menu and choose Use Register.
- Choose the account and click OK in the drop-down list.
- Click the Print icon at the top of the register.
- Specify the date range for printing.
Note: To print split details, check the Print splits detail box.
- Click OK, then select Print.
How to Print a Cheque in QuickBooks Online?
To print a cheque in QuickBooks Online, you will need to record a cheque and add it to the print queue. After setting up the printer, you can print checks one at a time or several at once.
a. Set up QuickBooks to print cheques
Before your checks can print, the printer needs to be set up to align with your checks and add one or more checks to the print queue.
- Go to Expenses.
- Select Expense transactions.
- Hit on Print checks.
- Open the check you wish to print.
- Hit Print later or Print check. This will change the Check no. to “To print.”
- Choose your preferred check type: Voucher or Standard. Standard checks have three checks on each page; meanwhile, voucher checks have one check and stubs.
- Click Yes, I’m finished with setup.
Read More – QuickBooks Printing Errors
b. Add cheques to the print queue
To enter a new check, click the “Print Later” checkbox or the “Print Checks” option to add the check to the print queue. Once you do this, you can print all your checks at once.
c. Print cheques from the print queue
Follow the steps below to print your checks added to the queue:
Note: To modify the cheque type (standard or voucher), open the print setup and change the cheque type.
- Select + New.
- Select Print cheques.
- Load the cheques into the printer.
Tip: Test print on plain paper first to check alignment and avoid wasting cheques.
- Choose the chequing account from which the cheque was created from the drop-down.
- In the starting cheque number. field, enter the cheque number of the first cheque in the printer.
- Tick the checkbox next to each cheque you want to print.
- Select Preview and print.
- If everything looks good, select Print.
- If the cheques print correctly, select Done.
If your checks don’t print correctly, choose to reprint them or place them in the Print Checks list. Adjust the alignment settings in the print setup to get a printed copy of your cheque.
Conclusion
Printing checks in QuickBooks saves time and helps maintain financial organization by keeping banking and financial records together. You can learn how to print checks in QuickBooks Online & Desktop by following this detailed guide.
If you can’t align the checks in QuickBooks or encounter other problems, you must reach out to QuickBookSupportNet ProAdvisors at +1(866)500-0076. Talk to an expert now!
Frequently Asked Questions
How do I print a 941 form in QuickBooks Desktop?
Here’s how to print a Form 941 in QuickBooks Desktop:
- Log in to QuickBooks Online.
- Go to Taxes > Payroll Tax.
- Select the Forms tab.
- Hit on 941 forms.
- Hit Print.
How to set up check printing in QuickBooks?
Set up your QuickBooks Online for printing checks:
- Go to Expenses > Expense transactions.
- Hit on Print checks.
- Open the check you want to print.
- Hit on Print later or Print check and modify the check no. to “To print.”
- Choose the check type.
- Click on Yes, I’m finished with setup.
Do I need special paper to print checks from QuickBooks?
Yes, you need to use special, pre-printed check stock that is compatible with QuickBooks if you want the bank to process the check.
Why can’t I print my own checks in QuickBooks?
QuickBooks allows you to print your own checks, but it requires a proper setup process for first-time use to ensure correct alignment. Common reasons for not being able to print checks include incorrect print setup, a misconfigured printer, or trying to print on incompatible paper.
How to print checks in QuickBooks?
To print checks in QuickBooks, first enter the check details and select “Print Later” to add it to the queue. Then, go to the “Print Checks” section, enter the starting check number, and click “Preview and Print” to review the batch before printing.