QuickBooks is popular accounting software, thanks to its incredible features and functions. There are mainly two versions of the program- QuickBooks Desktop and QuickBooks Online. You can manage sales tax in QuickBooks online and edit the tax rates using simple steps. The Sales tax in Quickbooks Online can vary (increase or decrease) depending on the state where you run your business. Updating your sales tax ensure that you collect the right amount. This post elaborates on how to change sales tax in QuickBooks Online in simple steps. Let’s start!
Table of Contents
ToggleWhy Do You Need to Change Sales Tax in QuickBooks Online?

If you are a regular user of the QuickBooks Online program, you need to work in compliance with the tax authorities. If you have recently added sales tax in QuickBooks, it is imperative to know about changing sales tax rates over time. Therefore, you need to keep updating your sales tax rates regularly. However, when changing the sales tax in QBO, you need to keep several important things in your mind to make it smooth.
Also Read – Fix QuickBooks POS Failed to Open Company File Error
How Do I Change Sales Tax in QuickBooks?
You can change sales tax in QuickBooks manually. You can edit it using your preferred device, be it your Android or iOS device. It takes a few steps to get the task accomplished. Navigating through this post until the end can help you with the relevant steps.
Steps to Change Sales Tax in QuickBooks Online
If you are using the QuickBooks Automated Sales Tax Service, you don’t need to perform the steps. This service updates the sales tax rates automatically. If not, you need to follow the below-given steps with the utmost care and attention:
- In the first place, you need to log into QuickBooks Online.
- Now locate the Taxes menu and then click on it.
- Thereafter, you need to click on the Sales Tax option.
- Choose the Related Tax option located on the right side of the screen to proceed further.
- Moving ahead, select Add/Edit Tax Rates and Agencies option.
- Once the Sales Tax Rates and Agencies window appears on your screen, choose the appropriate tax rate that you prefer to change.
- Now click on the Edit button.
- When the Edit Sales Tax Component window appears on the screen, edit the tax rate along with the component name.
- In the end, click on the Save button to finish the task.
Following the above-given steps, you can change your sales tax rates in QuickBooks Online. Once done, you can go to Sales Tax Rates and Agencies to verify the changes.
Change Sales Tax Rates in QuickBooks Desktop
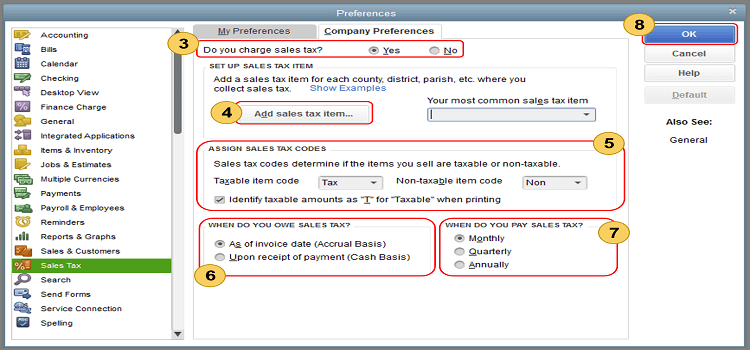
If you are a QuickBooks Desktop user, then it takes a few simple steps to change the sales tax rates in the Desktop version of the program. You can make the changes for multiple customers all at once in the QuickBooks Desktop application. Moreover, you can change the tax rates on every single transaction you make for the customers. Proceeding further with the procedure, follow the below-given steps:
- First thing first, open the QuickBooks program on your computer.
- Next, go to the Lists located on the top navigation bar.
- Thereafter, you need to hit on Sales Item by navigating through the drop-down list.
- Moving ahead, right-click on the Option and it will open a new window on your screen.
- Now in Tax Rate (%) option, you can enter the new tax rates.
- You may also edit the Sales Tax Name.
- Furthermore, add a Description to it and click OK to finish the task.
These steps are the easiest ways to edit your tax rates in QuickBooks Desktop. However, if you are facing any kind of unease, deactivate your existing rates and set up new sales tax rates for all new transactions.
Also Read – Fix QuickBooks Error 80070057
How to Edit a Sales Tax Rate on iPhone
If you are running QuickBooks Online on your iPhone, it allows you to change single as well as combined sales tax rates along with their names and description. However, you may not be able to change the name of your tax agency. Follow the below-given steps carefully:
- Open QuickBooks Online application on your iPhone in the first place.
- Now from within the Menu icon, go to Settings.
- Thereafter, tap on the Tax Rates option on your iPhone.
- Here, you can choose the tax rate you desire to change or edit.
- Moving ahead, tap on the Edit button.
- In the end, click the Save button to get the task accomplished.
Following these steps, you can save the changed tax information for further use on your iPhone. Additionally, you can very this tax rate information when required.
How to Edit a Sales Tax Rate in Android
Before you proceed any further with making changes to the sales tax rates, you need to enable the tax override feature in the first place. After enabling the feature on your Android device, you can access the app on your device.
You actually need to pay a visit to the web to open your QuickBooks Online app and then create a tax code in your QuickBooks company file. It will help you in accomplishing the desired task. Follow the below-given steps carefully:
- Open the QuickBooks Online app in the first place on your Android device.
- Next, you need to open the transaction that you want to edit.
- Moving ahead, go to the “Edit” icon.
- Now select the Tax entry that you wish to edit in QuickBooks Online.
- Make the required changes in the Tax amount and tap Done on your Android device.
This is how you can edit your sales tax rates in QuickBooks online and on various devices. Moreover, you can also edit the tax amount of the transaction for future needs.
Final Words!
The steps discussed in this post can help you in changing the sales tax rates in QuickBooks Online and the Desktop version of the program. Furthermore, it also explains the steps for your iPhone and Android devices. Changing the tax rates regularly ensures that you are working in compliance with the tax authorities. For more assistance, you can reach out to an experienced QuickBooks expert.

