How to Resolve QuickBooks Error 1603 When Installing?

Home > Blogs > How to Resolve QuickBooks Error 1603 When Installing?
  • Oct 15, 2025   |
  •   |
  • Estimated Read Time : 5 MIN

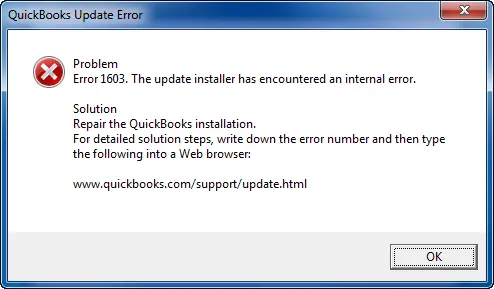
If you’ve encountered QuickBooks error 1603 during installation, you’re not alone. This issue typically arises due to problems with the Microsoft .NET Framework, which is essential for QuickBooks to run smoothly. The error message usually states: 

“Error 1603: There was a problem installing Microsoft .NET Framework [version].” 

QuickBooks Error Code 1603

This can be caused by incompatibility, missing files, or corrupted system components. In this guide, we’ll walk you through effective solutions to fix this error, ensuring that you can complete your QuickBooks installation without any hassle. Let’s get started with resolving this issue step by step!

What Causes Install Error 1603 in QuickBooks? 

Explore the points below to know the root causes of why QB installation is interrupted and causing installation error code 1603 in QuickBooks:

  • Multiple background processes are interfering with the installation 
  • Insufficient disk space
  • Outdated or incompatible Windows
  • Damages or corruption .NET Framework or MSXML Windows components
  • Third-party programs might be interfering with QB 

Top 5 Methods to Fix QuickBooks Error 1603 During the Installation 

In this section, we have mentioned a variety of factors that will help you troubleshoot QuickBooks error 1603 and ensure a seamless software installation. Be careful when performing such technical steps, or connect to an expert for help. 

1. Run QuickBooks Install Diagnostic Tool 

The QuickBooks Install Diagnostic tool identifies installation issues and performs a quick repair of the program.

Note: Make sure to download and install QuickBooks Tool Hub (1.6.0.8) in the latest release available. We recommend using the Tool Hub on Windows 11, 64-bit, for an improved experience.

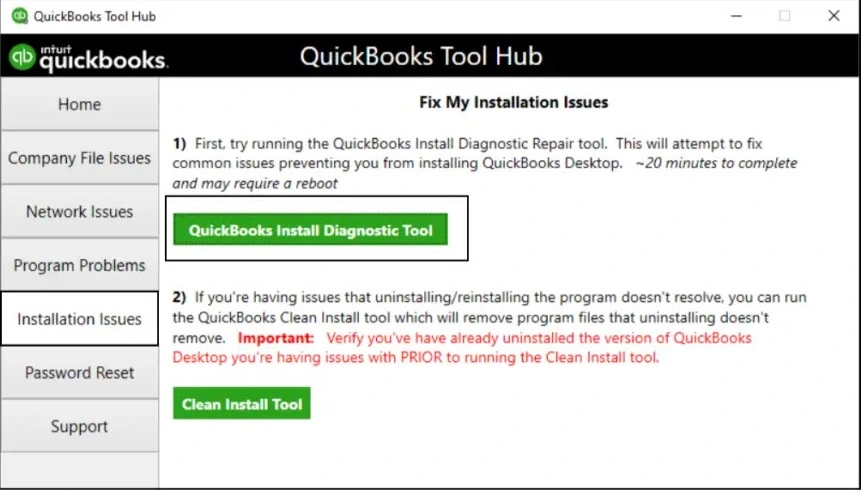
  • Launch the QuickBooks Tool Hub. 
  • Choose Installation Issues in the left pane. 
  • Hit on the QuickBooks Install Diagnostic Tool. Let the utility run; it may take up to 20 minutes. 
QuickBooks Install Diagnostic Tool
  • When done, restart your computer. 

2. Clean the Disk 

If your program is installed on a disk with limited space, you might encounter a not enough disk space, but plenty available error. Windows offers a Disk Cleanup tool to find and remove unnecessary files.

  • Open File Explorer
  • Right-click the target drive and choose Properties.
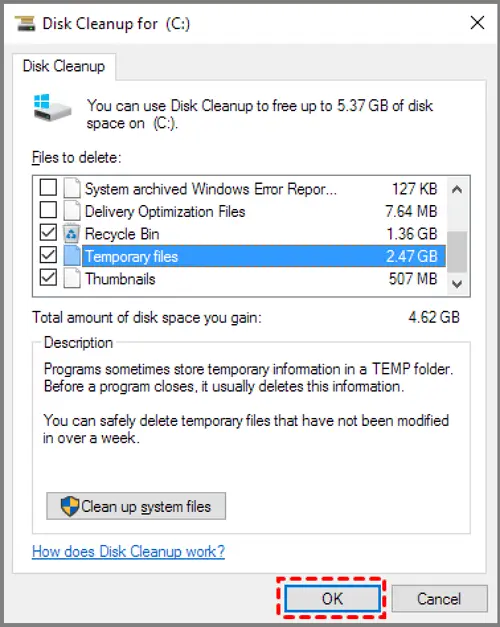
  • Click Disk Cleanup to start scanning for redundant files.
Clean the Disk
  • In the pop-up window, choose the files you wish to remove and click OK.

By running the Disk Cleanup, you will remove the previously installed Windows files, system restore points, Recycle Bin, and other system files. 

3. Update Windows

Update your Windows to the latest release to avoid compatibility issues with QuickBooks Desktop.

  • Press the Windows logo key. 
  • In the Windows Start menu, type Settings
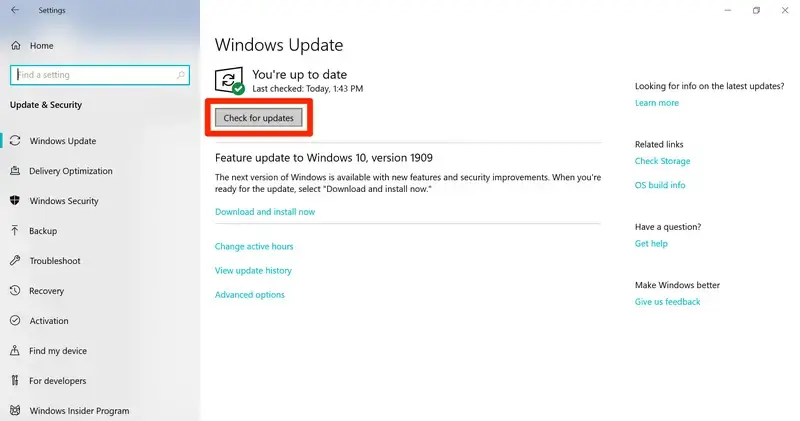
  • Select Windows Update in the left pane. 
  • Click on Check for Updates
Windows update
  • If updates are available, select Download & Install
  • When the update finishes, restart your computer. 
  • If you could install QuickBooks, open it, and then open your company file. 

If you weren’t able to install QuickBooks, install QuickBooks Desktop again.

4. Manually fix Windows components

Damage or corruption to Windows components responsible for software installation can make it challenging to install software. 

a. Repair or reinstall Microsoft .NET Framework

The steps below are applicable only to Windows 10 or a newer version. 

  • Exit all the open programs. 
  • Launch the Windows Start menu. 
  • Type Control Panel into the search and press Enter
  • Navigate to Programs and Features.
  • Hit on Uninstall a Program. Don’t worry, we won’t be uninstalling anything. 
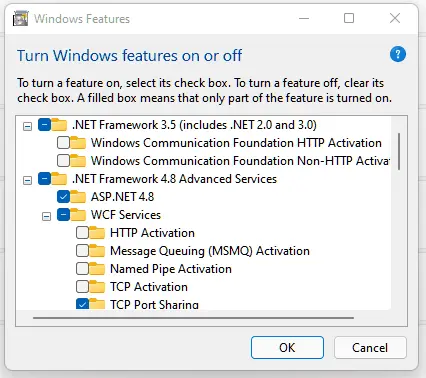
  • Click on Turn Windows features on or off.
Windows components
  • Look for the .NET Framework on the list.
  • Select the settings for both .NET Framework 4.5 (or later) and .NET Framework 3.5 SP1.

Note: The steps are the same for .NET. Framework 4.5, 4.6, 4.7, and 4.8.

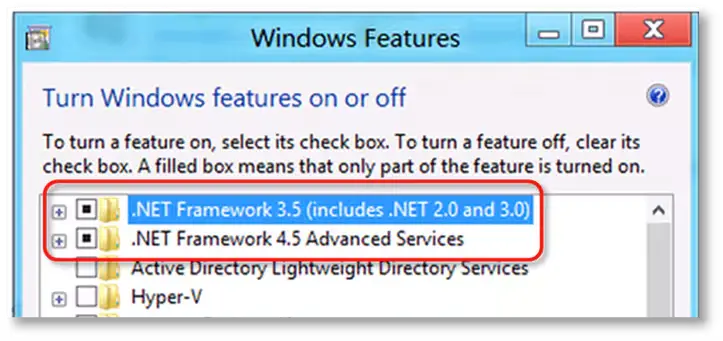
i. Check NET Framework 4.5 (or later)

If you haven’t selected .NET Framework 4.5 (or later) checkbox:

  • Mark the checkbox .NET Framework 4.5 (or later) to enable it. 
  • Click OK to save the changes.
  • Restart your computer.

If you already checked the .NET Framework 4.5 (or later) checkbox:

  • Mark the .NET Framework 4.5 (or later) option to turn it off. Don’t turn it back on.
  • Click OK to save the changes. 
  • Restart your computer.
  • When signed back in to Windows, proceed with the steps to turn on .NET Framework 4.5 again.
Windows Features

ii. Check NET Framework 3.5 SP1

If you haven’t selected the .NET Framework 3.5 SP1 checkbox:

  • Mark the .NET Framework 3.5 SP1 checkbox to enable it.
  • Click OK to save your changes.
  • Restart your computer.

If you haven’t selected the .NET Framework 3.5 SP1 checkbox:

  • Mark the .NET Framework 3.5 SP1 checkbox to turn it off. Do not turn it back on. 
  • Click OK to save the changes. 
  • Restart your computer.
  • Once you are signed back into Windows, perform the steps to turn .NET Framework 3.5 SP1 on again.

When you encounter an error when turning .NET Framework on or off, connect to an IT professional or Microsoft at +1(866)500-0076. The issue might be related to your operating system, not QuickBooks. 

b. Repair Microsoft MSXML

Register MSXML on a 64-bit operating system using the following steps.

  • Open the Windows Start menu. 
  • Type cmd in the search. 
  • Right-click on CMD.
  • Choose Run as Administrator.
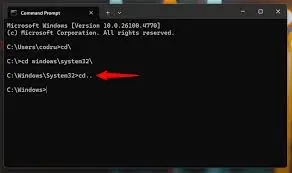
  • Type cd\windows\syswow64 in the C: prompt.
Repair Microsoft MSXML
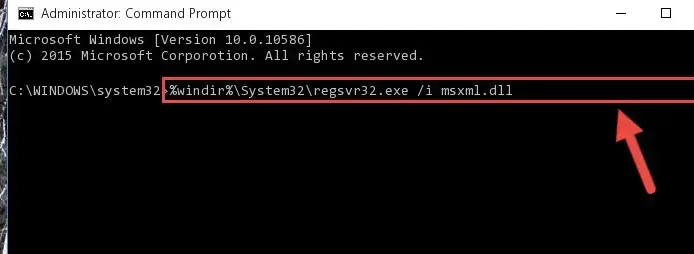
  • Now, type regsvr32 MSXML6.dll and press Enter.
  • When done, try installing QuickBooks Desktop again. 

Register MSXML on a 32-bit operating system using these commands.

  • Press the Windows + R keys together to open the Run command. 
  • Type cmd in the Windows search. 
  • Press Enter
  • Type regsvr32 MSXML6.dll, then press Enter.
regsvr32 MSXML6 dll
  • Try to install QuickBooks Desktop again. 

5. Use Selective Startup to install QuickBooks Desktop

Installing QuickBooks Desktop in selective startup allows you to temporarily block the third-party software and run the installation seamlessly.

Before starting, make sure to

a. Switch to Selective startup

To make sure no other apps get in your way, switch to Selective startup. If you’re uncomfortable doing the steps, consult your computer’s manufacturer or a Windows expert.

  • Press the Windows+R keys together to open the Run command
  • In the Run prompt, type msconfig.
  • Click OK.
  • Navigate to the General tab. 
  • Choose Selective startup and Load system services.
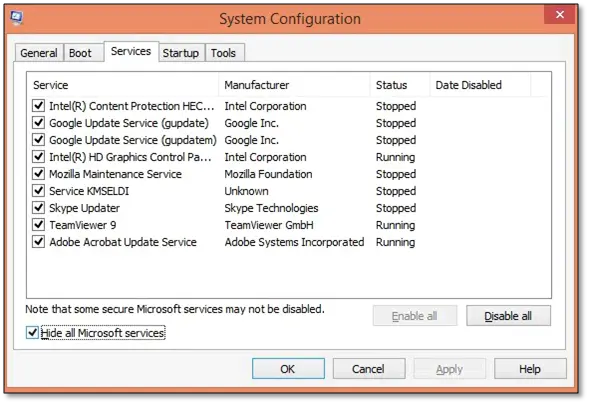
  • Navigate to the Services tab. 
  • Select Hide all Microsoft Services.
  • Hit on Disable all.
System Configuration window
  • Uncheck the option for Hide all Microsoft services.
  • From the list of services, select Windows Installer.
  • Click OK.
  • Select Restart on the System Configuration window.

b. Uninstall or install QuickBooks Desktop

  • Reinstall QuickBooks Desktop.
  • Launch the Run command by pressing the Windows+R keys.
  • In the run, type msconfig, then select OK.
  • Go to the General tab. 
  • Choose Normal startup.
  • Click OK.
  • Select Restart in the System Configuration window. 

Conclusion 

In this blog, we’ve explored the root causes behind the QB installation failure and QuickBooks error 1603, along with various troubleshooting methods to help you resolve the issue quickly.

If the error persists or you need expert assistance, don’t hesitate to reach out to QuickBooks professionals. Contact a certified QuickBooks ProAdvisor today by dialing the +1(866)500-0076 for further support!

Frequently Asked Questions 

  1. Why am I getting QuickBooks error 1603 on Windows 10? 

You may encounter QuickBooks error 1603 on Windows 10 if your Windows installation is outdated or incompatible. Additionally, damaged or corrupted Windows components, third-party software, or processes on your computer can interfere with the QB installation. 

  1. What is QuickBooks error 1603? 

QuickBooks error 1603 means you failed to install QuickBooks Desktop on your computer, either due to insufficient space or incompatibility with Windows OS. You may also encounter a warning message that states, “Error 1603: There was a problem installing Microsoft .NET Framework [version].

  1. Can I install QuickBooks on a new computer? 

Yes, you can install QuickBooks on a new computer. To get started with QB on a new computer, use the product and license number to activate it. When moving from an old computer to a new one, be sure to transfer the backup file as well. 

  1. How to update QuickBooks Desktop? 

To update QuickBooks Desktop to the latest release available, go to Help at the top menu bar. Select Update QuickBooks Desktop > Get Updates > Update Now. When done, restart your computer and install the downloaded update file. 

Frequently Asked Questions

Running the QuickBooks Install Diagnostic tool, updating Windows, and repairing Microsoft components may help you address error code 1603 when installing QuickBooks. If this doesn’t help, try installing QuickBooks in Selective Startup mode.

QuickBooks error 1603 is an interruption when installing QuickBooks Desktop due to damaged or corrupted program files, using an outdated version of Windows, damaged Microsoft components and more. You may also get a warning message, “Error 1603: There was a problem installing Microsoft .NET Framework [version].”

Your QuickBooks Desktop won’t update due to internet connectivity issues, inaccurate date and time settings, damaged or corrupted QB program files, malware infection or other related errors.

The Quick Fix my Program and QuickBooks Install Diagnostic tool

To install a new version QuickBooks or to simply update the software:

• Select Help at the top menu bar.
• Click on Update QuickBooks Desktop.
• Select the Update Now tab.
• Hit the Get Updates button.
• Once done, reopen QB and click Yes to install them.