
Let’s Fix ‘QuickBooks Detected that a Component Required to Create PDF’

May 19, 2026

Admin |

Estimated Read Time : 5 MIN

Sharing physical copies of pay slips and invoices, providing PDF versions, or printing records of financial and accounting activities is an essential part of any business.

However, even these simple processes can sometimes be disrupted by software issues, leading to error messages. One of the most common warnings users encounter is the following:

Error: A component required to create PDF files is missing.

QuickBooks Detected that a Component Required to Create PDF

This issue typically occurs due to an outdated version of QuickBooks, system incompatibility, or problems with your email application, such as Microsoft Outlook.

In the following guide, we’ll provide a detailed overview of this error, explore its possible causes, and walk you through step-by-step solutions to resolve it quickly and efficiently.

What is the QuickBooks Missing PDF Component Issue and More About It? 

The QuickBooks missing PDF component issue generally occurs when the software cannot find the required component needed to complete PDF, printing, or email operations. When attempting to email a document, save a PDF file, or print anything, you might see one of the following error messages:

  • There is a problem connecting to your currently selected printer, Microsoft XPS Document Writer, on the XPS port.
  • Could not print to the printer.
  • QuickBooks can’t complete the current action due to a missing component: the missing PDF file component.
  • QuickBooks is not responding.
  • PDF Converter is shown offline.
  • You cannot print directly to the QuickBooks PDF Converter.
  • The device is not ready.
  • Unable to save as a .pdf file.
  • QuickBooks could not save your form or reports as a .pdf.
  • QuickBooks freezes when you try to reconcile accounts.
  • Print Driver Host for 32-bit Applications has Stopped Working.
  • Unrecoverable error.
  • QuickBooks PDF Converter Activation Error -20, -30, or -41.
  • Error 1722 or 1801 when installing PDF Converter.
  • Problems printing transactions or reports.
  • The reconciliation window disappears or doesn’t show

What Causes the QuickBooks Missing PDF Component Issue?

Several underlying factors can trigger the QuickBooks missing PDF component issue, often related to system configuration, permissions, or outdated components. Explore the list of common causes: 

  • General computer issues
  • Using an outdated version of QuickBooks Desktop 
  • Outdated or incorrect temp folder permissions 
  • Not having enough permissions to use the XPS printer 
  • Microsoft XPS Document Writer might be missing from the printer list 
  • Possible issues with the template or form you are using 
  • Outdated Print Spooler service properties
  • Corrupted or missing XPS Components or insufficient user permissions  
  • Outdated Windows OS 

Steps to Fix QuickBooks Detected that a Component Required to Create PDF

In this section, we will explore different methods that will help you fix the ‘QuickBooks detected that a component required to create PDF’ error and perform the PDF and printing-related operations seamlessly. Be sure to follow these steps carefully as mentioned below.

1. Restart and reset your temp folder permissions

Start with a basic refresh to resolve common system issues and then reset the temp folder permission:

a. Restart your computer

To begin with, restarting your computer is often the simplest way to resolve temporary system issues. Restarting clears temporary system glitches, resets background processes, and can fix problems like locked temp folder permissions by giving the system a fresh start.

b. Reset your temp folder permissions

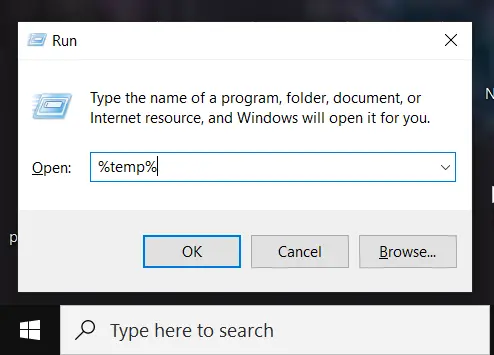
  • Press the Windows + R keys together to open the Run command.
  • In the Run prompt, type %TEMP% and press Enter.
Type TEMP
  • Right-click anywhere on the empty area of the temp folder. Then, choose Properties.
  • Go to Security.
  • Ensure all the user names and groups in the security have full control.
  • Once the permissions are set to Full Control, try saving the file as a PDF again or printing your documents in QuickBooks.

c. Test if you can print to your XPS (only for Save as PDF and Email issues)

When printing, QuickBooks uses parts of the XPS Document Writer (a Microsoft Windows product) to save the file as a PDF. Test to verify if you can print using the XPS Document Writer. 

  • Launch Notepad on your computer. 
  • Type Test in the file.
  • Go to the File menu and then click Print.
  • Choose the XPS Document Writer, and then Print.

Note: If you don’t see XPS Document Writer, you’ll need to allow your computer to print to your XPS printer.

  • Name the file and then save it to your desktop. 
  • Move to your desktop and view the XPS document you just printed using Notepad. 

If you’re unable to print to your XPS printer—or any physical printer—outside of QuickBooks, it’s best to reach out to your IT professional or contact Microsoft support for assistance.

Allow your computer to print to your XPS printer

  • Launch the Windows Start menu. 
  • Type the Control Panel in the search field and press Enter
  • Now, switch to Category view.
  • Go to Programs.
  • Choose Programs and Features
  • Choose Turn Windows features on or off.
Hit Turn Windows features on or off
  • From the list of services, check for Microsoft XPS Document Writer.
  • Finally, click OK.

2. Reinstall Microsoft XPS Document Writer

Since the error often occurs when the PDF-related components are damaged or missing, reinstalling the Microsoft XPS Document Writer helps restore the necessary system functionality and resolve the ‘QuickBooks detected that a component required to create PDF files is missing’ issue.

  • Press the Windows + I keys together to open Settings
  • Go to System and choose Optional features (or “Apps” > “Optional Features“).
  • Now, scroll down or simply search to find the Microsoft XPS Document Writer option. 
  • If you find the option: 
    • Click on it and choose Uninstall.
    • Now, restart your computer.
  • When done, move back to the optional features and click on “Add a feature.” 
  • Search for “XPS,” mark the checkbox for Microsoft XPS Document Writer, and click on “Install.” 

4. Run the QuickBooks Print & PDF Repair Tool

The QuickBooks Print & PDF Repair tool verifies all the PDF & printing components in QuickBooks and then runs a quick repair to resolve the issues. Here’s how you can utilize the tool: 

Important Note: Make sure to download and install QuickBooks Tool Hub (1.6.0.8) in the most recent version available. For a good experience, Intuit recommends you use Windows 11 (64-bit).

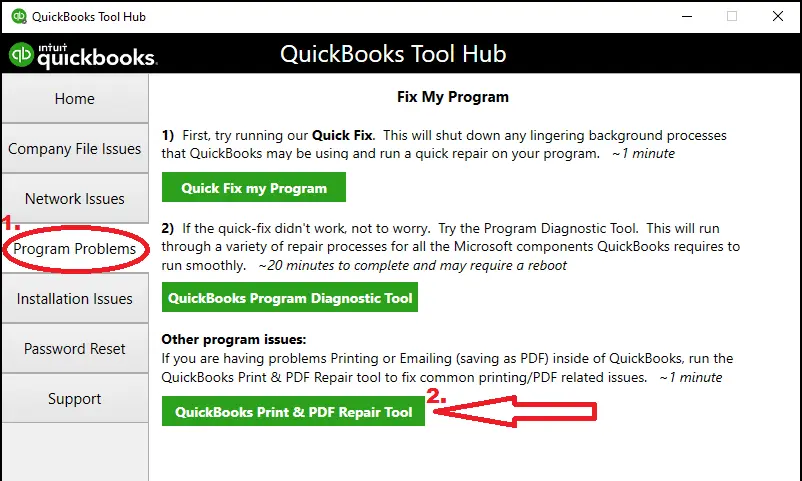
  • Launch the QuickBooks Tool Hub. 
  • Go to Program Problems in the left menu. 
QuickBooks PDF & Print Repair Tool
  • Click on QuickBooks Print & PDF Repair Tool. The tool might take a minute or more to open. 
  • When done, try to print, email, or save as a PDF from QuickBooks Desktop again. 

5. Create a new template or form

Replace the template or form you are currently using with the new one:  

  • Design a fresh template for your form, and refer to available guidance if needed.
  • Update the template used in your transaction.
  • Generate your PDF document.

6. Update the Print Spooler service properties

Updating the Print Spooler service properties addresses “QuickBooks has detected that a component required to create PDF files is missing” by restoring proper operation of the Windows print services required for PDF generation.

  • Right-click on the Windows Start icon on your desktop. 
  • In the search field, type Run and press Enter
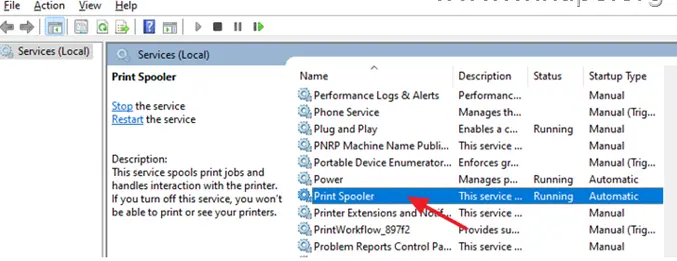
  • Now, search for the Print Spooler service.
  • Right-click on the Print Spooler service and choose Properties
  • Move to Startup type and choose Automatic
  • Select Apply and then OK. 
  • Right-click on the Print Spooler service and click Start to initiate the service. 

You should be able to save or email a PDF.

The reconcile window disappears or doesn’t show

If QuickBooks seems to freeze after selecting Reconcile from the Banking menu, but PDF features are still functioning, the reconcile window may be opening off-screen.

  • Check all active windows to see if the reconcile screen is hidden or listed.
  • Click Close All, then try starting the reconciliation process again.
  • If errors persist while reconciling accounts, look into solutions for unrecoverable errors.

If the issue continues, you may need assistance from your IT specialist or Microsoft support.

Note: These steps apply to Windows systems only and do not cover Terminal Services environments.

If you’re unable to print to the XPS printer outside of QuickBooks, it’s best to reach out to your IT professional or Microsoft for further help.

Below are some troubleshooting steps you can review with your IT professional:

  • Make sure to enable the XPS service on your computer. 
  1. Launch the Run command by pressing the Windows+R keys. 
  2. Type optional features and select OK.
  3. Look for Microsoft XPS Document Writer and make sure it’s selected.
  4. Click OK.
  • Now, test the XPS Document Writer and try printing outside QuickBooks Desktop. 
  • Configure the security software settings. 
    • Security software settings, such as those in Norton Antivirus or McAfee Firewall, may prevent .XPS files from being created. Review your security program’s configuration to ensure that .XPS file generation is allowed.
  • Verify user permissions for the XPS Document Writer in Windows. 
    • If a user lacks the required rights to print using it, QuickBooks cannot convert files into PDF format. You might need to log in with administrative privileges to modify these permissions.

Resolve Missing Components Error in Windows 11

  • Press the Windows logo icon key on your Windows 11. 
  • Type “Control Panel” in the search and press Enter
  • Choose Uninstall a program
  • Now, click on Turn Windows features on and off.

Note: If you’re not already signed in as an administrator, a login prompt will appear—enter your admin credentials and click “Yes” to continue.

  • In the Windows Features window, tick the box next to Microsoft XPS Document Writer.
  • Finally, click OK.

Conclusion 

The “QuickBooks detected that a component required to create a PDF” error is a fairly common issue, as outlined above, but it can disrupt essential tasks like generating invoices, reports, and other financial documents. Since PDF functionality plays a key role in day-to-day accounting operations, resolving this problem quickly is crucial. We hope the troubleshooting methods shared in this blog have helped you fix the error and restore smooth performance.

Frequently Asked Questions 

How to fix QuickBooks missing PDF component error?

To fix the QuickBooks missing PDF component error, download and run the QuickBooks Tool Hub and select “Fix PDF & Print Problems” under the Program Problems tab. Other effective solutions include restarting the computer, ensuring the Microsoft XPS Document Writer is active, or repairing the QuickBooks installation via the Windows Control Panel. 

Why can’t I create a PDF in QuickBooks?

QuickBooks cannot create a PDF usually due to a missing/damaged Microsoft XPS Document Writer, outdated software, or restrictive temp folder permissions. The issue is commonly resolved by running the QuickBooks Tool Hub’s Print & PDF Repair Tool, enabling the XPS writer, or updating Adobe Reader. 

How do I fix PDF issues in QuickBooks Desktop?

To fix PDF issues in QuickBooks Desktop (such as “cannot save as PDF,” email errors, or printing issues), the most effective solution is to download and run the QuickBooks Tool Hub and use the PDF & Print Repair Tool. Other solutions include restarting your computer, updating QuickBooks, or ensuring the Microsoft XPS Document Writer is enabled. 

How do I find a PDF that disappeared in QuickBooks? 

To find a disappeared PDF or fix a “missing PDF component” error in QuickBooks Desktop, download and run the QuickBooks Tool Hub and select Program Problems > Fix PDF & Print Problems. Other solutions include updating QuickBooks, repairing the installation, enabling the Microsoft XPS Document Writer, and checking your default temp folder permissions. 

Why is the PDF icon not showing?

The PDF icon or functionality may not be appearing in QuickBooks Desktop due to a missing or damaged “PDF component,” outdated software, or issues with the Windows XPS Document Writer. This frequently causes error messages when attempting to print, email, or save forms as PDFs. 

About The Author

Lana Creston

Lana Creston is an experienced technical and accounting writer with a total of 9 years of experience. She currently works on QuickBooks accounting and technical guides at QuickBookSupportNet. Lana has a passion for reading and writing about various technical topics, especially exploring new accounting methods and software, while continuously expanding her expertise in the ever-evolving field of finance and technology.

QuickBooks Desktop 2023 is ending — Upgrade QuickBooks Desktop 2023 to 2024 for continued performance and support.

Get a Free Consultation with Our QB Tax Experts
!-->