. QuickBooks helpline Archives - QuickBookSupportNet

QuickBooks is a powerful accounting software that helps businesses to store and manage their business accounting data efficiently. Besides, it allows multiple users to access to work on the QuickBooks company file to enhance workflow and productivity. However, an annoying error code, QuickBooks Error H505, can appear on your screen when working in a multi-user mode. When you try to access a company file in a multi-user environment, an error message appears on your screen:

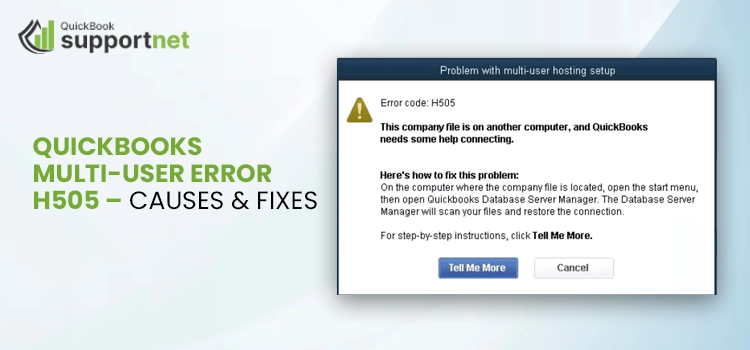
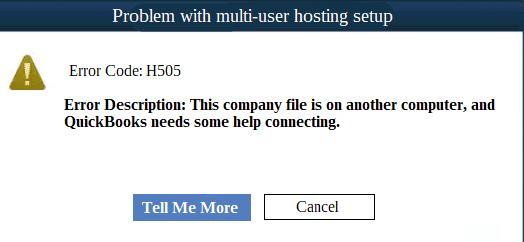
QuickBooks Error message H505

Error Description: This company file is on another computer, and QuickBooks needs some help connecting.

QuickBooks Error H505 (Error Message)

There can be a variety of possible factors that can cause this error to roll out. To resolve the QuickBooks error code, you need to know those possible factors. Let’s find out!

What Makes QuickBooks Error H505 to Appear On Your Screen?

Below is the list of the reasons that can cause this QuickBooks Company file access error code H505 when working in a multi-user environment:

  • Firewall obstructing the incoming and outgoing communication to the company file.
  • When hosting is not properly configured in multi-user mode.
  • QuickBooks Database Server Manager is not scanning the files and folders in the program.
  • Missing or damaged network data (.nd) file.
  • The inability of QuickBooks to trace the IP address of the computer can also cause QuickBooks error H505.
  • Erroneous DNS settings.

If you are not able to detect the exact reason behind the error, reaching out to the QuickBooks help desk can be useful. You can describe the symptoms of the errors to get relevant assistance.

What Are the Main Symptoms of QuickBooks Error Code H505?

QuickBooks error code H505 can be determined by the below-given symptoms:

  • Trouble in opening the QuickBooks company file in multi-user mode.
  • An error message appears on the screen that suggests that the company file you are trying to access is already open on another computer.
  • An active program window in QuickBooks crashes on the arrival of the error.
  • System crashing every now and then.
  • Windows freeze or become unresponsive.
  • You may not be able to access the file stored on the server.
  • QuickBooks error message with code H505 arrives on the screen.

How to Eliminate QuickBooks Error Message Code H505?

After knowing the reasons and symptoms of the error code H505 in QuickBooks, let’s check some effective troubleshooting solutions for the same:

Solution 1: Use QuickBooks File Doctor

QuickBooks File Doctor is an efficient tool that can repair damaged company files in the QuickBooks software. A damaged QuickBooks company file is also one reason that can block your access to the file. To use the tool:

  • Download QuickBooks Tool Hub and save it to your Desktop.
  • Now open the tool from its location and select Company File issues.
  • Next, you need to open the QuickBooks Tool Doctor to troubleshoot the issue.
  • Run QBFD Tool and wait until it repairs the damaged file. The time varies based on the company file size.
  • Once the repair process is done, try to open the company file again to check if the QuickBooks error H505 is fixed. If it persists, try the next solution before contacting the QuickBooks help desk.

Solution 2: Verify the Server Services

The next solution you can follow to resolve the QuickBooks error code H505 is verifying the server services. Below are the steps you can follow to verify the server services. 

  • Firstly, run the Windows command on your PC by pressing the “Windows +R” keys together.
  • Thereon, type “services.msc” in the search box and then click on the “OK” option.
  • Under the new window, double-click on the “QuickBooks DBXX” option.
  • After that, select the “Startup Type” as the “Automatic” option and make sure that the service status is either selected as “Running” or “Started” option.
  • Then switch to the “Start” tab, followed by a click on the “Recovery” option.
  • Moving ahead, select the restart service option for the first, second, and subsequent failure options.
  • Now, save the updated changes by clicking on the “Apply” > “OK” option.
  • At last, repeat the procedure for the QBCFMonitorService.

Thereon, examine if the QuickBooks error code H505 has been resolved or not. If this method didn’t help you resolve the error, then jump to the next solution.

Solution 3: Verify the Hosting

Error H505 is closely related to the hosting of the company file. You need to confirm that the system intended to host the file has hosting enabled on it. Besides, it fulfills all the configuration requirements to host the file. Once done, you need to confirm that hosting is not enabled on the other computers except the server computer. In such a case, you will get an error message that will tell you that the file is open on another computer. After verifying the hosting, try to open your company data to check the status of QuickBooks error H505.

Solution 4: Configure the Windows Firewall Port Settings

Configuring the windows firewall and security settings for the QuickBooks desktop application can be a solution for getting the error fixed. Here are the steps to easily configure the windows firewall port settings. 

  • Commence this process by opening the windows run command on your PC.
  • In the search field, type “Control Panel” and then click on the “OK” option.
  • Under the control panel settings, select the “System and Security” option.
  • The next step is to click on the “Firewall and Network Protection” option.
  • After that, click on the “Advanced Settings” option and select the “Inbound Rule” option. 
    Now, click on the “New Rule” option, select a port, and click on the “Next” option.
  • Here, you must ensure that you have selected the TCP option and then provide the port for the version of QuickBooks desktop which you are using.
  • Followed by the above steps, click on the “Next” option and restart the QuickBooks desktop application.

Now, try to perform the same task in which you initially faced the QuickBooks error code H505. If you still face the error code H505, jump to the next solution.

Solution 5: Add QuickBooks to the Firewall Exception List

Adding the QuickBooks software to the firewall exception list can help you to fix many small bugs and errors with the software. Below are the steps you can follow to accomplish the same.

  • First of all, navigate to the control panel settings on your PC.
  • After that, click on the “Firewall Settings” option.
  • Under the firewall settings window, click on the “Allow a Program” option.
  • Add the QuickBooks DBXX version to the exception list and save the updated changes.
  • At last, restart your computer and launch the QuickBooks desktop application. 

At last, restart your computer and launch the QuickBooks desktop application. 
Once you are done with the above steps, check for the presence of the QuickBooks error code H505. If you still face the error code, try the next solution.

Solution 6: Run the QuickBooks Database Server Manager on Server System

The QuickBooks database server manager can help you to fix many errors and issues with QuickBooks. Here are the steps you can follow to run the QuickBooks database server manager tool on your PC to resolve the errors. 

  • First of all, run the latest version of QuickBooks tool hub (1.5.0.0) on your PC.
  • Thereon, click on the “Network Issues” option, which is available on the left side of the screen.
  • Now, click on the “QuickBooks Database Server Manager” option on your PC.
  • If you can see the company’s file folder, click on the “Start Scan” option. If you cannot see the file, manually select it by clicking on the “Browse” option.
  • Followed by the above steps, click on the “Start Scan” option.
  • With this effect, the QuickBooks database server manager will start the scanning process on your PC and will automatically fix all the firewall permissions.
  • At last, once the process gets finished, then click on the “Close” option. 

After completing the above steps, try using the multi-user mode in QuickBooks. After following all the solutions mentioned above, the QuickBooks error code H505 will be resolved at this stage. 

Final Words!

The simple solutions described in this post helps in the resolution of QuickBooks error code H505. However, if you need any additional assistance at any point of troubleshooting, look for QuickBooks customer help to keep this technical annoyance at bay.

Frequently Asked Questions

Ques 1. Is there any particular error series that is similar to QuickBooks Error H505?

Ans. Yes., along with QuickBooks Error H505, there are three more errors in the ‘H’ series. They are H101, H202, and H303. All these problems fall in the same category because they have one thing in common. Error H101, H202, H303, and H505 are all server-related issues. Each of these problems has its own troubleshooting fix that you can follow to get rid of them. However, you will find some common solutions to these issues.

Ques 2. What is something that I need to keep at the top of my head about QuickBooks Error H505?

Ans. If you are irked with QuickBooks error H505, make sure to remember the following:

  • Remember that it can only be a QuickBooks Desktop version or license manager hosting.
  • To ensure that, you need to download that particular version of QuickBooks from Intuit’s official site.
  • Make sure you have QuickBooks installed on the host computer.
  • Also, ensure that you deploy QuickBooks on the system. Without this, you will not be able to switch from single-user mode to multi-user mode.

Ques 3. Which version of Windows faces QuickBooks error H505 the most?

Ans. Although you can encounter QuickBooks error H505 on any version of Windows, it is usually found in Windows XP, Vista, and Windows 7. Users working on QuickBooks in these Windows complain about this issue the most. The reason behind this could be using an older Windows version. You can try and get the latest Windows version, and this might resolve the issue.

Ques 4. Suggest some troubleshoots for QuickBooks Error H505?

Ans. Here is a list of some techniques that you can use to fix QuickBooks Error H505:

  • Use QuickBooks File Doctor Tool.
  • Create a new folder for the QuickBooks file
  • Enable company file access in the new company folder.
  • In addition to that, make necessary edits to firewall port settings.
  • In addition to that, make changes to QuickBooks hosting settings
  • Install and use QuickBooks Database Server Manager.
  • Also, audit server services for QuickBooks.

Ques 5. Can I stop multi-user hosting in QuickBooks?

Ans. Yes, you can stop multi-user hosting in QuickBooks Desktop. Follow these steps to do so:

  • Open QuickBooks Desktop and go to the menu bar.
  • Here, click on the File menu and look for the Utilities option.
  • Lastly, from the drop-down list, select Stop hosting multi-user access, and you are done.

Are you struggling while Create a Journal Entry in QuickBooks Online? If that’s so you have arrived at the perfect spot. In this detailed post, we have discussed the stepwise instructions to make the journal entries. The main motive for preparing the journal entry is to digitally record every business transaction appropriately in the books of accounts. 

However, to get learn more about how to make a journal entry in QuickBooks Online, you must explore this entire post. 

Getting issues while creating a journal entry in QuickBooks Online? Call us at @+1855-603-490 and get all your issues resolved within no time. 

What are the Major Reasons for Creating Journal Entry in QuickBooks Online? 

Here, we have described some of the reasons why you must create a journal entry in QuickBooks Online. Let’s explore it. 

  • It allows the users to transfer money between income and expense accounts.
  • Moreover, by creating the journal entry you can easily transmit money from an asset, liability, or equity account to an income or expense account.

What are the Rules to Create Journal Entry in QuickBooks Online?

QuickBooks journal entries are performed for income tax provisions, depreciation entries, and loan interest adjustments. There are various conditions to enter journal entries. These rules are mentioned below.

  • Include one account receivable or accounts payable type entry
  • Use accounts receivable or payable on the second line of the journal entry
  • Accounts payable or receivable type entry will require a customer or vendor
  • Never make Journal entries to Inventory or Payroll accounts.

Procedures to Create A Journal Entry in QuickBooks Online

Discuss with accounting professionals for learning and assistance. If you still don’t know which account requires the debit and credit transaction, follow the below instructions properly. Go through the below steps to create a Journal Entry in QuickBooks Online.

  • In the beginning, hover your cursor toward the + New icon. 
  • After this, head towards the Journal Entry option and proceed to the next step. 
  • Following this, from the Accounts field you have to pick an account.
  • Based on whether you wish to debit or credit the account, add the amount within the right column. 
  • Now, choose another account from the list of the available option to which you wish to transfer the money to or from. Later on, based on whether you have included the debit or credit amount in the first line you must input the same amount within the opposite column. 
  • Furthermore, you are supposed to review the amounts. Here, you must verify that you have added the same amount within the Credit column on one line and the Debit column on another. This will mainly reflect that your both accounts are balanced properly. 
  • Afterwards, you must include the correct information within the memo section so that you must be aware of why you have prepared the journal entry. 
  • At last, you must hit the Save & New option or Save & Close whichever is available on your screen to wind up the entire process.

Conclusion

This is all about how to make a journal entry in QuickBooks Online. However, if you are still struggling while preparing the journal entry you can consult with our professionals through the live chat facility. Otherwise, you may drop a message to our professionals for a quick response. 

Frequently Asked Questions (FAQ’s)

Q1. What are the steps to reverse a journal entry in QuickBooks Desktop?

Ans. Go through the stepwise instructions given below to reverse a journal entry in QuickBooks Desktop.

  • Firstly, you must choose the Settings option followed by the Charts of Accounts.
  • Now, you must browse for the account for which you have prepared the account. Further, tap on the View Register option.
  • Next, look for the journal entry within the account register. Check that the word “Journal” is in the Ref No or Type Column.
  • Following this, pick the journal entry to expand the view and hit the Edit option.
  • Afterwards, hover your cursor over the Reverse option and then tap on the Save option.

Q2. How Can you Delete a Journal Entry in QuickBooks Online?

Ans. Suppose you have established a journal entry by mistake, then you can remove it permanently by applying the steps below.

  • Initially, move to the Setting menu followed by the Charts of Accounts.
  • Now, look for the account that you have prepared the journal entry for. Later on, hit the View Register option.
  • Afterwards, search for the Journal entry from the Account register. Also, verify that the word “Journal” in listed in the “Ref No” or “Type” column.
  • Now, pick the journal entry to expand the view and hit the Delete option.
  • At last, hit the Yes button for the confirmation.

QuickBooks error 15106 is a common error in the program that comes from 15XXX series of errors. This error series mainly affects the update process of the application, and when it occurs, you may not be able to update QuickBooks or payroll. When updating QuickBooks payroll, you can receive an error message on your screen that reads:

Error 15106: The update program is damaged.

QuickBooks Error 15106

This error mainly occurs due to the lack of administrative rights or Firewall restrictions blacking an update process. However, there can be multiple factors behind the error. Somehow, users might face trouble in dealing with the error, and that’s why we are here to help you. In this post, we are going to cover complete information about how to get the error resolved. So, if you want detailed information on QuickBooks error code 15106, read the full post.

Get instant and professional assistance to resolve error code 15106 in QuickBooks by calling our experts at 1(855) 603-0490.

What Is QuickBooks Error 15106 When Updating QuickBooks Payroll?

Windows Installer is important software that helps the install, uninstall and update process of QuickBooks and its update process on Windows OS. However, when it gets damaged or corrupt, you may not be able to update the QuickBooks as it starts giving errors. This QuickBooks error code is closely related to the damaged Windows Installer. Error 15106 crops up on the screen due to a damaged Installer when you try to update the payroll. When the error occurs, you need to take the necessary steps to suppress the possible factors and complete the update process without any obstacles.

What Are The Possible Reasons Behind QuickBooks Payroll Update Error 15106?

QuickBooks error 15106 can take place due to a number of the possible factors as stated in the below-given list:

  • Partial installation of the QuickBooks application where the important components are missing, which are required in updating the program.
  • Your WebRoot antivirus program perceives QuickBooks Installer as a potential threat and blocks it.
  • When you try to update the QuickBooks with insufficient administrative rights.
  • Windows UAC settings are set to High, interfering with the update process.
  • Incorrect antivirus or anti-malware application settings can also hinder an update process causing QuickBooks error 15106.

Ways To Troubleshoot QuickBooks Error Code 15106

Stuck in the middle of the QuickBooks Payroll update? The below-described solutions can help you in the error resolution when followed carefully:

Solution 1: Login As An Administrator

  • Click the Start button and then select Control Panel.
  • Alternatively, you can open the run window (Windows + R) and type Control Panel, then hit Enter.
  • Next, select User Accounts and Family Safety and then hit on User Accounts.
  • After that, you need to click Manage another account and enter the admin password.
  • You can easily locate the type of account right below the name of the account. If it is an administrator account, jump to the next solution. If not, ask your IT administrator to provide the administrative password to the user getting an error when updating QuickBooks payroll.

Solution 2: Reset QuickBooks Updates

If the error persists after opening QuickBooks with the administrative rights, reset QuickBooks updates by following the below-given steps:

  • Launch QuickBooks and select Update QuickBooks located underneath the Help tab.
  • Now from under the Options tab, select Mark all.
  • Select Save and then go to the Update Now tab.
  • Checkmark the box for Reset Update now and hit Get Updates.
  • If you are still getting the error 15106 in QuickBooks Desktop, move to the next solution.

Solution 3: Repair Damaged Installation of QuickBooks

A partial or damaged installation of the QuickBooks application can also promote error 15106 when updating the QuickBooks application. Repairing the QuickBooks installation can help you in the error resolution.

  • Press Windows + R keys together and type “appwiz.cpl” in the Run box, and hit Enter.
  • When Uninstall or Change a Program window opens, locate and double-click QuickBooks.
  • Select Change/Remove and then hit Next.
  • Make sure that the Repair option is selected and then hit Next.
  • Click on Repair, and it will start the repairing of QuickBooks installation crucial for the resolution of QuickBooks error 15106.
  • If you see an error message “ File in use,” select Ignore and then move ahead with the Repair.
  • Wait until the repair process is complete, and then open the QuickBooks program.
  • In the end, select Install Now; when QuickBooks has recently downloaded an update window appears on the screen.

Final Words!

This post can help you in efficient troubleshooting of the payroll update error 15106 in QuickBooks. For further assistance, you can contact our QuickBooks experts by dialing our QuickBooks helpline number.

Are you looking for the steps you need to follow to start the customer transaction workflow in QuickBooks Desktop? If yes, then this blog post will guide you in this direction. Here, you will find the steps you need to follow while starting off the customer transaction workflows and even different ways to track the transaction.  This workflow can help in organizing cash flow, tracking sales and receivables. However, if you need further assistance, you can reach out to QuickBooks Desktop support to offer the best support service.

Workflow 1 – Invoice -Payment Deposit

You must follow this workflow when provided with a product or service, and your customer plans to pay later. Once your customer has paid, you can easily record QuickBooks’ payment to close the customer’s invoice or even reduce the balance.

Transaction Workflow in QuickBooks
  • The first user should create an invoice
  • Then you need to record the invoice payment
  • At last, deposit the customer’s payment

Workflow 2 – Sales Receipt Deposit

You should go for this workflow when your customer pays you on the spot for any product or service.

Transaction Workflow in QuickBooks
  • First, create a sales receipt
  • Then you need to deposit the customer’s payment

Workflow 3 – Estimate – Invoice – Payment – Deposit

You need to follow this workflow, also called progress invoicing, when working on projects or jobs for the customers. You can use an estimate like the quote, bid, or proposal to track the materials, labor, and additional expenses used in the project. After that, you can invoice your customer once the project is completed.

Transaction Workflow in QuickBooks
  • Here, you need to create and send the project estimate to the customers
  • After that, you should create an invoice from the estimates
  • Also, record the invoice payment
  • At last, you need to deposit the customer’s payment

Workflow 4 Sales Order – Invoice – Payment – Deposit

You should follow this workflow when the customers order an item that is not there in your stock at the moment. This way, you will know what products you have to buy from your vendors to complete the customer’s order on time.

Transaction Workflow in QuickBooks
  • You first need to create a sales order for the items that are on the backorder
  • Then you have to create an invoice from the sales order
  • You need to record the invoice payment
  • At last, you need to deposit the customer’s payment

Workflow 5 – Estimate – Sales Order – Invoice – Payment – Deposit

You need to follow this workflow when you need to complete a project but don’t have complete materials on your hand yet. You can create the sales order from the estimate for tracking the items on backorder. Then, create an invoice from the estimate after the completion of the project.

Transaction Workflow in QuickBooks
  • You first need to create and send a project estimate to your customer
  • Then create a sales order from that estimate
  • After that, you have to create an invoice using the sales order
  • Now you need to record the invoice payment
  • Deposit the customer’s payment

Workflow 6: Statement Charges – Finance Charges – Statement – Payment – Deposit

You must go with this workflow when you regularly charge your customer for items but are invoicing them periodically. You can skip creating the invoice for each charge, and then your customer can pay their accumulated charges in a total amount.

Transaction Workflow in QuickBooks
  • You need first to create your customer’s statement charges
  • Then you have to assess the finance charges
  • After that, create and send the billing statement to the customer
  • Then you must record the payment that is received
  • At last, deposit customer’s payment

If you find it challenging to understand this Transaction Workflow in QuickBooks, then you don’t need to think twice before calling QuickBooks technical support to avail their help. You can avail the expert’s guidance of a technical professional to resolve the query faced by QuickBooks users.

Read Also : Quickbooks error H202

+1-855-603-0490