Are Drop Down Menus Not Working in QuickBooks? Try This

Home > Blogs > Are Drop Down Menus Not Working in QuickBooks? Try This
  • Nov 12, 2025   |
  •   |
  • Estimated Read Time : 5 MIN

The drop-down menu allows you to select customers, vendors, accounts, and other options when running specific operations in QuickBooks Desktop or Online. However, if your “drop-down menus are not working in QuickBooks“, it may stop you from completing transactions such as invoicing or printing checks.

An incompatible browser or incorrect DPI settings in Windows or QuickBooks can cause such display issues. In this detailed guide, we will explore the reasons the error occurs and the steps to troubleshoot it for seamless functioning. 

Why Are Drop down Menus Not Working in QuickBooks? 

Below is a list of multiple reasons why the drop-down menus are not working in QuickBooks. Let’s explore them one by one: 

For QuickBooks Online

  • Using an Incompatible browser 
  • Excessively stored cookies & caches 

For QuickBooks Desktop

  • Outdated QuickBooks Desktop 
  • Possible data damage or corruption to the company file
  • Incorrect DPI settings 
  • View preferences might be incorrect in QuickBooks 
  • Incorrect display settings of Windows 
  • Incorrect installation or corruption of the program files

How to Fix the Drop-down Menus Issue in QuickBooks Desktop and Online?

Drop-down menu problems are common display issues in both QuickBooks desktop and online. In the section below, we’ll discuss how to fix such problems in both versions. Proceed with caution below:

Fix the drop-down menu issues in QuickBooks Online 

Explore the troubleshooting steps mentioned below to resolve the drop-down menu issues in your QuickBooks Online:  

1. Use a compatible browser

Generally, QuickBooks supports the current and two previous versions of your browser. Intuit does not support any old versions of your browser. 

These are the browsers that are supported on both web and mobile devices:

Note: QuickBooks does not support Internet Explorer any longer. 

  • Google Chrome: version 78 or newer
  • Mozilla Firefox: version 76 or newer.

Note: To preview and print forms on Mac OS, you’ll also need the Firefox PDF plugin.

  • Microsoft Edge: version 79 or newer
  • Safari: version 12 or newer (Mac only)
  • Opera: version 68 or newer
  • Samsung: version 10 or newer

2. Try opening in the incognito window 

See if opening QuickBooks Online in a private window resolves the issues:

  • Mozilla Firefox: CTRL + Shift + P
  • Microsoft Edge: CTRL + Shift + N
  • Google Chrome: CTRL + Shift + N
  • Safari: Command + Shift + N

3. Clear the cookies & caches in your browser

The caches & cookies in your browser store files on your system that help load websites or programs faster on your next visit. Over time, this data becomes outdated, further complicating the running of web-based performance tests.

Proceed below to learn how to resolve the cookies & caches on your browser: 

a. Firefox
  • In Firefox, select the menu icon. 
  • Choose Settings
  • In the left pane, select the Privacy & Security panel.
  • Click on Clear Data in the Cookies and Site Data section.
  • The Clear browsing data and cookies page will open.
  • Next to the When:, under the drop-down menu, select Everything
  • Mark the checkbox for Temporary cached files and pages.
  • Click on the Clear button.
  • Exit the Settings page.
  • All of your changes will be automatically saved. 
b. Google Chrome
  • Launch Google Chrome on your computer. 
  • Go to More at the top right corner. 
  • Select Delete/Clear browsing data.
  • Choose a specific time range to clear the data, such as Last hour or All time.
  • Select the information that you want to remove. 
  • Hit on Delete data.
  • If you are clearing the cookies when signed in to Google Chrome, you won’t be signed out of your Account. 
c. Safari for Mac
  • Open Safari on your Mac. 
  • Go to History at the top. 
  • Select Clear History and click on the pop-up menu. 
  • Choose the specific time you want to clear the browsing data for. 
d. Safari for iPad and iPhone
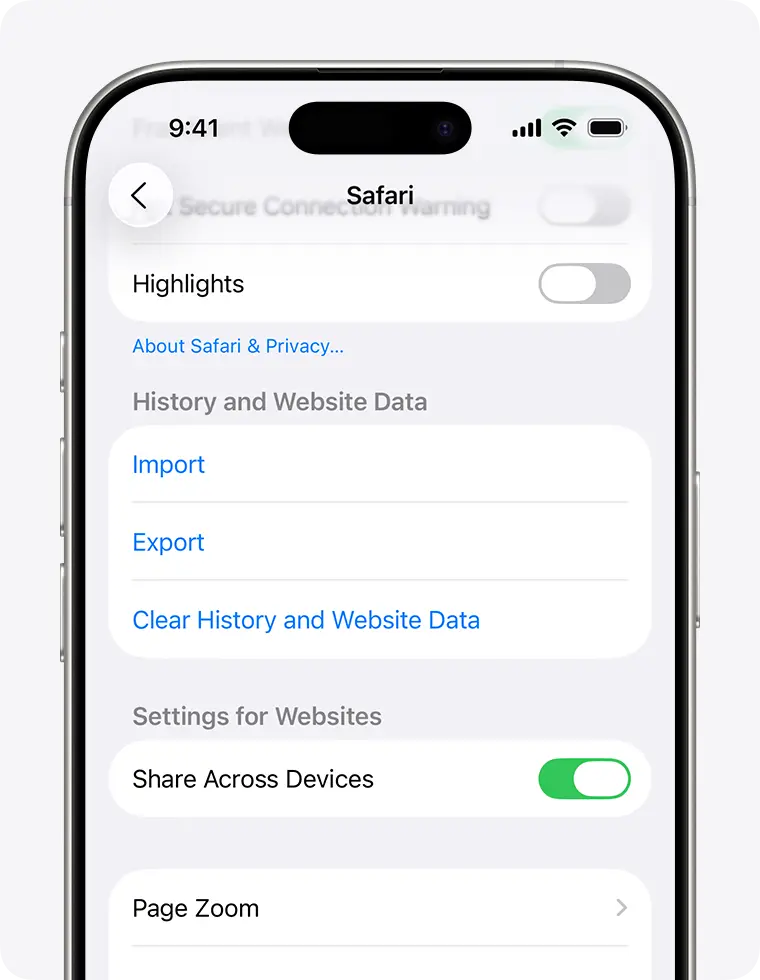
  • Navigate to Settings at the top. 
  • Select Apps and then Safari
  • Move down and click on Clear History, then Website Data.
  • Choose the timeframe to delete, then tap Clear History. This won’t impact your AutoFill data. If the button is grayed out, there might be no data to clear, or you may need to check your Screen Time web content restrictions.
tap Clear History
e. Microsoft Edge
  • Select Settings and more at the top. 
  • Go to Settings > Privacy, search, and services.
  • Click on Clear browsing data
  • Next to Clear browsing data now, select Choose what to clear.
  • Select a specific time range from the drop-down menu under Time range.
  • Choose the types of browsing data you wish to clear. 

For example, you might want to remove the browsing history and cookies while saving the passwords and form fill data. 

  • Select Clear now.
  • Once you clear the caches, restart your browser to save the changes as expected.  

4. Clear the Intuit-specific cookies 

Clearing Intuit-specific cookies helps resolve technical glitches with Intuit products like QuickBooks, primarily by removing corrupted website preferences.

a. Google Chrome

  • Select the More ⋮ icon at the top right. 
  • Go to Settings
  • Choose Privacy and security.
  • Hit on Cookies and other site data.
  • Select See all cookies and site data.
  • In the search bar, type “Intuit” to find the Intuit-specific cookies.
  • Click Remove all shown or the trash can icon.
  • Now, restart Google Chrome so the changes can take effect.

b. Mozilla Firefox

  • Select the Menu ☰ icon in the top-right menu bar. 
  • Select Settings > Privacy & Security.
Mozilla Firefox privacy policy
  • Hit on Manage Data under Cookies and Site Data.
  • In the search bar, type “Intuit” and press Enter to find the Intuit-specific cookies. 
  • Click Remove All Shown.
  • Choose Save Changes.
  • Restart Mozilla Firefox for the changes to take effect. 

c. Safari

  • Launch the Safari browser.
  • Beside the Apple icon, choose Safari
  • Go to Preferences.
  • Click on Privacy > Manage Website Data.
Manage Website Data
  • In the search bar, type “Intuit” to find the Intuit-specific cookies. 
  • Hit on Remove All.
  • Now, select Remove Now > Done.
  • Restart the Safari browser for the changes to take effect. 

Fix the Drop-down menu issues in QuickBooks Desktop

The steps below will help you fix the issues why the drop-down menu is not working in QuickBooks Desktop: 

1. Update QuickBooks Desktop 

Admin rights allow you to make necessary changes for an update, such as adjusting system settings, granting permission to download files, or running installations. Ensure you have the correct permissions or run the QuickBooks Desktop updates as an administrator.  

2. Verify and Rebuild company file data 

The Data Verify utility checks the integrity of your data in your company file and runs the data reconstruction tool to recreate or repair any damaged data. Learn how to run the tool using the steps below:

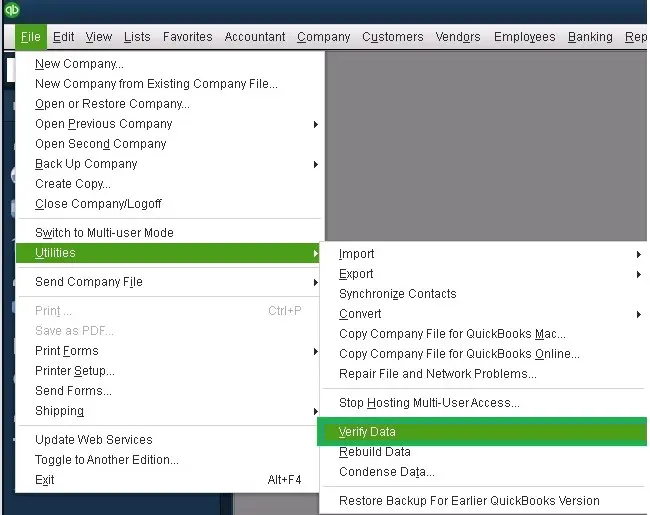
a. Verify your company data

  • Navigate to the Window at the top. 
  • Select Close All
  • Go to File > Utilities
verify and rebuild company file data
  • Hit on Verify Data. If you see:
    • QuickBooks detected no problems with your data—your data is safe and protected, and you don’t need to do anything else.
    • An error message—look for the error on our website
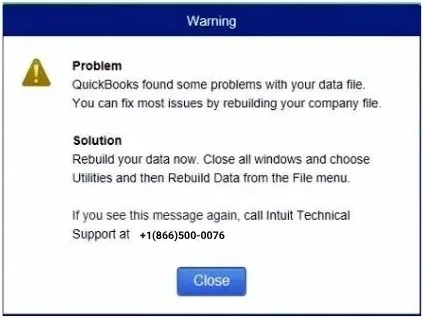
    • Your data has lost integrity—Data damage has been found in the company file, and you need to rebuild it
Intuit technical Support

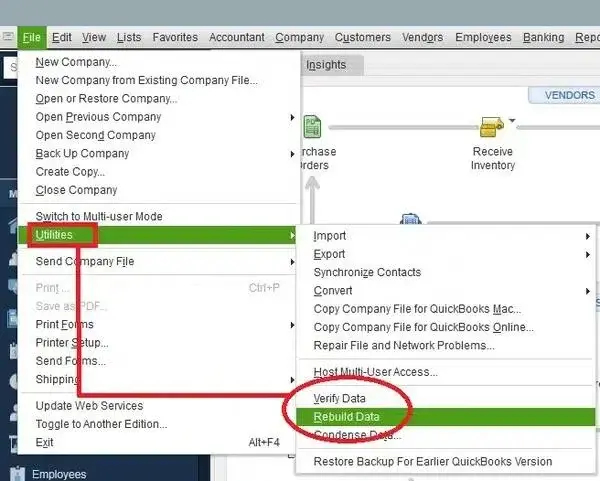
b. Rebuild the data damages 

  • Navigate to File > Utilities and click on Rebuild Data
Rebuild Data
  • QuickBooks will ask you to create a backup before rebuilding the damaged data in your company file. Click OK, as a backup is required before rebuilding.
  • Choose the location to save the backup copy and click OK. Make sure that you are not replacing the already existing company file. Type a new name in the File name and select Save
  • Click OK when you receive the Rebuild has completed message.

Read More – Verify and Rebuild Data in QuickBooks Desktop

3. Modify DPI settings for QuickBooks 

Before you adjust the Windows settings, modify the display and view preferences in your QuickBooks.

  • Exit QuickBooks Desktop.
  • Launch the Windows Start menu. 
  • In the search field, type QuickBooks.
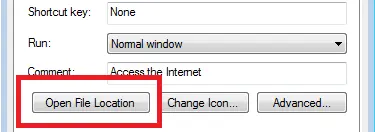
  • Right-click on the QuickBooks icon and choose Open file location
choose Open file location
  • Right-click on the QuickBooks.exe file in the folder and choose Properties.
  • Navigate to the Compatibility tab.
  • Mark the checkbox for Disable display scaling on high DPI settings. You may also choose Change high DPI settings and then Override high DPI scaling behavior.
  • Finally, select Apply and click OK.

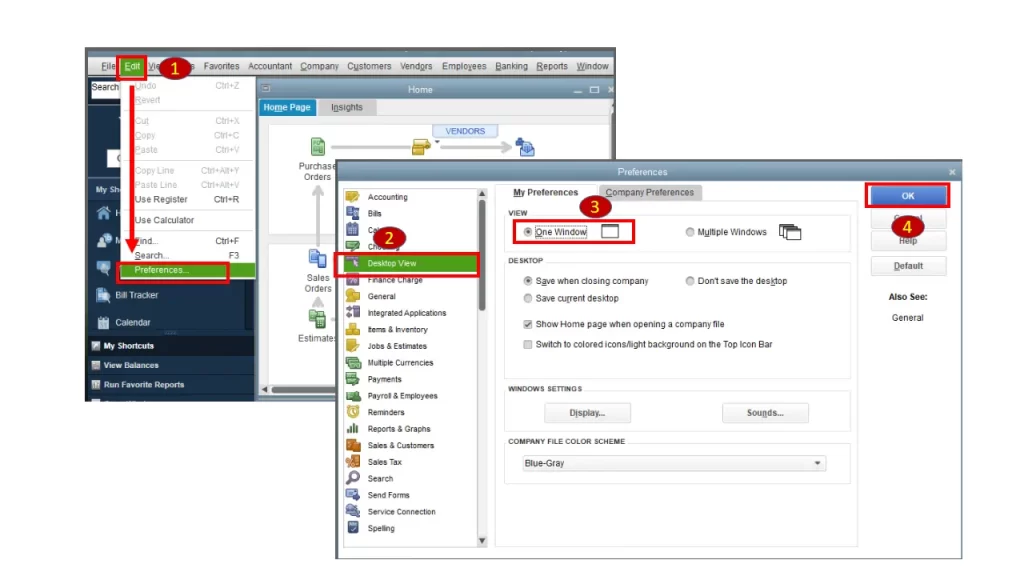
4. Adjust your view preferences in QuickBooks

Let’s adjust the view preferences, which can be the reason why drop-down menus are not working in QuickBooks: 

  • Launch QuickBooks Desktop. 
  • Navigate to the Edit menu. 
  • Choose Preferences.
  • From the list, choose Desktop View
view preferences in QuickBooks
  • Go to the My Preferences tab.
  • Select the One Window option in the View section. 
  • Finally, click OK

Exit QuickBooks, then open it again and open the company file. Check again for the display issues. Move to the next solution if drop-down menus are not working in QuickBooks. 

5. Change your Windows display settings

QuickBooks functions best with the default Windows DPI settings. Changing these settings could cause display issues.

Important: Remember that modifying your Windows settings affects all applications on your computer, not just QuickBooks.

To reset the default display settings for Windows 10 and 8, follow Microsoft’s instructions:

  • Ensure your screen resolution is at least 1024 x 768, with 1920 x 1080 recommended for optimal display.
  • After adjusting, restart your computer, open QuickBooks, and load your company file.

6. Run the QuickBooks Install Diagnostic tool 

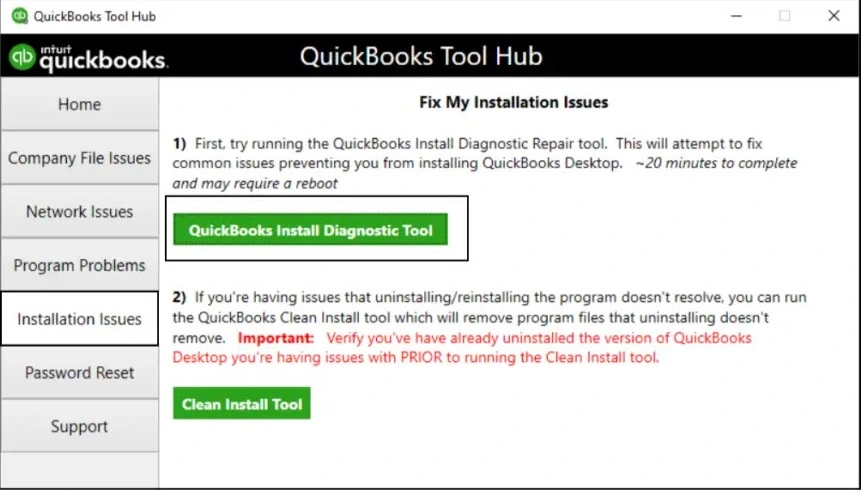
The QuickBooks Install Diagnostic tool identifies installation issues with your QuickBooks and runs a quick repair to resolve them.

QuickBooks Install Diagnostic Tool

To run the utility, you must download and install QuickBooks Tool Hub to the latest release available and make sure to use it after closing QuickBooks Desktop. When done, access the tool and run the QuickBooks Install Diagnostic tool.

7. Clean Install QuickBooks Desktop 

Clean installing QuickBooks Desktop removes damaged or corrupted program files and allows you to install the software fresh. This fixes issues caused by incorrect installations or file corruption, which can lead to drop-down menu problems in QuickBooks.

Conclusion 

In conclusion, a drop-down menu is a necessary tool that lets you access different functionality and run the processes accordingly. If your drop-down menus are not working in QuickBooks, the information in the detailed blog must have helped you resolve the problem and ensure a smoother functioning of the software.

For further assistance, we highly recommend consulting with QuickBooks ProAdvisors for a quick resolution. Dial +1(866)500-0076 to talk to an expert now!

Frequently Asked Questions 

Why is my drop-down list not working in QuickBooks? 

A QuickBooks drop-down list may not work due to browser issues, such as a corrupted cache or a corrupted company file. To fix this, try clearing your browser’s cache, opening a new incognito window, using a different browser, or logging in with a different username and password.

How do I edit a drop-down list in QuickBooks?

To edit a QuickBooks drop-down list, go to the Settings menu, select All lists, choose the list you want to edit, and then select Edit from the action menu. 

How to activate the drop-down list in QuickBooks?

To activate a drop-down list in QuickBooks, first determine if you’re creating a new custom list or troubleshooting a non-working one. You can create a custom drop-down by going to Settings > Custom Fields (in QuickBooks Online) and choosing “Drop-down list” as the data type. 

Where is the settings menu in QuickBooks?

In QuickBooks Online, the main settings are accessed by clicking the Gear icon in the top-right corner and selecting Account and Settings. For QuickBooks Desktop, go to the Edit menu, then select Preferences

Why can’t I scroll down on QuickBooks?

You can’t scroll down in QuickBooks due to browser issues, mouse problems, or display settings, so you should try clearing your browser’s cache, checking your mouse for dirt or a low battery, or adjusting your screen resolution and zoom level.