
10 Best Solutions to Fix QuickBooks Error 6190 Promptly 

Jun 13, 2026

Admin |

Estimated Read Time : 5 MIN

QuickBooks is designed to make financial management seamless, especially when multiple users need to collaborate on the same company file. However, things don’t always go as planned. One common issue that can interrupt your workflow is QuickBooks error 6190. This error typically occurs when there’s a conflict between how the company file is being accessed and how QuickBooks expects it to be used.

In many cases, the problem arises when a user opens the company file in single-user mode while others attempt to access it in multi-user mode. Another frequent cause is a mismatch between the transaction log file (.TLG) and the company file (.QBW), which can confuse QuickBooks and prevent it from opening the file correctly. Understanding why this error happens is the first step toward resolving it quickly and preventing future disruptions.

What Causes Company File Error 6190 in QuickBooks? 

Understanding the root causes behind this error is essential for troubleshooting it effectively and preventing it from disrupting your workflow in the future: 

  • Multiple users are attempting to access the file simultaneously without a proper hosting setup
  • Damaged or corrupted company file
  • Incorrect network configuration in a multi-user environment
  • QuickBooks database server issues are preventing proper file communication
  • The company file is opened in two different systems at the same time in an unsupported way
  • Outdated QuickBooks version is causing compatibility or access issues
  • File permission restrictions that prevent users from accessing the company file properly
  • Windows Firewall or antivirus software might be blocking QuickBooks Desktop  

Top Methods to Troubleshoot QuickBooks 6190 When Opening Company File 

Addressing QuickBooks error 6190 promptly is essential to regain access to your company file and avoid workflow interruptions. The following methods will guide you through practical solutions to resolve the error and help ensure smoother, error-free file access moving forward.

1. Update QuickBooks Desktop

Updating QuickBooks Desktop to the latest version ensures you’re running the most recent security patches, performance improvements, and bug fixes that keep the software stable and reliable. An outdated version can often lead to compatibility issues, especially in a multi-user environment where smooth network communication is essential. 

2. Run QuickBooks File Doctor

The QuickBooks File Doctor verifies the company file for potential data damage and network connectivity issues, then runs a quick repair on the program. Move to the below steps to learn how to run the tool and resolve common issues:

Important Note: Make sure to download and install QuickBooks Tool Hub (1.6.0.8) in the latest version.  

  • Launch the QuickBooks Tool Hub on your computer. 
  • Select Company File Issues in the left menu bar. 
  • Hit on Run QuickBooks File Doctor. The tool usually takes a minute or more to open the file doctor; wait until then.

Note: If the QuickBooks File Doctor doesn’t open, search for QuickBooks Desktop File on your Windows and open the tool manually.

  • When QuickBooks File Doctor opens, choose your company file from the drop-down menu. If you don’t see the company file, click on Browse and search and find your company file. 
  • Choose “Check your file,” then click Continue.
  • Enter the QuickBooks admin password to allow access, then click Next

3. Check if Hosting is on for all workstations

It is highly recommended to use the main computer as a server to host your company’s files.

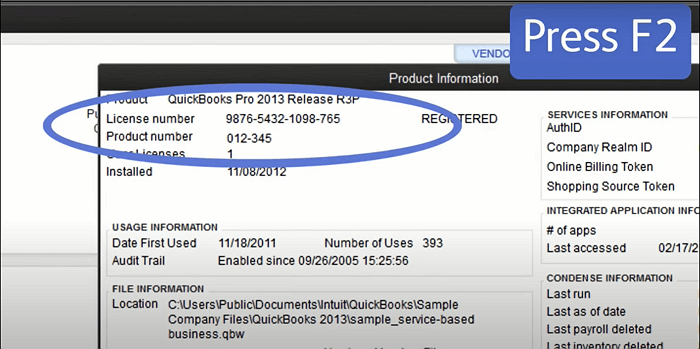
  • Launch the Product Information window by pressing F2
License Information and a product key
  • Now, look for Local Server Information and make sure hosting is turned off. 

4. Restart all your computers and servers

Sometimes, all of your computers, servers, and workstations require a full reset. Follow the steps below to learn how to do so:

Important:

  1. If you are using QuickBooks Enterprise Hosting rather than a dedicated server, please contact us via chat so we can assist you in restarting the service.
  2. If your company files are hosted by one of our Intuit Hosting Providers or another third-party service, reach out to them directly for help with restarting the service.
  • Restart your server computer (the one hosting your company files).
  • Restart each workstation (the other computers connected to the network that don’t host your company files).
  • Open QuickBooks Desktop on your server computer.
  • Open QuickBooks Desktop on each workstation.

5. Rename the .ND and .TLG company files and run the QuickBooks Database Server Manager

The .ND and .TLG files are components of your primary QuickBooks company file. These configuration files allow QuickBooks to access the company file in a multi-user or network environment.

If these files become damaged or corrupted, you may encounter errors when opening your QuickBooks company file. To resolve this, we recommend renaming these files, as doing so will not affect or delete your company data.

When you rename the company file, QuickBooks automatically creates new .ND and .TLG files after you rescan the file using the QuickBooks Database Server Manager and reopen the company file.

a. Rename the .ND and .TLG file

  • Locate the folder where .ND and .TLG files are saved. 
  • Open the folder. 
  • Look for the company file name with the same name as your company file, but with the .ND and .TLG extensions at the end. 
    • company_file.qbw.nd
    • company_file.qbw.tlg
  • Now, right-click on each file and choose Rename. 
  • Add the word .OLD at the end of each file name.

Example: company_file.qbw.nd.OLD

b. Run the QuickBooks Database Server Manager

The QuickBooks Database Server Manager (QBDBSM) hosts your QuickBooks company files. Restart the QBDBSM and scan the QuickBooks files after you rename the .ND and .TLG files.

From the QuickBooks Tool Hub, run the QuickBooks Database Server Manager.

  • Open the QuickBooks Tool Hub. 
  • Go to Network Issues in the left menu bar. 
  • Click on QuickBooks Database Server Manager. Make sure to install QB Database Server Manager if you haven’t installed it yet. 
  • In the QuickBooks Database Server Manager, choose Start Scan if you see your company file. If you don’t, click on Browse and look for your company file, then select Start Scan
  • Open QuickBooks Desktop and try to sign in to your company file again. 

6. Open a sample company file from a workstation

Try opening a sample company file to determine whether the issue lies with your company file or with QuickBooks itself. If the sample file fails to open and an error appears, it indicates that your QuickBooks installation may be corrupted and requires repair.

  • To proceed, open a sample file by selecting one from the list of available sample company files.
  • If the sample file opens successfully, move on to Solution 4.

7. Repair the QuickBooks installation 

With the help of the QuickBooks Tool Hub, you can run various automated tools to fix damaged, corrupt, or incorrect installations. You can also terminate background processes, repair Windows components or components that interact with QuickBooks, and instantly repair the program:

a. Run Quick Fix my Program 

The Quick Fix my Program closes the QuickBooks processes running in the background and then runs a quick repair to the program.

  • Open the QuickBooks Tool Hub. 
  • Click on Program Problems in the left menu bar. 
  • Choose Quick Fix my Program.
  • Launch QuickBooks Desktop and open your data file.

b. Run the QuickBooks Install Diagnostic tool

If an error occurred during the QuickBooks installation, it can lead to issues when you try to use the program. You can resolve common installation problems by using the QuickBooks Install Diagnostic Tool.

  • Launch the QuickBooks Tool Hub and go to Installation Issues.
  • Click on QuickBooks Install Diagnostic Tool and allow it to run (this may take up to 20 minutes).
  • Once the process is complete, restart your computer, open QuickBooks Desktop, and access your company file.
  • Finally, update QuickBooks to the latest version to ensure you have the newest fixes and security updates.

8. Copy the QuickBooks file to the Desktop

Copy your company file to the desktop and try opening it to check whether the issue is related to its current location.

  1. If the file opens successfully from the desktop, the original folder or drive where it’s stored may be damaged.
  2. The problem could also be caused by the file being stored within too many nested folders, exceeding the system’s file path limit.
  3. If the file still doesn’t open after moving it, the file itself may be corrupted.

Steps to follow:

  • Navigate to the folder where your company file is saved.
  • Locate the file with the .QBW extension.
  • Right-click the file and select Copy. Then go to your desktop, right-click, and choose Paste.
  • Press and hold the Ctrl key while opening QuickBooks to bring up the No Company Open window.
  • Click Open or restore an existing company, then browse to the desktop and open the copied file.

9. Move your company files to your local hard drive

If your company file (.QBW) is stored on a removable device or an online location, transfer it to your computer’s local hard drive instead.

Key best practices to follow:

  1. Keep all QuickBooks files, including your company file, on the hard drive of your server computer. While services like Dropbox or Google Drive are useful, they may lead to performance or access issues.
  2. Avoid saving files on removable or external storage devices. This includes USB drives, external hard disks, or NAS systems, as they aren’t suitable for running QuickBooks or supporting multi-user setups.
  3. Do not encrypt your QuickBooks files or the drive they’re stored on, since encryption can interfere with multi-user connectivity.

Note: Moving your company file to a different computer does not impact your QuickBooks license.

  • Before you begin, ensure QuickBooks Desktop is installed on the new computer.
  • Create a backup of your company file on your current system by following the required steps.
  • While saving the backup, assign it a distinct name so it’s easy to recognize and doesn’t overwrite any existing files.
  • Store the backup in a convenient location, such as your Windows desktop.
  • Transfer the backup file to the new computer. You can use a USB drive, an external device, or share it over the same network.
  • On the new computer, restore the backup file and make sure it also has a unique name.
  • If you use payroll features, update the tax table after transferring and restoring the file.

10. Close all QuickBooks processes

  • Sign in to your server computer as an admin. 
  • Open the Task Manager by pressing  Ctrl+Shift+Esc.
  • Now, click on Show processes for all users and choose Users.
  • Choose each QuickBooks process (QBW32.EXE, qbupdate.exe, and QBDBMgr.exe), then End Task.
  • Finally, try opening the company file in multi-user mode.

If you still get an error, Go to solution 6.

11. Check the folder permission manually

You may encounter QuickBooks error H202 if the folder where your company file is stored does not have the correct permissions. Improper folder access can prevent QuickBooks from connecting in multi-user mode. To resolve this, ensure that the folder permissions are properly configured to allow sharing of company files across the network, and then try opening your file again.

12. Configure Windows Firewall ports and Anti-Virus Software

Windows Firewall is a system security application that monitors, controls, and verifies incoming and outgoing data to protect your computer. However, you may encounter errors if the firewall or antivirus software blocks access to certain QuickBooks programs or files. To prevent such issues, it is important to properly configure the necessary Windows Firewall ports for QuickBooks Desktop and set appropriate exceptions in your antivirus software to ensure smooth and uninterrupted operation.

Conclusion

Finally, we are concluding this blog with a detailed, comprehensive guide to QuickBooks error 6190. We have discussed a variety of possible reasons that can hamper the network connectivity when opening the company file over a network. Following the above steps ensures the issue is resolved and you can open the company file promptly.

Frequently Asked Questions

How do I resolve QuickBooks error 6190?

    To resolve QuickBooks error 6190 (often combined with -816), which occurs when a transaction log (.tlg) file does not match the company file (.qbw), immediately restart your computer to close stuck processes, ensure all users are logged out, and update QuickBooks to the latest release.

    How to fix error 6189 816 and 6190 816 QuickBooks?

      To fix error 6189, 816 and 6190, 816 in QuickBooks Desktop by restarting all computers, running the QuickBooks Tool Hub’s “Quick Fix my Program,” and ensuring only the server hosts the company file. These errors indicate multi-user file access conflicts or damaged network files (.ND/.TLG). 

      How to fix error 6209 0 in QuickBooks Desktop?

        To fix error code 6209 0, which usually stems from a damaged .NET Framework or corrupted installation, run the QuickBooks Install Diagnostic Tool via the QuickBooks Tool Hub. If the error persists, try repairing the QuickBooks installation in Windows Control Panel, repairing Microsoft .NET Framework, or reinstalling QuickBooks. 

        What does code 6210 in QuickBooks mean?

          Error code 6210, 0 typically indicates a company file access issue in multi-user mode, often occurring when a workstation (not the server) attempts to host the company file. It signifies a conflict, such as incorrect hosting settings, corrupt .ND/.TLG files, or network restrictions preventing access to the data. 

          About The Author

          Lana Creston

          Lana Creston is an experienced technical and accounting writer with a total of 9 years of experience. She currently works on QuickBooks accounting and technical guides at QuickBookSupportNet. Lana has a passion for reading and writing about various technical topics, especially exploring new accounting methods and software, while continuously expanding her expertise in the ever-evolving field of finance and technology.

          QuickBooks Desktop 2023 is ending — Upgrade QuickBooks Desktop 2023 to 2024 for continued performance and support.

          Get a Free Consultation with Our QB Tax Experts