
Jan 28, 2026
Admin |
Estimated Read Time : 5 MIN
A proper setup or configuration of your QuickBooks is necessary for accurate sales tax calculation, recording, tracking, and reporting, so you can charge customers properly and file your tax returns without errors.
Calculating your taxes and filing also requires adding tax agencies (state/city), setting the correct tax rates, taxable or non-taxable products, and customers, and testing invoices to ensure tax is applied properly.
Learn how you can set up and use tax in QuickBooks Desktop for automatic tax calculation on invoices and sales receipts, track how much tax you collect, generate liability reports, and help you record tax payments to the correct agencies, making tax filing accurate and hassle-free.
Table of Contents
ToggleBefore configuring and using taxes in QuickBooks Desktop, make sure you have the following information:
In this section, you will learn how you can set up the accurate tax rates, products & customers, add tax agencies, and how much tax must be collected. Let’s enable the tax feature and further configure it for accurate tax calculation:
In QuickBooks Desktop, you must enable the sales tax feature and set up sales tax items or tax groups to start recording sales tax:

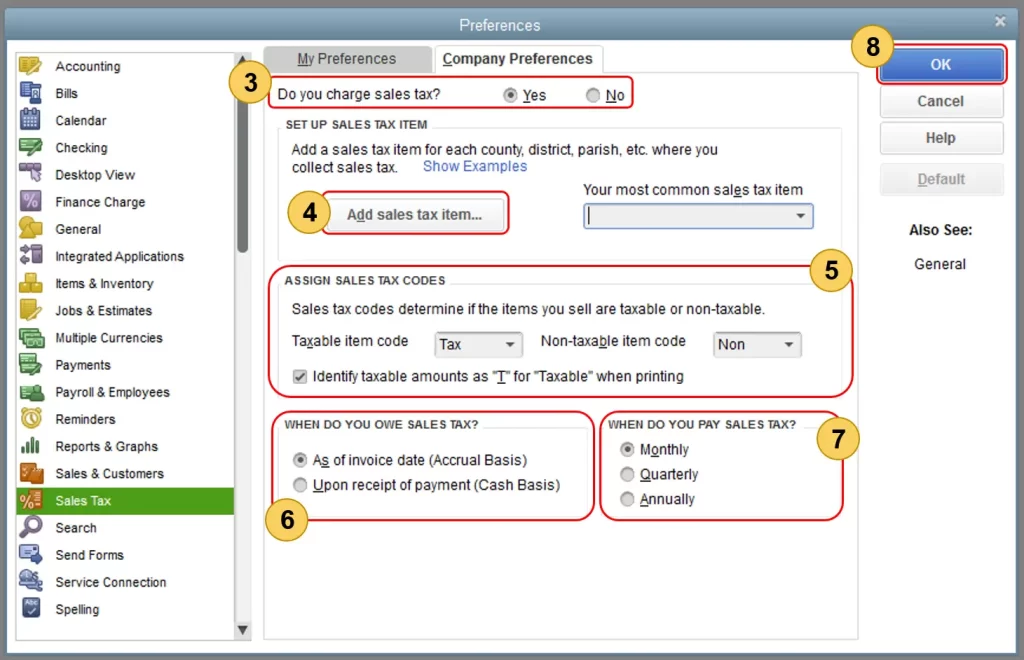
Go to the Sales Preferences tab for Sales Tax and proceed below:
1. Set up Sales Tax Items: Add sales tax items for all the locations (county, district, city) you collect taxes from. Click on Add sales tax item… to start the process. Check the steps mentioned below to create items and groups.
2. Assign Sales Tax Codes: These codes help you easily differentiate taxable and nontaxable sales and customers when reporting. QuickBooks will automatically create TAX (taxable) and NON (nontaxable) codes when you turn on sales tax.
3. Set Tax Basis: Select how you would pay sales tax:
4. Set Payment Frequency: Select how you would pay sales tax:
Click OK to save your preferences.
Here’s how to specify sales tax items and groups for accurate tax calculations in QuickBooks Desktop:
Sales tax items calculate a specific tax amount on taxable sales only.
Let’s create a new sales tax item:
Let’s edit an existing sales tax item:
Use a sales tax group when multiple sales tax items apply to the same transaction but should be shown as a single line item on forms. Even though they appear as one line, you can still track and report each tax separately.
To create a sales tax group:
Assign Sales Tax Codes
Using the correct sales tax codes (such as TAX or NON) for items and customers helps ensure that taxable and non-taxable sales are reported accurately.
You must specify which customer or item is non-taxable so QuickBooks can exclude it from tax calculations for accuracy. Here’s how to set up non-taxable status:
1. For an Item
2. For a Customer
If the standard TAX and NON codes don’t meet your needs, you can create custom tax codes.
Other Non-Taxable Codes: These can be used to handle specific scenarios where items or services are not taxable.
| Sales tax code | When to use |
| OOS | OUT-OF-STATE SALES. Many states don’t require sales tax on out-of-state sales. You can assign this sales tax code to a customer who purchases from your store but resides in another state. Many QuickBooks company files already include this non-taxable sales tax code by default. |
| LBR | LABOR. In many states, labor services aren’t subject to sales tax so that you can assign the LBR code to a service item. Some QuickBooks company files already include this non-taxable sales tax code by default. |
| NPO | NON-PROFIT ORGANIZATIONS. These organizations aren’t charged sales tax, even when the products or services you sell are normally taxable. The NPO code would be assigned to the customer. |
| GOV | GOV. Sales made to government offices are not subject to sales tax. |
| WHL | WHOLESALERS. Customers who purchase goods from you solely for resale. |
| RSL | RESELLERS. Customers who purchase your products in order to resell them, or who use your products as components to create and sell their own products. |
When you set up and use tax in QuickBooks Desktop, you can easily calculate taxes, assign tax or non-tax status to products and customers, and generate reliable reports with confidence. By following the steps outlined in this guide, you can streamline your tax management process and avoid costly errors.
If you need expert assistance at any stage, contact QuickBookSupportNet at the +1(866)500-0076 for instant consultation. Speak with a certified QuickBooks ProAdvisor today!
How to set up tax code in QuickBooks Desktop?
Go to Lists > Item List. Choose a tax code such as “TAX” or “NON” from the dropdown. Or select Add New to create custom codes from the Tax Code dropdown. Define your tax basis (Cash/Accrual) and payment frequency, assigning codes to items and customers as needed.
How to set up tax in QuickBooks Desktop?
Go to Edit > Preferences > Sales Tax, create individual Sales Tax Items and Sales Tax group in the Item List, defining the tax agency and rate for each. Now, assign your taxable items and customers and ensure the tax codes are applied correctly on transactions to track and report liabilities.
How do I set up local tax in QuickBooks Desktop?
First, create individual Sales Tax Items for sales tax or add them as Payroll Tax Items for employee-based local taxes in the Item List and Employee Center, respectively, then assign them to customers/employees.
Where is the taxes tab in QuickBooks Desktop?
In QuickBooks Desktop, there isn’t a single “Taxes” tab; instead, tax functions are found under the Edit > Preferences > Sales Tax for setup, the Vendors menu > Sales Tax > Pay Sales Tax to pay, and the Employees > Payroll Center > File Forms for payroll taxes.
Lana Creston is an experienced technical and accounting writer with a total of 9 years of experience. She currently works on QuickBooks accounting and technical guides at QuickBookSupportNet. Lana has a passion for reading and writing about various technical topics, especially exploring new accounting methods and software, while continuously expanding her expertise in the ever-evolving field of finance and technology.
How to Fix QuickBooks Error 15311 During Updates
Oct 22, 2026
How to Fix QuickBooks Payroll Error 15301
Oct 22, 2026