Fix QuickBooks Error 6000, 83 with Preventive Tips
Dec 27, 2025
Nov 12, 2025
Admin |
Estimated Read Time : 5 MIN
Whether you’re running reports or filing your taxes, having printed copies allows you to save records both manually and within your software. However, you might encounter an issue when trying to save a document as a PDF or print it, along with an on-screen warning message:
“Error: QuickBooks can’t complete the current action due to a missing component: Missing PDF file component.”

This QuickBooks missing PDF component issue can appear in various forms and trigger different error messages. We understand how frustrating it can be to deal with such problems. To help you out, we’ve created this detailed guide explaining the possible error messages, their causes, and the effective methods to fix the issue.
Table of Contents
ToggleThe following is a list of error messages that may appear when you attempt to print or save as a PDF. Fortunately, these issues can be easily resolved using the QuickBooks Print & PDF Repair Tool, which is detailed in the troubleshooting section.
Here’s why you see the QuickBooks missing PDF component when trying to save as a PDF or printing:
We’ve gone over several reasons why QuickBooks detected that a component required to create a PDF error may appear, along with a list of possible error messages that could show up. Below are some steps to help you save as a PDF or print without any issues.
A compatible version of QuickBooks Desktop is required to run the software, whether printing, saving as a PDF, or running your reports. Updating QuickBooks Desktop to the latest release ensures that security patches and features are up to date and more.
The QuickBooks Print & PDF Repair tool allows you to fix issues with printing, saving, or emailing forms as PDFs from QuickBooks Desktop.
Note – Download and install QuickBooks Tool Hub to the latest release (1.6.0.8). For the best experience, we recommend using Tool Hub on Windows 11 (64-bit).
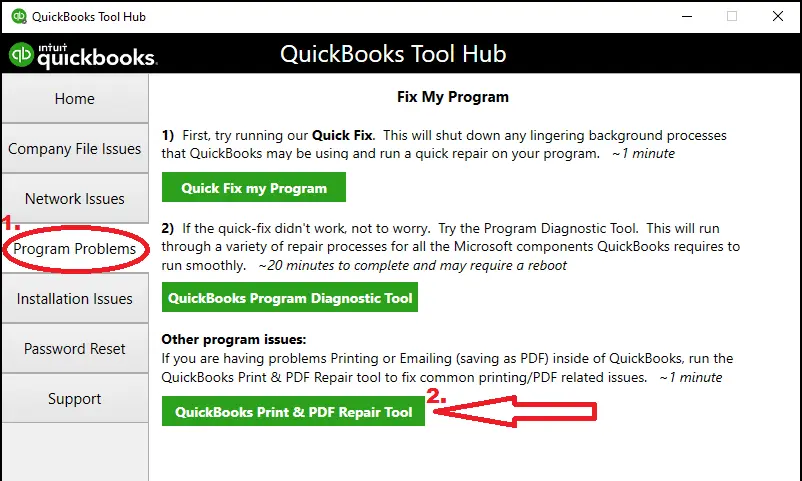
If the error doesn’t resolve, proceed to Solution 2.
Restarting your computer and resetting your Windows temp folder permissions are standard troubleshooting steps that can resolve various QuickBooks Desktop issues, such as printing.
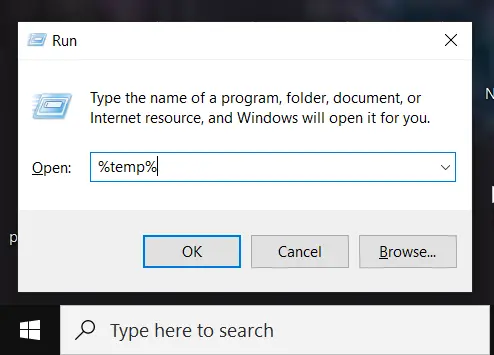
QuickBooks uses some parts of the XPS Document Writer, such as the Microsoft Windows product, when saving a PDF file. Test to see whether the XPS Document Writer printer works:
Note: If you don’t see XPS Document Writer, you’ll need to allow your computer to print to your XPS printer.
If you fail when printing using the XPS Document outside of QuickBooks Desktop, you must reach out to IT professional or contact us.
Allow your computer to print to your XPS printer

Use the new template or form when printing or saving as a PDF to resolve issues:
Let’s update the Print Spooler service properties to resolve connectivity and processing issues:
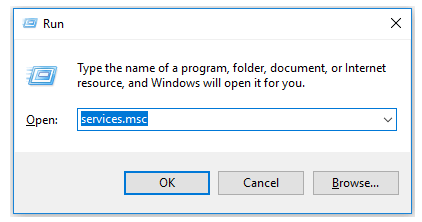
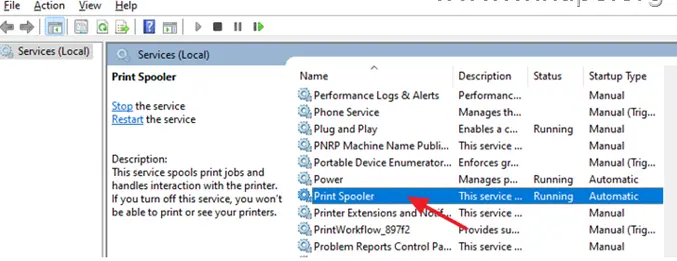
QuickBooks uses Adobe Acrobat Reader as a component for printing and saving as a PDF. If it’s corrupted or outdated, you might encounter the missing PDF component issue in QuickBooks.
For Windows:
For Mac:
If updating Adobe Reader/Acrobat didn’t resolve the problem, you’ll need to repair your Adobe installation.
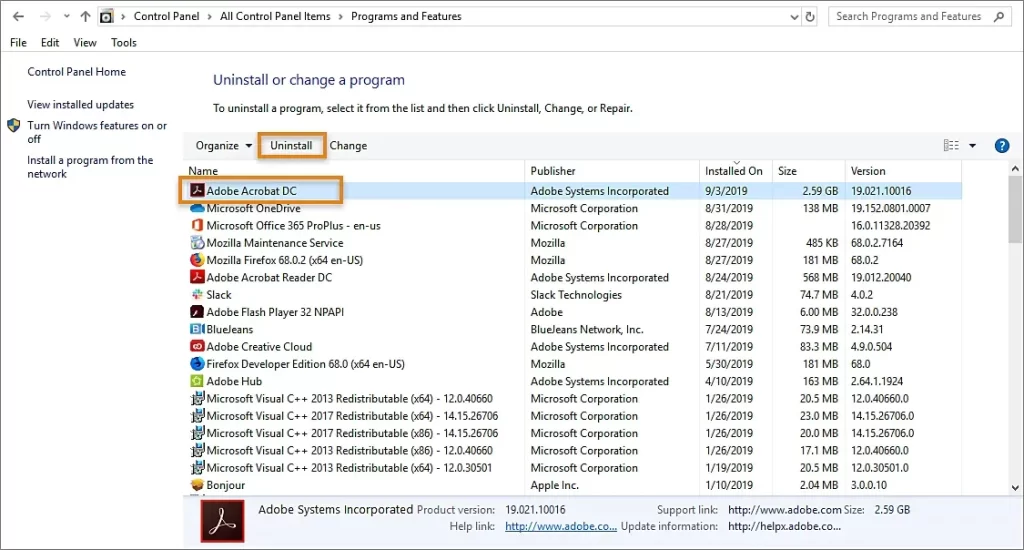
| Tip: If repairing Adobe Reader doesn’t resolve the issue, try uninstalling and reinstalling the program. |
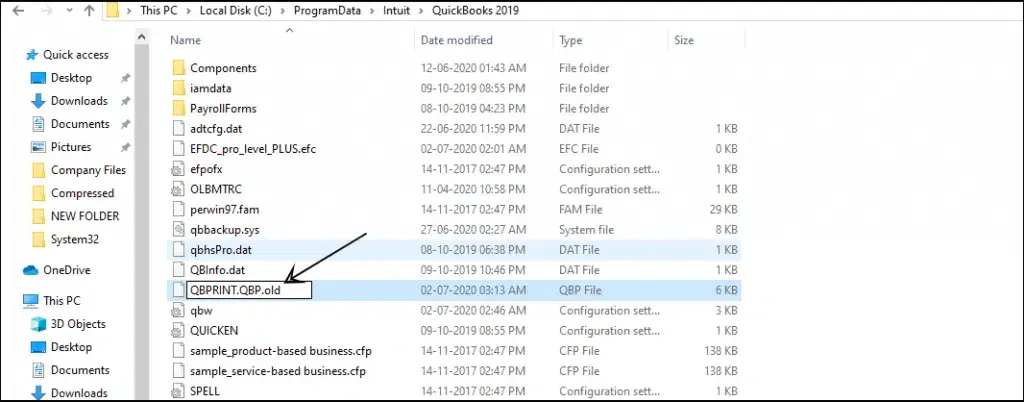
Renaming the QBPrint.qbp file forces QuickBooks to create a new file. This way you will lose all custom printer setups, but also resolve printing errors caused by a corrupted file.
Quick tip: You might need to display hidden files and folders or search for files using Windows to find these files in Windows.
Open QuickBooks Desktop.
Note: You do not have to do this for every transaction.
Note: The steps below are only for Windows, not Terminal Services.
If you failed when printing using the XPS Document writer outside QuickBooks, you must reach out to an IT professional or contact us.
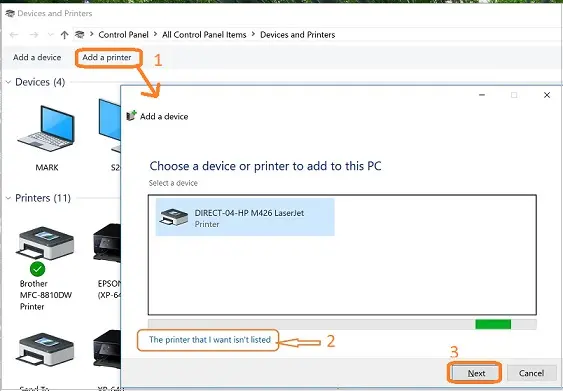
You can try the steps below with an IT professional:
Finally, we are ending this blog with a list of possible factors that may be causing “QuickBooks detected that a component required to create PDF,” along with detailed steps on how to fix it. By following the above troubleshooting steps, you should have resolved the issue and be able to save the file as a PDF successfully.
For further assistance, dial +1(866)500-0076 to speak with a QuickBookSupportNet ProAdvisor available 24/7!
How to fix a missing PDF component in QuickBooks?
To fix a missing PDF component in QuickBooks, first run the QuickBooks PDF & Print Repair Tool from the QuickBooks Tool Hub. If that doesn’t work, try repairing your QuickBooks installation via the Control Panel, and ensure that Microsoft XPS Document Writer is enabled in Windows features.
Why is QuickBooks unable to complete the current action?
QuickBooks is unable to complete an action due to outdated software, corrupted company files, or missing or damaged components, especially when using PDF functions. You can also try running the QuickBooks Tool Hub to diagnose and repair the installation, update the program, or check Windows settings.
Why am I getting a PDF error in QuickBooks?
PDF errors in QuickBooks are often caused by outdated software, corrupted components, or Windows setting issues, or if the Windows component, such as Windows XPS Document Writer, gets damaged or missing.
How to create a PDF in QuickBooks?
To create a PDF in QuickBooks, you can either use the built-in “Save as PDF” or “Download” options for specific forms and reports, or use your system’s “Print to PDF” functionality.

Lana Creston is an experienced technical and accounting writer with a total of 9 years of experience. She currently works on QuickBooks accounting and technical guides at QuickBookSupportNet. Lana has a passion for reading and writing about various technical topics, especially exploring new accounting methods and software, while continuously expanding her expertise in the ever-evolving field of finance and technology.

Quick, clear, and hassle-free QuickBooks assistance.
Fix QuickBooks Error 6000, 83 with Preventive Tips
Dec 27, 2025
Let’s Change EIN in QuickBooks Payroll Subscription
Dec 26, 2025
