Archives

Home > Blogs > 2023 > July

One of America’s most-used accounting software, QuickBooks, is an effective and convenient software to meet all of your financing and accounting needs. Since the software, like any other, is man-developed, it has its issues and errors. One of the many errors that its users come across is QuickBooks error 1328, which we are here today to talk about.

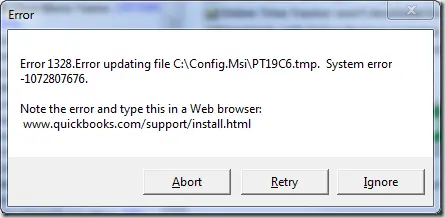
Error 1328 QuickBooks is an issue that occurs at the time of updating the software. When this happens, you receive a pop-up on your screen stating, ‘Error 1328. Error updating file c: \ config.msi \ PT **.tmp. System error – XXX.’

QuickBooks Error 1328 Error message

Remember that this error code occurs in various ways, so the text on your screen might vary accordingly.

Causes of QuickBooks error 1328

There could be many reasons behind this error code. Here is a list of the same:

  • Your QuickBooks file is corrupted or damaged in any way.
  • There is a possibility that you are facing an issue with your network. This can cause a hindrance in installing the file and therefore lead to error 1328 QuickBooks.
  • Additionally, this can happen if you are not using the right way to install the update.
  • Also, this issue can occur if your desktop has a virus that has affected the installed file.
  • Existing invalid entries or files or the uninstalled Windows.

Fix QuickBooks error 1328

If you are struggling to resolve QuickBooks error 1328, then here are a few fixes that you can try your hands on:

Solution 1: Edit the config.msi file name

The following steps will tell you how to do so:

  • Click on the Start menu and go to Explore.
  • Now, click twice on Drive C and open the folder.
  • Here, you need to go to the tools option and select the Folders option. You will find Hidden Files as well as folders.
  • Next, tap on the application all changes and hit OK.
  • Moving forward, type config.msi in the search bar and select it from the list.
  • Right-click on the same, and from the available options, choose Rename.
  • This is where you need to add .old at the end of the file’s name and save it.

Solution 2: Run Registry Repair Tool

To fix QuickBooks Error 1328, you can also use the Registry Repair Tool.

  • To repair damaged QuickBooks-related registry entries, you need to use any registry repair tool.
  • If you think that malware has affected your system, utilize any malware removal tool. This helps you remove the infection from your desktop.
  • Make sure that you remove all the junk from your system.
  • In addition to the unwanted files, delete any outdated device drives.
  • Try to uninstall and reinstall QuickBooks from your PC.
  • Scam to turn Windows System File Checker.
  • Lastly, install all the pending Windows updates.

Solution 3: Repair QuickBooks Installation

Go ahead and follow the below-mentioned steps to resolve QuickBooks error code 1328.

  • Open Control Panel from the Start menu.
  • Here, go to Programs and then to the Programs and Features.

QuickBooks Error 1328

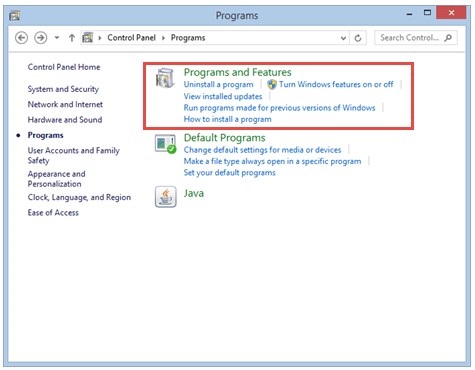
  • You will get a list of the available files. Locate the QuickBooks section and select the uninstall button.
  • On the following page, you will have the option for Repair and Remove. Select Repair and click on Next.
  • Now, follow all the instructions that appear on your screen to get the repair done.

Solution 4: Uninstall and reinstall the QuickBooks application

To do so, you will need QuickBooks Clean Install Utility.

  • The first step here is to get rid of the current QuickBooks software.
  • Go to the Control Panel and then to the Programs.
  • There, you will find the QuickBooks file.
  • On the next page, select Remove. Go with the available instructions, and the uninstalling is done.
  • Now, you need to reinstall the application.
  • Install and run QuickBooks Tool Hub.
  • From the list provided, click on Installation Issues.
  • Here, you need to select QuickBooks Install Diagnostic Tool.
  • You will now have to wait for 20 minutes while the process takes place.
  • Once done, restart your system and try to run QuickBooks again.

Solution 5: Use Startup Mode in QuickBooks

  • Press Windows + R from your keyboard to open the Run box.
  • Here, in the given space, type msConfig and hit OK.
  • Next, click on Selective Startup, and from the General tap, run computer services.
  • From the service tab, hit the Hide all Microsoft Services and select Disable all.
  • Make sure you uncheck all the boxes of Microsoft Services.
  • Also, check that the Windows Installer checkbox is marked. Hit OK then.
  • Now, go to the computer configuration and click Restart.

You now need to reset your computer settings to default.

  • Go back to the Run command with Windows + R.
  • Type msConfig again and press OK.
  • Here, go to Normal Startup and press OK from the General tab.
  • Finally, select the System Configuration window.

Solution 6: Check For Windows Update

If none of the above-mentioned solutions work for you, then look if you have any pending Windows updates.

  • Go to Settings from the Start menu.
  • There click on the Windows Update.
  • On the next page, tap on the Check for Update option.
  • If you have any pending updates, click on Install and wait for a while.
  • Once the update is done, restart your system and try running QuickBooks again.

Closing Statement

QuickBooks error 1328 appears if you have any issue when you are updating QuickBooks. In this blog, we have mentioned six different troubleshooting solutions for your convenience. Just follow these simple steps, and you are good to go. However, if you are not tech-savvy and need some help, you can always reach out to our team of experts at info@quickbooksupportnet.com, and someone from our team will get back to you to assist you.

Frequently Asked Questions (FAQs)

1. What does QuickBooks error 1328 indicates?

QuickBooks error 1328 appears when you are installing or updating your QuickBooks application. Error 1328 QuickBooks indicates:

  • The pop-up box appears with a message indicating the type of issue.
  • The error message also mentions the file path which is causing the error as c:config.msi.

2. What should I do if I face QuickBooks error 1328?

If you are unable to install or update your QuickBooks desktop because of QuickBooks error 1328, try these solutions:

  • Edit the config.msi file name.
  • Run Registry Repair Tool.
  • Repair QuickBooks Installation.
  • Uninstall and reinstall the QuickBooks application.
  • Use Startup Mode in QuickBooks.
  • Check For Windows Update.

3. What is a config.msi file?

A config.msi file is a hidden folder in the operating system of Windows. This is where you can find the extension of all the files that you install. You can file this file in Drive C.

4. Why should I rename my config.msi file to resolve QuickBooks error 1328?

There is a possibility that you are facing QuickBooks error 1328 because your config.msi file is damaged or corrupted. Renaming and restoring the file will solve this issue.

5. What is an unrecoverable error in QuickBooks?

An QuickBooks unrecoverable error is one that occurs when you try to run an unregistered program or code, and that cannot be corrected.

QuickBooks is one of the most effective accounting software that is so widely used amongst companies of all sizes. Be it big or small; companies rely on QuickBooks desktop. While beneficial, it also has its own limitations. QuickBooks is also prone to a number of errors and issues. QuickBooks error 15271 is one such error.

In this blog, we shall discuss this particular error that occurs when you try to update, install or repair QuickBooks. Before we get into the resolution part of this particular error, we might want to understand better what exactly is the QuickBooks Payroll Error and how we can successfully navigate it.

What exactly is QuickBooks Payroll error 15271?

The QuickBooks Error 15271 occurs when you are trying to update/ install the QuickBooks Desktop version, i.e, the Pro/Payroll or Desktop. The QuickBooks Error 15271 is as it appears below.

What can cause the QuickBooks Payroll Error 15271?

  1. Either a corrupt download or fragmented establishment of QuickBooks Pro software.
  2. A corrupt or damaged Windows Registry.
  3. Infectious Virus or Malware.
  4. A wrongly erased program.
  5. Incorrect or improper settings of Internet Explorer browser.

Solutions to troubleshoot QuickBooks Error 15271

Listed below some specific solution to troubleshoot the 15271 error QuickBooks.

Solution 1: Switch Off the UAC in Windows

To resolve this particular problem, you need to turn off the User Accounts Control in Windows.

Switching Off UAC in Windows Vista

  1. First of all, select the Windows option.
  2. After that, choose the Control Panel.
  3. Thereafter, you need to type UAC in the search dialog box. After that, hit the Enter Key button.
  4. Now, click on the User Account Control either ON or OFF.
  5. Click on the OK option.
  6. After that, reboot your device once.

Switching in Windows 7, 8 and 10

  1. First of all, access the Control panel settings.
  2. In Windows 7, you have to choose the Start option and then go to Control Panel.
  3. In Windows 8, you will have to type the Control panel in the Start menu and then click on the Control Panel.
  4. Enter UAC in the search box.
  5. Click on “Change User Account Settings”.
  6. In order to turn off the UAC, you need to move the slider to the “Never Notify” option.
  7. After that, click on Ok. If the system prompts you for the Admin password or the confirmation, then you need to provide the password or the confirmation.
  8. Now click on the option “turn on your UAC”.
  9. Finally, click on the OK button.

Solution 2: System Registry

  1. First things first, open the command prompt.
  2. After that, you need to regedit in it.
  3. Thereafter, hit the enter key.
  4. Then, you need to choose the failure 15271 option from the list.
  5. After that, select the export option.
  6. Consequently, choose the folder where you want to save the data.
  7. Delete all the files and data from the system that are not necessary.

Solution 3: Selective Start-Up

Damaged QuickBooks files is one of the major reasons behind QuickBooks Payroll Update Error 15271. Fixing these is the first step in the direction of solving this problem.

  1. Firstly, you should create a backup of the company file.
  2. Also, you should keep copies of QuickBooks Desktop and product license separately.
  3. Press Windows and R keys together. It shall open the Run window.
  4. Fill in MSConfig and then click on OK.
  5. From the General Tab, Choose Selective Startup and Load System Services.
  6. Choose Hide All Microsoft Services from the Services tab.
  7. Finally, select the Disable All option.
  8. Then, you should subsequently uncheck the Hide All Microsoft Services.
  9. Ensure that the Windows Installer Checkbox is checked from the services list. In case it is not, do check mark the option.
  10. Click on OK.
  11. Thereafter, finally choose the Restart option from the System Configuration Window.

Also, you can uninstall and reinstall QuickBooks files through the QuickBooks Clean Install Tool and then switch to the normal mode.

Solution 4: Payroll Tax table

  1. First of all, select the Employees option and then choose the Get Payroll Updates option.
  2. Thereafter, check the Download Entire Update option.
  3. Next, select Download Latest Update. After the download is done, you would get an informational window on the screen.

Solution 5: Update QuickBooks Desktop

There might be a possibility of using an outdated version of the QuickBooks Desktop and thus facing the error. When you encounter the QuickBooks Error 15271 while updating the payroll, you must apply this solution of manually updating QuickBooks Desktop

  1. At the outset, From under the file tab, you should run the QuickBooks application and then press the Close Company/Log Off option.
  2. After that, select the Exit option from the File tab.
  3. Thereafter, you need to go to the Desktop and then right-click on the QuickBooks icon and try running it as an Administrator.
  4. Next, QuickBooks will display the No Company Open message. After this message, pick the Help option and then select the Update QuickBooks option.
  5. From the Options menu, tap on the Mark All option and then click on the Save option to save all the changes.
  6. Thereafter, you need to check the Reset update option from the Update Now menu.
  7. Consequently, tap on the Get Updates option, and after QuickBooks shows the Update Now option, you need to close the application.
  8. Subsequently, run the QuickBooks Desktop application again and then tap on the Yes and Install Updates Popup.
  9. After all the updates are done, try restarting your system to see whether the issue has been resolved.

Also Read : QuickBooks error 15103

Winding Up

So, this is it about the QuickBooks error 15271. We have talked about the factors that cause this particular problem and how you can navigate it successfully. You can follow the above-mentioned solutions if you should face this QuickBooks Error 15271.

Although we have listed the probable solutions, you might also want to consider a situation where none of these methods work. In that case, you need to seek professional help or support. Should you face any such situation, we would urge you to reach out to us. Our team of skilled & certified professionals is ever ready to take up any of your problems and provide a quick fix to your issues. Please visit our website and send us a mail at info@quickbooksupportnet.com for more.

Frequently Asked Questions (FAQs)

Q1. What should you do before you you start fixing the QuickBooks Payroll Update Error 15271?

Ans. Before you start performing the troubleshooting of the QuickBooks Error 15271, you should ideally create a backup of the company file. In order to do so, you must adhere to the following steps:

  • First and foremost, you need to launch the QuickBooks Desktop.
  • Access the File option next and then hit the option named “Backup Company”.
  • Then, click on the option named Build Local Backup
  • As a final step, follow the instructions on the screen in order to create a backup of the company file.

Q2. Can turning off the UAC fix the QuickBooks Payroll Update Error 15271?

Ans. Yes, switching the UAC off can definitely fix the QuickBooks Payroll Update Error 15271.

Q3. Can a damaged registry file be responsible for the QuickBooks Payroll Update Error 15271?

Ans. Yes, definitely. A corrupt or damaged registry file can cause QuickBooks to display the payroll update Error 15271.

Q4. Would updating Payroll Tax table be of any help in troubleshooting the QuickBooks Payroll Update Error 15271?

Ans. Yes, it could be. Updating a payroll Tax table is one of the troubleshooting methods that can help in fixing the QuickBooks Error 15271.

Are you facing trouble while connecting with your bank account with QuickBooks? QuickBooks error 350 is a faulty situation when you may encounter a similar situation. This error can take place when the connection expires or is updated by the bank while using the Banking menu. With the error, there comes a warning message, as shown below:

“Can’t Connect Bank Error 350”
“The old connection doesn’t work”

Every time the QuickBooks error code 350 pops up, the users fail to download the bank transactions. Thus, it prevents the users from doing their ongoing business operations. At this moment, it becomes crucial to resolve this error by targeting the possible causes and implementing the relevant solutions.

What Can Possibly Lead to QuickBooks Error 350 Desktop?

As a QuickBooks user, you can get QuickBooks Desktop error 350 while performing the banking operations. As a result, an important ongoing task gets disturbed, and you will need to determine the possible causes and solutions for the error. Below are some of the prominent causes for you to take a look at:

  • Sometimes, it may happen when the server of your bank is down. This problem mainly takes place when the website is under maintenance.
  • QuickBooks error message 350 will appear when performing a bank-related task.
  • In other instances, it may occur when QuickBooks fails to establish a connection with the banking servers.
  • Another cause may be an expired or updated connection from the bank’s side.
  • The corrupt data file containing the transactions is also one of the many reasons that can lead to QuickBooks Error Code 350.

What Signs Should I Focus On To Identify the QuickBooks Error Code 350?

The following signs and symptoms will help users determine the occurrence of QuickBooks Error Code 350:

  • The task of linking your banking server becomes challenging.
  • Sometimes, this error might create issues during the invoice creation or payment process in QuickBooks.
  • There might be the possibility that your old connections won’t remain the same.
  • The users might discover that their bank connection fails to work.
  • Moreover, the users won’t be able to match the security questions.

Simple Procedures to Overcome QuickBooks Error 350 Transfer of Credits

Are you sick and tired of finding the appropriate solutions to resolve QuickBooks Error 350 Transfer of Credits? If that’s the case, then you have landed at the right place. Here, we have covered all the effective solutions that will help you deal with the issue in the least time possible.

Resolution Way 1: Relink Your Bank or Credit Card Account

You must carry on with the stepwise instructions listed below to relink your bank or credit card account.

  • In the initial step, you must launch QuickBooks Online on your device.
  • After this, navigate to the Banking menu or Transactions menu.
  • Now, you must choose the blue square for the account you wish to reconnect.
  • Advancing in the procedure, hit the Sign In link.
  • Thereon, you must add the User ID and Password required to log in to your bank’s website.
  • Now, pick the accounts you wish QuickBooks to download the transactions for. Later on, pick the highlighted Continue button.
  • Once you are all set, hit the Update option to download the latest transactions from your bank.

If the Quick bank error 350 is not resolved here, move to the next solution.

Resolution Way 2: Utilize the Verify and Rebuild Data Tool

To fix the damage present in the QuickBooks company file, you must use the Verify and Rebuild data tool. For that, you must apply the resolution methods explained below closely.

  • Begin the process by launching the QuickBooks software on your device.
  • After this, move to the File menu, followed by the Utilities option.
  • In the next step, navigate to the Verify Data (used to verify if the company file is damaged or not) option.
  • If you find out the data is damaged, you get the message, “Your Data has lost its integrity”. In that scenario, you must run the Rebuild tool.
  • Thereon, proceed further to the File menu and hit the highlighted Utilities option.
  • Go further by hitting the OK button and then pick the Rebuild Data (used to rebuild the damaged data in QuickBooks) option.
  • Now, pick the appropriate data backup location and hit the OK button.
  • Once you have generated the backup data file, the tool will begin to reconstruct the corrupted data to overcome QuickBooks error 305.

Check if the error 150 in QuickBooks is gone or still persists. If not resolved, try the next method.

Resolution Way 3: Locate the Error in the QuickBooks Log File

You must apply the steps instructed below to find the error within the QuickBooks Desktop log file:

  • Primarily, access the QuickBooks homepage and hit the F2 key to launch the Product Information window.
  • Soon after this, choose Tech Help by hitting the F3 key on your keyboard.
  • Proceed further by clicking on the Open File tab and then look for the log file. Once you have found the file, tap on the Open File button.
  • Finally, you must look for the error message and the transactions that might evoke the QuickBooks error code 305.

Resolution Way 4: Eliminate the Web Browse Cache Files

The browser’s cache files often create issues while syncing with the bank website. So, to resolve the issue, you have to remove the unnecessary cache files of your web browser to resolve the error code 305 in QuickBooks.

For the Users Accessing Google Chrome:

  • In the first place, launch Google Chrome on your device.
  • After this, see the three vertically placed dots on the top right corner of the screen.
  • Thereon, choose the History option from the extended list that opens up on the screen.
  • Proceed further by hitting the Clear Browsing Data tab.
  • Next, you must choose the time range from when you want to delete the history.
  • After making the appropriate choice, pick the Clear Data option.
  • Finally, relaunch the Chrome browser and try to sign in to your bank account to determine whether you are still getting QuickBooks Error 305.

If You Are a Mozilla Firefox User

  • First of all, move to the menu tab of Firefox and hit the History option.
  • Afterward, navigate towards the Clear Recent History option, and it will represent the window with the Time Range.
  • Make sure that you have set it to everything to Clear the entire Cache and junk files.
  • Ensure you have selected the cache checkbox by clicking on the drop-down arrow next to the Details option.
  • Soon after this, hit the Clear Now tab and shut down the Firefox application.
    End the process by relaunching your browser to verify whether the issue is resolved or not.

Steps For The Users of Internet Explorer

  • In the beginning, launch the Internet Explorer on your device.
  • After this, hit the Gear icon and then choose the Safety option.
  • In the next step, pick the Delete Browsing History option and check that you have left the checkbox of Preserve Favorites Website data unmarked.
  • Thereon, mark the Temporary Internet Files checkbox and hit the Delete button followed by OK.

Final Words!!

We assure you that the above information will help you resolve QuickBooks Error 350. However, if you still need help, connect with our professionals anytime via the live chat facility. Our highly-trained professionals will assist you with stepwise instructions to resolve the issue. Otherwise, you also have the option to send the mail to the experts and get all your doubts clear within no time.

FAQ's

Ans. The users must update everything to refresh their bank or credit card account connection. There are a few banks that you have to update it after every 90 days, whereas others require an update after every 18 months. However, if the connection expires, users might encounter Error 350 in QuickBooks.

Ans. The users must perform the following steps to resolve bank error in QuickBooks.

  • Primarily, move to Bookkeeping > Transactions menu > Bank Transactions.
  • Now, pick the tile for the bank account and hit the Edit icon.
  • Following this, hit the Edit Sign-In Info and then update the details as per your requirements.

Ans. On the occurrence of QuickBooks Error 350, users won’t be able to connect with their bank account. Also, they might face issues while downloading the latest bank transactions.

Does your payroll update fail every time you try to update it, resulting in QuickBooks error 15241? If yes, continue reading this blog post till the end and find the relevant solutions to fix it. You may face further technical issues along with this error, including crashing and performance lagging of your system.

The error appears with a text message reading, “You received error 15241: The payroll update did not complete successfully.”

QuickBooks Error 15241

We understand that any glitch or delay in the payroll process due to such errors can negatively affect your business. Thus, follow this comprehensive blog and continue troubleshooting this issue.

Avoid facing potential data loss due to payroll update errors. Contact our QuickBooks experts at +1-855-603-0490 for professional assistance while solving the annoying QuickBooks payroll update error 15241.

How to Recognize QuickBooks Error 15241?

The following signs will help you recognize QuickBooks error 15241 in your system.

  • Your QuickBooks application’s unexpected and sudden crashing can be a prominent sign of error 15241.
  • You may notice your computer system’s sluggish and slow performance after the attack of this payroll update error.
  • If your QuickBooks application stops working out of the blue, it might be due to the existence of error code 15241.
  • While dealing with this error, you will notice the repeated occurrence of error messages such as, “Error 15241: The payroll update did not complete successfully.”
  • Your Windows operating system will suffer, too; the keyboard and mouse clicks won’t respond to your commands.
  • One of the most clear signs is the interruption or failure of payroll updates.

Obvious Reasons for QuickBooks Payroll Update Error 15241

Having a better understanding of the reasons behind QuickBooks payroll update error 15241 can help you rectify the error efficiently. Let’s have a look:

  • One of the most obvious reasons for facing payroll update failure is the disabled File service Copy (FSC). This service is a must-add-on one in the QuickBooks application that helps update the necessary QuickBooks. 
  • Malicious virus attacks to your system won’t let you complete the QuickBooks payroll update process successfully and results in QuickBooks payroll update error 15241. 
  • A poor and unstable internet connection can also interrupt the payroll update process. 
  • Ensure all your essential QuickBooks company data files are free of corruption or damage, or else you may face issues with the payroll update processes. 
  • The invalid Payroll Service key is another factor that leads to QuickBooks error 15241. 
  • Poor or incorrect configuration of any third-party antivirus program or Windows Firewall is also a prominent factor that triggers the QuickBooks payroll update process. 
  • If your Windows Registry is facing any internal technical glitch, it may prevent you from updating your QuickBooks payroll resulting in the error code 15241. 
  • The corrupted QuickBooks installation files or incomplete installation process of the software can also bring payroll update issues. 
  • If you mistakenly or accidentally delete the essential QuickBooks files, you get the QuickBooks error message 15241 on your screen.

Tested Solutions to Troubleshoot QuickBooks Error Code 15241

Below we have penned down a few troubleshooting strategies that professionals test to help you quickly rectify the annoying QuickBooks error code 15241. Have a careful look:

Troubleshooting Strategy 1 – Perform the System File Checker Scan

It’s an instant method to resolve payroll update errors caused by corrupted or damaged system files. Use the System File Checker by following the given directions:

  • Begin the System File Checker scan by first clicking the Windows Start menu and typing “Control Prompt” in the Search Programs and Files bar.
  • In the next step, after getting the results, make sure to not open the Control Prompt directly but after pressing the CTRL + Shift buttons on your keyboard simultaneously.
  • After this, you will see a black and blank screen with a flashing cursor. Here, you are required to enter the SFC/Scannow command.
  • Press the Enter key after typing and let the System File Checker run to solve the corrupted system files issues.
  • Once the scan is over, try to update your QuickBooks payroll again. If you still fail, try the next strategy.

Troubleshooting Strategy 2 – Enable the Required QuickBooks FCS Services

As discussed above, the disabled QuickBooks FCS Services is one of the primary causes of the QuickBooks payroll update error 15241. So, try to enable the services by performing the given steps. But do not forget to back up your QuickBooks Desktop to avoid the loss of crucial company data.

Steps to enable FCS Service in Windows XP
  • First of all, close your QuickBooks application and its related Windows running on your system.
  • In the next step, from the Desktop, you need to right-click the My Computer icon and continue to select the Manage option.
  • Here, you will find the Computer management screen where you are required to click the drop-down list of Services and Applications.
  • After this, tap the Services button and search for Intuit QuickBooks. Once you get the results, double-click the Intuit QuickBooks FCS service.
  • Now, navigate to the General Tab and continue to click the Startup Type menu to select the Manual option further.
  • Finally, click the OK button, and continue launching the QuickBooks application.
Steps to enable QuickBooks FCS in Windows 7, 8, 10, and Vista
  • Begin this procedure by first closing the QuickBooks Desktop application.
  • Now, navigate to the Desktop and right-click the My Computer wizard and choose the Manage alternative from the options list.
  • Here in the left pane, you will get the Services and Applications option; click the same, followed by double-clicking the Services option.
  • In the next step, search for the Intuit QuickBooks FCS service, and once you find it, double-click the service from the given list.
  • Now, move to the General Tab and continue to select the Startup type from the drop-down menu, and choose the Manual alternative.
  • After this, click the Apply button to apply all the above settings and changes.
  • Finally, click the Start button and select the OK option to end up with the enabled QuickBooks FCS service.

Now, try to update your QuickBooks payroll again and check the error status. If the update procedure still fails, let the next technique help you.

Troubleshooting Strategy 3 – Re-validate your QuickBooks Payroll Service Key

As mentioned earlier, the invalid QuickBooks payroll service key won’t let you complete your QuickBooks payroll update process. Let’s re-validate the QuickBooks Payroll Service key and avoid update failures.

  • The first step to start this process is to open your QuickBooks application and continue to select the Employees option from the taskbar.
  • In the next step, select the My Payroll Service key and continue to choose the Activate Service key.
  • Now, you will see the Service keys window on your screen. From this window, you are required to choose your current Payroll option.
  • After this, click the Edit option, followed by hitting the Next button continuously till you find the Finish button.
  • Hit the Finish button, and by this, your QuickBooks payroll service key will be re-validated. Now, try updating your payroll.

Troubleshooting Strategy 4 – Use the CD to Update your Payroll in Pro/Premier Versions

Updating the QuickBooks payroll in Pro/Premier version via CD can help you complete your QuickBooks payroll update successfully. Perform this procedure by following the given directions:

  • First, you need to insert your QuickBooks payroll update CD into your computer system.
  • Now, you will find the Get Payroll Updates window on your screen, access the window and continue.
  • In this window, navigate to the Employees section and select the Get Payroll Updates option.
  • After this, you need to verify the update.dat and update3.dat files in the payroll update CD. Click these files and follow the on-screen instructions for the same.
  • In the next step, you need to tab the Browse alternative and select the CD drive from the drop-down menu.
  • Here, you will notice options from the payroll update disk, including update3.dat and update.dat files.
  • Continue to this, select the Open alternative, then choose the OK button from the Payroll update window.
  • Now, move to the Windows Start menu and cease the QuickBooks desktop application. After this, navigate to the My Computer/This PC icon and right-click the CD drive.
  • You will get an Explore option, click the same, and insert the same payroll update CD into another system.
  • Check if the file opens in the other system or not. If yes, consider the issue within the original system only.
  • However, if the file is not opening on the other system as well, you need to buy a new payroll update CD by visiting the official Intuit website.
  • Once you’re done with the above directions, try to update your payroll application.

The Last Notes..!

We hope the solutions given above have helped you troubleshoot the QuickBooks error 15241. However, we understand that you may face issues while solving these errors. So, reach our experts via Live Chat Support and get professional assistance.

Frequently Asked Questions

Q. What does the File Copy Service (FCS) mean?

The File Copy Service, or FCS, is basically a crucial add-on service in the QuickBooks application. This service helps QuickBooks users transfer files during the crucial QuickBooks update procedures.

Q. What signs does the QuickBooks error code 15241 display?

You will notice the following signs:

  • Failure of QuickBooks payroll updates 
  • No response from mouse clicks and keyboard tabs
  • Sluggish running of your Windows and QuickBooks 

Q. Why am I unable to download the latest QuickBooks payroll updates?

You may face issues while downloading the QuickBooks payroll updates due to the following:

  • Insufficient system requirements 
  • Missing verification permissions 
  • Poor internet connection
  • Antivirus software problems 
  • Excessive cache data and temporary files

Related Post:-

Are you finding issues while login to Online Banking? Wondering what is the reason behind this problem? It might happen due to the occurrence of QuickBooks Error 103. Usually, the users might encounter this error while using the inappropriate User ID and password for the bank account they wish to link with. However, if you are struggling with this error, then you must stick to this post to get instant help to overcome the issue.

Don’t have any clue on how to rectify QuickBooks Error 103 and looking for immediate help? Call us at @ +1-855-603-0490 and consult with our highly-trained professionals to acquire the best possible assistance.

Indications That Will Help You Recognize QuickBooks Error 103

This section covers all the signs and symptoms that will help you determine QuickBooks Error 103.

  • The users might face difficulty while connected to their bank account due to improper login credentials.
  • Every time the user strikes with QuickBooks Error Code 103, they won’t be able to use the online banking feature.
  • You might observe the sudden freezing of your Windows operating system.
  • Moreover, the users might get an error message on their computer screen.
  • Sometimes, the users might notice the sudden crashing of your system.

Why Do the Users Face Error Code 103 QuickBooks Online?

If you are searching for the root causes that might trigger Error Code 103 QuickBooks Online, then your search ends here. Below, we have specified all the factors that are responsible for the occurrence of the error.

  • Sometimes, it may happen when you have opted for the incorrect financial institution.
  • You are entering the wrong login credentials while connecting with your bank account.
  • There is a possibility that you are not connected with a good internet connection.
  • Another reason may be the presence of .MSG file bugs.
  • In other instances, it may appear due to when the hardware facility fails to turn on.

Essential Points You Must Know Before Fixing Error 103 QuickBooks

You must consider the following points in your mind to fix Error 103 QuickBooks. This will help you in fixing the error efficiently.

  • Try login to your account using the login credentials that is linked with the QuickBooks account.
  • You must be very cautious while entering the password, as passwords are case-sensitive.
  • Check that you are using an active and uninterrupted internet connection.
  • Look whether there is bank server issues or any other problem at the bank’s end.

Once you know about the causes and symptoms of QuickBooks Online Error 103, let’s start fixing the error.

Simple Tricks To Terminate QuickBooks Bank Error 103 Effortlessly

Below, we have elaborated on the best ways to eradicate QuickBooks Bank error 103. While applying the resolution methods, you must be careful not to skip any single step. Before applying these steps, try relaunching your device and logging in to your QBO application. If it doesn’t work, move to the resolution methods below.

Alternative Way 1: Put the Bank Login Details in QuickBooks Online

Here, we have listed the proper steps to log in to your bank account in QuickBooks.

Steps Taken For Previous Connections

  • To start the process, move to the Bookkeeping option and choose Transactions, followed by Banking.
  • Next, you must pick the bank or credit card account that requires updating.
  • Now, locate and tap on the Edit icon and then tap on the Edit Sign-In Info option.
  • For instance, if your web browser fills the User ID and password automatically, remove them. Doing so, will give the surety that your web browser won’t store the old details by mistake.
  • Proceeding further, put the valid User ID and Password associated with your bank account. If you see that your bank represents a Show option, tap on it to ensure that the password is added appropriately.
  • Finally, hit the Save and Connect option to conclude the process.

Steps Taken For New Connection

  • To initiate the process, move to Bookkeeping, choose Transactions, and hit the Banking option.
  • For instance, if your linking with the account for the first time, choose the highlighted Connect Account option from the landing page. Conversely, go to Link Account if you are previously linked with an online bank account.
  • You must put your bank’s web address, like http:/www.bank.com that you have acquired from the bank’s official website. Otherwise, you can directly insert your bank name within the search field. 
  • Now, you must pick the name of your bank account from the search results.
  • If you find that your web browser auto-fills the user credentials, delete them. This will give the surety that their web browser won’t insert the old details by mistake.
  • Thereon, insert the User ID and Password of your bank account. If you see that the bank offers a Show option, tap on it to ensure that you have added the password accurately.
  • Later, hit the Continue option and proceed to the next step.
  • With this, you can now easily connect with your bank account. If you still find that you are encountering Error 103 QuickBooks Online.

Alternative Way 2:  Validate That Your Login Credentials are Accurate

Review the instructions below to validate that you have entered the correct login details.

  • To begin the process, launch a new window on your preferred web browser and access your bank’s website.
  • Now, you must write down the web address of your bank. You might find this handy later.
  • After this, put the correct User Id and Password associated with your bank account.
  • For instance, if you notice that you can login successfully, it signifies that you are using the correct User Id and password. On the other hand, if you can’t sign in to your bank account and encounter Error 103 QuickBooks. In that scenario, you must go through the instructions given on the screen to recover your user ID, password, or both of them.

Alternative Way 3: Rectify QuickBooks Bank Connection Error 103 For Self-Employed

  • In the beginning, tap on the Reconnect option that comes with the error message. You must insert the username and password accurately.
  • Afterwards, hover your cursor over the Update Sign-In Info option.
  • Thereon, you must go through the following pointers to verify the bank connection.
  • You must check that the bank’s login web page URL.
  • After this, look for the bank name using the URL that you use to login to your bank account. You must try all the possible results by deleting certain strings from the URL.
  • For instance, if you spot that the QuickBooks Online Bank Error 103 comes along with your key bank, then try signing into your bank website. Later on, look at whether the third party is interrupting using the steps below.
  • You must move to the Self-Service menu and hit the highlighted Security Center option.
  • After this, choose Business Tools and tap on the Manage Security option. Then, you can easily get third-party access.

Ending Note!!

With this, we wind up this post and hope now you can easily login to your online bank account without encountering QuickBooks Error 103. If still, any questions arise in your mind regarding this issue, you are free to consult with our professionals through the live chat facility. Our professionals will guide you with useful tips to overcome the issue immediately. Otherwise, you can also send a mail to our experts explaining your query to get a proper resolution.

Frequently Asked Questions (FAQ’s)

Q1. What do you mean by Error 103 in QuickBooks Online?

Ans. Error 103 in QuickBooks Online represents that you are not using the proper login credentials. As a result, your financial institution stops processing your login request and prompts you to verify your login details.

Q2. How Can I overcome a bank connection issue in QuickBooks?

Ans. If you find that the bank is linked partially, move to Bookkeeping, click Transactions, and then choose the Bank Transaction option. After this, you must pick the affected bank account and disconnect it using the pencil icon. At last, you must try to reconnect to your bank account and verify if the issue is fixed.

Q3. What should you do to rectify the bank errors in QuickBooks?

Ans. To resolve the bank errors in QuickBooks, have a glimpse at the pointers below.

  • You must run a manual update on your bank account.
  • Check that you can login to your bank account using the URL provided by your financial institution.
  • Review the messages, alerts, and notifications you got from your bank, signifying that something is not working properly.
  • If all these steps don’t help you, wait for at least one day so that the issues are resolved on the bank’s end.

Q4.  What would happen on the occurrence of QuickBooks Error 103?

Ans.  Whenever the user encounter QuickBooks Error 103, they won’t be able to login to an online bank account in QBO. Thus, it obstructs the users from making any online payments which might affect the ongoing task.

Also Read:-

Posts pagination