Archives

Home > Blogs > 2023 > May

QuickBooks Payroll service helps users handle their business payroll processes. You can calculate and initiate payments and file taxes using this excellent service. However, when updating payroll service in the program, a perplexing QuickBooks error 12152 can come into vision. You can get this error when downloading the latest updates for the QuickBooks payroll service.

When QuickBooks fails to do so, some other issues are also experienced in the program. You won’t be able to run payrolls accurately. A weak connection to the server is the most apparent factor behind the evolution of this error. The error 12152 can be resolved with a few simple solutions. However, if you don’t know the right procedure to fix it, the troubleshooting can give you a severe headache. Worry not! We have covered it all for you in this post; just follow it until the end.

Why Does Payroll Update Fail, Giving QuickBooks Error 12152 Desktop?

If you are clueless about the error, let’s discuss the root causes that can provoke the QuickBooks update 12152 error:

  • An outdated version of the QuickBooks desktop application can be the primary reason for payroll error 12152 in QuickBooks.
  • Sudden power failures can shut down the PC, which may lead to an error.
  • QuickBooks installation files need to be downloaded properly on your device.
  • Unstable or poor internet connection preventing QuickBooks from connecting to the server.
  • When your device is affected by the virus, or there is a threat of a malware attack.
  • Windows registry files are damaged or corrupted on your device, required for the update process.
  • Missing QuickBooks files may also cause the QuickBooks error 12152.
  • QuickBooks desktop software is unable to find the licensing information.

These are the possible reasons a user may face QuickBooks payroll update error 12152 on their device.

Signs & Symptoms of QuickBooks Error 12152 Payroll Update Error

If you are facing any of the below-mentioned signs or symptoms, it indicates that your device is affected by QuickBooks update error 12152. Some common symptoms are:

  • QuickBooks desktop application is not working/ opening, which is not a common scenario.
  • Your PC shut down suddenly without showing any prior sign.
  • A pop-up window display message appears on the screen, reflecting error code 12152.
  • PC’s screen is frequently hanging and freezing now and then.
  • The mouse and keyword inputs don’t receive prompt responses from the system.

Solutions To Fix QuickBooks Payroll Update Error 12152

After having detailed information with the list of possible reasons for the error, along with the symptoms, we can now move to the troubleshooting methods. Let’s take a brief look at some of the tried and tested solutions that you can execute to fix QuickBooks error 12152:

Solution 1. Verify Date and Timing Settings

The first solution to fix QuickBooks payroll update error 12152 is to check your device’s date and timing settings. Incorrect settings can lead to the occurrence of the error. So, here are the steps that you can follow to check the date and timing settings on your device:

  • First, ensure that your device’s date and timing settings are correct.
  • In case you find that any detail is incorrect, then put the cursor at the time and then right-click on it.
  • After that, you must click on the “Change Date and Time” option.
  • Then, change the date and timings per your region, and click on the “OK” option.

Once you are done with the above steps, restart the QuickBooks desktop application. Moreover, check whether the error code 12152 has been resolved or not. If not, you will need to move to the next solution.

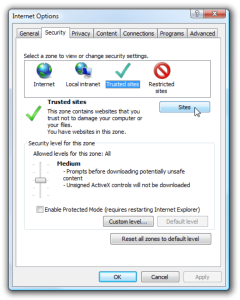
Solution 2. Restore the Internet Settings Option on Your System

You are here; it means the QuickBooks error 12152 is not resolved. Therefore, let’s take a look at the steps that you can use to configure or restore internet settings on your device:

  • First, press and hold the “Windows + R” keys together on your device to open the Windows run command on your device.
  • Moving ahead, you have to type “Control Panel” in the search box and then click on the “OK” option.
  • As the control panel window appears on your screen, click on the search bar option and type “Internet options.”
  • Now, the Internet properties pop-up box will appear on your screen.
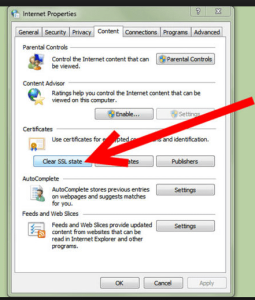
  • Here, switch to the “Advanced” tab settings and click on the “Restore Advanced Settings” option.
  • Once you are done with the above steps, click on the “OK” option and wait a few minutes to revert to the internet settings option.
  • At last, restart your PC and launch the QuickBooks desktop application to check whether the QuickBooks error code 12152 has been eliminated.

Solution 3. Run QuickBooks Clean Install Tool

QuickBooks clean install tool is an in-built tool inside the QuickBooks tool hub, which helps to fix the installation issues with the software. To run the QuickBooks clean install tool on your device, given below are the steps that you need to implement:

  • First, launch the control panel on your device and move to the “Programs and Features” window.
  • Thereon, click on the “Uninstall a Program” option and then select the “Next” option to view a prompt asking to choose between Repair and Remove.
  • Moving ahead, click on the “Remove” option and follow the on-screen instructions.
  • Now, navigate to Intuit’s official website and download the latest version of QuickBooks Tool Hub.
  • After the downloading ends, double-click on the downloaded file and follow the on-screen instructions to install it.
  • Thereon, launch the QuickBooks tool hub application on your device and then click on the “Installation Issues” option available at the left side menu screen.
  • Click the “QuickBooks Clean Install Tool“ option, and the diagnosing process will commence on your device.
  • As the diagnosing process ends, update the QuickBooks desktop application to the latest release, and then check whether the QuickBooks error code 12152 has been resolved.

If this method does not help you eliminate the error, move forward with the procedure below.

Solution 4. Change/Revise Registry Editor Extension

An invalid Windows registry can lead to various technical issues in the system, and error code 12152 QuickBooks is among them. So, here are the steps that you can execute to modify the registry editor extension on your device:

  • Firstly, you must open the Windows run command on your device by pressing the “Windows + R” keys together.
  • Thereon, you have to type “cmd” in the search box. Note: Make sure not to press the enter button.
  • After that, the permission dialogue box will appear on your screen.
  • Here, you have to click on the “Yes” option.
  • Moving ahead, a blank black window with a blinking cursor will open on your screen.
  • You must type “Regedit” and then hit the enter button.
  • Thereon, you must search for a related key with QuickBooks error code 12152 in the registry editor windows such as Google Chrome, Internet Explorer, etc.
  • Afterward, move to the “File” menu and click on the “Export” option.
  • After the previous steps, save the Google Chrome or Internet Explorer backup key in a folder, and then provide a file to the name.
  • Select the required branch, and click on the “Save” option.
  • At last, ensure that the file is stored in the desired path location with the .reg extension.

Solution 5. Restore Your Computer to the Previous Mode

If you have recently updated your PC’s window to the latest release, then there are chances that some bugs may enter your device. The best way to deal with these small bugs is to restore the older version on your PC. Given below are the steps that you can execute to restore your PC to the previous mode:

  • First of all, log in to your computer with administrative rights.
  • Secondly, you have to click on the “Windows” icon and navigate to the “All Programs” option.
  • After that, navigate to the “Accessories” section and move to the “System Tools” option.
  • Now, select the “System Restore” option.
  • In this next step, a prompt window will appear on the screen, and then you have to select the “Restore my computer to an earlier time” option.
  • Then click on the “Next” option and select the location/ point/ folder where you want to restore the version.
  • Confirm the restoration request by clicking on the “Next” option.
  • Again, click on the “Next” option and permit the program to complete the process.
  • Finally, once you are done with the above steps, check whether the QuickBooks error code 12152 has been fixed or not.

Ending Note!

We hope you find this blog useful. This blog has covered five tried and tested solutions you can execute to resolve QuickBooks error 12152: payroll update. If you need a different method than the methods mentioned above, and if you still face the error, you can get in touch with QuickBooks experts. Our QuickBooks specialists are available 24/7 at the help desk to provide the best feasible solution for your query.

FAQ’s

Q1. What is the main cause of QuickBooks Payroll Update Error 12152?

Ans. The possible causes that might give rise to QuickBooks Payroll update error 12152?

  • You might be using an invalid or expired QuickBooks payroll subscription.
  • There might be the possibility that you are using invalid security certificate.
  • You are not connected with a proper internet network connection.
Q2. What are the key points you know before fixing QuickBooks Error Code 12152?

Ans. Below, we have stated the following points that you must know before fixing QuickBooks Error Code 12152.

  • Review that you are accessing the valid subscription of QuickBooks payroll.
  • You are using the supported version of QuickBooks on your device.
  • Check that you are linked with a proper internet connection.
Q3. What do you mean by QuickBooks Error 12152?

Ans. The users might get stuck with QuickBooks Error 12152 when you are not using the active payroll subscription. On the occurrence of the error, users fails to update the payroll and thus interrupt the payroll-related tasks.

Q4. What should you do to resolve Error Code 12152 in QuickBooks?

Ans. Here, we have listed some resolution methods to overcome Error Code 12152 in QuickBooks.

  • Rectify the Internet Settings of your Device.
  • Perform the Clean Installation of QuickBooks Desktop.
  • Try to Restore Your Device to the Previous Mode.
Q5. What would happen on the occurrence of QuickBooks Update Error 12152?

Ans. Whenever the user confronts QuickBooks Update Error 12152 you won’t be able to install the newly launched payroll updates. Thus, it will stops the users from preparing paychecks, which eventually leads to delays in paying employees.

What’s more disturbing than facing an update error while downloading the latest software releases? Well, nothing, right? We understand how disturbing it is for the daily QuickBooks users to face update issues like QuickBooks error 12002 at the time of payroll update. It’s quite essential to get ready with all the latest updates while managing payroll operations using QuickBooks. But, such errors occur and hamper the entire workflow. Are you the victim, too? If yes, find the reliable solutions to fix the issue in this post. 

Hey! Does QuickBooks glitches like error code 12002 hamper your payroll update process? It’s better not to overlook such issues and immediately connect with the QuickBooks support team. Dial 1-855-603-0490. 

QuickBooks Error 12002 – What Message Users Face? 

Whenever you face a glitch or fluctuation while updating your QuickBooks Payroll application due to the QuickBooks error 12002, you will get a triggering warning error message. The following is the same text that appears on the user’s screen: 

“Error 12002: A network timeout that is preventing QuickBooks from accessing the server. Solution: Check your internet connection setup in QuickBooks from the Help>Internet Connection Setup menu selection. Verify that your connection is set to use your computer’s internet connection.”

How Does the Error 12002 QuickBooks Affect User’s Operations? 

Well, whatever QuickBooks error occurs, eventually, users have to face its consequences, affecting the entire workflow of the company’s management. Similarly, the error 12002 QuickBooks occurs and disturbs the entire payroll operations. This also prevents users from accessing the new and advanced payroll features and encountering delays in the workflow due to outdated payroll programs and whatnot. Thus, it’s better not to ignore such stubborn and threatening errors and immediately take action. But let’s first have a look at the factors that mainly trigger such update glitches in QuickBooks. 

Hey! Looking for the Reasons Behind QuickBooks Error Code 12002? 

Below, we have listed all the primary causes of the annoying and disturbing QuickBooks error code 12002. Take a look and notice how this issue has taken place in your application. 

  1. Incorrect configuration of the internet settings is one of the most prominent reasons for facing payroll update errors in QuickBooks. 
  2. Sometimes, the anti-virus or any third-party security software also blocks access to QuickBooks services, including payroll. Eventually, users have to encounter error code 12002 in QuickBooks. 
  3. Do you know a corrupted QuickBooks software installation can also invite payroll update glitches? Well, yes. You may be facing QuickBooks error 12002 if your software installation is damaged or corrupted. 
  4. Facing internet connection issues? If yes, fix them out. The poor internet connection is also a major reason for facing QuickBooks payroll update issues. 
  5. Make sure your default internet browser is Internet Explorer. Why? It’s because any other internet browser, if set as default, may interrupt you from downloading the latest QuickBooks payroll updates. 
  6. Any idea about SSL settings? If these settings are incorrect in your computer system, the download process of the latest payroll updates won’t be successful.
  7. Network timeout is one of the most evident factors responsible for triggering QuickBooks issues like error 12002 QuickBooks. 

Did you get all the factors that may trigger the payroll update glitch in your QuickBooks application? If yes, let’s begin with the troubleshooting guide. But wait! Firstly, have a look at the considerations you better not ignore before fixing the error. 

Consider the Following Things Before Fixing QuickBooks Errors 12002

Before you take any step ahead to fix the payroll update error 12002 in QuickBooks, make sure to consider the enlisted things. It will further help you in seamless troubleshooting of the error.

  • Create a backup file for your company data file. 
  • Ensure your internet network connection is steady and strong. 
  • Run the updated Windows Operating System and avoid compatibility issues. 
  • Access a secure website like a financial institution page outside your QuickBooks Desktop. 

Solution Guide to Eliminate QuickBooks Payroll Update Error 12002

Finally, it’s time to root out the error using the solutions given in this section. Follow each instruction carefully to eliminate the annoying QuickBooks payroll update error 12002 seamlessly. 

Troubleshooting Procedure 1 – Verify the Internet Connection 

As discussed above, the issues with your internet connection can prominently bring QuickBooks payroll update errors. So, verify your internet connection. For this:

  • Firstly, open your QuickBooks Application and hit the Help tab. 
  • Now, navigate to the Internet Connection tab and verify that your internet connection is proper. 
  • If it’s properly fixed, tap the Next button and hit the Done option. 
  • Finally, try to update your QuickBooks payroll and check whether the error 12002 QuickBooks is still interrupting you. If yes, proceed to the next solution. 

Troubleshooting Procedure 2 – Issues with Outdated Chrome Browser? Update Now! 

Yes, an outdated Chrome browser can also lead to interruptions during the payroll update process. So, follow the given procedure and update your Chrome:

  1. Begin this procedure by first opening your Chrome Browser
  2. From the top menu, hit the More option. 
  3. In the next step, hit the Update Google Chrome alternative. 
  4. Here, you’re asked to wait for a while till your Chrome Browser is updating. 
  5. Done? Now, end the process and click the Relaunch button. Move to the next solution if the error still persists. 

Troubleshooting Procedure 3 – Install QuickBooks in the Selective Startup Mode 

The corrupted installation also gives rise to issues like QuickBooks payroll update errors. Thus, follow the given procedure to install QuickBooks in Selective Startup Mode correctly:

  1. Firstly, press the Windows + R buttons on your keyboard and open the Run Window. 
  2. Herein, type “MsConfignd,” and correspondingly, hit the Enter key. Now, click the Selective Startup option and the Load System services from the general tab as well. 
  3. After this, move to the Services tab and select Hide all Microsoft Services. Continue, and select Disable all alternatives. 
  4. In the next option, remove the tick marks from the Hide all Microsoft Services checkbox. 
  5. Choose the Windows Installer checkbox from the number of services given. Hit the OK button and navigate to the system configuration window. 
  6. Done up to this? Now, perform a clean installation of your QuickBooks software and restart your computer system. 
  7. Again, open the Run window and type MsConfig. Click the OK button, and select the Normal Startup option from the particular General Tab. 
  8. Finally, restart your system again and check whether the QuickBooks payroll error 12002 has been resolved or not.
Let’s Wrap Up the Whole Story! 

So, by the end of this well-detailed blog post, we hope you have learned everything related to the QuickBooks error 12002. Did you? It’s OK if you still have any confusion. Our team is there to help you professionally! In case the solutions given above fail to troubleshoot the error or you need further help, connect with us. Our certified QuickBooks technicians, via the available Live Chat Support option, will assist you with effective resolution strategies. 

FAQ’s

Question 1 – What to do before troubleshooting QuickBooks error 12002? 

A1: Before you begin troubleshooting the QuickBooks error code 12002, you must create a backup file of your company data. 

Question 2 – What methods can help me fix the payroll error 12002 in QuickBooks? 

A2: The following methods can help users get rid of the payroll error 12002 in QuickBooks: 

  • Update your Google Chrome Browser
  • Install QuickBooks in the Selective Startup Mode 
  • Set Internet Explorer as Default browser
  • Correct the configuration of Internet Explorer settings. 
Question 3 – How can I reach out to the QuickBooks expert team for further help regarding the QuickBooks payroll update errors? 

A3: You are free to call our professional QuickBooks team at 1-855-603-0490 for further inquiry. Also, you can access the Live Chat Support option and get immediate assistance to resolve the QuickBooks payroll update errors. 

QuickBooks is one of the most advanced and well-favored software. It is loved by millions of people because of its top-notch features. But with all the features, there are a few errors, as well, that QuickBooks User faces; one of them is QuickBooks Unexpected Error 5. This Error arises when the QuickBooks Data Base Service user can’t access their Company File from its location. If you are also among such users, who are stuck with this Error, read this blog to find the Apt Solution.

Are you facing Trouble while rectifying QuickBooks Error 5? If yes, then dial @, and get your Solution immediately.

What is QuickBooks Unexpected Error 5?

Whenever a user encounters this Error, an alert message will come up on your screen that says:

“Got unexpected error 5 is a call to NetShareGetInfo for Path.”

It affects the different versions of QuickBooks software as well, including the QuickBooks POS. You may experience this Error while installing the POS hardware, using the company file in a multi-user mode, or opening the QuickBooks function.

What are the causes that evoke QuickBooks Unexpected Error 5?

In this section of the blog, we have mentioned all the reasons that terrify QuickBooks Error Code 5 in your System. Once you know the reasons, it will be easier for you to troubleshoot the Error effortlessly.

  • Your Company Data file is damaged.
  • You might be using an outdated version of the QuickBooks Software.
  • There must be viruses or malware present in your System.
  • .ND (Network Data) file might be corrupted.
  • There might be an interval between the workstation and your Company File due to network issues.
  • You might not have enough permission to utilize the specific company File in the Multi-user mode.
  • In case the System file or registry entry is deleted.
  • If the System is forced to shut down.

What is the Procedure to Fix QuickBooks Unexpected Error 5?

Now, let’s move ahead and see how you can rectify QuickBooks Error 5 efficiently in just a few steps:

1st Method: Remove and Recreate QuickBooks Company File User

To remove and recreate the users account, follow the instructions given below:

Remove the User

  • Firstly, open the QuickBooks Software and head to the Company section.
  • Next, you have to choose the Users.
  • Moving ahead, select the Setup Users and Roles option.
  • Now, choose the User from the user list, and lastly, hit ok for the Confirmation.

After removing the users, you have to re-create a new user; this will help you in rectifying the Unexpected Error 5 in QuickBooks.

Re-create the User

  • Choose the Users and Roles button.
  • Thereon, create a new Username for the New User.
  • After that, create a New Password and confirm it again.
  • Lastly, establish the Roles for the User, and hit the Ok Button.

2nd Method: Disable the User Account Control on Windows

User Account Control is a feature that helps you by restricting unknown changes to your Windows Operating System. Sometimes, it can also stop you from using the company file. Thus you have to disable it for a few moments to access the Company File.

  • Begin the process by selecting the Start button and choosing the Control Panel.
  • Thereon, look for the User Account from the search bar and click it.
  • Next, you have to tap on the Change User Account Control Settings.
  • Hit on Yes, and move the slider button to the Never notify end.
  • Select Ok and restart your Window.
  • Now, rerun QuickBooks and check if the Error is resolved.

Note: In case error 5 in QuickBooks is fixed now, then ensure to Enable the UAC on your Windows.

3rd Method: Fix the Damaged Company and .ND File with the help of File Doctor

Alternatively, you can also use the QuickBooks File Doctor to resolve the QuickBooks unexpected Error 5.

  • Initially, install the QuickBooks Tool Hub.

Note: The QuickBooks user who has a 2020 or later version of the software can simply go to the Tool Hub download page by hitting the QuickBooks Tool Hub option, present in the Help tab. However, if you can’t find it in the Help box, then look for it online by going to the official website of Intuit. Once you find Tool Hub, download it.

  • After downloading, look for the setup file named QuickBoosToolHub.exe and install it in your System.
  • Now, follow the on-screen information to complete the installation process. After installing, open the QuickBooks Tool Hub.
  • Now, head to the Company File Issues option, and hit on the QuickBooks File Doctor to initiate the file repair process.
  • Now, look for the Company File, and once you find it, select it.
  • Tap on the Check your File tab, and then click on the Continue button.
  • QuickBooks File Doctor will now do your work; it will find the issue in the Company File on its own and repair it as well.

4th Method: Provide the File Share Access

Error 5 in QuickBooks can also appear if the file share for the Company File is disabled. Thus enable it by following the given steps:

  • Firstly, Open File Explorer.
  • Thereafter, right-click on the folder wherever it is saved.
  • Now, choose the Properties button, followed by Sharing tab.
  • Next, you have to select partial or full sharing according to your Business needs.
  • Lastly, select the Apply button and tap on the Ok tab.
5th Method: Download the Reimage Repair Tool

Reimage is an online System repair tool that rectifies all the known errors a Computer faces.

  1. In the beginning, download the reimage repair tool and save it on the desktop.
  2. Thereafter, navigate to the file location, click on the File, and hit Yes on the prompt.
  3. Now, do the Automatic Scan.
  4. Unmark the checkbox, then select the install button; the tool will now get scanned on its own.
  5. Now, you have to start the repair process.
  6. At Last, relaunch QuickBooks and check if the Unexpected Error 5 is resolved.
6th Method: Get the latest version of QuickBooks POS 

Another thing you can do to resolve Error 5 in QuickBooks is to update the QuickBooks Point of Sale to its latest version. 

  1. At First, Sign in to your point of Sale System as an Administrator and head to the Help option.
  2. Now go to Software Update and choose the Updater Preference.
  3. Tap on the General tab, and choose the Auto Download Updates Button.
    Note: You can also opt for the Notify Me button to get all the latest notifications regarding the updates.
  4. End the process by hitting the Ok tab.
7th Method: Delete and Install the QuickBooks Desktop

If none of the above processes works in your favor, then you might have to delete and reinstall the QuickBooks Desktop from your System.

  1. Open the Run dialog box by pressing the Windows+R button.
  2. In the search box of the Run box, enter appwiz.cpl.
  3. Now, once the Window is open, there you have to look for QuickBooks.
  4. Once you are in it, double-click on it, and select the delete button to remove QuickBooks and its features.
  5. Now, go to Inuit’s official website, and download the QuickBooks program again.
  6. Once it is downloaded, go to the File and install it properly by following the on-screen prompt.

Bottom Line!

We hope this blog will help you in rectifying the QuickBooks Unexpected Error. However, if you get stuck in some process while fixing the issue, you can get help from our QuickBooks professionals using the live chat button. Moreover, you also have the option to email us all your Queries and get a proper solution in the shortest time possible.

Frequently Asked Questions!

Question 1: How to Delete a User if you want to fix QuickBooks Unexpected Error 5 Call Netsharegetinfopath?
Answer:
If you want to resolve the Error by deleting a user, check the steps given below:

  1. Open QuickBooks Desktop and head to the Company tab.
  2. Open it, and tap on the Users option.
  3. Next, you have to select the Setup Users and Roles button.
  4. Now, click on the User you want to delete from your List.
  5. Finally, tap on the Ok button and confirm the process.

Question 2: Is it possible to fix an Unexpected error 5 in QuickBooks using File Doctor Tool?
Answer:
QuickBooks File Doctor tool will help you in fixing the Error effortlessly. You just have to follow a few instructions, and you are done.

  1. Begin the process by downloading and installing the File Doctor Tool in your System.
  2. Thereafter, Run the Tool in the System.
  3. Now, Scan all the files and folders to find the Error.
  4. Once the file doctor tool finds the Error, it will repair it.
  5. Lastly, when the process is complete, the Tool will look for the Error again.

No doubt, QuickBooks is one of the most powerful accounting software used by SMEs to track their financial health. However, the robust accounting software is also prone to errors. One such error that users are facing while using the software is the QuickBooks script error. The most perplexing QuickBooks bug happens when a user attempts to access a website from the QuickBooks 2016 application running on Windows 7, 8, or 10. This is the most confusing error as it shows no early symptoms or signs. The users frustrate when they receive QuickBooks script errors, as it is not easy to find the root cause of the error.

If you, too, are getting the annoying QuickBooks script error code and are looking for simple resolving methods, then this blog is meant for you. Before proceeding to the troubleshooting methods, let us first have a look at what this error means, and what are its root causes. This blog focuses on same. Let us read the entire blog and find out the most suitable error solving method.

Got Frustrated By QuickBooks Script Error? Call Our Experts Now @1855-603-0490 and Get It Fixed Immediately.

QuickBooks Script Error Message

What is QuickBooks Script Error

Script error occurs at the time of opening a company’s file. By its default settings, QuickBooks always use the Internet Explorer web browser to connect to the internet. In that meantime, if the JavaScript or VB Script is not installed properly or has installation issues, then the QuickBooks Script Error can occur with a popup display message: QuickBooks Script Error: Unable to Get Property Length of Undefined or Null Reference.”In addition to impairing QuickBooks programme performance, script errors on your computer may also cause problems with your browser and the internet.

Though QuickBooks Script Errors never damage your crucial data or break the file; however, it is important to resolve the error immediately. In order to pick the right solution, you must first know the possible reasons that triggers the error.

Read Also – How To Uninstall QuickBooks

Factors that Trigger QuickBooks Script Error

There are numerous reasons that trigger QuickBooks Script error and interrupt your on going work. Though, some of the most common yet prominent reasons that shoot QuickBooks script errors are listed below:

  • Script processing function is either disabled or blocked.
  • Your PC is attacked by a virus or malware.
  • Unwanted changes in the scripts.
  • Script plugin or software is damaged or corrupted.
  • PC’s window is damaged
  • Online downloaded data is not automatically syncing with the script software.
  • Script debugging feature is disabled.
  • The file which you are trying to open is damaged.
  • The cache browser folder is full or corrupted.
  • The third party or a window firewall is blocking the proper functioning of the script.
  • There is a possibility of damaged QuickBooks data files.

What are the Common signs and Symptoms to Identify QuickBooks Script Errors?

Although we have mentioned that there are no early signs or symptoms, however, some signs are reported by QuickBooks users. Here are some signs or elements that users may experience as a result of a QuickBooks script problem if you want to determine whether your system is affected or not.

  • Internet Explorer is not working properly or is responding slowly to the requests.
  • QuickBooks online activities are prohibited.
  • Facing difficulties in the navigation to the features in QuickBooks.
  • Not able to download or install the latest version of QuickBooks software.
  • Frequent popup messages regarding the error on the screen.
  • Not able to traverse the screens while using the QuickBooks.

Steps To Fix QuickBooks Script Errors

After getting all the information about the script error in QuickBooks, now, let’s discuss the methods to fix the QuickBooks script errors. Just follow the below-mentioned steps and get rid of the problem of facing QuickBooks script errors.

Before starting the QuickBooks script errors solution, please make sure to turn off the notification of every script error in internet explorer 7, 8, 9.

Solution 1: Deleting cache and history of Internet Explorer

Before you start any time-consuming process of solving the error, first, you must try to clear the cache and history of the browser. Sometimes, when the browser is full with unwanted cache, then it might show some errors to its users. So, here are the steps that you can follow to clear the cache on your internet explorer.

  1. Open internet explorer.
  2. Now, click on the tools option.
  3. Then, click on “Internet options” and then “General Tab”.
  4. Now, click on the “Delete Browsing History”. You can also go directly to this page by pressing the “Ctrl + Shift + Del” keys together.
  5. Then, on the history page, select all the options and then click on the “Delete” option. After this, all the history, cookies, and cache will be deleted in Internet explorer.

Solution 2: Turning off the Add-Ons feature in the Internet Explorer

  1. First, open internet explorer
  2. Go to the tools section.
  3. Then, click on the internet options, and there, search for the “Manage Add-Ones” option and click on that.
  4. At last, select the “disable” option from the bottom side of the screen.

Now, you have successfully turned off the Add-one’s feature. This method will definitely help you to solve the problem. If the problem still continues, then don’t bother and follow the last solution.

Solution 3: Uninstall the ActiveX file in Internet Explorer

  • Go to the settings page.
  • After that, check all the installed ActiveX files in your system.
  • After that, you have to search for that name starting with qboax such as qboax11 or qboax11.dll.
  • Then, at Last, close all the running windows or pages in your Windows Explorer, and then finally, delete all the located files available in your system.

Once, you have deleted the ActiveX files from your internet explorer, then again relaunch the QuickBooks software, and perform that task in which you were facing the Script error. At this stage, the QuickBooks Script error will be solved.

Method 4: Run Internet Explorer in Compatible View

Follow the below mentioned steps to run the internet Explorer in the compatible view.

  • Open the internet explorer and click on the three dots available at the top right corner.
  • Pick the tools option and open the compatible view settings.

Compatibility View Settings

  • Put a tick in the box to the left of “Display all settings in compatible view.”
  • Click the “Save” button to make the changes in the Internet Explorer..
Method 5: Clear SSL certificates from Internet Explorer

The steps to remove the SSL certificates from internet explorer are as follows:

  • Click the gear icon in Internet Explorer once it is open.
  • Choose the internet options.
  • In the internet options, choose the tab “Content”.
  • Now, click on clear SSL state option, available under the content tab.

Clear SSL Certificate

  • Click the “OK” button to save the modifications.
Method 6: Set Internet Explorer as Default Browser

You can remove the problem by setting the internet explorer as your default browser. Go through the below-mentioned steps to set internet explorer as your default browser.

Set Default Browser

  • Open internet explorer.
    Click on the gear icon, settings tab, and then open the internet options tab.
  • In the internet options, choose the programs tab.
  • Now, click on the “Make default” option available under the programs option.
Method 7: Add Intuit as a Trusted Site

Adding Intuit as a trusted site will solve your problem. To accomplish the same thing, take the following actions:

  • Open the internet explorer settings and navigate to the tools sections.
  • After that, navigate to the security tab.
  • In the security tab, go to the sites tab and pick the trusted sites.

Add Intuit Trusted Sites

  • In this, add Intuit as a trusted site.
  • Follow the instructions for QuickBooks.
  • Close the trusted site window.
  • In the custom sections, go to the miscellaneous and enable the cross-domain platform.
  • To save changes, click “OK”.
Method 8: Disable the script notification error

You can solve the problem by disabling the script notification error in the browser settings. Follow these simple steps to do the same.

  • Open the IE and click on the gear button to open the settings.
  • Now, choose the tool options, followed by internet options.
  • Click on the advanced settings available under the internet options and uncheck the “Display a notification about every script error”.
  • Press the OK button to save the changes.
Step 9: Repair the QuickBooks Data File

If you are having a problem with QuickBooks, you can repair it with the help of QuickBooks file Doctor. To do the same, you have to go to the official website of QuickBooks and download the QuickBooks doctor from there. Run it after installing it on your computer. It will automatically fix the issue if there is any.

We have tried to accumulate all the possible methods to troubleshoot the QuickBooks Script error.

Read Also : QuickBooks Error PS077

Summary

Facing errors while using the QuickBooks software is very frequent. Whenever you face any error in QuickBooks, there is no need to be panic about it. In this article, we have mentioned all the necessary information about QuickBooks, the Script error, and the methods to get the problem resolved. You can use any of the above methods to get rid of the error. If you are still facing the error, don’t hesitate to get in touch with our assistance team. They are happy to help you.

Frequently Asked Questions (FAQ’s)

Q1. What error messages display on the emergence of QuickBooks Script Error?

Ans. There are different error messages that users might observe on the arrival of QuickBooks script error, which are as follows:

  • “A script on this page is causing your browser to run slowly”. 
  • “The error has occurred in the script of this page”.
  • An error has occurred on the script of this page line: 7 Char: 561 Error: Unable to Get Property Length of Undefined or Null Reference Code: 0”. 

Q2. What should I do if a QuickBooks script error evokes during the import process?

Ans. If the QuickBooks script error appears during the import process, apply the following steps. 

  • Launch the Internet Explorer on your device.
  • After this, look for the Tools button and tap on the Internet Options.
  • If you won’t be able to find the Table option, hit the Alt button. 
  • Consequently, it will show the Hidden option. 
  • Click on Discovered Advanced option and remove the notification related to script error. 
  • At last, hit the OK button to conclude the process. 

Q3. How can you fix the script error while an export process in QuickBooks?

Ans. To fix the script error that occurs while exporting in QuickBooks, use the steps below. 

  • Initially, click the Tools option from the right side of your browser.
  • After this, go to Safety & Security > Delete History.
  • You must choose the checkbox next to “Cookies and Website Data” and hit the Delete option.
  • Wait until it removes all the browsing history and exits from the internet browser. 

Q4. What do you mean by script error in QuickBooks?

Ans. The script error in QuickBooks specifies that the command is not executing properly. In other instances, it mainly triggers when your QuickBooks is exchanging the information with the webpage, and JavaScript creates some issues. 

Posts pagination