Author: admin

Home > Articles by: admin

QuickBooks is an excellent accounting software that enables its users to handle their business accounting and bank accounts efficiently. You can Download Bank Statements to QuickBooks directly to the program and save time and effort. Downloading transactions in QuickBooks helps you track the income and expenses of your business.

Besides, you can make comprehensive reports on profit and loss statements. If you are digging the web to learn how to download bank statements to QuickBooks, then you have landed at the right place. Here is an informative guide on how you can download bank statements to QuickBooks and ensure the accuracy of your business accounting transactions. Let’s go.

Need professional’s assistance in downloading your bank feed transactions to QuickBooks? Give us a call @ +1-855-603-0490.

Why Is It Required To Download Bank Feed Transactions To QuickBooks?

QuickBooks banking feature allows users to download their banking transactions to the program and save it here for at least 90 days. Also, you can track your income and expenses for your business when you have a dedicated bank account for QuickBooks.

Once the transactions are moved to QuickBooks, accept them in your record books and then make sure that there is no discrepancy in them. Reconciling bank transactions is the best way to ensure that your accounts are accurate.

Points You Need To Stick To When Downloading Bank Transactions To QuickBooks

When moving bank transactions to QuickBooks, you need to consider a few essential points that are listed for you below:

  • Before you proceed any further with the download or update, you need to create a backup for your data file. It will safeguard your data from loss or disruption.
  • You may also reach out to your bank or financial institution and ask them if they can do it.
  • Make sure that you are using the latest version of the QuickBooks application to carry out this task efficiently.

Also Read – How to Delete Transactions in QuickBooks

Procedure To Download Bank Feed Transactions in QuickBooks Application

There are two main procedures in QuickBooks to accomplish the download task. The first one is WebConnect, and the other is DirectConnect. Both of these methods use CSV import. You can use these methods to move transaction flow into QuickBooks. Furthermore, you can also get it done manually.

First Procedure: Bank Feed Transaction Import Using WebConnect 

This method allows you to connect with your financial institution using WebConnect. You will need to run the program on your default web browser. Below are the ways to get the job done:

Inside QuickBooks Desktop Application

  • From within the QuickBooks application, open your bank account.
  • Thereafter, go to the Bank Feeds Center section and then choose your bank account.
  • Moving ahead, click on the Download Transactions button.
  • Once done, a QuickBooks Program Window will show up wherein you need to enter your ID or password to get it done.

Outside The QuickBooks Desktop Application

  • Open your default Internet browser and pay a visit to your bank’s legit website outside the QuickBooks application.
  • After that, log into your ledger by entering your email, password, or code word. Make sure that you have filled these areas accurately.
  • Moving ahead, download the online transaction activities via .QBO or QuickBooks Web Connect file.
  • In the end, import .QBO (WebConnect) file to finish this procedure.

In this method, users can download bank statements to QuickBooks using WebConnect. Alternatively, there is a different method to do it (DirectConnect).

Second Procedure: Bank Transaction Download Using DirectConnect 

While using the second procedure, you need to be careful about a few things. Below are a few important considerations you should follow carefully:

  • This method will access the maximum number of transactions. Therefore, downloading the most recent transactions can be a more suitable way to do it. You may delete the remaining transactions by eliminating the statement.
  • Keep in mind that DirectConnet will not be able to download previous bank transactions.
  • You can’t download your bank feed transactions again after deleting a downloaded statement.

Steps To Download Transactions With DirectConnect

Below is how to download bank statements to QuickBooks using DirectConnect:

  • First things first, go to the Banking menu and then follow this given series of actions –
  • Select Bank Feed, then select Feeds and finally Banking Center.
  • Now from within the bank account list, select a record you want to edit.
  • Using the drop-down menu, delete and modify the records when required.
  • Once done, click the Download transactions option.
  • Moreover, you can also synchronize the account by clicking on the “Sync this record” option.
  • Alternatively, you may choose the “Sync all for this bank” option if you want to download transactions for all your accounts at the same bank.
  • Now type in your password in the “Access to” window to connect to your bank.
  • Finally, click the OK button to complete the bank feed transaction download.

Also see – Fix QuickBooks Gmail Not Working Problem

Third Procedure: Move Bank Transactions Using CSV Import

If you want to import bank transactions manually using the CSV format, then the below-given steps can help you complete the given task:

  • First of all, log into the QuickBooks Online and import created CSV file.
  • Thereafter, locate the banking menu and click on it.
  • Now select an account and click the File Upload button. In QuickBooks, check if there is a link “Import a statement”, “Upload a bank file”, or similar links. It will help you upload the created CSV file.
  • You can use the Browse option to locate file CSV file and click the Next button.
  • Now select an account in QuickBooks you want to use for import and click Next.
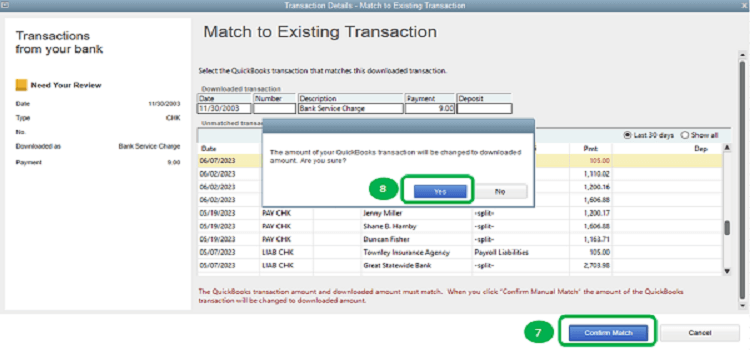
  • Proceeding further, confirm the Mapping and Dare format, Date and Description columns are preselected, and the amount column is set. Again, hit the Next button to move to the next step.
  • Before you initiate the importing process, review your transactions to make sure that they are accurate.
  • Click the Next button and complete the import process. Once imported, you can categorize the transactions to maintain a comprehensive record of your bank transactions.

QuickBooks Banking Center

The Banking Center in QuickBooks is a centralized location wherein you can download and manage your bank feed transactions from your bank or financial institution. The program has an incredible feature known as “Bank Feed” that allows users to connect their online bank or credit card directly to the QuickBooks application. 

Instead of entering your transactions manually, you can download them to QuickBooks and track the profit and loss of your business. Using this feature, you can save time and effort in manually entering the transactions. Above all, you can reap the benefits of the QuickBooks reconciliation feature and confirm that the transactions are recorded accurately in the program by comparing them to that in your bank. 

Summing It Up! 

The solutions described in this post can help you download the bank feed transactions in QuickBooks with absolute ease. By downloading your transactions in the QuickBooks program, you can reap the incredible features of the bank feed feature of the program. However, if something is stopping you from getting the job done, just reach us, and our QuickBooks specialist will guide you with the relevant help.

Class tracking is the most important feature of QuickBooks that allows the users to track account balances by department, business office or location. Moreover, it also enables the users to keep a close eye on the segments on which they want to. However, if you also wish to track specific expenses and categorize shared expenses, you have to set up classes in QuickBooks.

This comprehensive post focuses on how to set up classes in QuickBooks so that you can start organizing your class according to class. Furthermore, if you wish to assign classes to your employees, you need to enable the class tracking feature for Online Payroll.

Looking for immediate help to set up classes in QuickBooks? Give us a call @+1-855-603-0490 and have a one-to-one conversation with our experts to obtain the best possible results.

Prerequisites Required before you Turn On Class Tracking in QuickBooks 

Before turning on the class tracking feature, consider the following points. Go through the points listed below closely.

  1. The users must know that they can set up the withholding tax account and item. Next time you want to charge the withholding tax, the existing withholding tax item would work.
  2. You have to set up the classes as per the reporting you wish to do. Also, you must organize the classes in the way you want to see the business segments on reports. 
  3. Last, if you wish to set up the “other class” for recording the miscellaneous transactions. These include the transactions which don’t fit in any other class.

Also Read – Fix QuickBooks Error PS077

Learn how to Set Up Classes in QuickBooks Desktop

Are you frustrated with searching for the right steps to set up classes in QuickBooks Desktop? If that’s so then your search ends here. Below we have stated some of the simple instructions for setting up classes.

Step 1: Enable the Class Tracking Feature

The steps for class tracking in QuickBooks may vary per Windows and Mac operating systems. Therefore, we have listed steps for both operating systems and apply the steps accordingly.

For the Windows Users:

  • In the beginning, open your QuickBooks data file and then move to the Edit menu, followed by Preferences.
  • After this, choose the Accounting tab and click on the Company Preferences tab.
  • Proceed further by marking the checkbox next to the “Use class tracking for transactions” option. 
  • If you want to receive the notification when you haven’t allotted a class, mark the “Prompt to assign classes” checkbox. 
  • End the process by tapping on the OK button.

For the Mac Users:

  • In the first step, move to the QuickBooks menu and click on Preferences.
  • From the Workflow section, opt for Transactions.
  • Now, mark the “Use Class Tracking” checkbox and then shut down the transaction window to save the desired changes made.

Step 2: Categorizing of the Expenses and accounts 

Steps for Windows Users 

  • Initially, navigate the Lists menu and choose the Class List option. 
  • After this, click on the drop-down menu of Class and pick the New option.
  • Now, you have to add the class name according to your accounts. 
  • Furthermore, for the sub-class, you have to mark the “Sub class of” checkbox. Then, you have to search for the class under this section.
  • Finally, you have to click on OK to add the classes.

Steps for Mac Users

  • In the first step, move to the Lists menu and hover your cursor over the Continue option.
  • To generate a new class, you must tap on the Plus “+” icon and add your class name.
  • Ultimately, tap on Ok to establish a class successfully.

What can you do using the class tracking feature in QuickBooks?

With the help of the class tracking feature, you can allot a class to numerous transactions. These transactions may include:

  • Invoices
  • Sales Receipt
  • Sales Order
  • Purchase order
  • Paychecks
  • Refunds and Credit
  • Check
  • Bill
  • Estimate
  • Statement Charges
  • Credit Card Charges

Stepwise instructions to enable class tracking in QuickBooks Online 

Are you having trouble turning on the class tracking feature in QuickBooks Online? If that’s so then go through the stepwise instructions listed below.

Step 1: Enable the class tracking feature 

  • In the initial stage, move to the Settings option and choose the Account and Settings option.
  • Now, you have to click on the Advanced tab and then move to the Categories section to make the changes required.
  • After this, mark the checkbox of “Track Classes”.
  • Furthermore, mark the checkbox beside the “Warn me when a transaction isn’t assigned a class”. This is an optional step you may also skip.
  • Head towards the Assign Classes section and then choose the “One to entire transaction” option.
  • In the end, tap on the Save option followed by the Done option.

Tip: You have to choose the One to entire transaction option if you don’t want to add a class for each product you sell to the customer. Moreover, it also helps save time and allow you to impose one class to the entire invoice or sales receipt.

Also Read – Fix QuickBooks Error H202

Step 2: Setting up your class list 

Once you have enabled the class tracking feature you can easily set your class list. Just by preparing the class lists will show the different parts of the business. You must keep the class list simple so that it should be easily understandable. In short, the simpler your classes would be, the easier it would be to understand your reports.

Instructions to Enable the Class Tracking for Online Payroll 

The users have to turn on the class tracking for Online Payroll so that they can easily track the payroll transactions. After this, you have to allot a single class to all the employees or allot different classes to different employees.

  • In the first step, move to the Settings option and then opt for the Payroll Settings option.
  • After that, first click on the Edit icon from the Accounting Section.
  • Furthermore, tap on the Edit icon from the Class Tracking section and then pick how you wish to track the transactions.

Note: If you cannot find the Class Tracking section within the Accounting Preferences, ensure you have enabled the class tracking feature. If the classes are turned off, switch them on and repeat the above-listed steps. Whereas, if classes are enabled, switch it off, sign out, and then log in again to enable the class tracking feature.

  • Later on, hit the Continue option and then click Done.
  • You are supposed to enter a class for every employee. Alternatively, you may also assign one class for all of the employees.
  • In the end, to save your preferences, click on Continue and then on the Done option.

Final Thoughts!!

Hopefully, using this post, you can now easily set up classes in QuickBooks Desktop and Online. Thus, you can track your transactions by class, department, or product line. However, if you still get stuck at any of the above-listed points, contact our QuickBooks experts via email or live chat.

QuickBooks is the largest accounting software for various business persons and provides facilities for Bookkeeping and Accounts Maintenance. For many years, QuickBooks has proved a remarkable tool for several users. It has always been a trustworthy software that ensures full safety for the transactions to the accounts. It also has highly advanced features for creating work easily. Here, you will learn how to record vendor refund QuickBooks Desktop. To know about this process, contact QuickBooks technical assistance.

Method 1 – When vendor deliver you a refund check for returned inventory items

Keep a Record of Vendor Check Deposit

  • First, visit the Banking Menu and choose to make Deposits
  • After that press Ok in the deposit menu
  • Click at Received from Drop-Down option and choose the vendor who has sent you the refund
  • Now, choose the correct Accounts Payable option from the account
  • In the Vendor field, mentioned the actual amount of the vendor’s check
  • Then, type the rest information in the Deposit Account
  • Press Save & Close option.

Keep a Record of Bill Credit for the Returned Items

  • In the vendor’s menu, choose Enter Bills option first
  • Now, press at the Credit option to keep an account for the returned goods
  • Now type the Vendor Name and click at Items Tab
  • Enter the number of refund items that are mentioned in the refund check
  • Finally, click at Save & Close.

Attach the Deposit to the Bill Credit

  • Move to the Vendor’s Menu and then, choose Pay Bills
  • Now verify the deposit with the Vendor Check Amount
  • Select Set Credits and attach the Bill Credit that you have done
  • Press at Done and then tap on Pay Selected Bills and then press at Done.

Method 2 – When the Vendor Delivers A Refund Check for the Paid Bills

Keep a Record of Vendor Check Deposit

  1. First, click at Make Deposits at the vendor menu option
  2. Move to the make deposits menu and click at Received from the drop-down and choose the vendor who has sent the refund
  3. In the accounts menu, take the appropriate Accounts Payable
  4. Enter the correct amount in the account column mentioned in the vendor check
  5. Now, press the Save & Close option.

Keep a Record of Refunded Amount’s  Bill Credit

  1. First, move to the Vendor’s Menu and choose Enter Bills
  2. After this select, the Credit Accounts option to maintain an account for the refund goods.
  3. Type the Vendor Name and click at Expenses Tab
  4. Type the accounts on the original bill
  5. Move to the Accounts Column and type the appropriate amount for each entry
  6. Finally, press the Save and Close tab.

Link the Bill Credit to the Deposit

  1. Move to the Vendor’s Menu and choose Pay Bills
  2. Now, go through the deposits that are same as vendor amount
  3. Choose Set Credits and link the bill credit you have done already and then press at Done
  4. Now, click at the pay choose bills and then, tap at Done.

Method 3 – When Vendor Delivers a Refund Check on behalf of Real Vendor

Keep A Record of the Deposit For Vendor who Sent The Refund Check

  1. Move to the Banking Menu and choose Deposits
  2. Then, in the Make Deposits window press at the Received from Drop-down menu and selected the vendor who sent you the refund
  3. Now, from the account drop-down menu, choose the right Accounts Payable account
  4. Move to the account column and enter the same amount mentioned in the refund check
  5. Now, type a Memo, check number, payment method and class
  6. Finally, click the Save and Close option.

Although the second process is related to keeping a record of deposit mentioned at Bill Credit and linking the deposit to the Bill Credit is same as the procedure given in Method 1 and Method 2. & Record Vendor Refund QuickBooks For more details, you can call QuickBooks customer service.

A customer-centric software used by small, medium and large entrepreneurs, i.e. QuickBooks software. QuickBooks company files are used to keep all essential business data. Losing up your business data will bring some short and long-term impacts for your business. Repair damaged QuickBooks data is required to maintain a smooth workflow of the accounting task as soon as they take place. QuickBooks Repair tool is available to remove damaged QuickBooks data error. This blog will provide you with immediate repair methods and causes for QuickBooks damaged data errors. In case, the given methods are not helpful; you can contact QuickBooks phone number to fix it.

Possible Reasons Behind Corrupted Data Errors in QuickBooks

The repair requirements are considered when the given reasons create data damaged in QuickBooks.

  • Unwanted power failure causes the system and QuickBooks to close unexpectedly and bring company data file damage in QuickBooks.
  • Data list having incorrect entries from a user
  • If QuickBooks company file (.QBW) has corrupted accounts, names, or products list, will give rise to an error in company file data in QuickBooks.
  • Virus or malware attack will also damage the QuickBooks data file.

How to Troubleshoot Corrupted Data in QuickBooks?

You can now go through below given repair methods for data damage in QuickBooks as you are known about possible reasons behind its occurrence.

Step -1  Make Use of Recreate Data Utility and Verify QuickBooks Options

  • Open QuickBooks and press on File option
  • Now, press at utilities and click at Rebuild Data Utility option
  • If you see a message for backing-up data file, press at the Ok option
  • Wait for the message to display “Rebuild is finished’ and then press Ok option
  • Next, choose Verify Data from Utilities and run to check the possible data damage.

If the above procedure will not assist you, move to the next step to troubleshoot this error.

Step – 2 Remove Data Damage in QuickBooks Using QuickBooks File Doctor

You can repair data corruption in QuickBooks if you use QuickBooks file doctor repair tool to fix corrupted data issues in the company file.

Step – 3 Eliminate Company File Corruption Manually

When you run Verify Data Utility, data damage in the company file in QuickBooks will be displayed on your computer screen. You can troubleshoot this issue manually by following the few steps given below.

  • From the Verify Results window, choose to Expand All option to look at data damage issues in the QuickBooks company file.
  • Now, go to repair corrupted data issues one by one if you are comfortable to finish it.

If you can’t follow the given steps in troubleshooting corrupted data errors in QuickBooks, then call QuickBooks enterprise support phone number to remove it. It is available 24/7 hours to fix this issue and take up your call. One of its technical executives from the technical team will attend your call and assist you in removing this error one by one on call. Put up all your issues with a professional executive, and you will get the proper solution regarding this.

Are you looking for the steps you need to follow to start the customer transaction workflow in QuickBooks Desktop? If yes, then this blog post will guide you in this direction. Here, you will find the steps you need to follow while starting off the customer transaction workflows and even different ways to track the transaction.  This workflow can help in organizing cash flow, tracking sales and receivables. However, if you need further assistance, you can reach out to QuickBooks Desktop support to offer the best support service.

Workflow 1 – Invoice -Payment Deposit

You must follow this workflow when provided with a product or service, and your customer plans to pay later. Once your customer has paid, you can easily record QuickBooks’ payment to close the customer’s invoice or even reduce the balance.

Transaction Workflow in QuickBooks
  • The first user should create an invoice
  • Then you need to record the invoice payment
  • At last, deposit the customer’s payment

Workflow 2 – Sales Receipt Deposit

You should go for this workflow when your customer pays you on the spot for any product or service.

Transaction Workflow in QuickBooks
  • First, create a sales receipt
  • Then you need to deposit the customer’s payment

Workflow 3 – Estimate – Invoice – Payment – Deposit

You need to follow this workflow, also called progress invoicing, when working on projects or jobs for the customers. You can use an estimate like the quote, bid, or proposal to track the materials, labor, and additional expenses used in the project. After that, you can invoice your customer once the project is completed.

Transaction Workflow in QuickBooks
  • Here, you need to create and send the project estimate to the customers
  • After that, you should create an invoice from the estimates
  • Also, record the invoice payment
  • At last, you need to deposit the customer’s payment

Workflow 4 Sales Order – Invoice – Payment – Deposit

You should follow this workflow when the customers order an item that is not there in your stock at the moment. This way, you will know what products you have to buy from your vendors to complete the customer’s order on time.

Transaction Workflow in QuickBooks
  • You first need to create a sales order for the items that are on the backorder
  • Then you have to create an invoice from the sales order
  • You need to record the invoice payment
  • At last, you need to deposit the customer’s payment

Workflow 5 – Estimate – Sales Order – Invoice – Payment – Deposit

You need to follow this workflow when you need to complete a project but don’t have complete materials on your hand yet. You can create the sales order from the estimate for tracking the items on backorder. Then, create an invoice from the estimate after the completion of the project.

Transaction Workflow in QuickBooks
  • You first need to create and send a project estimate to your customer
  • Then create a sales order from that estimate
  • After that, you have to create an invoice using the sales order
  • Now you need to record the invoice payment
  • Deposit the customer’s payment

Workflow 6: Statement Charges – Finance Charges – Statement – Payment – Deposit

You must go with this workflow when you regularly charge your customer for items but are invoicing them periodically. You can skip creating the invoice for each charge, and then your customer can pay their accumulated charges in a total amount.

Transaction Workflow in QuickBooks
  • You need first to create your customer’s statement charges
  • Then you have to assess the finance charges
  • After that, create and send the billing statement to the customer
  • Then you must record the payment that is received
  • At last, deposit customer’s payment

If you find it challenging to understand this Transaction Workflow in QuickBooks, then you don’t need to think twice before calling QuickBooks technical support to avail their help. You can avail the expert’s guidance of a technical professional to resolve the query faced by QuickBooks users.

Read Also : Quickbooks error H202

Wondering how to import accountant changes in QuickBooks? Navigate through this post until the end to get the relevant help.

If you want your accounting management to be simplified, the QuickBooks Desktop application can be your best bet if it enables users to work with seamless collaborations with the accountants, employees, and other users to establish an efficient workflow.

You can create an accountant’s copy of your business accounting data and send it to your accountant for review. The accountant then reviews your books and makes the required changes to them. Once the changes are made, you can import them to your QuickBooks file. Here, you can find out how to get it done. Let’s start!

What Is An Accountant’s Copy In QuickBooks?

Creating an Accountant’s copy of your QuickBooks company file enables you to send your accounting data to your accountant for review. The accountant then reviews your books and makes sure that it is correct. If not, the accountant will make the required changes that you can import and automatically update in your company file.

There are two ways to implement the changes. Your Accountant can send you an Accountant Changes file, and you can save it to your hard drive. Alternatively, the accountant can use the Accountant’s Copy File Transfer service to send their changes through the web. In this method, the file is saved in the Intuit server, wherein you can make a secured data exchange with your accountant.

See Also – How to Change Tax Rates in QuickBooks

Things You Need To Consider Before Sharing Accountant’s Copy Of Data File 

Before you start this procedure, you need to consider the below-listed points:

  • Make sure that the accountant’s copy of the program is compatible with the QuickBooks Desktop version. 
  • The changes will not be imported to the client’s version of the QuickBooks application if the changes are made using features that are not present in the client’s QuickBooks. 
  • Upgrade your file when opening an Accountant’s copy in the newer version of the QuickBooks application. 
  • When the client and accountant are using the same version of the QuickBooks Desktop application, it makes the best import. 
  • If not the same version, a gap of one year between the versions of QuickBooks also works fine when it comes to importing the Accountant’s changes in QuickBooks. 
  • You need to set the dividing date to define the fiscal period. The accountants can make the modifications only if they fall on or before the dividing date. 
  • Contrarily, the clients can only work on the file that falls after the dividing date to ensure that no overwriting is done on the applied changes. 

How To Import The Accountant’s Changes?

Now that you know these important considerations let’s proceed further and perform the steps to import the accountant’s changes into the QuickBooks application. The below-listed steps can help: 

  • Before beginning the import process, create a backup of your company file to prevent any loss of data due to some unfavorable outcomes. 
  • If you are using the Enterprise version of the QuickBooks Desktop, turn off any Advanced Inventory features you’re currently using. 
  • You can turn it on later once the import procedure is done. 
  • Now, within the QuickBooks Desktop application, navigate to the File menu and select Send Company File. 
  • Thereafter, you need to select Accountant’s Copy and then Client Activities.
  • If the accountant sends the changes in an Accountant’s Changes file, you need to select Import Accountant Changes from the File.
  • Now locate your file using the browse option and make sure that the file has a.QBY extension.

Note: If the Accountant’s Copy File Transfer Service is used by your accountant, you need to select the import Accountant’s Changes from the Web.”

Review The Changes In the Accountant’s Copy Of The QuickBooks

Proceeding further, you need to review the changes your accountant has made to your company file. It is an imperative task to ensure the accuracy of your financial data. When the changes are Import Accountant Changes In QuickBooks, QuickBooks Desktop adds them automatically.

You need to check if it does not cause any conflict with the recent changes you have made. If there is an issue, you need to talk to your accountant. Review the changes by following the below-given steps:

  • Now that you are all set to import the changes, select Incorporate Accountant’s Changes to start the procedure. 
  • In case you don’t wish to import their changes, just click on the Close button.
  • Moving ahead, select OK to confirm the changes made by your accountant and close any open windows.
  • In the end, select OK and Close again. Here, the program will create another backup of your company file.

To conclude this task, update the closing date and password based on the changes made by your accountant. If you want it to review later, open the folder containing the QuickBooks company file and perform the procedure. You may locate all the changes within a PDF having those changes listed in it.

Issues Related To Accountant’s Changes Import

Sometimes, when Import Accountant Changes in the QuickBooks Desktop application, you may face multi-faceted errors. The list may include the following: 

  • QuickBooks is unable to import the accountant’s changes. 
  • The Import Accountant’s Changes from Web/File option is not available.
  • QuickBooks is not responding. 
  • A different Accountant file is used for data import than the one created for implementing the accountant’s changes import.

In such a condition, you need to follow the below-given solutions: 

Solution 1: Make sure that the company file you have opened is correct and is not upgraded.
  • You need to ensure that the opened company file has the “Accountant’s Changes Pending” option at the top of the screen. 
  • In case the right file is opened but does not have the “Accountant’s Changes Pending” option at the top, apply the changes manually to get the task accomplished. 
  • If an upgraded version of the company file opens, restore the backup saved before the upgrade process. Confirm that the accountant’s changes are still pending. 

Also Read – How To Fix QuickBooks Error QBWC1085?

If the upgrade process using the right company file, which is also not upgraded, is unable to complete, you need to move to the next solution. 

Solution 2: Save the files locally

If you have opened the right company file and that too is the same version of it, you need to copy the Accountant’s Changes file to your local drive from a USB flask or server drive. If you are still experiencing trouble with the file import, try the next solution. 

Solution 3: Send the Accountant’s copy using a different procedure

If none of the above-described procedures help in importing the accountant’s changes, you need to use a different method to get the job done. In case you have used the Accountant’s Copy File Transfer service, you may send the changes using a CD, email attachment, or USB flash drive.

If you are having trouble importing the changes, make sure that your company file is not damaged. 

Final Words!

Navigating through this full blog will help you how to import accountant changes in QuickBooks. Also, you can follow the troubleshooting procedures discussed in this post on having trouble with the import of the accountant’s changes to your data file. However, if you need professional assistance to save time, we have got you covered. Our QuickBooks experienced team can guide you with the relevant steps and get it done with the utmost ease.

Today in this blog we are going to discuss everything about the QuickBooks error 3371, what are the reasons behind this error, and how to get it resolved. So, stay tuned till the end of this blog.

What is QuickBooks Error 3371

QuickBooks being the number one accounting and financial software is helping small and medium-sized business owners to expand their business. Although, none of its competitors can compete with the QuickBooks based on the number of features and benefits.

Apart from that, QuickBooks users also face various errors while using the software. One of the most common and frequent errors is 3371. This error usually occurs when the QuickBooks failed to load the Licensing data of the company or when you try to activate or run the QuickBooks desktop version for the first time. There are three different status codes of QuickBooks Error 3371, which are as follows.

  • Error 3371
  • Error 3371, Status Code – 1
  • Error 3371, Status Code – 11118
Error 3371, Status Code – 11118

All the above-mentioned errors codes are caused when the QuickBooks is not able to run or show the licensing properties.

Reasons Behind QuickBooks Error 3371

As all the QuickBooks Errors are occurred due to a main solid reason, the same applies as well in the case of Error 3371. QB users still have to pinpoint the specific causes that lead to the error. So, here are some of the common reasons why this error occurs.

  • The program didn’t get access due to the antivirus software.
  • The qbregistration.dat file is damaged or corrupted.
  • The Microsoft MSXML file is not working.
  • The license information is not valid or cannot be retrieved.

How to Identify QuickBooks Error 3371

You can easily identify the QuickBooks Error code 3371 by looking for these specific symptoms that you may observe by working on it.

  • QuickBooks Desktop is crashing frequently.
  • Not able to show the licensing information.
  • Your PC is hanging or the window is crashing.

Now, let’s have a look at the methods, which you can follow to get the problem resolved.

How to Resolve QuickBooks Error 3371

QuickBooks error code 3371 can easily be diagnosed by following some simple methods. So, these are the steps that you can follow to get rid of the QuickBooks error 3371.

Method 1: Update your PC’s windows to the latest version

Sometimes, updating windows to the latest version can help you to solve a basic problem. That’s why we have listed this method at the top, as it is less time-consuming and the chances of solving the problems are large.

  • Go to the search option available on the taskbar and type “Windows Update” in the insert box and then press the enter.
  • After that, on the right side of the screen, you will see the “Search for updates” option. Click on that.
  • After that, the windows update will start downloading.
  • Once the downloading ends, restart your PC and relaunch the program to check if the problem is solved or not.

Method 2: Stops all the background running applications

  • First, close your QuickBooks desktop and go to the task manager.
  • Then click on the processes and search there for QBW32.EXE instances. Select all the files with that name.
  • Then click on the end task option.

Method 3: Permanently delete the ECML File

Below mentioned are the steps that you can easily follow to permanently delete the ECML file.

  • First, press the Windows and R keys together.
  • Then in the insert box, type C:\ProgramData\Intuit\Entitlement Client\v8 and click on Ok.
  • Now, you will see the ECML file. Right-click on that file and delete it.
  • After that, close the Windows.
  • At last, run the QuickBooks again and then do the task again which you were initially doing before facing the error. The QuickBooks error 3371 will most probably be resolved.
delete the ECML File

Method 4: Download and Use the QuickBooks tool hub program

  • First, close all the apps, and then download the QuickBooks tool hub program from the official website of QuickBooks.
  • Then run the downloaded file and accept all the terms & conditions and intuit’s license agreement.
  • Once the installation process ends, then click on the finish option.
  • Now, to run the QuickBooks tool hub, double-click on its icon.
  • Then, under the program problems section, click on the “Quick Fix my Program” option.
  • At last, click on the OK tab and then open the QuickBooks and run the licensing file.

This tool can help you automatically solve the license, validation, and registration error in the QuickBooks to recreate the damaged or corrupted file.

Method 5: Manually solve the error

You can follow the below-mentioned steps to get this error resolved.

  • To begin, first of all, recreate the corrupted entitlementDataStore.ecml file and solve the licensing and registration glitches and errors.
  • Now, with the help of the QuickBooks Diagnostic tool, fix the Microsoft.NET framework, MSXML& C++
  • Then install it again and run the reboot.file
  • At last, update your QuickBooks to the latest version.

Summary:

In this blog, we have mentioned all the necessary information about the QuickBooks error Code 3371 and its causes and how to get it resolved. You can follow the above methods to get rid of the error. Also, if you are still facing any issues with the QuickBooks or if you have any specific queries regarding the QuickBooks Error Code 3371, then feel free to reach out to us. Our professional customer care team will be happy to assist you.

Frequently Asked Questions

1.What triggers QuickBooks Error 3371?

QuickBooks error 3371 is an installation problem. There can be quite a few reasons why it hinders your operations on the software:

  • Missing or damaged company files
  • Virus or firewall attack Also, if the Qbregistartion.dat file is corrupted
  • Incomplete or pending Windows update
  • Additionally, damages MSXML component

These are the most common problems that can be behind this error code.

2. Where can I locate my Qbregistration.dat file in my system?

Qbregistration.dat file is located in your QuickBooks file folder. To look for the same, go to File Explorer and type the file name in the search bar, and hit Enter.

Now, if no results are available on your screen, this means you need to display the hidden files too. Here is how that is done:

  • Open File Explorer on your desktop from Windows.
  • Next, from the menu bar, click on View and go through the drop-down list.
  • You will either find the Hidden Items option or go to Show, and then you will see it.
  • Select the option and search again.

3. How to open QuickBooks License properties?

The license properties are stored in the ECML file of QuickBooks. In order to open this file, press the Windows+R keys from your keyboard to open the run command box. After that, in the provided space, type entitlementDataStore.ecml and hit OK. Now, you can find the license properties here. 

4. Suggest some troubleshoots for QuickBooks error 3371.

Here are a few solutions that you can try your hands on to overcome QuickBooks error 3371:

  • Delete ECML file
  • Get the latest Windows version
  • Run QuickBooks Fix my program from QuickBooks Tool Hub
  • Use QuickBooks Install Diagnostic Tool
  • Fix the problem manually 

5. What to do if I want to remove the QuickBooks Desktop installation?

In order to clear your current installation of QuickBooks Desktop, follow the steps below:

  • Firstly, you need to download and run QuickBooks Tool Hub.
  • Now, open the application and click on Installation Issues from the options on the left.
  • Here, you will see Clean Install Tool button; hit that.
  • After that, enter your QuickBooks and product version and select OK. 

These steps will do the job for you. You can now install QuickBooks again. 

QuickBooks Online is an excellent accounting solution that gives the flexibility of handling your business accounting remotely with better-shared access to data and seamless collaborations. Besides, it allows you to record your transactions in the program. However, if you accidentally create a transaction in QuickBooks Online, you have the option to void or delete It. Not sure how to delete transactions in QuickBooks Online?

Well! This blog gives the answer to the same concern of the users when they want to delete transaction in QuickBooks Online. Besides, we will also discuss the other options than deleting an erroneous transaction. Let’s move ahead! 

What To Do When a Transaction is Created Mistakenly? 

When you create a transaction by mistake, you can either void or delete it. These actions stop this undesired transaction from affecting your account balances and reports. Deleting or voiding transactions are two different things. Let’s understand the difference between these two methods of dealing with an accidental transaction in QuickBooks in the first place. 

Voiding a transaction means you will have a record of the transaction, but it won’t affect your account balances or reports. On the other hand, when you delete a transaction, it gets completely vanishes from your books, and it won’t show in any accounts or reports. 

You may delete or void a transaction based on your requirement. The recommended way is to void the transaction as it keeps a record of the transaction. Some of the transaction’s details are recoverable with an audit log in QuickBooks; however, you may not be able to recover the whole transaction. Therefore, it is crucial for you to ensure that the transaction will never be required in the future before you finally delete it.  

When to Void a Transaction?

Setting a transaction to void is a good bookkeeping practice. Having a record of the deleted transaction can help you to keep track of the transaction. Besides, voiding a transaction would not affect your ledger books and other balances. You may not be able to void any payment in QuickBooks, which is already recorded for the invoice. QuickBooks enables you to delete all the transactions, but you can’t void the below-given transactions: 

  • Deposits
  • Estimates
  • Purchase orders
  • bills
  • Delayed charges
  • Vendor credits

Also Read – QuickBooks Not Responding

When to Delete a Transaction? 

When you are unable to void a transaction, you will have to delete it to keep your records accurate. If there is some issue in these transactions, you need to delete them to keep your books correct. You need to make sure that you won’t need to check the transaction before you finally delete it. As we have discussed, you won’t be able to recover a deleted transaction completely.  

Steps To Delete a Transaction in QuickBooks Online

Now that we know what the difference between deleting a check or putting it to void is, let’s find out the steps to delete a transaction: 

Step 1: Navigate To the Expense Menu 

In the first place, you need to launch the QuickBooks application and move to Sales. Alternatively, you may also click on the Expense menu if you can’t find the Sales.

Step 2: Find the Undesired Transaction 

In the next step, you need to find the transaction you want to delete. You may also use the search option to get the job done. Open it once found. 

Step 3: Check If You Need To Void or Delete a Transaction

After opening the transaction, you need to review it to make sure if you want to void this transaction or delete it permanently from your books. 

Step 4: Include a Date for Your Action 

Now that you have made up your mind to delete or void the transaction, you need to include the void or deletion date. To do so, you can add a note in the message or memo section. Once done, move to the next step. 

Step 5: Make the Desired Action and Then Confirm It

After following all the steps with full care and attention, here, you need to click on More from within the Footer section. Now click on Void or delete as needed and click Yes to confirm the action. 

How to Delete Multiple Transactions in QuickBooks Online? 

The above-given solution can help you in deleting a single transaction in QuickBooks Online. If you want to delete multiple transactions, you need to go to the Baking options from the menu. Here, you can find the list of the transactions that take place from within the application. The below-given steps can help you to get the task done:

  • First thing first, go to the Banking option on the homepage menu of QuickBooks.
  • In the second step, click on Bank Feeds.
  • Moving ahead, click the Bank Feeds Center button. 
  • After that, go to the Items Reviewed section and choose the account name.
  • Once done, you have to choose the Items to Delete tab.
  • Thereafter, select the transactions you want to delete from the list.
  • Here, you need to click on Delete Selected button to delete the selected items. 
  • In the end, click the Yes button to confirm the deletion.

How to Clear All Payments in QuickBooks Online? 

If you want to clear all payments in QuickBooks Online, follow the below-given steps:

  • First of all, go to the accounting software QuickBooks Online.
  • Thereafter, move to the Banking section or select the Transactions section. 
  • Moving ahead, click the Banking option. 
  • Next, you have to click the option labeled Banking. 
  • After this, select the bank account you want to clear the transactions from. 
  • Now head towards the For Review option. 
  • Checkmark the box for Date. 
  • In the end, you have to click the Exclude tab, and it will remove all the transactions at once.

Final Words!

It is crucial to void or delete the erroneous transactions in QuickBooks Online, to prevent any discrepancies in your books. Some users find it difficult to delete erroneous transactions from their accounting software. Therefore, this post explains the easy procedure to delete transactions in the QuickBooks Online application.

Struggling with QuickBooks error 12031? Here is a handy guide for you that can help you with the error resolution! The emergence of QuickBooks has almost revolutionized the business sector across the globe. QuickBooks is designed to assist the firm in day-to-day accounting transactions. With just a snap of a finger, users can easily fetch business reports, create invoices, and compose tax bills simultaneously.

Accounting has become way easier than before with the use of QB software. Undoubtedly, the application has extraordinary features. Still, it is prone to several implications, like technical glitches, errors, bugs, and other concerns.

What is QuickBooks update error 12031?

QuickBooks error 12000 series is usually linked with the problems that happen while upgrading the QB software and Payroll update services. In other words, QuickBooks error 12031 appears when a QB payroll service is restored or the software is updated. Sometimes, disruption in firewall and security system set-up caused by improper configuration set-up could be the reason behind it. 

Invalid system set-up configuration can bring this error to your system. This is the common error code that the user faces. It interrupts the connection of the QB with the host services, which interrupts the work process.

Also Read – Reset QuickBooks Admin Password

What Are the Reasons Behind QuickBooks error 12031 appears?

There is no specific reason for this error to appear in your system. Have a look at a few of the reasons behind error code 12031, which are as follows –

  • Poor/weak Internet connection can be one of the possible reasons behind the error.
  • Internet explorer, which is the most favored browser by QuickBooks, is not set as your default browser.
  • Firewall hindrances can impact your work process.
  • Invalid SSL configuration set-up.
  • Due to the detrimental attack of Viruses or Malware. 

The aforementioned are the reasons behind the occurrence of the QuickBooks error 12031. You can fix the issue by considering the exact cause of the error. 

Step by Step guide to fix QuickBooks error 12031

Follow the steps given below in order to troubleshoot the QuickBooks error 12031. 

Step 1: Configure a Stable Internet Connection

When updating the QuickBooks Payroll service, you need to make sure that you have a stable Internet connection. If it is not stable, you need to switch to a strong one. Follow the below-given steps:

  • First, open QB software on your software. 
  • Navigate to the help menu located on the left side of the software.
  • Select “Internet Connection”.
  • Then, you are required to visit the option stating, “Use my computer’s Internet connection settings to establish a connection when this application accesses the Internet.”
QuickBooks Error 12031 (internet connection setup)
  • Tap on the next option and then click Done to complete the ongoing set-up. 

Note – Upgrade the software to the latest upgraded version, in case you haven’t done it yet. 

Step 2: Run QuickBooks Connection Diagnostic Tool

QuickBooks Connection Diagnostic Tool is an important utility in the program that helps you check your Internet connection. Following the below-given steps can get the task accomplished:

  • Download the QuickBooks Connection Diagnostic Tool. When downloading is completed, install it, following all the prompt instructions.
  • Proceeding further with the solution, double-click on the icon and open the tool.
  • Go to the test connectivity tab, choose Browse, and probe for the company file.
  • Select the company file which is affected by the issue.
  • Then, move to the Test connectivity option.

After a few minutes of processing, the QB error will get vanished.

Step 3: Examining the Firewall

At times, the firewall blocks the ongoing process of QuickBooks and halts the downloading and updating process. Hence, you have to alter the Firewall settings to resolve the QuickBooks error 12031. To do this, go through the given below steps –

  • Type Firewall and Enter in the search bar of the Start menu.
  • Pick out the Window firewall from the selection. 
  • Then, select Allow a Program or Feature option.
  • Choose the Change setting option. Then, a new window will appear. 
  • Click on the box that enables you to access the Firewall option.

Step 4: Rename the Network Data file

Network Data (.ND) is a network file; if damaged, you may experience trouble in updating your QuickBooks payroll service. To repair this file, follow the below-given steps:

  • Check the source folder of the QB company file.
  • Inspect the file name having extension as .nd or Network Data File. 
  • Do right-click on the .nd (Network Data file) and click on Rename option.
  • Add old at the end of the file name with extension .nd. For instance, companyfilename.qbw.nd.old.
Step 5: Update QuickBooks Payroll Services

Make sure that you are using the latest version of the QuickBooks application, including your payroll service. If not, you need to update it by following the below-described solutions:

  • Open QuickBooks and go to the menu option.
  • Select the “Internet Connection Set-up.”
  • Go to the “Internet Properties.”
  • A roll of tabs will appear before you, and you have to choose Advanced Tab. 
  • Then, change the Advanced Settings so as to align it to your needs. 
  • Click Apply.
  • Click on the OK button, and the appearing window will shut.
  • In the end, close your QuickBooks Desktop application before jumping to the next step.
  • Open it again to update the QuickBooks payroll services.

Summing Up!

Hope the above-given steps will help you to effectively troubleshoot the QuickBooks error 12031. Before applying any of the measures before, determine its specific reason. Then, implement any of the steps to fix the error code, even after applying the measures, if encountering the same error again. Feel free to approach Technicians or chat with live person, which is open 24×7 for your assistance.

QuickBooks provides the payroll facility that enables the users to pay their employees on time, keeping track of their working hours etc. The main purpose of this feature is to reduce the stress of manually creating the payroll and the hassle of maintaining the payroll records of the employees. However, if you want to use the payroll feature in QuickBooks then it is necessary to payroll setup in QuickBooks Desktop. Read this comprehensive post to know all the details that are required to set up payroll in QuickBooks Desktop easily without any further delays. 

Payroll setup in QuickBooks

Stepwise Instructions to Setup Payroll in QuickBooks 

Are you struggling while setting up payroll in QuickBooks? If that’s so then don’t worry and go through the steps listed below. 

Step 1: Get your Payroll Subscription Activated 

You are required to activate QuickBooks Desktop Payroll Basic or Enhanced Payroll annual subscription after purchasing it. The procedure of activation may differ if you purchase online, by phone or via retail store. 

A. Activate your Subscription purchased via Online or Phone :-

You will obtain the 16 digit service key via email while purchasing the QuickBooks Desktop subscription via Online or Phone. In order to continue using the QB feature you are required to enter this key. If you are unable to find the service key then check your junk folder or automated service key retrieval tool. You are supposed to logged in via your Intuit account. Follow the steps listed below to activate the QBDT. 

  • Initially, open your QuickBooks company file.
  • After that, go to Employees> Payroll > Enter Payroll Service key. 
  • Thereafter, tap on the Add option. 
  • Then, you are required to input the service key that you have obtained on your registered email id with QuickBooks. 
  • After this, click Next and then tap on the Finish option.
  • Select the Ok option once you receive the Payroll Update message on your computer screen. 
  • Finally, ensure that your service status is Active and then tap on Ok option.

B. Activate the Subscription purchased via Online store:-

  • In the first step, open the QuickBooks company file. Then, tap on Employees > Payroll> Install Payroll from the box. 
  • Now, input the details into the Payroll License and Product Information page. You can acquire your QuickBooks license number on the brightly colored sticker inside the box. 
  • Choose the Continue option and go through the steps shown online to accomplish your payroll activation including adding service key.

Also Read – How to Setup the QuickBooks Desktop for the First Time?

Step 2: Fill the online application/make a Payroll PIN 

Now, you are required to connect your bank account so that you can access the direct deposit and we can pay and file taxes. To complete the online application follow the steps listed below:

A. Assemble your business and Principal Officer details:-

must have your business legal name, address and Federal Employer Identification Number(FEIN).

  • The users must have the principal’s officer name, home address, Social Security Number and birth date. 
  • Moreover, you must have the user ID and password for your business bank account online. Otherwise you must have routing and accounting number for the account you wish to use for direct deposits and payroll taxes. 

B. Fill-Out an Online application:-

  • Initially, go to the Employees option > My Payroll Service > Activated Assisted Payroll.
  • Go through the instructions displayed on-screen and then input the details within the application wizard. 
  • Make your payroll PIN and ensure that the PIN must be of about 8-12 characters, letters and numbers only.

Step 3: Accomplish your payroll setup tasks 

In this particular task, users are supposed to add their employees, set up federal and state payroll taxes. Also, you need to add any paychecks and tax payments that you have already paid during this year. There might be the chance that it may take time to get your payroll info into QuickBooks. Therefore, the setup enables the users to add info as per your suitability. In order to get the setup tasks, you are required to follow the steps as follows:

  • In the first step, open your QuickBooks company file 
  • Then, move to the Employees and then tap on the Payroll Setup option.

1. Steps for adding employees:-

Before moving ahead to add the employees you must have the information such as hire date, birth date, pay rate, completed W-4 form, any paycheck deductions, bank details, etc. 

  • In the first step, open QuickBooks Desktop and then add the basic employee details within the required text fields. Then, click on Next option.
  • After this, you have to enter the compensation that may include information such as pay items, rates and pay frequency. Further, opt for the Next option. 
  • Now, fill out the personal details carefully and then tap on the Next option. 
  • Thereafter, pick the mode of payment between physical check or direct deposit and fill the bank details correctly.
  • Tap on the Next option and input the tax details appropriately within the required text fields.
  • Finally, review the details carefully and make changes if required and then choose the Done option.

2. Steps for setting up company (pay items, deductions, PTO):-

In this procedure you can either choose the preset lists of items, insurance benefits and retirement deductions or you can set up customer items.  If you give paid vacation to your employees or any sick leave then you have to mention that also.

  • Initially, click on the Employees option and then tap on Payroll Setup.
  • Ensure that you have added at least one employee. For that click Company and you will get a list of pre-selected compensation items. 
  • If there are some items that are not required then click on the toggle in the Status column. 
  • You may also add the pay items to your employees by choosing Assign to Employees. Tap on Insurance Benefits if you offer medical, dental vision or other insurances. 
  • Tap on Add, choose the insurance item from the insurance benefit type drop-down. 
  • If you offer Retirement benefits then choose the option of Retirement Benefits. 
  • Also, you may set up the sick or vacation leave by tapping on the Paid Time Off option. 
  • After this, you will get the pre-selected items or you can choose the Add option and then select from Miscellaneous Type drop-down.

3. Steps to Setup Taxes:-

For setting up the taxes the users must have a Federal Employer Identification Number (FEIN), state account numbers and State Employment Insurance rate. 

In order to set up taxes, open QuickBooks then click Employees > Payroll Setup. Then, you must choose the report which the IRS requires for reporting your wages and taxes. Your federal taxes  are already pre-set and this will represent all taxes for your state. For adding SUI rate, click Unemployment item > Edit > Next > Add your rate. Then, set up your bank account in Charts of accounts, add account number, deposit frequency and click Schedule Payments. After that, input the details required for each tax. Click Enrollments to get guidance to enroll in electronic payments and filing IRS. 

4. Enter Pay History:- 

The users are required to add the paychecks and tax payments if you have already paid it to your employees. These details may include pay stubs or reports for each of the employees paid during the entire year. Also, you must have the information related to tax liability reports or tax payment receipts or statements.

5. Review and Finalize:-

If you have input the pay history, you are required to enter federal and state filing details for closed quarters. QuickBooks will go through all the pay history details and detect errors. Thus, it ensures that your W-2 statement is appropriate.

Step 4: Activate your QuickBooks Service and sign your payroll authorization forms:-

After winding the setup tasks contact the experts and they will ensure that everything is set up appropriately so that you can create the paychecks easily. Also, the experts will guide you on how to activate your service.

Once your subscription is active experts will send the principal an email by attaching the payroll authorization forms. You are required to sign the forms by the principal officer and sent back to the experts as soon as possible so that they can easily file taxes and file your forms.

Closure

So, here we end this post and hope that now you get a better understanding on how to setup payroll in QuickBooks Desktop. However, if you are encountering any issue even after implementing these steps then you may contact our QuickBooks experts for complete guidance.

Posts pagination