Archives

Home > Blogs > 2022

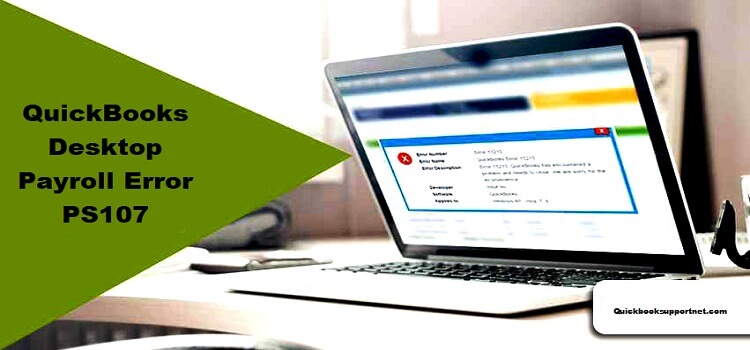
When QuickBooks internal file has become unreadable and shows an error message PS107 on your computer screen, this error occurs while downloading Payroll Updates. You will observe that reasons lead to QuickBooks error PS107 and then visit the solutions.

Reasons Behind QuickBooks Error PS 107

  • Server Weak Issue
  • The old form of Finance Programming supports an early form of finance as they create a new one
  • A virus or spyware infecting the system
  • A corrupted file in the QuickBooks

Methods to Resolve QuickBooks Error PS107

Few troubleshooting solutions are given below to fix QuickBooks error PS107. Let’s go through them carefully.

Method – 1

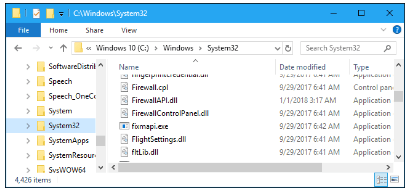
  • First, move to the Task Manager and click on the processes tab
  • Now display all applications beginning with QuickBooks
  • Now click the End Task or End Process.

Method – 2

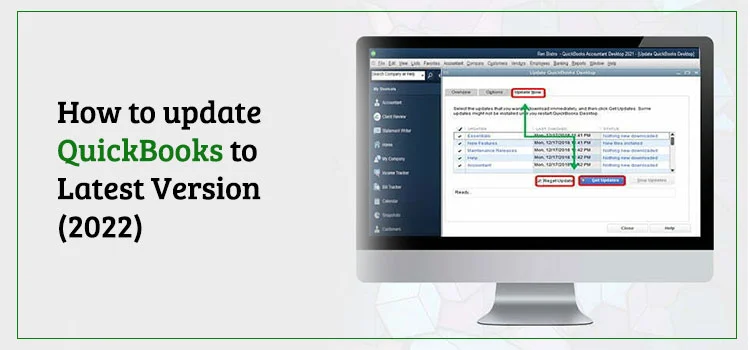
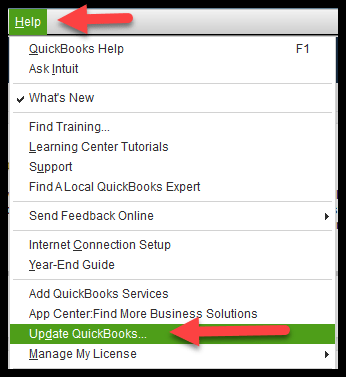
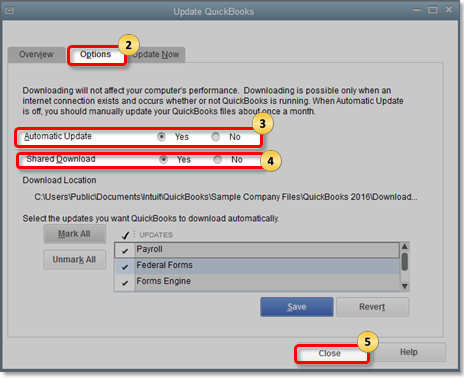
  • Move to the Help menu and choose Update
  • Click options and click the Mark all button
  • Press update now
  • Now press Reset Update and click on the Get Updates
  • Once you observe Update Complete message, shut down QuickBooks Desktop.

Method – 3

  • Access Get Payroll Updates now and implement the Payroll Update CD
  • Press on Employees and click on Get Payroll Updates for pro and premier
  • Suppose you have been asked to search for update.dat or update3.dat, then respond to the notifications
  • Press on Browse
  • Choose the CD Drive from the Look in the drop-down menu
  • Select update.dat or update3.dat in the Payroll Update now and click the Open option
  • Click Ok.

Method – 4

  • First, unclose the Run command on the keyboard and click Ctrl+R
  • Now enter misconfig. and press Ok
  • Tap selective startup, load system services, and load startup items in the General tab
  • Now press the Services
  • Choose Hide all Microsoft services and click on disable
  • Press to remove Hide Microsoft services
  • Now choose the services and make sure that the Windows Installer checkbox is established
  • Now choose and press Ok; if it is not available there, then move to the system configuration window
  • Click restart your computer
  • When the system is restarted, then do activate a clean install.
Method -5
  • Switch to single user mode by pressing
  • Press switch to a single user
  • Select Backup Company and click create local option available on the QuickBooks file menu
  • Press on local backup once you have the backup window option and select the location for backup
  • Next click Ok
  • Inspect for the options on this page and select the one you like
  • Select the appropriate option for you once you are completed with Ok
  • Press Ok in the Create Backup option
  • Organize future backups and choose to save your backup now.

Once you have followed the above methods, you can eliminate QuickBooks error PS107. To rectify QuickBooks quickly, you must dial the QuickBooks support number to get some accurate tips.

FAQs ( Frequently Asked Question)

Ques. How to Troubleshoot QuickBooks Payroll errors?

Ans. Some troubleshooting steps are given below to fix QuickBooks payroll errors.

  • Press the Help menu
  • Select about QuickBooks
  • Click Ctrl+Alt+Y at your keyboard, then press on Next
  • Choose the employee who was underpaid in the employee information window
  • Do a double-click on the employee’s name
  • Analyze the YTD adjustment details
  • Press Ok.

Ques. Can I switch from QuickBooks Desktop to Online?

Ans. It depends upon your monthly subscription and the cheaper cost. QuickBooks is cost-effective if you use multiple employees using the software. QuickBooks Desktop Pro is affordable if you don’t require additional users and planning to utilize software before updating.

Ques. How to control Payroll errors?

Ans. Some troubleshooting steps are given below Payroll errors.

  • Briefly indicate the error and apologize
  • Explain what brought on the problem and observe
  • Describe what methods are taken to fix this problem and confirm that it should not be repeated.

Ques. Do you require to purchase a QuickBooks desktop every year?

Ans. QuickBooks desktop is available for yearly subscription or purchase with an extra price per user.

Are you witnessing QuickBooks Banking Error Code 105? If yes, you don’t have to worry; this error is one of QuickBooks’ common banking problems, which can give you a hard time. It can occur when the bank website is down and can disrupt your work. You can resolve this issue on your own by taking the help of this blog post and then following the steps mentioned here.

What is QuickBooks Error 105 ( Banking Error)?

This error 105 usually occurs when the banking website encounters some specialized issue. These issues could be the server issue because of which the information cannot be exchanged securely between the banking website & QuickBooks Online software.

Why Error 105 Occurs in QuickBooks?

Check out the list of causes by which QuickBooks Banking Error 105 occurs:

  • It may occur because of the poor Internet connectivity
  • It can even arise because of the issues in the bank & financial institution
  • If the downloaded or imported file/files are accidentally deleted
  • When you are using an old or incompatible computer for the QuickBooks

Also Read – QuickBooks Error 102

Steps to Fix QuickBooks Banking Error Code 105

You need to check the following solutions that are mentioned below for fixing the QuickBooks Banking Error 105:

  • Re-check the name of the financial institution.
  • Ensure that you have chosen the correct bank name while setting up the accounting process.
  • Even check that the URL of your bank website outside QuickBooks is correct.

Solution 1: Update the QuickBooks desktop

  • You have to use the update button to update your QuickBooks account and then run the manual updates
  • You need to ensure that all the latest and advanced third-party programs must go through the latest version system setup
  • Then log in to your bank website by using the correct online banking URL
  • You need to verify the messages with a successful login to your bank website
  • Make sure there is no hindrance in verifying your bank account details, transactions, history, and account summary
  • If the issue persists, then re-verify it after a few days so that bank got enough time to rectify it
  • If the issue exists for more than 24 hours, then you must contact the online customer support & ask for their help with your bank details

Solution 2: Connect the bank accounts with the QuickBooks

  • From the left menu, choose the ‘Banking‘.
  • If you are unable to connect with the bank, then verify the name of the bank or financial institution
  • From the top right corner, choose the ‘Add Account’ option & look for the name of the financial institution
  • Choose the name of your financial institution from the list
  • Enter the ‘User Id and password’ of your account in the space provided and then hit the ‘Continue’ tab
  • You have to complete the extra verification steps and then choose the  option of ‘Securely’ connect
  • Choose the option of ‘bank emblem’ with which you want to connect, and then from the drop-down menu, choose the ‘account type.’
  • If you don’t have an account, then choose the option of ‘+Add New ‘to create the new account
  • You should know that QuickBooks keeps the backup of financial transactions for 90 days so that you can use it.

Solution 3: QuickBooks Manual Update

  • Choose the option of ‘Banking.’
  • Now you need to select the icon of ‘Update’ present at the upper right corner
  • If you want to update only some accounts, then just clear the unwanted accounts
  • You then have to click on the ‘Update Now ‘icon
  • Now enter the ‘Multi-Factor Authentication (MFA) credentials ‘and then hit the ‘Continue Update’ icon

Solution 4: Verify with your bank or credit card provider

  • Check with your credit card and bank to see if everything is fine on their end.
  • Sign-in to your bank and credit card account by entering the correct credentials.
  • If you cannot sign in, get in touch with your bank and credit card company to ask for their help.
  • If there is an error with your bank’s server, you need to wait for some time or try again later.
  • You can even reach out to technical experts by calling the QuickBooks helpline number that stays available 24*7. 

QuickBooks Banking Error Code 105 typically occurs when there are connection issues between QuickBooks Online and the bank’s website. This error may prevent the software from downloading banking transactions. To resolve it, users should verify their bank credentials, update account information, and ensure that the bank supports QuickBooks Online integration. Additionally, checking for any ongoing maintenance on the bank’s website is recommended.

You must be aware of Microsoft Outlook, an integral part of Microsoft Office, which is used as an email manager.  You can not only send emails, but you can even integrate it with several third-party online apps for providing email functionality. You can integrate it with QuickBooks Desktop so that you can send emails from your Desktop app using MS Outlook as the primary email client. You can face the issue when there is a misconfiguration in the Windows settings or when your Outlook freezes while sending emails. This blog will help you when you face the error of “QuickBooks outlook not responding” while sending emails from your QuickBooks Desktop app. You need to follow this blog to know the causes and solution of this error.

QuickBooks is Outlook not responding error message

Why QuickBooks Outlook is not responding Error Occurs?

Some of the most common reasons why Outlook freezes while sending emails using QuickBooks are:

  • When you are not running QuickBooks as an administrator on your Windows OS
  • The email settings in Internet Explorer are faulty.
  • Incorrect email settings in your QuickBooks.
  • The installation of QuickBooks Desktop is inappropriate, damaged, or incomplete
  • The Microsoft Outlook is already running in the background of your system computer while you are sending email from QuickBooks
  • When the MAPI32.dll file is damaged.

Steps to Fix QuickBooks Outlook is not responding Error

Follow these given steps to fix the error outlook not responding in QuickBooks application.

Ensure to Run QuickBooks with Admin Rights

  • Right-click on the icon of QuickBooks Desktop and select Properties >Compatibility tab.
  • Here tick mark on the checkbox that reads Run this Program as Administrator present under Privilege Level section.
  • If the checkbox is already checked, then you have to click Apply and then OK.
  • At last, restart your computer and see if the problem is resolved or not.

Verify Email Preferences for QuickBooks

QuickBooks Outlook not responding
  • Open QuickBooks software and go to Edit tab > Preferences > Send Forms.
  • Then go to the My Preferences tab and choose the option of Send email using and then click OK.
  • Now click the Edit tab > Preferences > Send Forms > My Preferences tab > QuickBooks Email and hit OK.
  • Then  you have to select Edit > Preferences and then choose Outlook option and hit the OK button
  • Exit the QuickBooks and Outlook and then restart your Windows and try to send email using QuickBooks.

Repair QuickBooks Desktop and Outlook

QuickBooks Outlook not responding
  • You have to repair your QuickBooks Desktop software
  • If by repairing QuickBooks Desktop software, there is no luck in fixing “QuickBooks Outlook is not responding” error. Then, you have to download Microsoft Support and Recovery Assistant tool to repair Microsoft Outlook installation.

Verify the Email Preferences of Internet Explorer

  • You need to exit from the QuickBooks and close any company file if it’s open.
  • Then you have to run Internet Explorer on your Windows.
  • You need to click on the Gear icon > Internet Options >Programs > Set Default.
  • Now you have to click on the Set your Default Program link.
  • Then you need to select the Outlook option and click on the option of Set this Program as Default and then hit on OK button
  • You then need to close the Internet Explorer and try sending an email using QuickBooks again.
  • If you’re QuickBooks Outlook Freezes while sending the email, you have to follow the next troubleshooting step.
Repair Damaged MAPI32.dll File
  • You need to close any running application of your Windows.
  • Then open Windows File Manager and go to C:\ Windows\ System32 folder.
  • You have to locate and double-click on the Fixmapi.exe file.
  • If you cannot locate the file in the Windows Explorer, you have to search it manually.
  • Once the tool has repaired MAPI32.dll file, you can easily open QuickBooks software and can try to send an email

There are still chances that your MS Outlook may not respond in your QuickBooks accounting software while sending the emails even after executing the solutions that are listed above. If you are also struggling with the “QuickBooks Outlook not responding” error, give a call to QuickBooks expert for immediate troubleshooting guidance.

QuickBooks auto data recovery is an outstanding tool designed to recover damaged QuickBooks files or lost data. The tool allows you to utilize some essential features of ‘Auto Replication to create a duplicate QuickBooks Company file(.QBW), the QuickBooks Transaction Log File, and the auto-recovery quality. Suppose you can’t get any idea to use the QuickBooks Auto Data Recovery tool; you must dial the QuickBooks customer support number to get essential tips to use it.

The article will assist you to know ‘QuickBooks Auto Data Recovery Tool’ and how it is helpful to resolve ‘data recovery issues.

The two ways in which ‘ADR’ can help you recover the ‘Lost file’

  • Recreate lost transaction with your current ‘Transaction Log File’ & a copy of your Company file.
  • Recreate the last few hours of transactions with a copy of the Company file & the Transaction Log File.

Points to be Considered Before Utilizing the ‘Auto Data Recovery’

  • QuickBooks Auto Data Recovery Tool is available for QuickBooks Pro, Premier, Enterprises for windows.
  • The feature is not present in Accountant Editions.
  • There is a file size limitation of 1.5 Gigabytes. For a backup greater than 1.5 Gigabytes, then you cannot create an Auto Data Recovery.
  • Your QuickBooks Desktop have the latest updates.

Recover ‘Hacked or Missed Data’ with QuickBooks Auto Data Recovery

Method – 1 Utilize the original. TLG file with ‘. QWB. adr file’

  • Use the “Original Transaction Log File’ and the Auto Data Recovery version of your company file to recover the recent transactions. Follow the below-given procedure to complete the process.
  • Make a new folder on the ‘Desktop’ named QB Test.
  • Open the folder where you have this company file saved
  • See the company file location on the ‘Product Information Screen’   and the ‘No Company open window’.
  • You can copy the ‘Corresponding.tlg’ file and paste it to QuickBooks Test Folder on your Desktop.

Reflect/Show File Extensions

  • Click button Windows+E to open the File Explorer
  • Now you can press’Organize’ and choose the ‘Folder’ and search options
  • For Windows 10, 1 & 8-Press View & choose the ‘Filename Extension’.
  • New choose ‘Hide Extensions’ for the known file types.
  • Chooseapply and okay
  • Access the QuickBooks Auto Data Recovery folder
  • Take the ‘.adr file’ and paste it to the QB folder. Your folder will have a QBW. Adr& tlg file on your QBTest folder.
  • Go to the QBTest Folder and right-click, QBW.adr file’ & Press the ‘Rename’ option
  • Now a delete ‘.adr’ from the end of the file.
  • Open QuickBooks again to access the company file saved in your QBTest folder and certify all transactions are there.
  • Now ‘Run’ verify utility to ensure the integrity of this company file
  • If this company file is fine, then you can move the damaged company file to a separate location
  • Lastly, transfer a copy from ‘QBTest’ to the original site.

Method 2 – Utilize the ‘QBW.adr’ & ‘.TLG.adr’ files

In this solution, you will use the ADR version for both.QBW &.TLG files. This feature will recover the last 12 hours of transactions.

  • Make a ‘New folder’ on the Desktop
  • Name this folder as ‘QuickBooks.’
  • Open the folder that says ‘QuickBooksAutoDataRecovery’.

Note: Check the company file location on the Product Information screen

  • Copy ‘.TLG.adr’ and ‘.QBW.add files & now paste them to the ‘QBTest folder’.

Display the File Extensions

  • Click on ‘Windows+E’ to open the File Explorer
  • Click on ‘Organize’ and choose folder & search options.
  • For Windows 10,8.1 & 8-Press View & select the ‘File name extension’
  • Select ‘Hide extensions’ for the known file types
  • Select Apply &okay
  • In the QBTest folder, you remove the ‘.adr’ from the end of the file name to get a ‘.qbw & .tlg’ files on the QBTest folder.
  • Access the QuickBooks and open the company file that is saved in the ‘QBTest folder’. Verify that all the transactions are there.
  • Now ‘RUN’ the verified utility to ensure the integrity of the company file
  • If the company file is fine, then you can shift the ‘damaged company file’ to some other location
  • Finally, transfer the copy from ‘QBTest, to the original place.

With the above steps, you can quickly recover all the ‘lost’ QuickBooks Data. QuickBooks Auto Data Recovery Tool is an efficient device that helps you get back all your lost QuickBooks Data. If you have doubts in any of the steps above, speak to an expert at QuickBooks support number to get appropriate solutions. The technical team is thoroughly trained and experienced to handle every issue in QuickBooks easily.

The technical help desk is available all the time to assist and help you. Get all your errors resolved instantly by connecting with the QuickBooks contact center. Sometimes, you cannot activate the QuickBooks auto data recovery tool to get back your lost data in a folder, then call technical experts to resolve this issue.

QuickBooks, apart from being a popular accounting software, can be a notable investment for your business, depending on which version you select. Knowing about what each of the QuickBooks products stands for and what it can provide can help you determine which QuickBooks version is best for your business as well as your budget. When it comes to construction-allied businesses, the QuickBooks Desktop Contractor version proves to be your best pal. In this blog, we are going to talk essentially about the QuickBooks Contractor Edition and how it compares with other versions of the software. We will also list its various features and advantages that make it the numero uno choice of the contractors.

QuickBooks Contractor edition

QuickBooks contractor is a special edition of the QuickBooks Premier desktop software tailor-made to meet the requirements of the construction industry. It includes added benefits and features that enable it to simplify accounting for construction. The contractor edition of QuickBooks is ideal for construction, contracting, and any sort of business that needs advanced job costing and project management. The Contractor edition of QuickBooks has the following features;

Job Estimation

Through QuickBooks Contractor, developing and distributing job estimates to prospective customers becomes quite easy. More and more data should be included in the estimate because this data becomes the foundation of the subsequent change orders, invoices, and analyses of the budget.

Changes to estimate orders

The bigger the project, the more chances there are of it going not as planned. When these changes are required in a project, you can immediately make those changes, and QuickBooks will generate a change order then and there.

Also Read – How To Delete Deposit in QuickBooks?

Creation of Purchase Orders

Another significant feature of QuickBooks Contractor is its ability to create purchase orders almost immediately. Project Managers sometimes forget to order essential materials, which can result in costly add-ons and time lost. With QuickBooks Contractor, they can very easily create those purchase orders. Also, they can use purchase orders to identify the required supplies.

Invoice Creation

The estimates can be used to create the invoice. By selecting a pre-determined percentage to bill for each item, you can create either an in-progress invoice or you can invoice only the specified items on the estimate.

Time and Cost allocation

An employee’s pay cost can be attached to a specific work and a service item. When you ascribe the earnings to a particular task or service item, QuickBooks, on its own, calculates any payroll taxes for that work.

Reporting

Another major feature of QuickBooks Contractor is its reporting. As many as 19 kinds of reports are available, which assist in maintaining and evaluating the construction projects. These reports calculate the various parameters associated with the construction business, such as job profitability, job estimates vs the actual comparison, estimates vs the job progress invoices, item profitability, etc.

Job Costing Center

Job Costing Center is one of the most well-known features of the QuickBooks Contractor version. It provides you with a measure of the jobs in profitability. The job costing center displays the top and bottom three such jobs during a period of the last three months. It is also responsible for highlighting your recent performance as well as links to the important job costing reports.

Pros of QuickBooks Contractor Edition

  • QuickBooks Contractor is especially good for contractors who are tracking job costs separately from bookkeeping. QuickBooks Contractor reduces the work by tracking job costs. Job tracking combines the task of job costing and general bookkeeping. Like a large number of small contractors, you might also try to track the job costs in an excel spreadsheet. Not only does the Contractor edition reduce the work by combining tasks, it can also avoid costs that get missed because the job costs are tied to the total company expenses.
  • Experienced contractors who work with a small group of people are quite good at estimating profit on projects they are deeply involved with, even if they do not do the exact job costing. However, as the number of people grows and the multiple crews are involved, they no longer remain closely involved, and it becomes much harder for them to estimate the job profitability. With multiple crews, it is important that you have accurate job costs helping you to evaluate and assist your project managers in controlling the costs.
  • Apart from the remarkable job costing features, QuickBooks Contractor also contains the inventory features of the QuickBooks premier. Materials that are returned from the job site can be recorded as inventory so that the project managers can use them on the next job instead of ordering unnecessary materials.
Cons of QuickBooks Contactor version
  1. Some accounting duties require completion on-site for your company. For instance, a construction company might require the services of a repair technician. It is commonplace for employees to be required to produce invoices for unforeseen costs while on the job. The better choice for this is QuickBooks Online if this is your top goal. QuickBooks contractor does not help very much with this.
  2. Your off-site certified public accountant (CPA) or bookkeeper won’t be able to examine your accounts from their office computer, unlike with online software. Instead, while utilizing QuickBooks Contractor, you must produce an Accountant’s Copy and transmit it to your CPA.
  3. The number of concurrent users for QuickBooks Contractor Edition is capped at five. But let’s say your construction business has a bigger accounting division that needs constant access. In such a situation, QuickBooks Enterprise is the better option for you as it has a contractor-specific edition and supports up to 30 concurrent users rather than the QuickBooks Contractor version.
QuickBooks Pro Vs QuickBooks Contractor

There are a host of differences between the QuickBooks pro and the QuickBooks Contractor version. While QuickBooks Pro offers an open-ended structure that requires the user to fill in what he wants, QuickBooks Contractor has a set of pre-determined formats that can help you with the various requirements of the construction business. When it comes to accounting, the Contractor version will help you with it, though you may still require assistance from an accountant or other qualified resource. QuickBooks Pro’s chart of accounts for contractors mingles job-related and overhead costs, which is just not right. Also, QuickBooks Pro provides fewer accounts in its Chart of Accounts than the Premier Contractor edition does.

There are also a set of differences between the two when it comes to specific business needs. The Contractor version purports to understand your requirements. If its preconceived notion of how your business is run is right, you will be in great shape. If you have a different approach, then it is better to buy a canned setup rather than doing the customization for it. QuickBooks Pro, on the other hand, can give you that virtual identical flexibility to run the accounting for your business.

QuickBooks Mac vs QuickBooks Contractor

This particular version of QuickBooks is right for businesses of any size on an iOS platform that has an annual revenue of less than 1 million US dollars and does not require giving QuickBooks access to more than three people. When it comes to the features, QuickBooks Mac is nearly identical to the QuickBooks Pro version. You can do in QuickBooks Mac everything you can do in QuickBooks Pro. These features include things such as connecting your bank accounts, invoicing customers, and paying bills, just like in QuickBooks Pro. The only drawback is that the QuickBooks Mac does not come in various industry-specific versions.

QuickBooks Premier Contractor includes a customized chart of accounts, a customized product and services list, and various customized reports for construction-related businesses. QuickBooks Premier contractor also allows you to purchase up to five user licenses and also includes a forecasting tool.

Conclusion

We have tried to put forth the various QuickBooks contractor features as well as compared it with other QuickBooks versions. This particular software has proved extremely beneficial for contractors and other construction-related workers. Should you need any further assistance with the QuickBooks Contractor or if you have any queries regarding the same, you can always contact us. We have a team of dedicated QuickBooks professionals who are adept at resolving such issues. Kindly get in touch with us through call or shoot us a mail at [info@quickbooksupportnet.com]. We’d be happy to help!

Frequently Asked Questions

Q1. Is there an industry-specific version of QuickBooks?

Ans. Yes, QuickBooks offers industry-specific versions but only with QuickBooks Desktop. The QuickBooks Premier version allows different versions for different industry verticals. QuickBooks is also working towards adding specific versions in the future, so you should keep checking before the next software update.

Q2. What is the QuickBooks Contractor version?

Ans. QuickBooks Contractor version is a special edition of the QuickBooks premier software which can meet the needs of the construction business. It also includes special features and different reports that are beneficial in helping you budget and account for the costs of the large jobs.

Q3. How does job costing in QuickBooks help businesses?

Ans. QuickBooks Projects has integrated job costing for the construction industry (a feature available to QuickBooks Online Plus and QuickBooks Online Advanced customers). You can accurately examine how much money you spend and make for each task with QuickBooks. To keep track of every dollar, you can take pictures of your receipts and tag hours worked and other expenses for each employment. For quick access, all of your jobs and projects’ profitability and cost reports will let you know exactly where you are.

Q4. How does invoicing feature in QuickBooks Contractor help in business?

Ans. Construction QuickBooks invoicing allows you the freedom to get paid as you choose. It can accept checks, cash, bank transfers, all major credit card types, or both. Your client can pay promptly online by clicking the “Pay now” option on the invoice. One can also swipe a card with the mobile card reader. You can process the payment and then transfer it to your bank account after tracking the same.

QuickBooks is the prominent and advanced accounting software developed to handle accounts, bank transactions, invoices, salary slips, etc. If you have already Setup and Configure Email Service In QuickBooks to your desktop, you can start sending an invoice to your clients or send and receive reports, and you can also perform other transactions within QuickBooks desktop through outlook or webmail id. This QuickBooks added feature is beneficial for small and mid-sized businesses.

What Are The Benefits of Setup and Configure Email Service In QuickBooks?

  • No trouble in emailing estimates invoices to customers
  • Able to send payment reminders to your customers via emails
  • Customers and vendors details are automatically fetched
  • You can fetch data from spreadsheets and attachments up to 2 MB
  • QuickBooks email is used for sending reports within offices or departments.

Why are Requirements for Setup Email in QuickBooks?

  • An email address from any email service company
  • Email user Id and password
  • Incoming and Outgoing email settings which are varied according to the email service provider
  • Server type all details

Steps to Configure QuickBooks Email Service on QuickBooks Desktop

Before moving ahead, you are required to prepare and configure your MS Outlook profile.

Use your existing MS Outlook profile or create a new one to configure your QuickBooks email service. It also required Outlook username, password, incoming mail server address, outgoing mail server address, and incoming email server type.

Procedure to Set up QuickBooks Email Invoices In Outlook

To continue with this process, you are required to create an Outlook profile first.

  • First of all, set up MS Outlook in QuickBooks Desktop
  • After that, fill in your username
  • Then, enter your password
  • The incoming email server address
  • Now, enter your outgoing email server address
  • Finally, enter your incoming email server type.

If you try to log in to your QuickBooks Desktop and send an email, a message is displayed that your password is invalid. Now, you should restore or set up a new password for your webmail account. If QuickBooks desktop doesn’t have MS Outlook, then

  • Move to the “QuickBooks Edit” menu
  • Press on “Preferences”
  • Choose “Forms”
  • Select “Outlook” and press “Ok.”

Procedure to Setup “Email Service” in “Webmail”

  • Connect with secure “Webmail.”
  • Move to “QuickBooks Edit menu” and choose “Preferences”, and send “Forms.”
  • Select “Webmail” and press “Add”
  • Enter your “Email address.”
  • Press on the “Enhance the Security” check box
  • Press “Ok”
  • Sign-in when the “Login Page” appears
  • Allow “Intuit Access”.

Your internet service provider determines Webmail servers and port settings. QuickBooks can automatically furnish Gmail, Yahoo, and other standard email provider’s details.

Select your different email service provider as additional emails if you wish to use a separate email. Ensure to verify this with your Internet Service Provider to set up Webmail in your QuickBooks Desktop.

  • Move to “QuickBooks Edit menu” and choose “Preferences” and “Send Forms”.
  • Choose “Webmail” and press “Add.”
  • Provide “Login Credentials”
  • Press “Ok” to save the changes.

Unlike secure webmail, QuickBooks Desktop requires entering your password if you are using webmail for the first time to send an email.

Suppose QB Desktop doesn’t accept your password, practice a two-step verification process to restore your email service password, and check email settings.

Internet Service Providers and Port Information

Here are mentioned various Internet Service Providers and Port Information in a table. Users can go through the given below tables to know their exact codes and information.

ISP (Internet Company) SMTP (Outgoing Server Settings) SMTP Port number
1AND1 smtp.1and1.com 587 (SSL enabled with password)
ADELPHIA mail.adelphia.net 110
AOL smtp.aol.com 465 or 587 (SSL enabled for incoming and outgoing mail server)
BELLSOUTH mail.bellsouth.net 110
COMCAST smtp.comcast.net 587
COMPUSERV smtp.compuserv.com or smtp.aol.com 110 or 587
COX Business smarthost.coxmail.com 25
COX Central smtp.central.cox.net 25
COX East smtp.east.cox.net 25
Cox West smtp.west.cox.net 25
EARTHLINK smtpauth.earthlink.net 25 (with password)
GODADDY smtpout.secureserver.net 80, 25 or 3535
GODADY with office 365 smtp.office365.com 587 (SSL enabled)
LYCOS smtp.mail.lycos.com 25
MICROSOFT OUTLOOK 365 outlook.office365.com 587 (SSL enabled)
NETSCAPE smtp.isp.netscape.com 25 (SSL enabled)
PRODIGY smtp.prodigy.net 25 (SSL enabled)
ROADRUNNER smtp-server.sc.rr.com 587
SPRINT PCS smtp.sprintpcs.com 25
VERIZON outgoing.verizon.net 465
VERIZON YAHOO outgoing.yahoo.verizon.net 465

Conclusion

This blog is helpful, and you can conveniently Setup and Configure Email Service In QuickBooks. If you have any further queries, call the QuickBooks phone number to get appropriate solutions. You can connect with the technical staff through call, email, or chat. The technical help desk is opened 24/7 hours to assist you with your problems. Get all your QuickBooks issues resolved instantly by getting in touch with its certified professionals. Once you connect with them, a technical representative will help you with accurate methods to fix any QuickBooks issue.

Reconciling your bank transactions with QuickBooks is really helpful since you have access to all your accounting data on one platform. Connecting your bank account to your QuickBooks software is one of the biggest timesavers for your business because the software automatically downloads the transactions from your bank. This blog will give you a general overview of what you need to do to fix the issue if QuickBooks not updating bank transactions.

Steps to fix QuickBooks not updating bank transactions

Sometimes users may notice that certain bank transactions are not visible in QuickBooks because the bank doesn’t connect to QuickBooks. When this occurs the best thing to do is to manually upload the transactions. Here’s what you need to do update your bank transactions manually:

Step 1: Make sure you pick the correct date range so that you don’t import transactions you’ve already recorded. Go to the ‘Accounting’ section and open the ‘Chart of Accounts’ to find the bank or credit card account you want to upload more transactions into.

Step 2: Then you will need to sign in to your bank or credit card’s website so that you can download transactions to your computer. Double-check the date range for the download and then save the file somewhere on your computer, preferably on the desktop.

Steps 3: In certain cases, the bank website may give you a series of options for how to download your transactions. As far as possible, QuickBooks recommends using Comma-Separated Values (CSV), QuickBooks Online (QBO), or Quicken (QFX) so that it becomes easy to upload.

Step 4: Once you complete the download you will need to open QuickBooks once again and sign in. In QuickBooks, you will need to go to the Banking or Transactions menu and then select the Banking tab. choose the account you want to upload the transactions into and then select the File upload option.

Step 5: Click on the ‘Browse’ option and select the file you downloaded from your bank. Go back to QuickBooks, click on the drop-down menu, and then select the account you want to upload the transactions into. Follow the onscreen instructions and match the correct banking fields before you upload the transactions.

Ending Words

Once you successfully upload your transactions you can match and categorize the transactions so that it becomes easier for you to manage them later on. Keep in mind, simply uploading the transactions is not enough because you will need to reconcile them so that there are no duplicate transactions.

You can call the QuickBooks technical support number and speak to a certified expert to learn how to manually reconcile your transactions. The support number is available 24 hours a day so that you can get in touch with certified QuickBooks software experts to set up, import, and categorize all your transactions without any problems.

Do you want to access the new and upgraded features of the QuickBooks software? If yes, it is necessary to update QuickBooks desktop to the newly launched version. Considering this, QuickBooks releases an updated version of the application every year. You can get the most out of the application with the updated QuickBooks version. 

However, if you are hunting for the proper procedure to update QuickBooks to the latest version, we advise to stay in touch with this post. This post will give all the essential details required to update the application. 

Why Should you Always Use the Updated Version of QuickBooks?

You have already listened multiple times about using the QuickBooks Desktop to the latest version, but what are the benefits and advantages of updating the QuickBooks to the latest version. Let’s have a quick overview of why you should always update QuickBooks to the latest release.

  • With new and updated features, you can capture the market more quickly than competitors. 
  • Some of the basic issues and problems are resolved in new versions. 
  • New and improved user interface.

Features That Are Included in QuickBooks Desktop 2022

Below, we have described some of the features that are included with the QuickBooks Desktop 2023. 

1. Intercompany Transactions:-
With the help of this feature, you can now issue a bill or check between your separate data files. This feature is mainly beneficial when you have separate but shared companies that execute the business with one another. 

2. Inventory Item Categories:- 
Now users can easily classify their items into categories in order to keep the inventory organized way. Moreover, you can utilize these categories to get a better understanding of the inventory stock while running the reports. 

3. Inventory Expiration Dates:-
With the upgraded version of the QuickBooks Desktop 2023, you can easily link necessary expiration dates with your serial/lot numbers. Moreover, mentioning the expiration dates will eliminate the risk of selling expired items. Thus, it will help in making the sales decisions, such as discounted items that will expire soon. 

4. Track Vehicle Mileage:-
You can access the QuickBooks mobile application to check the miles you have covered for business purposes. Later on, you can import and approve them within the QuickBooks Desktop. Moreover, you can monitor your trips and vehicle details all year to have your mileage deduction ready while filing the taxes.  

5. Payment Links:- 
With the help of the payment link, you can now easily acquire the payments for items you won’t have to send the invoices.

6. Cash Flow Hub:-
Get your business successful by utilizing the Cash Flow Hub feature in QuickBooks. This feature gives you in-depth information regarding the cash status of your company. Moreover, this feature helps you easily watch the money coming in and going out of the business. Thus, it would help maintain and enhance your business’s cash flow.

Different Ways to Update QuickBooks Desktop

Thinking about how to update QuickBooks?. Well, there are four different methods that you can follow to update the QuickBooks desktop application.

Let’s quickly overview how a user can update the QuickBooks Desktop application to the latest available version. Later on, we will discuss each of these methods in-depth.  

  • On-Demand update download
  • Automatic update download
  • Manually update QuickBooks
  • Release Download

These four are the only methods or ways that you can follow to update a QuickBooks desktop version to the latest available version. 

Method 1: On-Demand update Method

QuickBooks’ on-demand update method, also known as the Immediate update method, empowers the QuickBooks users to download the new updates on their PC immediately and simultaneously. Also, through this method, users do not have to keep running the QuickBooks desktop till the updates get completely downloaded. 

So, let’s look at the procedure you can follow to update the QuickBooks desktop through the on-demand update method. 

  • First, double-click on the QuickBooks desktop icon on your desktop screen to run the application. 
  • Then on the home page, click on the “Help” option in the header section.
update quickbooks
  • Thereafter, click on the “Update QuickBooks” option. 
  • Under the new QuickBooks update window, select the “Update Now” tab and hit the “Get Updates” option.
  • After that, tap on the “Maintenance Releases” option, and a new page displaying the changes and improvements will open. 
  • The downloading process will now commence. 
  • Once the downloading ends, close the QuickBooks desktop application and open it again. 
  • After opening the QuickBooks again, you will see a prompt message regarding the QuickBooks desktop update. 
  • Now, click on the “Install Now” option.
  • Once the installation process ends, then restart your PC.

You have successfully updated the QuickBooks desktop application to the latest version through the on-demand update method.

Method 2: Automatic Update Method

The automatic Update feature is the default setting for updating the QuickBooks desktop to the latest version. Through this method, the QuickBooks desktop will be updated automatically whenever you will not using the QuickBooks but when you are connected over the internet. So, to enable the automatic update feature in the QuickBooks desktop application, below are the steps you can follow to get it done. 

  • First, run the QuickBooks desktop application. 
  • Now, click on the “Help menu” on the home page. 
  • After that, click on the “Update QuickBooks” option under the drop-down list. 
  • Once the QuickBooks update windows open, click on the “Options” tab at the top of the page. 
  • Now, select the “Yes” option in front of the “Automatic Update” feature and “Yes” for the “Shared Downloaded” feature.
  • At last, click on the “Save” option and then hit the close option.

You have successfully turned on the Automatic Update feature on the QuickBooks desktop. From now onwards, you don’t have to update the QuickBooks repeatedly. The new updates will get automatically downloaded at the time when your PC is connected to the internet and you are not using the QuickBooks. 

Method 3: Manually Updating QuickBooks

The manually updating process is the next method for updating the QuickBooks desktop application. Through this method, you must manually download the newly available updates of the QuickBooks desktop application. So, below mentioned are the steps that you can follow to update the QuickBooks to the latest available updates manually. 

  • First, exit the QuickBooks desktop application. 
  • On the desktop screen, right-click on the “QuickBooks” icon and click on the “Run as Administrator” option. 
  • Now, on the “No Company Open” screen, click on the “Help” menu option and then click on the “Update QuickBooks” option. 
  • Click on the “Option” tab and then select the “Mark All” option.
  • Then, click on the “Save” option.
  • After that, click on the “Update Now” option and tick mark the “Reset update Box.”
  • Now, click on the “Get Update” option. 
  • Thereon, the update will start downloading. Once the downloading ends, close the QuickBooks desktop application and launch it again. 
  • After that, a new pop-up display message on the QuickBooks home page will be opened on your screen. 
  • After that, click on the “Install Update” option and then click on the “Yes” option.
  • Once the installation process of updates ends, restart your PC.

You have successfully updated the QuickBooks desktop application through the manual update process.

Method 4: Release Download

Through this release download method, users can download, install & setup the available updates without even going for the update feature. This method is commonly used for updating all the copies of the QuickBooks desktop.

If you are using the QuickBooks desktop in a pro or premier multi-user mode, then you must share the updates for all the users. So, for updating the QuickBooks pro and premier multi-user mode, below are the steps you can follow to get it done.

  • First of all, open the QuickBooks shared company file.
  • Then, go to the “Help” menu, and click on the “Update QuickBooks” option.
  • Next, click on the “Options” tab. Then click on the “Yes” option in front of the “Shared Download” option.
  • At last, close the process by clicking on the “Save” option.

By performing these steps, you can now share the downloaded updates to all the PCs.

Now, that’s all with the methods you can follow to update the QuickBooks desktop to the latest available version.

Download Updates From QuickBooks Website

This method empowers the users to download the new updates of their QuickBooks desktop application from the official website of QuickBooks.

  • First, go to the official Downloads and Update page of QuickBooks, i.e., https://downloads.quickbooks.com/app/qbdt/products
  • Then under that page, under the standard start-up, select the country, QuickBooks desktop version, and the year you use the application. 
  • There, after a click on the “Search” option. 
  • After that, below the Download box, you will see the “Get the Latest Updates” option. 
  • Now, the updates will start downloading.
  • Once the downloading process ends, open the downloaded file and install the updates in your system. 
  • After that, restart your PC.

You have now successfully updated the QuickBooks desktop to the latest version. 

How to Update QuickBooks Desktop on Mac 

If you are using the QuickBooks desktop application on Mac, then below are the steps you can follow to update the QuickBooks desktop application to the latest release. 

Method 1: Updating the Version Within Application

For updating the QuickBooks desktop on Mac through the QuickBooks application, here are the steps you can follow to get it done. 

  • Firstly, run the QuickBooks desktop application. 
  • Then under the drop-down list, click on the “QuickBooks Update” option. 
  • After that, it will show you the available updates, and click on the install option. 
  • Once the updating process of the QuickBooks ends, then the QuickBooks desktop open will start automatically. 

Method 2: Manually updating the QuickBooks

  • The first step is to uninstall the QuickBooks desktop application.
  • Now, go to the QuickBooks Product updates page.
  • Select your QuickBooks product and version, and then click on the download option.
  • Once the downloading ends, then click on the downloaded .dmg file.
  • Now, drag the QuickBooks desktop icon to the Applications folder and install it.

So, the next step is to restore the company’s file in the QuickBooks Desktop application, for which below are the steps you can follow. 

  • On your Mac laptop, go to this location, Preferences > Backup > Reveal Backup Folder > Open the Downloaded Folder, where you saved the file.
  • Double-click on the backup file and drag the file to the QuickBooks company file location.
  • After that, open the QuickBooks Desktop application and click the “Browse” option.
  • Now, please select your company’s file from the folder and then open it.
  • After that, click on the “Continue” option, enter your company’s file name, and click on the “Save” option. 
  • At last, ends this procedure by clicking on the “OK” option.

Following this procedure, you have successfully updated the QuickBooks desktop application to the latest available version. 

Final Words!

Through this post, we assure you that now you can easily update QuickBooks to the latest version (2022). Also, you can now avail the top-notch features of the QuickBooks software to manage your accounting tasks easily. However, if you encounter any issues while updating the software, you can consult with our professionals anytime through the live chat facility. 

Are you stuck with the Query Processing Error QuickBooks and unable to resolve it? Worry Not!! In this comprehensive post, we have discussed the proper troubleshooting solutions to eliminate this error. Users often strike with Query Processing Error in QuickBooks while preparing the invoices. Whenever the error triggers, it interrupts the users in generating invoices which might lead to delays in the ongoing work.

However, it is crucial to overcome the QuickBooks Query processing error. So, get in touch with this article till the end and get your issue resolved easily.

Wondering how to tackle the Query Processing error in QuickBooks? All you need to do is to place a call at @+1-855-603-0490, and our professionals will guide you in the best possible manner.

Reasons That Might Trigger Query Processing Error In QuickBooks

It is a must to know the possible reasons that might give rise to the Query Processing error in QuickBooks. To make you aware of them, we have listed a few below.

  • You are not using the QuickBooks Desktop version of the newly launched version.
  • Sometimes, damage in the company file location might also lead to this error.
  • It might evoke due to the damage or corruption in the data file.
  • Another reason could be misconfigured security settings.

How to Fix Query Processing Error QuickBooks?

Now that you are well-versed about the root causes that might lead to Query processing Error In QuickBooks. We have mentioned some simple procedures that would help you eliminate this error.

Solution 1: Update QuickBooks To the Latest Release

QuickBooks updates are meant to resolve the known shortcomings of the program. It means that using the latest version of the program ensures that you are using the most error-free and efficient version of the program. Also, updating QuickBooks keeps its annoying technical errors at bay. To update:

  • Press and hold the CTRL key and open the QuickBooks Desktop application.
  • Thereafter, click on the Help icon to proceed further.
  • Now, you must choose the QuickBooks version that you are presently using
  • Move to the Update QuickBooks Window and click on Update.
  • Here, you need to select the latest version of the QuickBooks program.
  • Next, click on the Update option and wait until the update procedure finishes completely.
  • In the end, close QuickBooks and check if the error is fixed.

Solution 2: Open A Sample File in QuickBooks

After updating QuickBooks, if the query processing error QuickBooks continues, open a sample file to resolve the problem:

  • First of all, locate the QuickBooks icon on your device.
  • Now press the CTRL key and double-click the QuickBooks icon.
  • Don’t release the CTRL key until the No Company Open window appears on the screen.
  • Moving ahead, click the No Company Open heading.
  • Here, you must choose one sample file and hit the Open button.
  • After performing this series of actions, confirm whether the error is fixed. If not, try the next procedure.

Solution 3: Open Your Company File from A Different Location

If you are able to open the company file from a different location, it means the folder containing the QuickBooks file is damaged. If not, it reflects that the company file itself is damaged. To perform this test, go through the step-by-step instructions given below:

  • First of all, you need to create a new folder on your Desktop and name it QBTEST.
  • Thereafter, open the folder containing the QuickBooks company file and locate the file with the .QBW extension.
  • Now click on the file to highlight it.
  • Once highlighted, press CTRL + C together to copy the file.
  • Now go to the newly created folder on the desktop and paste the company file by pressing CTRL + V keys together. 
  • Once done, launch QuickBooks and press the CTRL-key.
  • Don’t release the key until the No Company Open appears.
  • Moving ahead, click Open and browse your company file from its new location.
  • Now try to open the company file to check if the QuickBooks query processing error is fixed.

If none of the solutions works, move to the next troubleshooting procedure.

Solution 4: Stop QuickBooks During Startup

Below are the steps that can help you in eliminating the QuickBooks query processing error:

  • In the first place, press and hold the Alt key on your keyboard.
  • Next, double-click the QuickBooks icon.
  • Thereafter, you need to type your QuickBooks Password in the specified area.
  • Once done, provide all the required information in the specified fields.
  • Moving ahead, release the Alt key and click on the OK button.
  • Now press and hold the Alt key and launch the menu on your screen.
  • In the end, release the Alt Key after signing into your QuickBooks account.

Solution 5: Recreate the QuickBooks Company File

If none of the above solutions helps in troubleshooting query processing error QuickBooks, then try the below-given steps to recreate your company file. It can help if the company file is damaged.

  • In the beginning, open your QuickBooks application.
  • Next, you need to go to the Company menu.
  • After that, click on the Users option to move ahead.
  • Here, you need to select the Set Up User & Roles.
  • Locate the erroneous user files and then delete them.
  • Navigate to the Account menu and click New and it will create a new user file.
  • Enter the correct login credentials – your username & password in the defined fields.
  • Now set up Roles for the user.
  • Once done, click OK to create a new user.

Solution 6: Turn Off UAC (User Account Control)

If the error continues to trouble you, check if turning off the User Account Control can help you in the error resolution:

  • To start the procedure, terminate the running programs on your computer.
  • Next, open the Control Panel window.
  • Now click on the Search field and type User Account in the field.
  • Click on the Change User Account Control option.
  • After that, hit the Yes option on the same window.
  • Proceeding further in this procedure, select Never Notify, which will stop the notifications.
  • Click OK and restart your computer.
  • In the end, open and use the QuickBooks desktop software.

To End Things Off!

We hope that this post might be beneficial for you in dealing with Query Processing Error in QuickBooks. Now, you can easily generate invoices in QuickBooks without any issues. However, if you want any further assistance regarding this error, you can consult with our professionals through a live chat option. Otherwise, you can also message our experts and obtain quick assistance within the shortest time applicable.

With the new updates and user requirements, Intuit launched several updates and upgrades yearly. If you discover that the older version of QuickBooks fails to meet your business requirements. This is the best time to upgrade the QuickBooks Desktop to 2022. With the upgraded version of the accounting software, you can get your hands on the newly launched features and enhance your accounting experience. 

As per the latest update, Intuit discontinued the QuickBooks Desktop 2019 version on 31 May 2022. So, if you are using that version, upgrade it to a new one immediately. With the help of this post, you can grab all the essential details to upgrade to QuickBooks Desktop 2022. 

Are you running short of time and looking for instant help to upgrade QuickBooks Desktop to 2022? Give us a call at @+1855-603-0490 and our professionals will suggest the best possible ways to resolve the issue. 

QuickBooks Update Vs. QuickBooks Upgrade 

Many times, users might get confused between the QuickBooks update procedure with that to the QuickBooks upgrade. However, these two are different from each other. 

QuickBooks updates, also known as maintenance releases or patches, This is mainly related to the improvements in the existing version of the program. Intuit rolls out QuickBooks updates on a regular basis. Using the updated version of the program ensures that you can make the best use of your accounting application. It resolves the existing issues in the program’s code base and improves the existing features for the users. If not updated, you can get multi-faceted issues in the program. 

On the other hand, the QuickBooks upgrade is not an improvement in the program, but it is the entire new program having the new features and functions for the users. Besides, one major difference between the two is that updates are free, whereas you need to pay the full fee of the program if you want to upgrade it. Additionally, the update is a simple process. Contrarily, you need to modify the entire database of the program in order to match the newly added features. Upgrades are a non-reversible process. Once you upgrade your company files to the new database structure, you may need help to open them in the older version of the program.

How To Upgrade QuickBooks To 2022 Version? 

There are several ways to upgrade your QuickBooks application. Check below:

Upgrade your QuickBooks Desktop Subscription 

When a new version of the QuickBooks Desktop rolls out, Intuit notifies you about the same on opening the QuickBooks program. You can upgrade the program by following the below-given steps: 

  • Once you have decided, select the Upgrade Now option. 
  • If you want to keep the current version of the program, select Keep the old version on my computer. 
  • Thereafter, select Let’s Go.
  • QuickBooks will not only install and activate the new version of the program for you but also update your company file for the new version of the program. 
  • Once the upgrade procedure is completed, select the Open QuickBooks option. 

Important: The time taken in the upgrade process may vary as per your Internet speed and the size of the company file. 

Upgrade QuickBooks Without Subscription

If you cannot the prompt to upgrade QuickBooks, fret not! It depicts that you are using a one-time purchase of QuickBooks product. You can utilize the QuickBooks upgrade tool to get the job done. Below are the steps: 

  • In QuickBooks, select Help and then opt for the Upgrade QuickBooks option. 
  • Next, you need to choose QuickBooks upgrade 2021, or 2022, whatever the version you want to upgrade to. 
  • After selecting your QuickBooks version from the available options, hit Upgrade Now. 
  • You may choose to keep the current version of the QuickBooks program on your machine. To do so, you need to select Keep the old version on my computer. 
  • Now tap on the highlighted “Let’s go” option to end up the entire process. . 

The previous action will make QuickBooks download, install, and activate the new version of the program. Besides, your company files will also be updated according to the new database. 

Upgrade QuickBooks Using Discovery Hub

Discovery Hub is included with the QuickBooks Desktop Pro, Premier Plus, Accountant Plus 2022, and all editions of the QuickBooks Desktop Enterprise 22.0. It is located on the top right of the menu bar. Moreover, It gives a preview of the new features included with the QuickBooks upgrade 2022 version. You can get the options to get the new features from here by upgrading your QuickBooks Desktop software. Below, we have discussed the proper instructions to do the same::

  • Go to the Discovery Hub from the menu bar and then select Upgrade to QuickBooks 2022.
  • Next, you need to select Proceed to upgrade, then hit the Upgrade now button. 
  • If you want an older version of the program on your machine, select Keep the old version on your computer. If not, leave this section blank and proceed further.
  • After the completion of the installation process, select Open QuickBooks.

What If Upgrade Tool Can’t Locate Your QuickBooks Desktop Purchase? 

Sometimes, when upgrading QuickBooks Desktop, you may not get prompt to choose a new version of the program. This problem occurs when you have used a different email for purchasing QuickBooks than you use for the program. In such a case, you need to provide your QuickBooks License info. Below are the steps: 

  • Find the email from QuickBooks that confirms the purchase. 
  • Thereafter, you need to enter your License Number and Product Number. 
  • Once entered, click Continue, and it will finish the upgrade process. 

Note: You can get your License info by logging into your Customer Account Maintenance Portal (CAMPs). 

Long Story Short! 

The steps discussed in this post can help you in upgrading your QuickBooks to the latest release. Besides, it also differentiates how the upgrade procedure differs from the QuickBooks update. Technical hiccups can arrive when upgrading the program. In such a case, you can reach out to our QuickBooks experts using our chat or email channels, and we will assist you with the best solutions. 

Frequently Asked Questions

Q1: Do I need to upgrade QuickBooks every year? 

Ans. No! It is not necessary to upgrade QuickBooks every year. There are many users who are still using the 2007 version of the program. When you upgrade the program, you will see that the older version is not working on the computer. However, it is crucial to update your accounting software on a regular basis. Updating QuickBooks will help you to utilize the enhanced features of the program in your day-to-day business accounting. 

Q2: What is the QuickBooks Desktop service discontinuation policy? 

Ans. QuickBooks Discontinuation policy describes the discontinuation of an old QuickBooks version. For instance, after May 31, 2022, QuickBooks Desktop for 2019 will be discontinued. Intuit notifies users in advance about the discontinuation of an older QuickBooks version. It doesn’t mean that you can’t use QuickBooks Desktop 2019. However, you may not be able to access the add-on services with QuickBooks 2019 or any version of the program which is discontinued. Besides, the support for the discontinued version is also not provided. 

Q3. What is the significance of upgrading QuickBooks to the latest version?

Ans. Here, we have provided some advantages of upgrading QuickBooks Desktop to the latest released version. 

  • You can get better data security for your crucial company data.
  • Moreover, it also enables the users to monitor the status of invoices in real time. 
  • Upgrading QuickBooks to the latest version will help eliminate the bugs and other security issues. 
  • Also, you can run the QuickBooks Desktop without encountering any technical bugs. 

Q4. How Much time does the QuickBooks Desktop upgrade process take?

Ans. The upgrade process of QuickBooks Desktop will take only few minutes. In short, the upgrade process might take 25-30 minutes to complete.

Posts pagination