Archives

Home > Blogs > 2023

If you are working with QuickBooks on your same system for a long time, you will be feeling bored and wish to Transfer QuickBooks Desktop to Another Computer. Various factors are responsible for this decision. You can use the migratory tool to transfer QuickBooks software from an old to a new computer, and a maximum of three files can be moved at one time. When you want to do this, you should follow the steps mentioned below to reinstall the QuickBooks Desktop installation.

QuickBooks is an advanced and multi-purpose accounting software to manage accounts, transactions, invoices, bills, taxes, payroll systems, etc. It is used to manage and maintain accounting and other tasks at the industrial and individual levels.

  • Make sure that you have product and license information
  • Uninstall QuickBooks to reinstall it
  • Download QB installation files
  • Then, install QuickBooks

If you have a QuickBooks license and product number but do not have QB installation files, then download them from Intuit website.

  • Move to ‘Help’ in the QuickBooks menu bar
  • Press on ‘register QuickBooks
  • Mention ‘business phone number’ and ‘postal code’.
  • Once you finish the information entering task, your QuickBooks will get registered.
  • New Computer’ registration detail is also recorded by Intuit

Suppose you have registered already, no need to register it again. When you transfer QuickBooks from one computer to another, you also share company files. Once QuickBooks is appropriately installed to a new system, it will become simple to copy all company files to a new computer.

If you find any issue in transferring QuickBooks to another computer, you must call the QuickBooks customer service number to get instant solutions immediately.

How Does the Migratory Tool Transfer QuickBooks from One Computer to Another Computer?

The migrator tool is one of the excellent features of QuickBooks software. You can complete the process through this tool in just a few clicks.

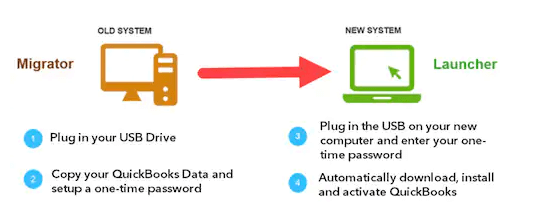
The migrator tool is also called a Transfer QuickBooks Desktop to Another Computer. It can be accessed if you are an Admin user. You should create a complicated password and copy or write it somewhere or in a secured place.

It is required only a single time during QuickBooks transfer. The migratory tool will allow you to take a maximum of three company files in your USB flash drive along with supportive documents.

A USB flash drive will physically move the file, but the migratory tool will internally perform a technical transfer task. The migratory tool will also download the correct QuickBooks desktop version in another system and help you to set up all the files.

What are the Requirements of Migratory Tools to Transfer QuickBooks To Another Computer?

  • Internet connection is available in a new computer
  • Pen Drive should have a minimum of 150-200 MB free space.

What Are The Data Copied Through Migratory Tools While Moving QuickBooks?

The required QB data is listed below to run QuickBooks Desktop.

  • QuickBooks Desktop details and other versions
  • Maximum 3 company files with supportive documents
  • All related files, custom templates and forms
  • QB templates and letters
  • Local attachments
  • Memorized reports
  • Spell checker
  • Financial Statement Designer
  • Cash flow
  • Statement writer
  • Business planner (.bpw)
  • QB loan manager(.lmr)
  • Advanced reports
  • Layout designer
  • Printer settings

What Are The Data That Won’t Get Copied Through a Migratory Tool While Transferring QuickBooks?

Few data are listed below that can’t be copied while moving Transfer QuickBooks Desktop to Another Computer.

  • Multi-user configuration setting
  • Payroll or payment details will not get copied as Intuit policy to secure data
  • Uninstall ‘Intuit Data Protect’ from the old system and reinstall it in another system
  • Company file not opened could not get copied
  • Back-ups created manually by a user will not be transferred.

How to Use Migratory Tools to Transfer QuickBooks From Old to a New Computer?

Some steps are listed below to use the Migratory tool in the old computer and new computer after transferring QuickBooks.

On Old Computer

  • Move to ‘File Menu’ in the QuickBooks menu bar.
  • Choose ‘Utilities’.
  • Search ‘Move QuickBooks’ to another computer and then press on it.
  • After this, press on ‘I am ready’ and create ‘One-Time Password’.
  • Select ‘Pen-Drive’ to use.
  • Wait for a few minutes when the files get copied.

On New Computer

  • Insert USB flash drive.
  • Search the ‘Move_QuickBooks.bat’ file on a USB flash drive and run it.
  • Type the Password that you have created.
  • Press on ‘Let’s Go’.
  • Migrator tool will now finish its work.

No fixed time is mentioned to complete the process. It totally depends upon internet speed and company file size.

Conclusion

The given above tips will help you learn the Migratory tool to Transfer QuickBooks Desktop to Another Computer to a new computer. If you can’t find ways suitable for sharing QuickBooks to another computer, you must call QuickBooks support to move QB company files to another computer. A technical representative will provide you with appropriate solutions to perform the transferring task of QuickBooks from an old to a new system. The technical executive is trained, professional, and expertise in solving any queries in QuickBooks. The helpdesk is opened 24/7 hours a week and 365 days a year to serve and assist you.

Users often convert Quicken data into QuickBooks Desktop to access the accounting application’s enhanced features. But, the users don’t have a clear vision of how to do so. So, to make it more convenient and easier for you, we have described the detailed steps to convert Quicken data into QuickBooks Desktop. We suggest you to read this article properly to gain in-depth information. 

Got stuck while trying to convert Quicken data into QuickBooks Desktop? Ring us at @ +1855-603-0490 and connect with our dedicated professionals to overcome the issue immediately. 

Also Read – QuickBooks already has A Company File Open Issue

Points You Must Remember Before convert Quicken data into QuickBooks

Below, we have illustrated some key points you must remember while proceeding with the conversion process.

  • Once you have converted the Quicken data to QuickBooks, it can’t be reversed. So, you must be sure before converting the data from one application to another. 
  • Another important thing is to prepare the backup of the Quicken data that you need to convert. So, if the data gets affected during conversion, you have a duplicate file copy. 
  • For instance, if you are accessing Quicken software on a Mac device, you first have to convert the Mac files to Windows. This is so because only the Windows files in Quicken are converted into QuickBooks software. 

In What Circumstances You Can Utilize Quicken Converter 

Quicken Converter is used to convert data from one accounting software to another. Down below, we have listed some of the instances when you can utilize the Quicken Converter, which is as follows;

  • You can utilize the Quicken Converter if you are migrating from a Quicken version that is not equivalent to the QuickBooks Desktop version you are using. 
  • Moreover, you may also skip accessing the Quicken Converter and convert directly to QuickBooks via Conversion Utility while using the Quicken version equivalent to your QuickBooks version. 
  • Apart from these, it is not feasible for the users to convert the Quicken data to QuickBooks through Quicken Converter or the Conversion Utility. This is so because the Mac files won’t get converted, so you have to convert them into Windows files first. 

Also Read – How to Reset QuickBooks Admin Password

Stepwise Instructions to Convert Quicken Data Into QuickBooks Desktop Data 

Are you unaware of the steps to convert Quicken data into QuickBooks Desktop? Worry Not!!. Instead, look at the instructions below to do the same. 

Stage 1: Through Quicken Converter

First Step: Get the Latest Version of Quicken Converter Download

Before utilizing the Quicken Converter Tool, check that you haven’t installed another version of it on your device. If you are already accessing the older version of it, then first you have to uninstall it from your device and then download the latest one. The users are supposed to download the most recently launched version of Quicken Converter that tallies with the version of QuickBooks Desktop you are accessing. 

Second Step: Install the Recently Downloaded Quicken Converter and Convert It. 

  • In the beginning, open the downloaded Quicken Converter on your device and hit the Next button. 
  • After this, mark the “I accept the terms in the License Agreement” and proceed further.
  • To initiate the Quicken Converter installation, tap Next, followed by the Install option. 
  • Choose the highlighted Launch Quicken Converter and select the Finish option. 
  • Following this, opt for the Open a data file located on this computer and choose Select File.
  • Now, search for the Quicken file (.QDF) and opt for the OK button. 
  • Afterwards, navigate to Convert it! option and then hit OK.
  • Finally, to get your new Quicken Data File (.QDF), tap on the Save option > Exit. 

Also Read – Resolve QuickBooks Error 6147

Stage 2: Search for the .QDF not .QFX file 

The Conversion tool generates a .QFX file (which isn’t used during conversion). Also, it prepares the .QDF file, which is the file that you wish to convert. So, for that, you have to search for the upgraded .QDF file from the folder named Q18Files or Q17Files. You will find that the Q18Files or Q17Files have the exact location of your original Quicken file. Apart from these, .QDF file also consists of the exact name as your original Quicken file. 

Detailed Steps to Convert the Quicken Data into QuickBooks Desktop Via Conversion Utility 

  • To begin with, navigate to the File menu and hit the Utilities option. 
  • After this, go to the Convert option followed by From Quicken option.
  • You must pick the Quicken file (.QDF) you wish to convert.
  • Soon after this, you will see that the Conversion Utility will assist you with the remaining conversion steps. 

Note: For instance, if you want to obtain any additional details regarding the Conversion Utility, hit the F1 key. After this, open the Help window in QBDT and include “Convert from Quicken”. 

Ending Words!!

Hopefully, we assure you that you have gained immense knowledge on converting Quicken data into QuickBooks Desktop. However, if you still get stuck at any point while converting the data, you can get help from our professionals through the live chat facility. 

Many times the users might get confused regarding the proper procedure to access company files located on a remote computer. Worry Not!! In this comprehensive post, we have discussed all the relevant facts required to launch the data file placed on the remote computer. Furthermore, for the detailed procedure, we recommend you to stay in touch with this post till the end.

Didn’t have any clue on how to access a company file located on a remote computer? Call us at @+1855-603-0490, and talk to our professionals, who are available round the clock to help you in the best possible manner asap.  

What are the Advantages of Remote Accessing QuickBooks?

With the help of Remote Accessing in QuickBooks, users can easily launch their data file placed on the server computer. Doing so will help them minimize the number of hours they work weekly. Apart from this, it also offers numerous benefits, which are as follows; 

  • The users can work from sitting anywhere in the world with a stable internet connection.
  • Moreover, the best part is that you can invest some extra hours to your business even while travelling.
  • It gives you access to your account from a mobile device and the system. 
  • Additionally, you can access any company file and your client’s system outside of normal working hours. 

Also Read – How To Resolve QuickBooks Error 15217

Points You Must Consider Before Opening Data File Stored on Remote Computer 

Before proceeding further, it is essential to know a few points to access QuickBooks Desktop remotely. Let’s have a look at these points attentively. 

  • The users need to map server on the host computer as a network drive. However, if you encounter any issue in mapping the network drive via UNC, you can implement the same procedure through the Server’s IP address. 
  • Moreover, ensure you have set up computers to access the file in a multi-user environment. 
  • Apart from these, you must also set the folder where the data file is placed. 

Stepwise Procedure to Open a Company File located on a Remote Computer in QuickBooks

This blog section lists all the steps you must apply to access data files placed on a remote computer in QuickBooks. Let’s have a look at the points given below appropriately. 

Stage 1: Get The QuickBooks Database Server Manager on Your Remote Computer 

QuickBooks Database Server Manager is a utility allowing users to configure the QuickBooks server to access the multi-user environment. Thus, it is essential to download and install the QBDBMgrN if you haven’t installed it previously. For that, apply the steps written below attentively. 

  • In the beginning, download the most upgraded version of QuickBooks Desktop on your device. 
  • Soon after this, navigate to the QuickBooks File menu and opt for the Switch to Multi-User Mode. 
  • You should tap the Yes option from the multi-user hosting setup required window. 

Also Read – How To Repair QuickBooks Error Code 80070057

Note: When installing the QuickBooks Desktop, the QuickBooks Database Server Manager starts running in the background. This service might run on the computer that runs your data file even if QBDT is not already open. 

  • Afterwards, hit the Ok button on the Multi-User Setup Information window. 
  • Next, you are supposed to include the relevant users by accessing the Company and then choosing Users. Later on, hit the Set Up Users and Roles followed by the New option.  

Stage 2: Enable the Network Discovery On and Disable Password Protected Sharing (Optional)

This is an optional method, but it is essential that the server must have enabled the Network Discovery. Also, it must be evident to access the file through a UNC path easily. 

Moreover, the users might be prompted with the Network Password when you have enabled the Password Protected Sharing. In such a scenario, you can either sign-in by accessing the network password or disable the feature. 

Furthermore, you must perform this procedure on the server or host computer. Also, you must perform it on all the workstations requiring access to QuickBooks remotely over the network. 

  • In the initial stage, launch the Control Panel on your computer.
  • Navigate to the Network and Sharing Center, followed by the Change Advanced Sharing Settings option. 
  • Now, you have to expand the Profile Type you are presently using and then move further. 
  • After this, opt for the Turn on Network Discovery option under the Network Discovery. 
  • Move further by tapping on the Turn-Off Password Protected Sharing option. 
  • In the end, hit the Save Changes option to restore all the relevant changes made. 

Stage 3: Locate And Then Launch the QuickBooks Company File 

Now, users are supposed to find and open the company file once the process ends. 

  • In the beginning, move to the QuickBooks File menu and hit the Open or Restore Company option.
  • After this, you are supposed to opt for the Open a Company File option and then click the Next option. 
  • Now, you must search where you have placed your company file.
  • For Example:- If your company file is stored in Drive E, navigate to the data file name (E:) in the list. 
  • You must look for the company file with the .QBW file extension from the list. Later on, opt for the Open option. 
  • Whenever asked, you are required to add the username and password in the required text fields.  

Also Read – Resolve QuickBooks Error 6147

Summing It Up!!

With the help of this detailed post, we hope that the procedure to access a company file located on a remote computer has become simpler and easier for you. However, if you need help with any of the steps above, consult with our professionals through live chat for immediate help.

Usually, the users might end up with QuickBooks already has a company file open issue while launching the data file. In other instances, it might pop up when the multi-user setup on the server computer and workstation is inappropriate. Every time the error occurs, it flashes the following error message on your computer screen indicating: 

“QuickBooks already has a company file open”

However, fixing the Can’t open QuickBooks already has a company file open issue is mandatory using the correct techniques. 

Facing difficulty while resolving QuickBooks already has a company file open issue? Connect with our professionals by placing a call at @+1855-603-0490 and resolve your issue within the shortest time applicable. 

Factors Responsible For “Can’t Open QuickBooks Already has a Company File Open” Problem. 

Here, we have listed some of the prominent causes why users cannot access the QuickBooks Data File. 

  • It might occur when users utilize different paths to access the QuickBooks company file.
  • There might be the possibility that the third-party applications running in the background is creating issues with QuickBooks processes.
  • Sometimes, it may occur when QuickBooks Database Server Manager is not running properly.
  • Another reason may be the inappropriate setup of multi-user mode in QuickBooks. 

Recent Post – How to Setup QuickBooks Workforce in QuickBooks Desktop

Simple Solutions to Apply When QuickBooks Says Company File is in Use 

Go through the simple resolution methods listed below to overcome QuickBooks already has a company file open issue. 

Solution 1: Restore the Newest Backup of the QuickBooks Desktop

You must verify that you are utilizing your device’s newly released version of QuickBooks updates. However, if it’s not installed already, get it installed to remove the minor glitches that might interrupt while accessing the data file. 

  • In the initial stage, hit the F2 key from your keyboard to bring the Product Information window into view. Herein, you must look for the QuickBooks version you use on your device.
  • Move to the QuickBooks Help menu and tap the Update QuickBooks Desktop option to install the newly launched version.
  • Once you have downloaded the updates, go through the instructions on-screen. Later on, open the QuickBooks application to opt for the Install Now option. 
  • Finally, verify whether you can launch the data file without encountering the error. 

Solution 2: Turn On Server Hosting and Disable Workstation Hosting

If you are still experiencing the error, then you must try to figure out the hosting setup on your server computer and on all workstations. For that, apply the stepwise instructions given below thoroughly. 

  • Firstly, launch QuickBooks and move to the File menu.
  • Afterwards, hover your cursor over the Utilities tab followed by the Stop Hosting Multi-User Access to turn off the multi-user mode. 
  • You are supposed to run the same steps on all the workstations to switch on the single-user hosting mode.
  • Thereafter, launch your server computer and go to the File menu > Utilities option. 
  • Hit the Host Multi-User Access to switch on the multi-user hosting on the server computer and repair the hosting setup. 
  • After this, try accessing the QuickBooks data file on the network and check whether you can access the file. 

Also Read – How to Recover data with QuickBooks Auto Data Recovery

Solution 3: Use the Task Manager to End All the Background QuickBooks Processes 

  • Firstly, end all the background processes in QuickBooks by accessing the Task Manager. 
  • Afterwards, hit the Ctrl + Shift + Esc keys together to launch the Task Manager. 
  • Proceed further by tapping the Processes tab and navigating the QuickBooks processes running. 
  • Furthermore, look for the process named QBDBMgrN.exe, right-click on it, and pick the Delete option. 
  • Finally, implement the same process for other QB processes to delete them, and once completed, re-open QuickBooks. 

Solution 4: Give a New Title to the .ND and .TLG files To Repair The Damage

At times, the damage in the Network data (.ND) and transaction log files (.TLG) might obstruct QuickBooks from accessing the data file. Therefore, repair the damage in these files by renaming them by performing the steps below. 

  • To begin with, move to the QuickBooks File Directory and navigate to the files with .ND and .TLG file extensions. 
  • Once you get these files, right-click on them one by one and opt for the Rename option to alter the filename. 
  • Now, include .OLD with the name of the file name as a suffix and press the Enter key to restore the changes made. 
  • Finally, try opening both these files and look whether you are still receiving the same error. 
Solution 5: Verify QuickBooks Company File is Opening
  • First, open the Start menu by tapping its respective icon from the desktop. 
  • Afterwards, look for the File Explorer and tap on it to open.
  • Following this, navigate to the QuickBooks.exe file you will locate from the QuickBooks folder. 
  • Hold down the Ctrl key and double-tap on the QuickBooks.exe file to open it on your device. Herein, you must ensure you won’t leave the Ctrl key until the QuickBooks Desktop is opened on your computer screen. 
  • Then, try launching the data file; if you cannot access it, try once again by launching the sample data file. 

Also Read – Resolve QuickBooks Error 6147

Final Thoughts!!

With the help of this comprehensive guide, we assure you that you can easily resolve QuickBooks already has a company file issue. However, if you still encounter the same issue or require any expert’s help, connect with our professionals through live chat. They will analyze your issue properly and suggest the proper solutions within no time.

With the introduction of Setup QuickBooks Workforce in Desktop, the time has gone when you have to wait for your employer to give you a printed pay-stub or W-2. After sending an invitation to the QuickBooks workforce by an employer, you can easily get access to your pay stubs and W-2. Moreover, the employees can also change their personal details such as a home address, bank account details, etc. Continue reading this entire blog to get detailed information on how to setup QuickBooks Workforce in Desktop. 

Facing trouble while trying to set up QuickBooks Workforce in QuickBooks Desktop? Call us at @+1855-603-0490 and connect with our highly skilled professionals to clarify all your doubts asap.

Procedure to Setup QuickBooks Workforce in Desktop Version

Facing issues while getting the appropriate steps set up QuickBooks workforce in the QBDT application? Your search ends over here. Below, we have listed proper instructions to accomplish the task easily.

Setting Up QuickBooks Workforce:

Step 1: Sign in to QuickBooks Desktop:

  • Open QuickBooks Desktop and sign in to your company file as the administrator. 

Step 2: Enable QuickBooks Workforce:

  • Click on “Employees” in the top menu.
  • Select “Manage Payroll Cloud Services.”
  • Check the box next to “ViewMyPaycheck” to enable QuickBooks Workforce.
  • Click on “Save Changes.”

Step 3: Set Up Online Payroll Service:

  • If you haven’t already set up your online payroll service, you’ll need to do so. Follow the on-screen instructions to complete this step. 

Step 4: Add Employees:

  • Make sure all your employees are added to QuickBooks Desktop with their correct email addresses.
  • To add an employee, go to “Employees” and select “Employee Center.”
  • Select the employee you want to add and click on “Edit Employee.”
  • Enter their email address under the “Personal” tab, and make sure the “Send all pay stubs” checkbox is selected.
  • Click “OK” to save the changes.

Learn How to Set up your QuickBooks Workforce account

Procedure 1: Acknowledge the Invitation from your Employer

Set up your QuickBooks Workforce account you need to acknowledge the Workforce Invite sent by your employer before accessing pay checks and W-2s. The validity of the invitation is up to 30 days. However, if the invasion time extends more than 30 days, then ask your employer to send a new invite.

  • In the initial stage, search for an email having the subject stating, “[Business name] has invited you to view your pay stubs online”. If the invite isn’t visible, look at your spam folder or inform your employer regarding the same. It might be possible that the employer has sent the email to the wrong email address. 
  • After this, access the email and hit Create Account or Sign In to accept the invitation. 
  • You must establish a new Intuit account with the correct email address and password if you don’t have one. If you have an account previously associated with the QuickBooks Workforce, TurboTax, or Mint, sign into the email using the correct login credentials. 

Steps to Rectify Sign-In Issues:

Users sometimes face difficulty while trying to sign in to QuickBooks. Therefore, to overcome the issue, follow the instructions given below to prevent this error. 

  • For instance, if you are already a user of the QuickBooks Workforce account, you may accept another invite from the new employer. In that circumstance, you must give them the same email address already linked with the QuickBooks Workforce account.
  • Ensure you are already a QuickBooks Online user and utilize a different email address for the QuickBooks Workforce account. 
  • Note:- We recommend you use your work email address for the QBO application and your personal email ID for the Workforce account. 
  • Your employer may have sent a new invitation. In that scenario, you must accept your employer’s most recently sent email invitation.

Procedure 2: Enable the Notifications for New Pay Stubs

Every time a new pay stub is launched, the user will be prompted for the same on their computer screen.

  • Begin the process by accessing the official website of Intuit and then login to your account.
  • Proceeding further, move to the highlighted Settings icon.
  • Afterwards, tap on the Email Notification option.
  • Following this, hover your cursor over the Send me an email when new pay stubs are an available option. 

Steps to View Your Paychecks and W-2 Form in QuickBooks Desktop

After implementing the above procedures, you can easily view and print your paychecks and the W-2.

Instructions to View your Time-Off and Year-To-Date Pay 

Your paychecks will give you the correct information regarding your payroll that is essential for you.

  • Available Time-Off:- You can get updates regarding your sick, vacation, and other available time-off balances. 
  • Year to Date:- Moreover, you will also get the details regarding your gross pay, deductions, year-to-date gross, net pay, withholdings, or deductions. 
Instructions to View Missing Pay-Stubs

The users won’t be able to view all the pay stubs due to multiple factors. For that, you may consult with your employer.

  • Your employer must have attached past pay stubs.
  • If your employer doesn’t run the payroll, it might be possible that your payroll is missing.
  • The employer may have cancelled their payroll service.
  • Apart from this, it might be possible that the employer has changed the payroll services and hasn’t sent you the invitation for the new one. 
Instructions to Get Your W-2s in Workforce

One can easily look at the W-2s copies B, C, and the other 2 from the W-2 menu. The new updates regarding the W-2s will be available in the QuickBooks Workforce account from January 31. However, the older W-2s are only available until the previous 3 years.

Furthermore, for additional security, you must cross-check your phone number or your personal details before accessing W-2s. 

  • In the initial stage, login to workforce.intuit.com using the correct login credentials. 
  • Afterwards, navigate to the W-2 menu and go to the next step.
  • Moving onwards, choose the W-2 copy that you wish to view. Otherwise, take a printout of the W-2s form. 

Note: Getting your W-2 copy mail in early February is mandatory. If you cannot receive the mail until February, you must consult with your employer for the same.

Wrapping It Up!!

With this comprehensive post’s help, we hope you can now setup QuickBooks Workforce in Desktop. However, if you still need help viewing your pay checks, consult with our professionals available through live chat. The experts will guide you with stepwise instructions and help eradicate your issue asap.

FAQ's

A: QuickBooks Workforce is an online portal where employees can access their pay stubs, W-2s, and other payroll-related documents. It provides a secure and convenient way for employees to view and download their payroll information.

A: No, QuickBooks Workforce is a free service for both employers and employees.

A: No, your employees don’t need QuickBooks accounts to access QuickBooks Workforce. They will receive an email invitation to set up their Workforce account.

A: To resend an invitation, follow these steps:

  • In QuickBooks Desktop, go to “Employees” and select “Send Payroll Data.”
  • Click “Resend Invitation” next to the employee’s name.

A: Yes, employees can access QuickBooks Workforce on mobile devices by using a web browser. QuickBooks doesn’t offer a dedicated mobile app for Workforce.

Are you hunting for appropriate procedures to open QBB, QBW, and QBX file without QuickBooks? Worry Not!! You have reached the right spot. This detailed guide has mentioned the complete instructions for opening QBB, QBW, and QBX files. Read this entire post carefully to get in-depth information about these files. 

Wondering how to open QBB, QBW & QBX file without QuickBooks and need help? Call us at @+1855-603-0490 and connect with our professionals to get the issue fixed in the best possible manner. 

Detailed Instructions to Open a QBB File Without QuickBooks 

QBB file is the backup file, which must be created to restore the backup of the data file. Follow the step-by-step instructions below to launch a QBB file without QuickBooks. 

  • Firstly, launch the QuickBooks Desktop and then access from the data file from your QB account. 
  • Afterwards, navigate to the QuickBooks File menu > Open file option.
  • Now, you must look for the company file with the .qbb extension.
  • You are supposed to hover your cursor over the Switch to Single-User Mode from the File menu.
  • Hit the File option once again, followed by the Export option.
  • In the next step, tap the Send Report option to transfer the report to New Excel Spreadsheet.
  • Subsequently, hit the OK button to see the QuickBooks company file opened in the Excel spreadsheet.
  • Now, move to the Filer menu of your Excel worksheet and tap on Save As to restore the file in Excel format to your device.
  • Assign a file name and pick the appropriate location where you wish to save the file.
  • Finally, hit the Save button to restore the final changes made to the new Excel spreadsheets.

Also Read – Troubleshoot QuickBooks Error 15225

Detailed Instructions to Open a QBX File Without QuickBooks

The QBX file is an accountant’s QuickBooks data file transfer copy. If you wish to access the file without QuickBooks software, you must convert it to a different extension. The users are supposed to convert the QBX file into a QBW file. Furthermore, the conversion steps and the launching of the file are illustrated below. 

  • In the initial stage, access the QBX file on your system.
  • To open the file, right-click on the icon of QBX and choose the Open option.
  • After this, you have to pick Excel to launch the file.
  • If this process doesn’t work, you must launch the Excel spreadsheet. 
  • From there, head towards the File menu and hit the Import option. 
  • Now, you must pick the option from other sources to launch the file.
  • Following this, reach out to the Import Page and choose the file named ‘.QBB’. 
  • Later, you must convert the QuickBooks file to the Excel file to continue ahead.
  • At last, check the file having the QBB file extension and try to launch it.

Detailed Instructions to Open QBW file Without QuickBooks

QBW is an essential QuickBooks file that is combined to restore the letters, images for your company along with the letters, images for your company, and financial data. 

  • To begin with, move to the Start menu and look for the Intuit folder.
  • After this, open the QuickBooks application and insert the sign-in credentials if prompted. 
  • You must pick the Excel file you wish to export from QuickBooks.
  • Following this, head toward the Customer, Vendors, and Employee options from the top of the window. 
  • In the next step, hover your cursor over the Customer Center and pick Excel from the top of the screen. 
  • Then, hit the Export Excel option and opt for Export after saving the file. 
  • Access the upgraded version of MS Excel to launch the QBW easily without accessing the QB software. 
  • Once the file is imported successfully, opt for the Data tab and hit the Other Resources option. 
  • Next, you can open the QBW file, so open it directly from the window. 
  • You are supposed to look for the QBW file outside the Excel file.
  • Once you are done with the file location, tap on the new QBW file. 
  • Finally, you can launch the QBW file easily without accessing the Excel file. 

Also Look – Resolve QuickBooks Error 6000 80

Ending Words!!

After implementing the above-listed steps appropriately, you can easily open QBB, QBW, and QBX file without QuickBooks. If you are still struggling while opening any of these files, we suggest you connect with our professionals through live chat. Our professionals will do their best to guide you in the best possible manner.

Are you stumbled upon QuickBooks Error 12157 while updating the QuickBooks Desktop or payroll? If that’s so, then it might happen due to incorrect configuration of the internet settings. Sometimes, users might also encounter this error when the Windows firewall interrupts the users from getting the latest payroll updates. 

However, it is crucial to resolve Error Code 12157 in QuickBooks with the help of proper troubleshooting methods explained in this blog. So, quickly look at this detailed post and get detailed resolution methods to eliminate the error instantly. 

Are you stressed about getting QuickBooks Error 12157 while updating payroll? Give us a call at our helpline +1-855-603-0490, and our professionals will provide the most relevant solutions to fix the error. 

Latest post – Latest Payroll News & Updates in QuickBooks Desktop Payroll

Why am I Continuously Receiving QuickBooks Error 12157?

The best way to easily configure the issue is to know the core aspects causing the error. Following are some probable root causes that might evoke QuickBooks Error Code 12157 while updating QuickBooks Desktop or payroll.

  • Issues with the internet network connection are one reason behind the QuickBooks Error 12157.
  • Sometimes, it may occur when Windows Firewall interrupts QuickBooks connection with the internet connection.
  • In other instances, it may happen due to inappropriate date and time settings. 
  • Moreover, it may occur when multiple QuickBooks software is installed on your devices. 

How Can You Determine QuickBooks Error 12157?

Users encountering QuickBooks Update Error 12157 might observe many different signs. Below, we have enumerated all such indications that might help you easily detect the error. 

  • The download process of the QuickBooks Desktop or payroll updates gets interrupted.
  • You might notice that the Windows starts crashing or freezing and reciprocate slowly to the user’s commands.
  • Sometimes, users might notice the poor performance of their PC.
  • An error message might flash on the computer screen on the occurrence of QuickBooks Error 12157. 

Simple Procedures to Fix QuickBooks Payroll Update Error 12157 

In this part of this blog, we will answer how to resolve QuickBooks Desktop Error 12157 using simple resolution methods. Also, we have provided the complete set of instructions to perform those troubleshooting methods appropriately. 

Also Read – Repair QuickBooks Error Code 80070057

Procedure 1: Make the Relevant Changes to Your System’s Date and Time

As mentioned above, an inappropriate date and time on the system might generate QuickBooks error 12157. Rectify the issue by making essential changes using the instructions below. 

  • Firstly, right-click on the clock from the bottom right corner of the computer.
  • Afterwards, hover your cursor over the Adjust Date and Time option.
  • Navigate to the Change Date and Time and appropriately mention today’s date and time in the respective text fields.
  • Once you are done, hit the OK option to proceed further.
  • Ultimately, try to update the QuickBooks Desktop and check whether you are still receiving the error. 

Procedure 2: Rearrange the Incorrect Internet Settings 

Issues with the internet connection are the main cause that might instigate error code 12157 in QuickBooks. So, adjusting the internet settings using the steps listed below is essential to fix the error.

  • To begin with, tap on the QuickBooks File menu and choose “Internet Connection Set up” option. 
  • After this, head towards the “Use my computer’s internet connection” option to link when the application uses the internet. Later on, opt for the Next button to proceed further.
  • Soon after that, move to the Advanced Connection Settings and then choose the Options tab. 
  • Finally, tap the Restore Advanced Settings option, click OK, and then Done to end the process.    

Procedure 3: Reconstruct the System Files and Settings 

You must re-establish system settings from the last restore point using the steps below to fix QuickBooks Error Code 12157.

  • To start the process, check that you have signed into the system accessing the proper administrative credentials.
  • After this, tap on the Start menu and then the Accessories option.
  • Navigate to Computer Tools and choose the option to reconstruct the system.
  • Furthermore, hit the highlighted Restore Point option followed by the Advanced System option. 
  • Then, you must confirm your actions when you see the prompt on the screen. 
  • Finally, relaunch your device and try to upgrade the QuickBooks Desktop to the most recently launched version. 

Also Read – Eradicate QuickBooks Error H101

Procedure 4: Include QuickBooks and Its Additional Processes, with the exception of the Firewall list 

You must verify that internet security and firewall settings are configured properly. Also, make sure that you have enabled ports 80 & 443. Furthermore, you must check that you have included the following files in the exception list. 

  • QuickBooksMessaging.exe
  • AutoBackup.exe
  • QBW32.exe
  • Dbmlsync.exe
  • QBServerUtilityMgr.exe
  • DBManager.exe
  • QBLaunch.exe
  • FileManagement.exe
  • QBGDSPlugin.exe
  • FileMovement.exe
  • QBDBMGrN.exe
  • IntuitSyncmanager.exe
  • QBCFMonitorService.exe
Procedure 5: Recommence the QuickBooks Updates Once Again 

Even after applying the resolution methods stated above, you cannot resolve QuickBooks Error Code 12157; try resetting QuickBooks Updates. 

  • In the initial phase, right-click on the QuickBooks icon and hit the Run as Administrator option.
  • Afterwards, move to the Help menu and choose the highlighted Update QuickBooks Desktop option. 
  • Soon after this, select the essentials as well as features of the software. 
  • Following this, tap on the Reset Updates option and then hit the Get Updates option. 
  • Ultimately, it will let you update your QuickBooks version easily without getting QuickBooks Error 12157. 

Ending Words!!

So, here we would like to end this post on QuickBooks Error 12157 and assure you that you may find it beneficial. However, if the troubleshooting methods listed above don’t work, you can talk to our accounting professionals through live chat for a quick resolution.

Updates play a major role as it offers robust security and update features to enhance the user experience. Similarly, QuickBooks Desktop Payroll also launches updates regularly so that you can get access to the current and accurate rates for computing state and federal tax returns. Moreover, the latest payroll update was launched by QuickBooks on February 16, 2023

However, it is essential to get the newly launched updates asap so you don’t avoid the benefits of new features developed by payroll. Further, review this entire post to get in-depth information on what is QuickBooks payroll and the latest payroll news. 

What Do You Understand By QuickBooks Desktop Payroll?

QuickBooks Payroll is a subscription-based service that helps businesses  compute employee payrolls timely without any issues. It is essential to upgrade the QuickBooks Payroll so that you can get timely updates regarding the latest payroll tax rates and can compute the payroll properly. Also, using this service, you can use the direct deposit feature to transfer pay checks directly to an employee’s bank account. 

Now, that you have understood the QuickBooks Desktop Payroll, go ahead to the further section of this blog to learn about the latest payroll news. 

Also Read – What is Release Date of QuickBooks Desktop 2023

What’s New in QuickBooks Payroll Update 22306 (Feb-16-2023)? 

There is a decrease in the wage limit for state unemployment insurance from $ 10, 500 to $14, 500. Apart from this, there are other 

For QuickBooks Desktop 2020

  • You might notice that the new tax table consists of new withholding tables for Colorado, Indiana, North Carolina, Minnesota, and Rhode Island.
  • Also, it consists of other changes for Alaska, New Mexico, Oregon, North Dakota, Hawaii, Arkansas, Pennsylvania, and Rhode Island. 
  • Moreover, you will get the latest E-File and E-Pay updates for Lowa. 
  • Now, while utilizing QuickBooks to transfer your company file over a network, your co-workers can install payroll updates without any internet access. For that, you must check that every copy of QuickBooks is set with the Share Download option and is turned on. 

For QuickBooks Desktop 2021, 2022, and 2023

  • With this tax table update, you can add other changes for Delaware.
  • You might discover that no form updates are available with this payroll update.
  • Moreover, there are no E-file & Pay updates launched. 
  • If the users are accessing QuickBooks to share their company files over a network, co-workers can install the latest payroll updates without direct internet access. Also, you must ensure you have set every single copy of QuickBooks with the Shared Download option. 

Alternatively, you may acquire information about the new features in QuickBooks Desktop Payroll via the company file. For that, use the steps below. 

  • Firstly, move to the Employees menu and hover your cursor over the Get Payroll Updates option. 
  • After this, choose the option that says, Payroll Update Info. 
Payroll Update Number  Date Released
22304 2/2/23
22302 1/12/23
22301 12/15/22
22216 9/16/22
22213 7/21/22

Wrapping It Up!!

We hope that now you have understood the relevance of getting the latest QuickBooks Desktop payroll updates. So, hurry up and don’t miss the chance of acquiring the latest benefits of accessing the payroll updates launched. 

Source URL – https://quickbooks.intuit.com/learn-support/en-us/help-article/employment-taxes/latest-payroll-news-updates/L84vA5glS_US_en_US

A transaction is a very important part of accounting, and any hindrance in the payment process can be big trouble. Most of the transactions are done through electronic means, and while using the QuickBooks accounting application, users might encounter an error message there, and the transaction remains incomplete. This error is termed where payment gets declined. Here we will discuss QuickBooks POS IP Response Error and how you can fix this error, along with all the important details.

QuickBooks POS (Point of Sale) is an application launched by QuickBooks which helps small retail businesses that are selling their products in-store and online to merge all their inventory and sales in one place and easily manage their business transaction. Read the article to learn more about POS IP Response Error and how you can resolve it. 

Recent Post – Eliminate QuickBooks Turned Black and White Issue

Why do QuickBooks POS IP Response Error Occur

The major possible reason for QuickBooks POS IP Response Error is poor internet connectivity, due to which the transaction gets timed out, and payment is declined. Another possibility due to which this has occurred in your system can be your browser history due to the server detecting some suspicious activity, due to which there can be a chance of your account getting compromised.

How Can I Fix POS IP Response Error in QuickBooks 

You can take the following measures in order to fix QuickBooks POS IP Response Error in your system:

Sign In and Sign Out of your QuickBooks Account

  • You need to log in again to your QuickBooks account, and after that, try to make another transaction. Follow the given steps to sign out of your QuickBooks account:
  • Open QuickBooks and then select the File option.
  • Choose setup Interview and select payment. 
  • Select Sign Out and then Sign In again.

Also Read – Fix QuickBooks POS Error Invalid Product Number

Clear the Browsing History, Cache, and Cookies of your Web Browser

Follow the given steps in order to clear your browsing history

  • Open your web browser and then settings.
  • Go to the history, or you can directly open a new tab and press “Ctrl+H”.
  • Clear all the history by selecting “All-time”
  • While deleting history, make sure you delete all Temporary Internet Files, cookies, and form data. 

Add QuickBooks to your trusted website in your web browser

Sometimes transactions get declined because the web browser might consider QuickBooks as a suspicious website. You need to add the QuickBooks/Intuit website as a trusted web browser.

  • Open your web browser and select settings.
  • Choose “Internet Options,” and under the security tab, choose trusted sites.
  • Select the Sites button and add the “intuit.com” address.
  • Select Add and choose Close. Make sure you have unmarked the box marked as “Require server verification (https:) for all sites in this zone”

Lower User Account Control (UAC) settings 

  • Open Control Panel, and under “System and Security,” choose the Action Center.
  • Choose the option “Change User Account Control Settings” and slide the bar to Never Notify.
  • Click OK to save changes.

Also Read – QuickBooks Payroll Update Error 15212

Uninstall and Reinstall QuickBooks Point of Sale

Sometimes the QuickBooks POS Error can occur because of any technical error of the software itself. For that, you need to uninstall QuickBooks Point of Sales, Relocate the related folders containing POS data, and install the software again. The steps for this are listed below:

Uninstall QuickBooks POS

  • Open Control Panel from “Program and Features.”
  • Select QuickBooks Point of Sales from the list of programs.
  • Right-click on it and select “Uninstall.”

Relocate and Rename all Point of Sales Files and Folder

After that, you need to relocate all the POS data files to the desktop or any other location on your computer. We might suggest that you rename these data files. Path for QuickBooks data files are listed below:

  • C:UsersPublicPublic DocumentsIntuitQuickBooks POS XX
  • C:Program Files (x86)IntuitQuickBooks POS XX
  • C:Program Files (x86)Common FilesIntuitEntitlement Clientv8
  • C:ProgramDataIntuitQuickBooks Desktop Point of Sale 18.0

Once you have relocated the files, reinstall the QuickBooks POS from the official intuit website.You also need to delete QBPOSDBSrvUser Windows users for that steps are listed below.

  • Open Control Panel, select User Account, and choose to Manage another account.
  • Click continue from the user account window, choose QBPOSDBSrvUser, and select Delete.
  • Restart your system

Also Read – Fix QuickBooks Error 1310

Steps to Reinstall QuickBooks POS

First, you need to visit the download and updates page to download the QuickBooks POS installation file, then follow the given steps:

  • Open the installation file from the download.
  • A download wizard will appear on the screen, in which you have to select “Next.”
  • Choose whether you need to install QuickBooks on this system or you need to have QuickBooks POS on more than two computers by clicking “Two or more computers.”
  • If you are selecting “Two or more computer,” then select the type of workstation this system will be:
    • Server Workstation (Main station which holds company data)
    • Client Workstation (Used as a cash register)
  • Now select installation and activate QuickBooks Point of Sale

Use Clean Up Company Data Utility to clean company data

Clean up Company Data is an option available in QuickBooks that helps to repair transactions and indicates various damage in your company file. In order to run clean company data, follow the given steps

  • Open QuickBooks, and under the File option, open Utilities. 
  • Choose Clean up Company Data. 
  • Select “Compress Data,” after which a warning message will appear, for which you need to select OK. 
  • You need to select the list you want to remove from the company file (History Documents, Non-history documents)
  • A window will appear on the screen on which you need to select “Clean Up” and wait until the cleaning is completed. 

Conclusion

We hope that from the information provided above you can easily resolve QuickBooks POS IP Response Error. In case this error still occurs, then you can contact our experts through live or you can mark a mail and we will revert on it ASAP.

If you have been using QuickBooks for a long time, the desktop version of the program can give a “QuickBooks Turned Black and White” error. In this error, some of the white areas in the program appear black when the error occurs. Some users also report similar issues, such as a gray screen in the program, gray lines in invoices, missing logos, and various others. 

Corruption in the system is one of the main reasons behind this error; however, several other possible factors may also bring forth this error. If QuickBooks Desktop fields display black instead of white, you need to perform the right troubleshooting solutions to get rid of this erroneous situation. Well! You don’t need to go anywhere else, as this post has covered it all for you.

Facing the QuickBooks black and white screen issue? Get instant help by dialling +1-855-603-0490. 

Recent Post – How To Get Rid on QuickBooks Scan Manager Not Working Error

Possible Reasons Behind QuickBooks Black and White Screen Error

Now that you are aware of this error, it is time to know the possible factors that can promote this problem. The prolonged utilization of the QuickBooks application can bring forth the graying or blackening of the QuickBooks Desktop version of the software. Some of the main reasons behind this error are highlighted in the below-given list: 

  • Outdated drivers that are not anymore compatible with QuickBooks. 
  • Improperly configured screen resolution is also one of the possible reasons behind this error. 
  • When the latest updates are not installed for the QuickBooks software. 
  • Improperly optimized screen resolutions as per your specific needs. 
  • Other issues related to the system, such as damaged firmware, system memory, and graphics card, are some other possible reasons that can promote this error message on your screen. 

Other Instances Of The Screen Display Issue

Some other instances of the screen display issue are specified in the below-given list: 

  • Improperly sized top right corner icon of the screen.
  • The absence of buttons and the use of large fonts are also a symptom of the error.
  • The unclear screen on maximization or minimization. 
  • Sometimes, you may also experience a blank page on the screen. 
  • Unfitted transaction form.

How To Resolve QuickBooks Turned Black and White Problem? 

Now that you know the possible reasons behind the arrival of the error, let’s discuss some best troubleshooting solutions to eradicate this annoying problem: 

Method 1: Run the Quick Fix my Program Tool Within The Tool Hub

In this troubleshooting method, you need to download the QuickBooks Tool Hub in the first place. This utility enables users to run various tools to rectify the program issue. Below are the steps: 

  • From Intuit’s official website, download the QuickBooks Tool Hub in the first place. 
  • Once done, save the file to a suitable location and then run the downloaded file to install it on your system. 
  • Follow the instructions carefully to finish the installation, and once done, agree to the terms and conditions so that you can put it to use. 
  • Now from within the QuickBooks Tool Hub, you will see various issues listed in it.
  • Here, you need to choose the Program Problems and then select Quick Fix My Program. 

It may resolve the QuickBooks turned black and white error; however, if the error continues, move to the next solution. 

Method 2: Update Video Card Drivers To The Latest Release

Outdated video card drivers are one of the main reasons behind the error, and to fix it, you need to update them. Below are the steps to get the task accomplished: 

  • Launch the Run window with Windows + R key to start the update procedure.
  • In the specified Run box, type dxdiag without making an error.
  • Next, click Enter and select Dialog 1. Jot down the Manufacturer/Model to move ahead.
  • Finally, you can download the necessary updates to resolve the issue.

Also Read – How to Fix QuickBooks Error PS077

Method 3: Change Windows Theme to Basic For The Error Resolution

If none of the above solutions worked, check if changing the Windows theme to the basic can eliminate the persisting problem.

  • Make a right-click on your desktop anywhere, and then click on Personalize option from the drop-down menu. 
  • Next, select one of the Windows Basic Themes.
  • After setting it to the theme to the basic, open QuickBooks and check if the QuickBooks turned black and white issue is resolved or not. 

If the error continues to trouble you, move to the next solution. 

Method 4: Re-Register The QuickBooks Program File If Nothing Works

After the trial and error of the various solutions, you will have to re-register the QuickBooks program to eradicate the problem:

  • Open the folder containing the QuickBooks Company file and right-click on the bat files.
  • Next, you need to select Run as Administrator from the drop-down list.
  • Here, ensure that you are running the Bat files with full Windows Administrator rights.
  • You will now see a command window with the path of the file scrolling in it. 
  • Wait for the bat utility to complete, and then close the Window.
  • Launch the QuickBooks and verify the status of the QuickBooks screen appears black instead of white.

Also Read – DIY Hacks to Resolve QuickBooks Error Code 1926

Ending Words!

This post enlists some of the best solutions to resolve the QuickBooks black and white screen error. Hope you have resolved the error by implementing these solutions correctly. However, if the error still persists, some of the steps might not be rendered correctly. In such a case, you may seek professional assistance and get one-on-one assistance from a trained professional. They will help you troubleshoot the problem immediately.

Posts pagination