There you go! All set to operate QuickBooks data files and suddenly encounter the unexpected data file error in QuickBooks. What will be your situation after this? Distressing, right? Do not worry; this comprehensive blog post will help you address this QuickBooks Data Corruption issue with the latest methods.
Fear of losing your essential business data due to potential QuickBooks fix data damage on your QuickBooks desktop company file errors is genuine enough. We have a team of QuickBooks expert technicians to assist and help you immediately. Just call us anytime anywhere.
Users may come across data damage in QuickBooks company file while formatting one or more pages. With this, they further face issues, including performance failures, power surges, damaged pages, disk failures, and data file damage. If you’re also facing the same issues, let’s quickly go through the reasons for such data damage and then troubleshoot the same.
Signs Indicating Data Damage in QuickBooks Company File
Determining data damage in QuickBooks company file becomes easier once you learn about the prominent signs of the same as given below:
- The foremost sign of noticing data damage errors is the issue with your Verify Data Utility or Verify Target. If the values in minor are unmatched by the major ones on your screen, it’s because of the damaged company data.
- If your paid bills and invoices are shown as unpaid in your QuickBooks software, it’s again a sign of the data file error.
- Consider there is a data error in your QuickBooks software if it starts running sluggishly.
- Internal glitches in your transactions balance sheet also indicate the data file error in your QuickBooks software.
- If your QuickBooks account’s name is preceded by an asterisk (*), the software has created accounts without the original accounts, which indicates the error in your QuickBooks data file.
Why Am I Facing Company File Data Damage in QuickBooks Desktop?
Below, we have listed some of the major reasons for facing company file data damage in QuickBooks Desktop. Carefully read them out to reach the roots of the issue.
- An unexpected shutdown or crash of your computer system is one of the major reasons for facing data damage issues in QuickBooks.
- Another reason for such data damage errors in the QuickBooks Desktop is the power surge or dropout.
- You may expect such an issue in your QuickBooks Desktop if the QuickBooks company data file size is larger than the standard size limit.
- Malware attacks and malicious virus infections can effectively provoke the data file error in QuickBooks desktop.
- In case your system lacks the basic requirements, such as Virtual memory, RAM, network interface cards, network cables, routers, etc., then you can surely face company data damage in QuickBooks.
- Damaged databases of your QuickBooks software are another reason for coming across the company data file issues.
- One of the prominent reasons for data damage in QuickBooks company files is the corrupted QuickBooks log file.
- An outdated version of your QuickBooks Desktop application is itself a big reason for coming across the data file error in QuickBooks Desktop.
Essential Points to Remember Before Troubleshooting Data File Error
Before you begin with the troubleshooting methods, it would be more than helpful to take a look at the following points and consider them. It will help you further avoid any potential technical errors:
- Do not use any wireless network, but choose a hard drive and then proceed.
- Make sure you have a backup of your QuickBooks company data files to avoid failures and data losses.
- It’s better to update patches and then move to troubleshoot the data damage in the QuickBooks company file.
- Enable the Rebuild and Verify Data tools on your computer system with the QuickBooks software and the related company data files.
- Do monitor your list size and track your QuickBooks database monthly.
- It’s better to delete all the transactions that you no longer need in your daily QuickBooks operations.
Troubleshooting Solutions to Address Data Damage in QuickBooks Desktop
Understood all the factors giving rise to the data damage in QuickBooks desktop? Now, let’s perform the troubleshooting methods given below and rectify this QuickBooks rebuild data utility some problems with your data file. Follow the instructions carefully as given:
Solution Method 1 – Run the Rebuild and Verify Data Tools
Using the Rebuild and Verify data tools to fix the issues in your company file leading to data damage can be an effective approach. For this, you must continue performing the following steps:
- Firstly, navigate to the File menu and select the Utilities alternative.
- After this, from the drop-down menu, choose and click the Verify Data alternative.
- Once chosen, hit the OK button, and if you encounter a text reading, “QuickBooks detected no problem with your data,” it means the company file has no issues.
- If you find any issue with the company data, you will automatically receive the Rebuild Now or View Errors prompt.
- Hit the OK button, and you will get some mandatory instructions to follow on your screen. Follow them and select the OK button to begin the rebuilding process.
- This process may take a while; wait for the same, and once the process is over, check for the data file error in the QuickBooks company file. If still the issue persists, try another method to resolve the same.
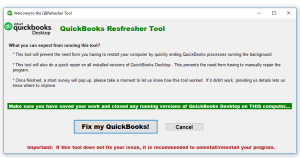
Solution Method 2 – Run QuickBooks File Doctor Tool
You can win over numerous company file errors by running the QuickBooks File Doctor Tool from the Tool Hub. However, if you don’t have the QuickBooks Tool Hub installed on your computer, get it by following the given directions:
- Firstly, visit the official Intuit website and directly download the QuickBooks Tool Hub.
- Once you have downloaded the QuickBooksToolHub.exe file, open your browser’s download and double-click the downloaded installer file.
- Now, save this installer file on your Desktop and open the same to initiate the installation of QuickBooks Tool Hub.
- When you open, you will see some on-screen instructions to follow, continue following them, and hit the Next button.
- Begin the installation by clicking the Install button, and wait till you successfully complete this installation process.
- Now, click the Finish button and end the QuickBooks Tool Hub installation process. After this, open the Tool Hub and navigate to the Company File Issues tab.
- Here, you will get the QuickBooks File Doctor Tool. Click the tool and start searching for the company file having issues by hitting the browse button.
- Once you get the file, click the Continue button and enter the required admin account credentials.
- Hit the Next button, and complete this procedure. If you still notice the data damage in the QuickBooks company file, follow the next solution method.
Solution Method 3 – Get the Latest QuickBooks Software Updates
When nothing works, a simple update can do wonders. Similarly, downloading the latest QuickBooks Data File Errors can be helpful to get rid of the annoying data file error in QuickBooks company files. So, follow the jotted-down instructions:
- Firstly, open your QuickBooks software and navigate to the help menu.
- From here, hit the Update QuickBooks button, and check whether any updates are available for your QuickBooks current version from the QuickBooks Update Window.
- If any update is available, hit the Yes option on the Update QuickBooks window. It will automatically update your QuickBooks Desktop software to the latest.
- Finally, click the Save button, end the update procedure successfully, and continue accessing your QuickBooks company files.
The Bottom Line..!
So, that’s all about this blog post! We hope you have got enough insights about the data file error in QuickBooks & QuickBooks won’t open company data file Now, do not let this issue hamper your smooth and efficient QuickBooks workflow. Just follow the solutions given above and troubleshoot the error. Contact our QuickBooks Support experts via the Live Chat Support facility if you face any issues or need help while removing this QuickBooks data file issue.
FAQ's
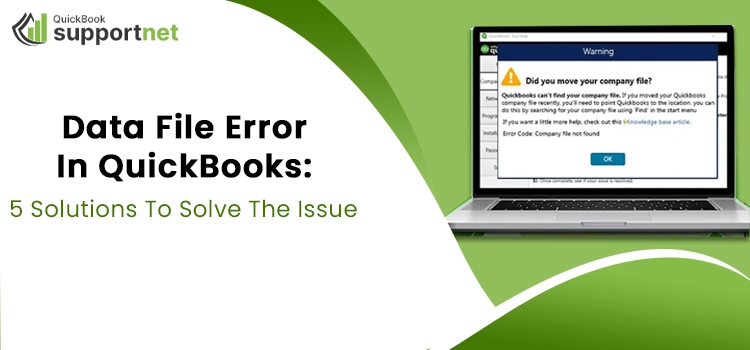
Q1: Does the changed file location result in a data file error in QuickBooks?
A1: Absolutely! If you change the location of your company file, it may result in data file errors with different codes in QuickBooks.
Q2: What tools can help me fix the data damage issues in the QuickBooks company file?
A2: You can use the following tools to fix the data damage errors in QuickBooks:
QuickBooks Verify and Rebuild Data Tool
QuickBooks File Doctor Tool
Q3: Does an outdated QuickBooks application affect company data files?
A3: Yes! That’s why it’s recommended to always update your QuickBooks Desktop application to the latest and avoid data errors in company files.
Q4: What signs can detect QuickBooks company file errors?
A4:
- Sudden shutdown of your computer system
- Slow and sluggish running of your QuickBooks application
- Negative transaction history
Q5: How can I resolve the QuickBooks data damage errors if the solutions in this blog fail?
A5: You can dial our toll-free number and contact our QuickBooks team or consult our technicians via the Live Chat Support facility.