Archives

Home > Blogs > 2023 > March

QuickBooks Payroll Service Connection is a very useful service for employers. It helps them in creating employees’ payroll, salary, and insurance. Besides, it can also keep an accurate track of the leaves, holidays, and other deductions. Payroll service in QuickBooks offers a myriad of advantages to business owners in managing their payroll processes efficiently.

However, when using this service, you may receive various issues. QuickBooks Payroll service connection error is also a perplexing issue in the program that can prevent you from using the program to its fullest potential. If you are stuck with this QuickBooks Payroll error and need to get rid of it, here is an intelligible guide for you. Let’s explore.

What is QuickBooks Payroll Service Connection Error?

QuickBooks Desktop Payroll service lets users send data or direct deposits to paycheck. When doing so, you may get an error message on your screen.

Quickbooks Payroll Service Connection Error Message

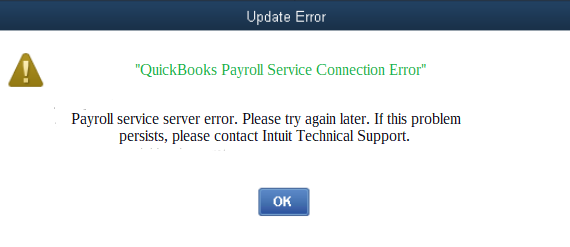
Payroll Connection Error

When any of the above-stated error messages appear on your screen, you need to look for its possible reasons and troubleshoot them. 

Possible Reasons Behind Server Connection Error In QuickBooks Payroll? 

 The payroll server error can take place due to several reasons as specified in the below-given list:

  • A faulty Firewall configuration can be a possible reason behind the error. 
  • Issues related to Internet security. 
  • Common issues related to the Internet connection. 
  • Sending a file in multi-user mode. 
  • When the security certificate gets invalid or outdated. 
  • Network timeout is also one of the main reasons behind the error. 
  • Make sure that the system date or time is correct, or it may give the same error. 

Aftermaths QuickBooks Server Connection Problem

When the error occurs, you may experience the following issues and their aftermaths:

  • The accounting system becomes inefficient when an error occurs. 
  • You may not be able to continue with the ongoing task. 
  • Payroll stops working, and you may not be able to work with it. 
  • Closing down your system.

Things To Keep In Mind When Resolving The Error

Before you proceed any further with the error resolution, considering the below-given points can make the troubleshooting easier for you: 

  • Also, confirm is your network connectivity is intact or not.  
  • When performing payroll operations, the multi-user mode should be disabled, and you must be working in single-user mode. 
  • Sometimes, a simple restart can fix the error. Try it before you move to more complex issues. 

If the QuickBooks Payroll service connection error continues, move ahead and perform the relevant solutions to get rid of the problem. 

How To Fix Server Error in QuickBooks Connection Service? 

Below are some of the most effective solutions that can help you get rid of the problem and retain your workflow: 

Solution 1: Run Reboot.bat File

In MS Windows, running reboot.bat file re-registers QuickBooks associated .DLL and .OCX files. To do so, you need to follow the below-given steps:

  • In the first place, you need to press the Start key.
  • After that, enter reboot.bat in the specified box and hit Enter button. 
  • When the command prompt windows appear on your screen, you will see many different file names.
  • Here, you need to avoid closing it forcefully. 
  • Wait for the reboot.bat file to finish its task, and then it will be closed itself. 

If the error continues, move to the next solution.

Solution 2: Update QuickBooks To The Latest Release 

Updating QuickBooks to the latest release ensures that the program is running in its optimal shape. To download the latest updates, follow the below-given steps:

  • First of all, close the QuickBooks application.
  • Once done, go to the ‘C:\Documents and Settings\All Users\Application Data\Intuit\QuickBooks < versionXX> \Components.
  • Here, you need to locate the folder with the name – DownloadQBxx,’ where xx specifies the QuickBooks version. 
  • Now right-click on the folder and select Rename. Add .OLD at the end of the folder name – DownloadQBxx.OLD.
  • After that, restart the QuickBooks application to proceed further.
  • Go to the Help menu and then to the Update QuickBooks desktop icon.
  • Now go to the Update Now option.
  • Moving ahead, tap on the Reset the Updates icon.
  • Thereon, click on the Get Updates button, and it will start downloading the latest QuickBooks Update.
  • Wait for the download process to end, then close and report in and click the Install the update icon.

If QuickBooks Payroll service connection error continues to occur, follow the next solution. 

Solution 3: Put QuickBooks Clean Install Tool To Use

QuickBooks Clean Install Tool is a helpful utility in the program that can resolve the common issues related to the QuickBooks installation. To run it, perform the below-given steps carefully: 

  • Go to Intuit’s official website and download the QuickBooks Clean Install tool.
  • Save the downloaded file on your computer at a location wherein you can easily access it.
  • Now click on QuickBooks_Clean_Install_Utility.Exe to open the file. 
  • When you see a permission window popped up on your screen, click the “I accept” icon on license settlement. 
  • Thereafter, choose the Continue tab. 
  • In the end, click the OK icon. 
Solution 4: Fix Common Internet & Security Application Issues

To make sure that your Internet connection and Firewall security settings are intact, check for the below-given points:

  • First thing first, make sure that the date and time in your system are correct. 
  • Make sure that your device has excellent network strength. 
  • Reconfigure your Firewall settings to resolve the issue. 

Ending Words! 

This post elaborates on some best troubleshooting steps to eliminate the QuickBooks Payroll service server error. If you are having any trouble performing the solutions, just connect with our professionals via chat or email, and they will guide you with intelligible solutions. 

QuickBooks enables users to connect their bank to the program so that they can keep track of their income and expenses. Also, reconciling your bank account with QuickBooks helps you know if there are any discrepancies in the transactions. However, there are multitudinous issues related to the bank account in QuickBooks. Bank error 102 and QuickBooks error 105 are some common banking error codes in QuickBooks.

These banking errors can crop up due to multi-pronged reasons. However, these are simple error codes and can be resolved with a few simple solutions. Navigate through this post until the end to know the best troubleshooting solutions for QuickBooks bank error 102 and 105.

Briefly Explain: QuickBooks Bank Error 102

QuickBooks Banking error 102 can take place due to the glitches in the bank’s website or when the website is under maintenance. When the error occurs, you will see an error message on the screen with the error code 102 in it. The error message in the QuickBooks Online reads:

QuickBooks Online is presently not able to establish a link to the website of the bank. 

The error can restrict you from accessing the bank accounts or transactions using QuickBooks. When the error occurs, you should look for the possible reasons behind the problem. 

Briefly Explain: QuickBooks Bank Error 105       

Bank error 105 in QuickBooks Online can take place when there are certain issues with the bank’s website. Sometimes, server issues can prevent a connection between the banking website and QuickBooks Online when exchanging information. An error message appears on the screen that states:

We’re sorry, but we can’t export your data.

The error message suggests an error when uploading your data to QuickBooks Online. You should look for the possible factors that can promote error 105 in QuickBooks Online.

Possible Reasons Behind the Error 102 & 105

The multitudinous reasons behind the bank error 102 are stated in the below-given list:   

  • The error is coming from your bank or the financial institution.
  • When you enter an incorrect username or password to open the bank’s website in QuickBooks Online.
  • If you are connected to an incorrect credit card account when using online banking.
  • Accidental deletion of the downloaded or imported files.
  • When your system is not compatible with the QuickBooks application.

Troubleshooting Solutions for QuickBooks Bank Error 102 & 105

Now that we are aware of the common banking error codes 102 and 105 in QuickBooks, let’s discuss their relevant solutions:

Solution 1: Update Your Bank Connection Manually

In the first place, you need to update your banking connection manually. To do so:

  • Go to your QuickBooks Online.
  • Next, sign in to your QuickBooks Online using your accurate login credentials.
  • Now go to Banking and select Update.

If the error continues, move to the next troubleshooting procedure.

Read Also: QuickBooks Error Code 12031

Solution 2: Check Your Financial Institution’s Website

Sometimes the error can take place when there is something wrong with the bank’s website. In such a case, try the following steps:

  • Sign in to your bank or financial institution’s website.
  • If you are unable to log in, go to your bank or credit card company.
  • Check if you have received any message or notification about the error.
  • The error alerts can tell you the exact reason behind the bank error 102 or bank error 105.
  • Furthermore, look for the possible reasons related to your account pages, account history or transactions.
  • If you are unable to find an error, there might be an issue with the connectivity. Try to resolve it and check if the error is fixed or not.

Solution 3: Check If Your Account Is New 

If your account is new to the bank, you may receive banking error 102. You need to keep in mind that some new accounts do not function properly with QuickBooks Online Banking. In this scenario, you should contact your bank or credit card and get more detail about the error. Besides, they will also tell you the best course of action for the resolution of the error.

Solution 4: Let the Bank Rectify the Error 

If none of the following procedures resolves the bank error 105, you should wait for the bank to rectify the problem. They may try to resolve the issue related to the server. It may take up to 24 hours or more.

Online Assistance

QuickBooks Online Banking issues can disrupt your workflow; however, applying the solutions discussed in this post can help you in the error resolution. If you need assistance from our QuickBooks experts, just give us a call on our QuickBooks helpline number and connect to the experts in no time.

Many times, QuickBooks users face several issues while installing the accounting software, which might interrupt the ongoing work. One of them is QuickBooks won’t accept product number during installation error that mainly triggers when entering the wrong product or service key. As a result, users fail to install the QuickBooks Desktop, hampers the overall business accounting tasks. 

However, it is beneficial to figure out this issue to continue installing QuickBooks without interruption. In this comprehensive guide, we have covered all the essential facts required to fix the QuickBooks won’t accept product number error. 

Getting issues while resolving QuickBooks won’t accept product number during installation error? Call us at @ +1-855-603-0490 and speak with our experts to resolve your issue within the shortest time possible. 

Reasons Why QuickBooks Won’t Accept Product Number During Installation 

It is the utmost responsibility of the users to understand the root cause of the error so that they can easily troubleshoot this error. To make you updated regarding all the possible causes, we have listed some of them below. 

  • You might be adding the incorrect QuickBooks Product Key
  • There might be some issues with the system’s date and time settings. 
  • Sometimes, it may occur when your device couldn’t meet the basic system requirements to run the QuickBooks software. 
  • Another reason may be insufficient admin permissions to log in to your device. 

Simple Procedures to Fix QuickBooks Won’t Accept Product Number During Installation Error 

You can apply the resolution methods below to overcome the QuickBooks won’t accept product number during installation errors. Ensure you apply the instructions in the same manner as written below to avoid further discrepancies. 

Procedure 1: Insert the Appropriate Product Number 

Users might often end up with this error when they have added the wrong product/license key. In this scenario, it is advised that one must cross-check the license key and check that the Caps Lock Key is off while inserting the license number. However, if you are typing the appropriate product key, proceed to the next troubleshooting step.

 Procedure 2: Verify and Modify the Correct Date and Time

 You must reach the screen’s bottom right corner and look for the system’s time and date. If it is appropriate, then proceed to the next resolution method. Otherwise, you must set the correct date and time from the system’s settings using the steps below. 

  • Into the bottom right corner of the screen, right-click on the time shown on the Windows taskbar. Then, you must opt for the Adjust Date/Time.
  • Now, you must determine whether the system’s time and date are appropriate. If not, hit the Date & Time tab and set the time and date. 
  • Once you have made the relevant changes, select the Apply button followed by OK.
  • After this, move to the QuickBooks Help menu and choose Activate QuickBooks.
  • Next, pick the highlighted Begin Activation option.
  • Finally, add the correct validation code and hit the Next button to accomplish the process. 

Procedure 3: Get the Latest Version of QuickBooks Installed

Sometimes, users might face installation errors in QuickBooks while using the obsolete version of the accounting software. So, updating it to the newly launched version is mandatory to resolve the issue.

  • To commence with, exit from all the applications running in the background, including QuickBooks.
  • After this, tap on the QuickBooks icon from the desktop, right-click on it, and opt for the Run As Adminsitrator option. 
  • Move to the Help menu from the upcoming No Company Open window.
  • Furthermore, click on Mark All > Save > Update Now button.
  • Now, you have to place the checkmark beside the Reset Update checkbox.
  • Proceed further by choosing the Get Updates option. 
  • Finally, close and reopen the QuickBooks to verify whether the issue is resolved. 

Procedure 4: Generate A New User With Proper Admin Rights 

  • Initially, move to the Start menu and opt for the Setting tab, followed by Accounts.
  • You must choose the Family & Other Users option within the Accounts column.
  • After this, click on Adding Another User and then Add an Account.
  • Verify that you have marked the Addition of a user without a Microsoft account checkbox. Moreover, you must also select the option that gives you the surety that you won’t have user’s login details.
  • Once it is over, include the correct username and password. 
  • Tap on the Next button to proceed and relaunch your device with the newly created account. 
  • Next, try installing QuickBooks with the product key and check whether your issue is resolved. 
Procedure 4: Perform the Clean Installation of QuickBooks 

If the above-listed procedures cannot resolve your issue, all you have to do is uninstall and install the QBDT again. For that, you must go through the following instructions given below. 

  • Firstly, you have to uninstall the QuickBooks Desktop. For that, you must go to the Start menu.
  • Insert “Control Panel” within the search area and hit enter key to open it.
  • Opt for the Programs and Features or Uninstall a Program option in the following screen.
  • Now, you must pick the version of QuickBooks you currently use from the available options.
  • Once you get your QBDT version, right-click on it and click the Uninstall/Change option. If this option isn’t visible, log out and log in back into your Windows user account with the correct login credentials. 

Wrapping It Up!!

We hope you have found this blog useful in overcoming the QuickBooks won’t accept product number during installation error. However, if you are still experiencing the same issue, consult with our highly-skilled professionals. You can connect with our expert team either through the live chat facility or by sending a mail regarding your query to them.

Create and Record Checks in QuickBooks the checks for your expenses is mandatory so that you can properly organize the checks in QuickBooks. The users are supposed to add a check in QuickBooks whenever they purchase with a hand-written check or they wish to print a new check. As a result, it will help in keeping your account updated and all your business transactions for which it is accounted. 

Further, go through this complete blog carefully to know the complete information to create and record checks in QuickBooks Online

Having trouble while trying to create and record checks in QuickBooks Online? Give us a call at @+1855-603-0490 and have a one-to-one consultation with our experts for quick assistance. 

Why Is It Necessary to Print Checks in QuickBooks Online?

Nowadays, most small and medium-sized businesses prefer to make the payments by check. There are multiple other reasons why users have to print checks in QuickBooks Online. To know about all of them, read the pointers given below. 

1. Large Purchases: 
There are most people won’t prefer to transfer a large amount of money electronically due to the high risk of fraud. Therefore, they prefer to make payments for expensive items through checks. 

2. Security:- 
It has been seen that making the payment electronically is not the safest mode. Whereas, giving the third party a check will help you in giving the surety that payments from both sides are valid. 

3. Timing:- 
For instance, you don’t have cash in hand and you don’t want to utilize the credit. In that scenario, making the payment through the check will give you more time to get the arrangement of the money. This is so because many financial institutions may take up to 2 to 3 working days to clear the check. 

4. Proof:-
By making the payment through the check, you can have the proof of purchase as sending money electronically won’t have any proof. Moreover, you have to represent the canceled check or a picture from an online banking page for giving proof of payment. 

Stepwise Instructions to Record Or Create a Check in QuickBooks Online

Go through the following instructions enumerated below to record a handwritten check in QuickBooks. Moreover, you can also implement these steps to edit and print a brand-new check. 

  • In the beginning, click on the + New option followed by the Check option. 
  • After this, select the Payee option from the drop-down menu. 
  • Now, you are supposed to click on the Bank account drop-down menu and pick the account from which you withdraw money. 
  • Fill in all the mandatory details in the check fields that you require. 
  • Next, choose the Print Check option if you wish to launch the check queue to print now. Otherwise, mark the checkbox next to the Print Later checkbox if you desire to print the check later on. 
  • Tap on the highlighted Save and Close option to exit from the check window. Otherwise, navigate to the Save and New option if you wish to establish another check. 

Note: If you opt for the Save option, it will add the check to your bank register but only send it to the print queue when you choose the Print later option. 

However, if you have made any mistakes while creating the check in QuickBooks Online, you can void a check. Apply the instructions given below to accomplish the process. 

Steps to Void a Check From the Check Page 

Voiding a check through the Check Page will allow you to examine the information regarding the original transaction. 

  • Begin the process by clicking on the Bookkeeping > Transactions > Expenses option. Otherwise, opt for the Expenses option. 
  • Go to the Filter option and then pick the Check option from the Type field. 
  • You must pick the date range in which you obtained your check and hit the Apply button. 
  • Choose the check that you wish to void from the Expense Transaction list to launch it in the Check screen. 
  • After this, opt for the More option and then pick the Void option from the pop-up menu list. 
  • Hit the Yes option to give the confirmation that you want to void the check. 

Detailed Procedure to Print Your Check in QuickBooks Online 

For instance, if you are recording the hand-written check then after saving the check you are all good to go. Whereas, if you have opted for the Print Later or the Print Check option, it means that you can print the checks from the print queue instantly. For that, you must implement the below-listed steps appropriately. 

  • To commence with, move to the + New > Print option. 
  • Now, you are supposed to insert your check into the printer appropriately. Tip: You can initiate the test print on plain paper to verify the alignment so that your checks won’t get wasted. 
  • Choose the checking account from which you have generated the check from the dropdown menu. 
  • Within the field of Starting Check. No, add the check number of the first check within your printer.
  • Tick mark the checkbox present beside every check that you want to print.
  • Moving ahead, opt for the highlighted Preview and Print option.
  • If you see that everything is right, go for the Print option to proceed further. 
  • After this, if you are able to print the checks properly, choose the Done option. 
  • On the other hand, if you won’t be able to print the checks properly, tap on some checks that need a reprinting option or keep checks in the Print checks list. 

Summing It Up!!

Through this post’s help, we hope you have gained immense knowledge regarding how to create and record checks in QuickBooks Online. However, if you need any additional help you can get in touch with our experts anytime through live chat.

Facing frozen QuickBooks Desktop issues? Well, you’re not alone in facing such problems, but thousands of daily QuickBooks users complain about the same. That’s why we have come up with this insightful guide to help you unfreeze QuickBooks Desktop application. A Frozen QuickBooks application is a result of a damaged or corrupted QuickBooks installation. However, many other factors can also lead to this issue. 

Users mainly encounter this issue when they try to enter transactions in the reports. Because of this, the active Windows also stops working, so it’s essential to address this frozen QuickBooks issue ASAP. So, continue reading this post and troubleshoot the issue permanently. 

Are you worried about your frozen QuickBooks Desktop issue? Don’t panic! Instead, contact our professionals at 1-855-603-0490 and ask for further help! We’re just a call away.

What’s the QuickBooks Freezing Up Issue All About? 

QuickBooks Desktop freezing is an issue that results in many further issues for the managers using QuickBooks in their accounting operations. Most users encounter this issue while working on the transaction reports essential for business accounting records. Also, a warning message stating, “Warning: ***-[NSPlaceholderDictionary qbinitWithObjects:forKeys:count:]: attempt to insert nil object from objects[0]” appears on their QuickBooks Desktop screen. 

Are you curious to know what exactly triggers this QuickBooks freezing up issue? If yes, let’s continue reading and unveil the possible reasons. 

Reasons Why Users Face QuickBooks Desktop Freezes Problem

The following reasons are mainly responsible for facing the QuickBooks Desktop freeze problem. Have a look and reach the roots of this issue: 

  • Enabled User Account Control (UAC) settings are one of the reasons for QuickBooks freezing. 
  • Users may face unexpected QuickBooks freezing issues if the QuickBooks company financial file name is too long. 
  • If third-party or other Windows programs apart from QuickBooks have occupied too much space, your QuickBooks may freeze while running. 
  • As already discussed, damaged or corrupted QuickBooks software installation is also one of the main reasons for freezing QuickBooks issues. 
  • The damaged or corrupted QBWUSER.INI file within your computer system is another major reason for facing QuickBooks Desktop freezes problem. 
  • If you’ve used a corrupted hard drive to install your QuickBooks application, you can surely face freezing issues later while working on the application.
  • The exceeded, or enough large QuickBooks company file size can also bring freezing issues while operating the QuickBooks application.

How Can You Notice the QuickBooks Freezing Up Issue?

If you are noticing the following activities in your QuickBooks application or on a computer system, it’s due to the QuickBooks freezing issue. Have a look at the following signs to recognize the error attack and close frozen QuickBooks accordingly. 

  1. Freezing of your Windows for a few seconds is one of the most common indications of the QuickBooks freezing error. 
  2. Crashing of your active Windows programs is also a sign of the freezing QuickBooks Desktop. 
  3. Another obvious sign is the continuous flashing of QuickBooks freezing issue warning messages on your screen. 
  4. If you’re facing repeated hanging and sluggish performance of QuickBooks, of course, it’s an indication of QuickBooks freezing problem. 

Quick Methods to Unfreeze QuickBooks Desktop Application

To unfreeze QuickBooks Desktop application, you need to undertake the troubleshooting methods cited in the section below. Perform the methods by following directions and seamlessly removing the QuickBooks freezing issue. 

Troubleshooting Solution 1 – Rename the Initialization File (QBUSER.INI File)

As we have discussed above, issues with the initialization file (QBUSER.INI file) are a prominent reason for facing the freezing issues in QuickBooks. So, undertake the given method and resolve the problem. 

  • Firstly, make sure to close your QuickBooks application and its related windows on your system, and then begin the troubleshooting. 
  • Secondly, hit the Windows + E tabs simultaneously on your keyboard, and by this, you will get the File Explorer window
  • After this, navigate to the My Computer option and select the C: Drive icon to open the same. 
  • Now, click the Search option and type QBWUSER.INI. Click the OK button to get the search results, and once you get the file, right-click the same to choose the Rename alternative. 
  • Change the file name by adding the .old extension at the end of the filename. After this, finally, restart your QuickBooks Desktop application. Still, facing the QuickBooks freezing up issue? If yes, proceed to the second strategy. 

Troubleshooting Solution 2 – Run the QuickBooks Fix My Program Tool from the Tool Hub

Since we are talking about the freezing issues in QuickBooks, the problem lies within the QuickBooks application. Also, the corrupted installation can bring such freezing issues. Thus, running the QuickBooks Fix My Program utility of the Tool Hub can fix this issue. 

  • Make sure you have QuickBooks Tool Hub installed on your computer system. If you don’t have one, get it from the official Intuit website
  • Once you have downloaded the installation file of the Tool Hub, save this file on your computer’s desktop. 
  • Now, open this downloaded QuickBooksToolHub.exe installation file and carry out the mandatory instructions given in the file. 
  • After performing according to the instructions, agree to the license agreement, and hit the Next button.
  • Now, to begin the installation hit the Install tab and wait till the installation procedure is over. Once the Tool Hub installation completes, tap the Finish button. 
  • Congratulations! You have successfully installed the QuickBooks Tool Hub
  • The next step is to open this Tool Hub and directly navigate to the Program Problems tab. 
  • From here, select the Quick Fix My Program tool, run the same, and let the tool repair the QuickBooks Desktop freezing problems.
  • Once the repair is done, restart your computer and open the QuickBooks Desktop again.  

If you’re still coming across the freezing problems in QuickBooks, move to the next solution. 

Troubleshooting Solution 3 – Take Help from the QuickBooks Rebuild Data Utility 

To close frozen QuickBooks Desktop applications and permanently eliminate the freezing issue, you must fix the data damage issues by running the QuickBooks Rebuild Data utility tool. Undertake the penned-down instructions for the same: 

  1. Firstly, open your QuickBooks application and navigate to the File menu. From here, select the Verify Data alternative. 
  2. On verifying the data, if you find any issue that might cause freezing issues in QuickBooks, again navigate to the File menu and select the Rebuild Data alternative. 
  3. Click the OK button and wait till the tool repairs the damaged data issue. Once the repair process is over, again click the OK option. 
  4. Finally, check the status of your QuickBooks application. 
Need Professional Help?

By the end of this post, we hope you have learned how to unfreeze QuickBooks Desktop. Implement the strategies above, and eliminate the annoying freezing issues in your QuickBooks. However, if you face any difficulty while solving this freezing issue or feel like calling professionals to help you, we are here! Connect with our QuickBooks expert technicians via the Live Chat Support facility and let this problem get fixed professionally. 

FAQ's

A1: From the QuickBooks Tool Hub, you can get help by running the tools below: 

  • QuickBooks Rebuild and Verify Data tool. 
  • QuickBooks Fix my Program utility.

A2: Primarily, the following issues can cause the QuickBooks Desktop Freezes Problems: 

  • Missing the essential system requirements is one of the major reasons for facing freezing issues in QuickBooks. 
  • The damaged QBUSER.INI file also leads to the freezing QuickBooks problem. 

A3: Yes, by restoring your system, you may unfreeze QuickBooks Desktop. For this, restore your system to an earlier state. 

A4: By noting down the following points, you can avoid facing QuickBooks Desktop Freezes problem in the future. 

A5:  Don’t panic! You are free to call our QuickBooks expert technicians anytime for further assistance. Also, you can approach our expert support team via the available Live Chat Support option. 

Do you have a tendency to over-renumerating your taxes? Not to worry anymore. As a taxpayer, most of us make mistakes when it comes to computing our taxes. If you are using QuickBooks for paying your taxes, it is required to zero out payroll liabilities in QuickBooks so as to get over any inaccuracies in the payment of taxes. In simple terms, liability is the particular taxation amount of the employees that are supposed to pay them by their company or organization but they didn’t receive yet.

The payroll liabilities balance report comprises information regarding the payroll items allocated to a liability account, deductions, and many other company contributors. In this write-up, we’ll unwrap all the relevant details related to the same so stay tuned till the end.

What do you understand by Payroll Liabilities?

Just like other types of liabilities, Payroll Liabilities are the amount that you don’t pay to your employees; however you owe it to them. This contains a specific amount of payroll taxes that are supposed to pay by the employees.

Some instances of payroll liabilities are as follows: 

  1. 401 (K) contributions
  2. Union dues
  3. Garnishments used for child support 
  4. Health Insurance Contributions 

Why is it required to zero out payroll liabilities in QuickBooks?

There are some primary factors that necessitate zeroing out of payroll liabilities in QuickBooks; a few of them are enumerated below: 

  1. You might need to zero out liabilities in case the workers are no longer receiving checks.
  2. Zeroing out payroll liabilities is imperative when you plan to make adjustments to the Health Savings Account covered by the commitments of the company to its employees.
  3. When the employee compensation equals the net estimated compensation, zeroing out is also a must.
  4. The compulsion of Paying all the liabilities makes zeroing out an inevitable process. 

Reasons that take place while reconciling payroll liabilities in QuickBooks! 

Whenever you try to reconcile payroll liabilities in QuickBooks, you may end up with some technical glitches due to certain causes. Here’s what: 

  1. If the employee has received more than the original payroll amount, you may have to deal with some errors while reconciling payroll liabilities. 
  2. Another reason if an error message pops up like “The file cannot be installed” or “It seems that you are going to pay your Payroll Liabilities”, it might trigger issues while reconciling payroll liabilities. 
  3. When you notice your particular bank account is seeming perfect, but actually, it’s not, causing issues when you reconcile payroll liabilities.
  4. The QuickBooks application version you are using is outdated, leading to reconciliation issues. 

Steps to zero out payroll liabilities in QuickBooks!

Below are the instructions to zero out payroll liabilities in QuickBooks to be followed:

  1. To start off, you have to navigate to the payroll center and then add a checkmark against payroll liability for which the payment was already made through cash or check.
  2. Now, hit the pay/view tab. It opens a liability check-up.
  3. Choose Expense and head to the account dropdown menu and then click on the expense account you select while recording the payment.
  4. After this, in the amount field, you must enter the negative value amount equal to the liability value.
  5. Hit the recalculate tab, which will make the payroll liabilities amount zero, and then tap on save and close to wind up.

Learn the process to adjust your payroll liabilities!

When your payroll liabilities are incorrect, you’ve to create a payroll liability to fix them. Let’s see how: 

  1. In the beginning, navigate to Employees and Payroll Taxes then Liabilities. 
  2. Next, click on Adjust Payroll Liabilities.
  3. Under the Date and Effective Date fields, choose the last paycheck date of the affected month or quarter.
  4. Tap on Employee Adjustment to correct your employee’s YTD info in the Adjustment is for section and then select the employee’s name. Ensure to do this even if the item being adjusted is a company-paid item.
  5. After this, select the payroll item you want to adjust under the Item Name column.
  6. You must enter the Adjustment Amount.
    • If the item is under-withheld, you have to write down a positive amount to increase. 
    • However, in case the item is over-withheld, type a negative amount to decrease.
  7. Type the amount under the Income Subject to Tax column if you’re in need to make a wage base adjustment.
  8. Moving ahead, enter a note about the adjustment for reference under Memo. 
  9. Choose the Accounts Affected and then hit the OK tab.
    • Tap on Do not affect accounts to leave balances untouched for the liability and expense accounts. The adjustment will only edit the year-to-date amounts on your payroll reports.
    • Opt for the Affect liability and expense account if you want the transaction to reflect in the liability and expense accounts.
  10. Press OK to close the Affect Accounts window.
  11. At last, click Next Adjustment if you have additional employees to enter an adjustment for. Else, select OK to save the changes.

Summing-up!

As we discussed above, liability is the money you owe someone but haven’t paid them back yet. If payroll liabilities reports show up incorrect accounts then it is important to zero out payroll liabilities in QuickBooks. Hopefully, you’re now able to do so after going through all the instructions provided over here. But if still you get stuck somewhere and need a straightforward solution to all your problems then don’t hesitate to connect with our QuickBooks helpdesk team who will surely guide you through the entire process.

QuickBooks is an outstanding tool that can help you streamline your cash flow management, send invoices to your customers and get paid. Besides, you can send customer-tailored invoices online. The timely payment reminders can prevent you from chasing after your customers for the payment. 

You can simply send an invoice email. When the customers open the email and click on Review and Pay or Pay invoice, it takes them to the invoice and they can pay it directly from there. They can choose to pay by credit card or ACH bank transfer based on how you have configured the payment options. Sometimes, your customers run into an error when making the payment for an invoice. In such a case, this post can help you in the error resolution. Let’s understand how! 

Various Instances of The Payment Errors with Their Resolution

There are various instances when your customers may not be able to make payment for the invoices. Below are some of the main instances of these errors along with their troubleshooting solutions: 

1: Pay Now Button Is Missing in The Invoice Email

Payment processing is an add-on feature enabled through QuickBooks Payments. If this feature is missing in QuickBooks, you can send invoices via email, but your customers may not be able to make payment directly through this invoice. If you have this feature, you need to ensure that the QuickBooks Payments feature is enabled. You may access this feature both in QuickBooks Online and QuickBooks Desktop. You may reach out to a reliable QuickBooks support number if not sure how to turn QuickBooks Payments on. 

2: Customers Get an Error Message When Making Payments

Sometimes, customers get an error message when making the payment. In such a case, they need to perform the below-given steps: 

  • If you are getting an error message when making the payment, clear your web browser cache. 
  • Once done, right-click on the Review and Pay button from the invoice email and copy the URL. 
  • Now open a web browser and paste the link into the address bar. 
  • If the link doesn’t open, switch your Internet browser. 
  • Try to make payment using Chrome, Internet Explorer, Safari, or Firefox browser, as QuickBooks Payments work best with these internet browsers.
  • Make sure that the browser you are using is updated to the latest version for effective cash flow management in QuickBooks.

3: When You Don’t Know How to Make Partial Payments 

If you are not sure how to make partial payments for an invoice from the payment page, follow the below-given steps: 

  • Open the invoice mail you have received in your mailbox and then select Review and Pay. 
  • Next, click on the Pencil icon to edit the Payment Amount. 
  • Now enter the partial amount you want to pay.
  • Now fill out the other required fields and select Pay. 

Note: Partial payments are not available when your vendor requests a deposit on an estimate. 

4: When Customer’s Credit Card Gets Declined When Making Payment

Sometimes, when your customers try to make payments, their credit cards get declined. In such a case, you need to understand the possible reasons behind the error. The two main reasons are stated in the below-given list: 

  • When the information entered by a customer does not match the bank. Verify that the entered information is correct and then make the payment for the invoice. 
  • If the payment amount exceeds the maximum limit of the credit card specified by the card issuer or bank. It would be better if you check the limit before proceeding any further with the payment process. 

In the End! 

The solutions explained in this post can help you make full or partial payments against the invoices without getting an error. However, if you are still getting errors or unable to make a payment due to a technical unease, get in touch with us by dialing our QuickBooks support number. The experts will help you with prompt support in streamlining your cash flow management. 

If you are working with QuickBooks on your same system for a long time, you will be feeling bored and wish to Transfer QuickBooks Desktop to Another Computer. Various factors are responsible for this decision. You can use the migratory tool to transfer QuickBooks software from an old to a new computer, and a maximum of three files can be moved at one time. When you want to do this, you should follow the steps mentioned below to reinstall the QuickBooks Desktop installation.

QuickBooks is an advanced and multi-purpose accounting software to manage accounts, transactions, invoices, bills, taxes, payroll systems, etc. It is used to manage and maintain accounting and other tasks at the industrial and individual levels.

  • Make sure that you have product and license information
  • Uninstall QuickBooks to reinstall it
  • Download QB installation files
  • Then, install QuickBooks

If you have a QuickBooks license and product number but do not have QB installation files, then download them from Intuit website.

  • Move to ‘Help’ in the QuickBooks menu bar
  • Press on ‘register QuickBooks
  • Mention ‘business phone number’ and ‘postal code’.
  • Once you finish the information entering task, your QuickBooks will get registered.
  • New Computer’ registration detail is also recorded by Intuit

Suppose you have registered already, no need to register it again. When you transfer QuickBooks from one computer to another, you also share company files. Once QuickBooks is appropriately installed to a new system, it will become simple to copy all company files to a new computer.

If you find any issue in transferring QuickBooks to another computer, you must call the QuickBooks customer service number to get instant solutions immediately.

How Does the Migratory Tool Transfer QuickBooks from One Computer to Another Computer?

The migrator tool is one of the excellent features of QuickBooks software. You can complete the process through this tool in just a few clicks.

The migrator tool is also called a Transfer QuickBooks Desktop to Another Computer. It can be accessed if you are an Admin user. You should create a complicated password and copy or write it somewhere or in a secured place.

It is required only a single time during QuickBooks transfer. The migratory tool will allow you to take a maximum of three company files in your USB flash drive along with supportive documents.

A USB flash drive will physically move the file, but the migratory tool will internally perform a technical transfer task. The migratory tool will also download the correct QuickBooks desktop version in another system and help you to set up all the files.

What are the Requirements of Migratory Tools to Transfer QuickBooks To Another Computer?

  • Internet connection is available in a new computer
  • Pen Drive should have a minimum of 150-200 MB free space.

What Are The Data Copied Through Migratory Tools While Moving QuickBooks?

The required QB data is listed below to run QuickBooks Desktop.

  • QuickBooks Desktop details and other versions
  • Maximum 3 company files with supportive documents
  • All related files, custom templates and forms
  • QB templates and letters
  • Local attachments
  • Memorized reports
  • Spell checker
  • Financial Statement Designer
  • Cash flow
  • Statement writer
  • Business planner (.bpw)
  • QB loan manager(.lmr)
  • Advanced reports
  • Layout designer
  • Printer settings

What Are The Data That Won’t Get Copied Through a Migratory Tool While Transferring QuickBooks?

Few data are listed below that can’t be copied while moving Transfer QuickBooks Desktop to Another Computer.

  • Multi-user configuration setting
  • Payroll or payment details will not get copied as Intuit policy to secure data
  • Uninstall ‘Intuit Data Protect’ from the old system and reinstall it in another system
  • Company file not opened could not get copied
  • Back-ups created manually by a user will not be transferred.

How to Use Migratory Tools to Transfer QuickBooks From Old to a New Computer?

Some steps are listed below to use the Migratory tool in the old computer and new computer after transferring QuickBooks.

On Old Computer

  • Move to ‘File Menu’ in the QuickBooks menu bar.
  • Choose ‘Utilities’.
  • Search ‘Move QuickBooks’ to another computer and then press on it.
  • After this, press on ‘I am ready’ and create ‘One-Time Password’.
  • Select ‘Pen-Drive’ to use.
  • Wait for a few minutes when the files get copied.

On New Computer

  • Insert USB flash drive.
  • Search the ‘Move_QuickBooks.bat’ file on a USB flash drive and run it.
  • Type the Password that you have created.
  • Press on ‘Let’s Go’.
  • Migrator tool will now finish its work.

No fixed time is mentioned to complete the process. It totally depends upon internet speed and company file size.

Conclusion

The given above tips will help you learn the Migratory tool to Transfer QuickBooks Desktop to Another Computer to a new computer. If you can’t find ways suitable for sharing QuickBooks to another computer, you must call QuickBooks support to move QB company files to another computer. A technical representative will provide you with appropriate solutions to perform the transferring task of QuickBooks from an old to a new system. The technical executive is trained, professional, and expertise in solving any queries in QuickBooks. The helpdesk is opened 24/7 hours a week and 365 days a year to serve and assist you.

Users often convert Quicken data into QuickBooks Desktop to access the accounting application’s enhanced features. But, the users don’t have a clear vision of how to do so. So, to make it more convenient and easier for you, we have described the detailed steps to convert Quicken data into QuickBooks Desktop. We suggest you to read this article properly to gain in-depth information. 

Got stuck while trying to convert Quicken data into QuickBooks Desktop? Ring us at @ +1855-603-0490 and connect with our dedicated professionals to overcome the issue immediately. 

Also Read – QuickBooks already has A Company File Open Issue

Points You Must Remember Before convert Quicken data into QuickBooks

Below, we have illustrated some key points you must remember while proceeding with the conversion process.

  • Once you have converted the Quicken data to QuickBooks, it can’t be reversed. So, you must be sure before converting the data from one application to another. 
  • Another important thing is to prepare the backup of the Quicken data that you need to convert. So, if the data gets affected during conversion, you have a duplicate file copy. 
  • For instance, if you are accessing Quicken software on a Mac device, you first have to convert the Mac files to Windows. This is so because only the Windows files in Quicken are converted into QuickBooks software. 

In What Circumstances You Can Utilize Quicken Converter 

Quicken Converter is used to convert data from one accounting software to another. Down below, we have listed some of the instances when you can utilize the Quicken Converter, which is as follows;

  • You can utilize the Quicken Converter if you are migrating from a Quicken version that is not equivalent to the QuickBooks Desktop version you are using. 
  • Moreover, you may also skip accessing the Quicken Converter and convert directly to QuickBooks via Conversion Utility while using the Quicken version equivalent to your QuickBooks version. 
  • Apart from these, it is not feasible for the users to convert the Quicken data to QuickBooks through Quicken Converter or the Conversion Utility. This is so because the Mac files won’t get converted, so you have to convert them into Windows files first. 

Also Read – How to Reset QuickBooks Admin Password

Stepwise Instructions to Convert Quicken Data Into QuickBooks Desktop Data 

Are you unaware of the steps to convert Quicken data into QuickBooks Desktop? Worry Not!!. Instead, look at the instructions below to do the same. 

Stage 1: Through Quicken Converter

First Step: Get the Latest Version of Quicken Converter Download

Before utilizing the Quicken Converter Tool, check that you haven’t installed another version of it on your device. If you are already accessing the older version of it, then first you have to uninstall it from your device and then download the latest one. The users are supposed to download the most recently launched version of Quicken Converter that tallies with the version of QuickBooks Desktop you are accessing. 

Second Step: Install the Recently Downloaded Quicken Converter and Convert It. 

  • In the beginning, open the downloaded Quicken Converter on your device and hit the Next button. 
  • After this, mark the “I accept the terms in the License Agreement” and proceed further.
  • To initiate the Quicken Converter installation, tap Next, followed by the Install option. 
  • Choose the highlighted Launch Quicken Converter and select the Finish option. 
  • Following this, opt for the Open a data file located on this computer and choose Select File.
  • Now, search for the Quicken file (.QDF) and opt for the OK button. 
  • Afterwards, navigate to Convert it! option and then hit OK.
  • Finally, to get your new Quicken Data File (.QDF), tap on the Save option > Exit. 

Also Read – Resolve QuickBooks Error 6147

Stage 2: Search for the .QDF not .QFX file 

The Conversion tool generates a .QFX file (which isn’t used during conversion). Also, it prepares the .QDF file, which is the file that you wish to convert. So, for that, you have to search for the upgraded .QDF file from the folder named Q18Files or Q17Files. You will find that the Q18Files or Q17Files have the exact location of your original Quicken file. Apart from these, .QDF file also consists of the exact name as your original Quicken file. 

Detailed Steps to Convert the Quicken Data into QuickBooks Desktop Via Conversion Utility 

  • To begin with, navigate to the File menu and hit the Utilities option. 
  • After this, go to the Convert option followed by From Quicken option.
  • You must pick the Quicken file (.QDF) you wish to convert.
  • Soon after this, you will see that the Conversion Utility will assist you with the remaining conversion steps. 

Note: For instance, if you want to obtain any additional details regarding the Conversion Utility, hit the F1 key. After this, open the Help window in QBDT and include “Convert from Quicken”. 

Ending Words!!

Hopefully, we assure you that you have gained immense knowledge on converting Quicken data into QuickBooks Desktop. However, if you still get stuck at any point while converting the data, you can get help from our professionals through the live chat facility. 

Many times the users might get confused regarding the proper procedure to access company files located on a remote computer. Worry Not!! In this comprehensive post, we have discussed all the relevant facts required to launch the data file placed on the remote computer. Furthermore, for the detailed procedure, we recommend you to stay in touch with this post till the end.

Didn’t have any clue on how to access a company file located on a remote computer? Call us at @+1855-603-0490, and talk to our professionals, who are available round the clock to help you in the best possible manner asap.  

What are the Advantages of Remote Accessing QuickBooks?

With the help of Remote Accessing in QuickBooks, users can easily launch their data file placed on the server computer. Doing so will help them minimize the number of hours they work weekly. Apart from this, it also offers numerous benefits, which are as follows; 

  • The users can work from sitting anywhere in the world with a stable internet connection.
  • Moreover, the best part is that you can invest some extra hours to your business even while travelling.
  • It gives you access to your account from a mobile device and the system. 
  • Additionally, you can access any company file and your client’s system outside of normal working hours. 

Also Read – How To Resolve QuickBooks Error 15217

Points You Must Consider Before Opening Data File Stored on Remote Computer 

Before proceeding further, it is essential to know a few points to access QuickBooks Desktop remotely. Let’s have a look at these points attentively. 

  • The users need to map server on the host computer as a network drive. However, if you encounter any issue in mapping the network drive via UNC, you can implement the same procedure through the Server’s IP address. 
  • Moreover, ensure you have set up computers to access the file in a multi-user environment. 
  • Apart from these, you must also set the folder where the data file is placed. 

Stepwise Procedure to Open a Company File located on a Remote Computer in QuickBooks

This blog section lists all the steps you must apply to access data files placed on a remote computer in QuickBooks. Let’s have a look at the points given below appropriately. 

Stage 1: Get The QuickBooks Database Server Manager on Your Remote Computer 

QuickBooks Database Server Manager is a utility allowing users to configure the QuickBooks server to access the multi-user environment. Thus, it is essential to download and install the QBDBMgrN if you haven’t installed it previously. For that, apply the steps written below attentively. 

  • In the beginning, download the most upgraded version of QuickBooks Desktop on your device. 
  • Soon after this, navigate to the QuickBooks File menu and opt for the Switch to Multi-User Mode. 
  • You should tap the Yes option from the multi-user hosting setup required window. 

Also Read – How To Repair QuickBooks Error Code 80070057

Note: When installing the QuickBooks Desktop, the QuickBooks Database Server Manager starts running in the background. This service might run on the computer that runs your data file even if QBDT is not already open. 

  • Afterwards, hit the Ok button on the Multi-User Setup Information window. 
  • Next, you are supposed to include the relevant users by accessing the Company and then choosing Users. Later on, hit the Set Up Users and Roles followed by the New option.  

Stage 2: Enable the Network Discovery On and Disable Password Protected Sharing (Optional)

This is an optional method, but it is essential that the server must have enabled the Network Discovery. Also, it must be evident to access the file through a UNC path easily. 

Moreover, the users might be prompted with the Network Password when you have enabled the Password Protected Sharing. In such a scenario, you can either sign-in by accessing the network password or disable the feature. 

Furthermore, you must perform this procedure on the server or host computer. Also, you must perform it on all the workstations requiring access to QuickBooks remotely over the network. 

  • In the initial stage, launch the Control Panel on your computer.
  • Navigate to the Network and Sharing Center, followed by the Change Advanced Sharing Settings option. 
  • Now, you have to expand the Profile Type you are presently using and then move further. 
  • After this, opt for the Turn on Network Discovery option under the Network Discovery. 
  • Move further by tapping on the Turn-Off Password Protected Sharing option. 
  • In the end, hit the Save Changes option to restore all the relevant changes made. 

Stage 3: Locate And Then Launch the QuickBooks Company File 

Now, users are supposed to find and open the company file once the process ends. 

  • In the beginning, move to the QuickBooks File menu and hit the Open or Restore Company option.
  • After this, you are supposed to opt for the Open a Company File option and then click the Next option. 
  • Now, you must search where you have placed your company file.
  • For Example:- If your company file is stored in Drive E, navigate to the data file name (E:) in the list. 
  • You must look for the company file with the .QBW file extension from the list. Later on, opt for the Open option. 
  • Whenever asked, you are required to add the username and password in the required text fields.  

Also Read – Resolve QuickBooks Error 6147

Summing It Up!!

With the help of this detailed post, we hope that the procedure to access a company file located on a remote computer has become simpler and easier for you. However, if you need help with any of the steps above, consult with our professionals through live chat for immediate help.

Posts pagination