Looking to upgradeQuickBooks 2023 to QuickBooks 2024 application for Windows? Users always look to upgrade their applications to use them smoothly and with more updated features. Do not burn out; we have clearly made this blog based on the queries of the users looking for the QuickBooks upgrade process.
Walk through this guide and get your complete roadmap to upgrade QuickBooks easily and successfully.
Before you begin:
In this guide, we have covered the most concrete solutions and steps to get the upgrade process done as per your expectations. Simply walk through this guide!
Back up your company file: This is a critical first step. Go to File, then click on Backupcompany and choose Create local backup.Finally, save the backup in a separate location, like an external drive or cloud storage, with a clear name (e.g., “MyCompany_Pre-2024_Backup.qbb”).
Gather your license and product numbers: You will need these to activate the new version. If you purchased a download, look for it in your purchase confirmation email from Intuit.
Ensure you have administrative rights: You would need admin access to your PC to install the new software.
Temporarily disable antivirus: For a smoother installation, it is a good practice to temporarily disable your antivirus software. Remember to re-enable it after the installation is complete.
Prepare to upgrade QuickBooks Desktop to QuickBooks 2024 for Windows
Navigate to the Homepage of your QuickBooks Desktop.
In the older version of your QuickBooks Desktop, open your company file and save it as a backup.
Open your company file in the new version as a QuickBooks admin.
Uninstall the previous version once you are done upgrading it to the newer version.
Finally, the installation process is completed.
Schedule an upgrade
For the scheduled upgrade, choose a specificdate and time.
Click on Continue to receive a confirmation message.
You will get a notification reminding you about your scheduled upgrade 7 days before, one day before, or on the day of the upgrade.
If something important comes up, you can reschedule the upgrade at a later date. Here is how you can do it:
Choose Upgrade Scheduled.
Choose a new time and date to reschedule the upgrade.
If you wish, you could proceed to cancel the upgrade from the same window.
Note:- Choose “Keep the old version of QuickBooks on my computer”. Selecting this option will store the old QuickBooks version on your PC.
Find out what happens on the scheduled upgrade
When the QuickBooks Desktop application is open, you will receive a frequent option to upgrade. You can choose from the two options below:
To upgrade to the new version immediately, click on Upgrade now.
If you are looking to schedule the upgrade for a later date, click on Reschedule.
Your QuickBooks upgrade will start automatically if your PC is on. It does not matter if the QuickBooks application is not open. You can also see the progress in the upgrade while the process runs.
If your PC is off, it will ask you to either upgrade now or schedule the upgrade later. The next time you open the company file, the upgrade will start automatically.
Upgrade your QuickBooks Desktop for Mac Plus
In your QuickBooks Desktop for Mac Plus, when you open your company file, you will find the Upgrade QuickBooks window.
Click on Upgrade for Fee.
Click on Let’s go.
Doing so would download and install the new version of QuickBooks.
Once completed, choose Open QuickBooks.
You can now register your new QuickBooks version.
Use the Upgrade QuickBooks menu to upgrade
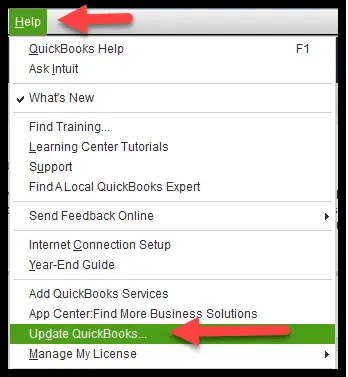
Open your company file and navigate to the Helpmenu.
Click on Upgrade QuickBooks and select Upgrade for Free.
Click on Let’s go.
Doing so would download and install the newQuickBooks version.
Once you are done, click on Open QuickBooks.
Now, you can register your new QuickBooks version.
Conclusion
In this guide on “UpgradeQuickBooks 2023 to QuickBooks 2024,” we hope that you have successfully upgraded your QuickBooks Desktop to 2024. However, if you are still facing issues with the upgrade process, please contact our senior QuickBookSupportNet specialist at +1(866)500-0076.
Frequently Asked Questions
1. Do I need to uninstall QuickBooks 2023 to install 2024?
No, it is not necessary to uninstall QuickBooks version 2023; you can install QuickBooks 2024 alongside 2023 and upgrade files when ready. However, you will typically switch to 2024 for daily use after upgrading.
2. What are the system requirements for QuickBooks 2024?
Check Inuit’s official 2024 system requirements for supported Windows versions, RAM, disk space, and the required .NET framework; requirements may differ from 2023.
3. Will my company file upgrade automatically when I open it in 2024?
When you open a 2023 file in QuickBooks 2024, it will prompt you to upgrade the file to the new version. You need to save a backup first.
4. Is it necessary to back up the company file before upgrading?
Yes, it is necessary. You always need to back up before upgrading to prevent data loss if something goes wrong.
5. Is the upgrade free if I already have a QuickBooks Desktop 2023 subscription?
Upgrading to 2024 typically requires purchasing the 2024 license/edition. Check your plan renewal and upgrade pricing.
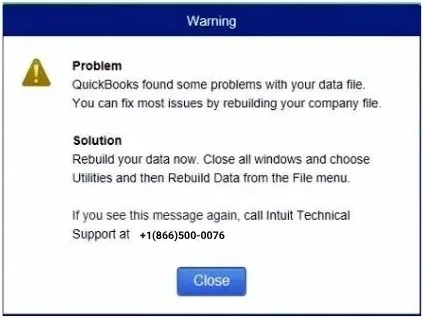
QuickBooks error code 1317 is an installation error that may occur when attempting to install a new version of QuickBooks Desktop or its updates. You might encounter a warning message on your screen indicating that the software or updates cannot be installed due to this error.
This issue typically arises from conflicts with the Windows operating system, its components, internet connectivity issues, or problems with your computer’s functionality. In this comprehensive guide, we will explore the root causes of QB error 1317 and provide step-by-step troubleshooting solutions to resolve it. Follow the guide carefully to ensure the error is fixed effectively.
What Causes Install Error 1317 in QuickBooks?
Explore the list of potential factors that trigger install error 1317 in QuickBooks Desktop.
Too many active processes or programs on your computer
General internet connection problems
Outdated Windows
Damage or corruption in Windows components
Incorrect installation or damaged program files
Insufficient permissions to install software or updates
Various programs or services may interfere with the QuickBooks installation
Top 7 Methods to Troubleshoot QuickBooks Error Code 1317
After identifying the root causes, follow the steps below to troubleshoot QuickBooks error 1317 when installing QuickBooks or software updates.
1. Restart your computer
Restarting your computer closes running programs and processes, clears active memory, and gives it a fresh start. This resets the state of both hardware and software, thereby resolving any issues that may be interfering with software installation.
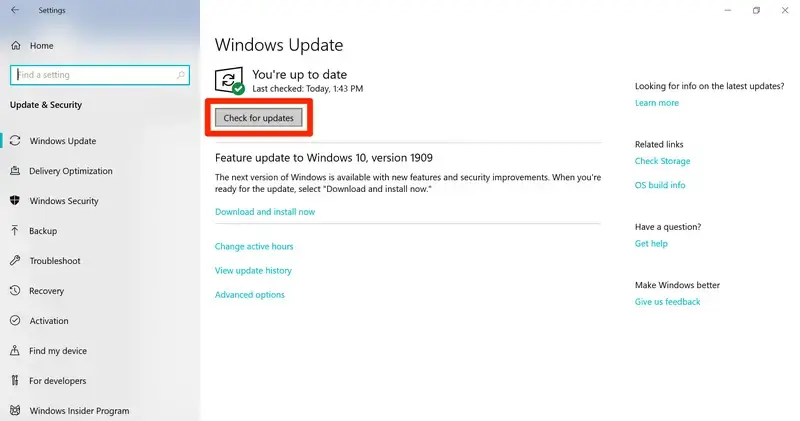
2. Update Windows
Ensure that Windows is up to date and compatible with the software you’re running, such as QuickBooks Desktop, to facilitate easier installation and improved performance.
Press the Windows logo key.
In the Windows search, type Settings > Enter.
Select Windows Update from the left pane.
Click on Check for available updates.
If the updates are available, hit Download & Install.
When done, restart your computer to apply the updates.
3. Manually fix Windows components
For a smoother installation and proper functioning of the software, Windows components play a crucial role. Repairing these components can help resolve QuickBooks error code 1317.
a. Repair or reinstall Microsoft .NET Framework
The steps below are only applicable for Windows 10 or later:
Close all running applications.
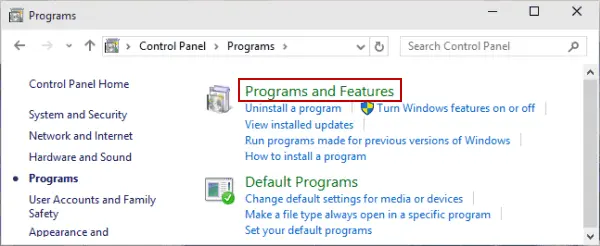
Click the Windows Start button.
Search for Control Panel and open it.
Navigate to Programs and Features.
Click Uninstall a Program (no uninstallation occurs).
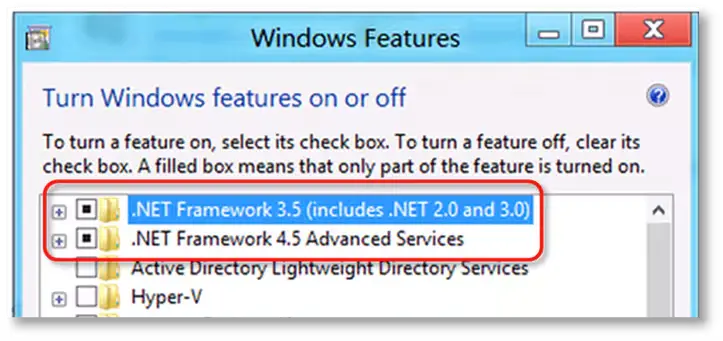
Select Turn Windows features on or off.
Locate .NET Framework in the list.
Verify settings for .NET Framework 4.5 (or higher) and .NET Framework 3.5 SP1.
Note: Steps to address issues with .NET Framework 4.5, 4.6, 4.7, and 4.8 are identical.
Check NET Framework 4.5 (or later)
If you haven’t selected the .NET Framework 4.5 (or later) checkbox:
Mark the checkbox for .NET Framework 4.5 (or later) to turn it on.
Click OK to save the changes.
Restart your computer.
If you have already selected the .NET Framework 4.5 (or later) checkbox:
Mark the checkbox for .NET Framework 4.5 (or later) to turn it off. Don’t enable the settings.
Hit OK to save the changes.
Restart your computer.
When signed back in to Windows, follow the same steps to turn on .NET Framework 4.5 again.
Check NET Framework 3.5 SP1
If the .NET Framework 3.5 SP1 option isn’t selected:
Mark the checkbox for .NET Framework 3.5 SP1 to turn it on.
Click OK to save the changes.
Restart your computer.
If the .NET Framework 3.5 SP1 option you selected already:
Mark the checkbox for .NET Framework 3.5 SP1 to turn it off. Don’t turn the settings back on.
Hit OK to save the changes.
Restart your computer.
When signed back in to Windows, follow the above steps to turn .NET Framework 3.5 SP1 back.
If you still see QuickBooks error code 1317 when installing, reach out to an IT professional or Microsoft. The issue may be related to your operating system, not QuickBooks.
b. Repair Microsoft MSXML
64-Bit Operating System: Register MSXML
Click the Windows Start menu, type cmd.
Right-click CMD and choose Run as Administrator.
At the C: prompt, type cd\windows\syswow64 and press Enter.
Type regsvr32 MSXML6.dll and press Enter.
Install QuickBooks Desktop.
32-Bit Operating System: Register MSXML
Press Windows+R to open the Run command.
Type cmd and press Enter.
Type regsvr32 MSXML6.dll and press Enter.
Install QuickBooks Desktop.
If the issue persists, consult an IT professional for help.
4. Repair QuickBooks Desktop
QuickBooks error 1317 can occur due to incorrect installation or damaged files. Repair the software using the tools in the QuickBooks Tool Hub.
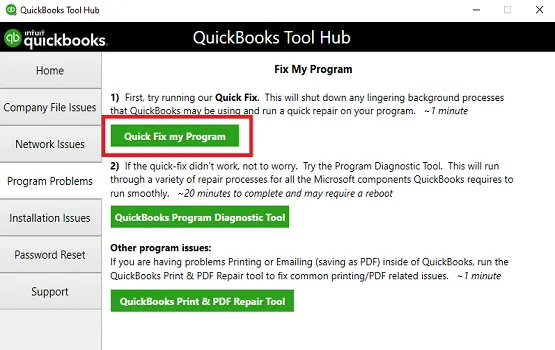
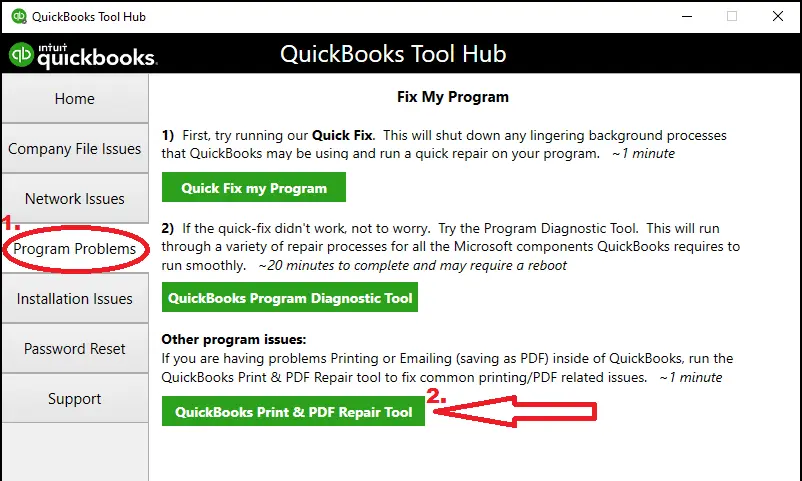
a. Run Quick Fix my Program
The Quick Fix my Program will shut down all the processes in the background that QuickBooks uses and run a quick repair to the program.
Open the QB Tool Hub.
Go to Program Problems.
Click on Quick Fix my Program.
Open QuickBooks Desktop and then the company file.
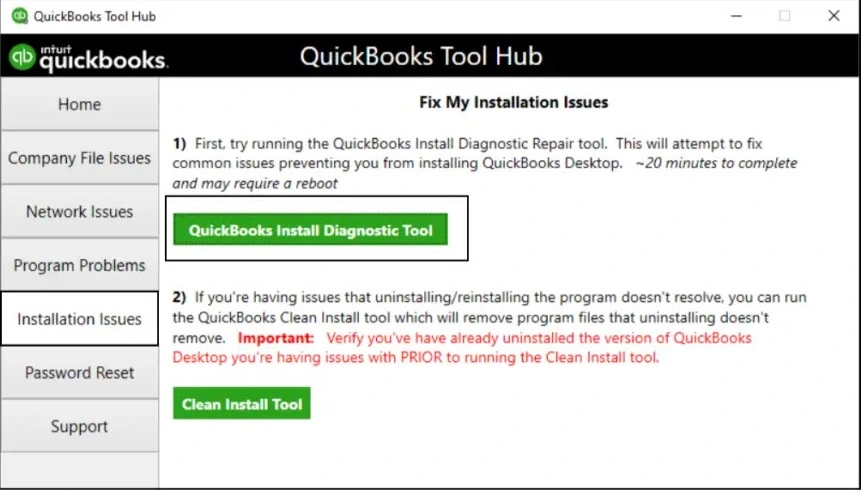
b. Run QuickBooks Install Diagnostic Tool
If something goes wrong during the installation of QuickBooks Desktop, problems may arise while using it. Use the QuickBooks Install Diagnostic Tool to repair your QuickBooks Desktop and fix common problems.
To install QuickBooks software updates successfully, the necessary folder and Windows access permissions must be set to replace the old files with the new ones. This ensures the update is completed without issues and resolves QuickBooks error code 1317. Make sure to set up a folder and Windows access permissions to modify the installation folders.
6. Reinstall QuickBooks Desktop in Select Startup
To ensure nothing interfered with the software installation, try reinstalling QuickBooks Desktop in Selective Startup.
a. Switch to Selective startup
To ensure that no other apps interrupt the QuickBooks installation, switch to Selective Startup. If you can perform the steps on your own, reach out to your computer’s manufacturer or a Windows expert.
Press the Windows + R keys together.
In the Run prompt, type msconfig and click OK.
Go to the General tab.
Choose Selective startup and Load system services.
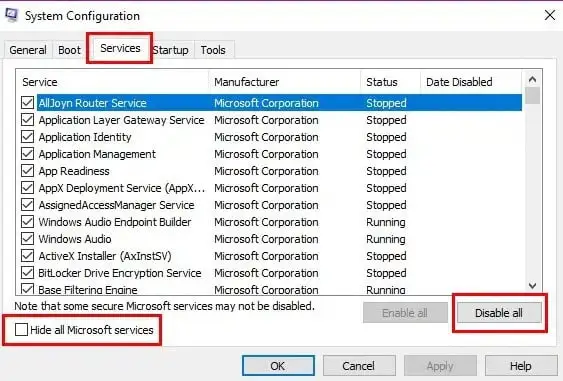
Go to the Services tab.
Mark the checkbox for Hide all Microsoft Services.
Hit on Disable all.
Remove the mark from Hide all Microsoft services.
In the list of services, choose Windows Installer.
Click OK.
Select Restart in the System Configuration window.
Go to the General tab and click on Normal startup.
Hit OK.
Select Restart in the System Configuration window.
Conclusion
We’ve covered the reasons behind QuickBooks Error Code 1317, which may occur during installation or software updates, along with detailed troubleshooting steps such as repairing QuickBooks, updating your Windows OS, and ensuring Windows components are up to date. Following these steps should help you resolve the error efficiently.
For additional support or expert guidance, connect with a QuickBookSupportNet ProAdvisor at +1(866)500-0076. Contact our support team today for personalized assistance!
Frequently Asked Questions
What does error 1317 mean in QuickBooks?
QuickBooks Error 1317 occurs during software installation or updates, indicating that the system lacks the necessary permissions to create a directory for the software. Use the QuickBooks Install Diagnostic Tool from the QuickBooks Tool Hub, or temporarily disable Controlled Folder Access in Windows.
How to fix QuickBooks error 6123?
To fix QuickBooks error 6123, use the QuickBooks Tool Hub to run Quick Fix my Program or QuickBooks File Doctor, verify and rebuild your company file data, move your company file to a local hard drive, or restore a portable backup file.
How do I fix error 1328 in QuickBooks?
To resolve QuickBooks error 1328, try selecting Ignore during the update process, or repair your QuickBooks installation through the Windows Control Panel. If these steps don’t work, you may need to perform a clean installation of QuickBooks Desktop to replace corrupted installation files.
How do I fix QuickBooks Desktop installation errors?
To resolve QuickBooks Desktop installation errors, download and run the QuickBooks Tool Hub from the QuickBooks website, then select Installation Issues > QuickBooks Install Diagnostic Tool. If the issue persists, try running the Quick Fix my Program option within the Tool Hub.
Why won’t my QuickBooks update install?
Your QuickBooks update may fail to install due to internet connection issues, incorrect system date/time, insufficient administrative privileges, interference from Windows Firewall or other security software, or a damaged QuickBooks installation.
QuickBooks error 15101 is one of the 15XXX series errors that appear when trying to update the QuickBooks Desktop software. Along with the error, you may also encounter a warning message stating,
“Your QuickBooks isn’t able to update because the downloaded files have been corrupted.”
Such an interruption usually occurs when you lack sufficient permissions to download the updates or when there are issues with various features of QuickBooks or Windows.
Today, in this detailed guide, we will cover a list of factors that hinder the QB update and cause update error 15101, along with suitable troubleshooting methods to overcome them. Let’s explore this guide in detail…
What Causes Update Error 15101 in QuickBooks?
Below is a list of the reasons why you see QuickBooks update error 15101 when updating. Explore them one by one:
Not having the proper admin rights
Various QuickBooks background processes may be lingering with the update
Previous QB updates might be causing the issues
The Shared Download Drive might not be mapped
Damages or corruption to the Windows files or folders
QuickBooks FCS is disabled
QuickBooks failed to verify the digital signature certificate
Windows Firewall might be blocking QuickBooks
The incorrect installation of QuickBooks or the program files is damaged or corrupted
Top 9 Solutions to Fix QuickBooks Error 15101 When Updating
In this section, we’ll discuss various methods that will help you resolve the causes mentioned above. To proceed with these fixes and resolve QuickBooks error 15101, ensure your software is up-to-date:
1. Download the updates as an administrator
Not having administrator rights will prevent you from making appropriate changes to the Windows OS or QuickBooks and will hinder updates:
Exit your company files and QuickBooks.
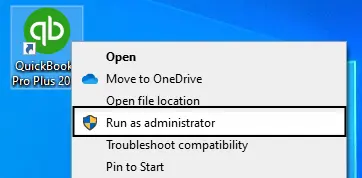
Right-click on the QuickBooks Desktop icon.
Select Run as Administrator.
Click Yes on the UAC prompt that says, “Do you want to allow this program to make changes to your computer?“
If you still see QuickBooks error 15101, try the steps below:
Exit QB Desktop.
Locate to C:\ProgramData\Intuit\QuickBooks XX\Components.
Note: XX is the QuickBooks Desktop version you use. For example, QuickBooks Desktop 2024 is DownloadQB24.
Right-click on Components and click Delete.
Launch QuickBooks Desktop.
Go to the Help menu.
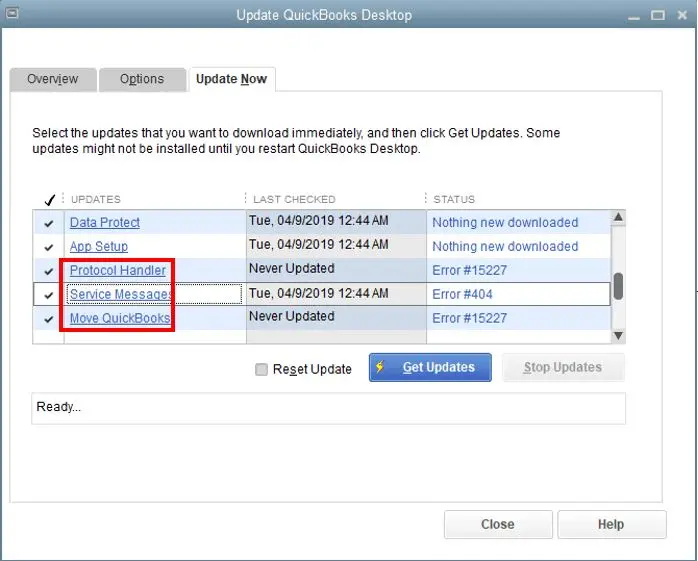
Select Update QuickBooks Desktop.
Click on Update Now.
Mark the checkbox for Reset Update.
Hit Get Updates.
When the download finishes, close and reopen QuickBooks Desktop.
Go to Help > Update QuickBooks Desktop.
Select Overview > Update Now.
3. Map the Shared Download drive
If you use QuickBooks in multi-user mode on a host, it’s necessary to map the shared download drive and then receive software updates.
Press the Windows logo icon key.
In the search bar, type This PC and select it from the search results.
Select More (…), then click on Map network drive.
Note: If you don’t see the Map network drive option, right-click on This PC and select Map network drive.
Choose a drive letter in Drive.
You can either:
enter the full path of the folder you are trying to map, or
Enter only the path of the computer file hosted from, and click Browse to find the file in the folder
Hit on Reconnect at sign-in to make sure the Drive app is updated every time you sign in to your computer.
Click Finish.
4. Run the SFC scan
An SFC scan checks Windows files and folders for potential damage and performs quick repairs to resolve the issue. Learn how to run an SFC scan by following these steps:
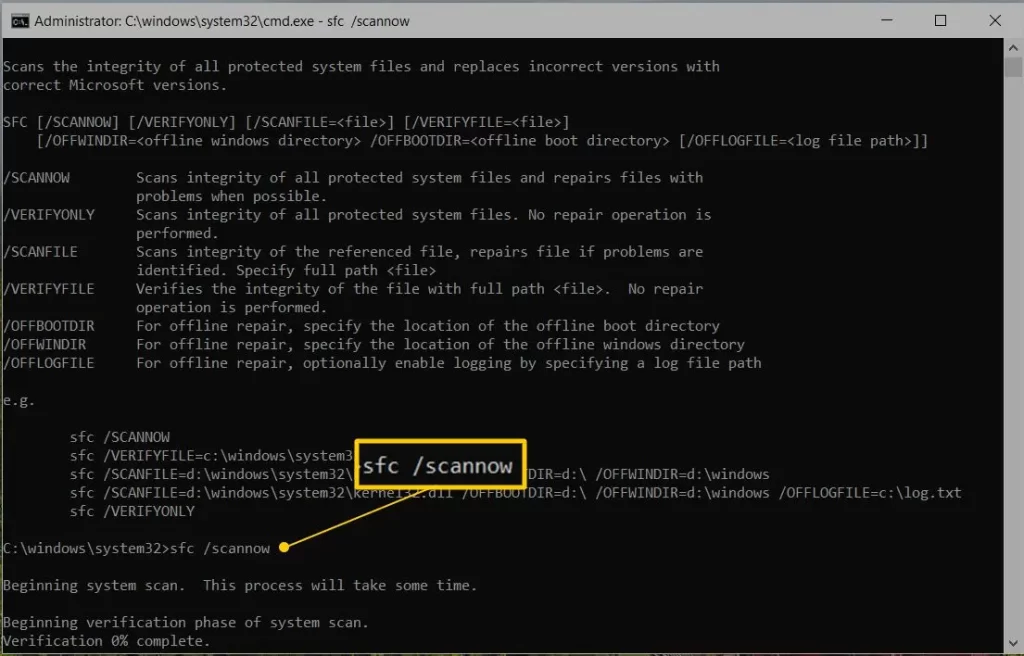
Press the Windows + X keys to open the Quick Link menu.
From the menu, click on Command Prompt (Admin).
Note: You can also run System File Checker (SFC) from Windows PowerShell (Admin).
Click Yes on the User Account Control (UAC) prompt.
Type SFC /scannow in the command prompt window and press Enter.
The System File Checker tool verifies the integrity of Windows system files and repairs them quickly if any issues are detected.
When this is done, reboot your computer.
5. Enable the QuickBooks FCS service
QuickBooks FCS is a service that runs in the background to initiate and execute QuickBooks updates while downloading them from Intuit servers. Let’s enable it to avoid QuickBooks error 15101 when updating:
Launch the Windows Start menu.
Type Run in the search and press Enter.
In the Run command, type COMPMGMT.MSC and OK.
The Computer Management window will open.
Click on Services and Applications.
Mark the Services option.
Scroll down your cursor until you find Intuit QuickBooks FCS and double-click on it.
Select Startup type > Manual.
Click Apply, then OK.
Once done, re-validate the payroll’s service key to refresh the connection.
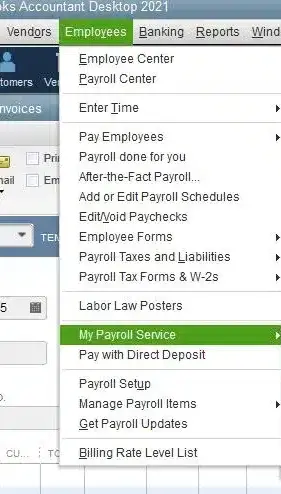
Go to the Employees menu.
Click on My Payroll Service.
Select Activate Service Key.
Highlight the current payroll > Edit under the Service Keys.
Click Next until Finish displays.
6. Install a digital signature certificate
Installing a Digital Signature Certificate enhances security and authenticates identity, ensuring data privacy for digital transactions:
Locate to C:\Program Files\Intuit\QuickBooks.
Look for the QB program file QBW32.exe.
Right-click on the same and select Properties.
Choose Digital Signature and make sure Intuit is selected in the signature list.
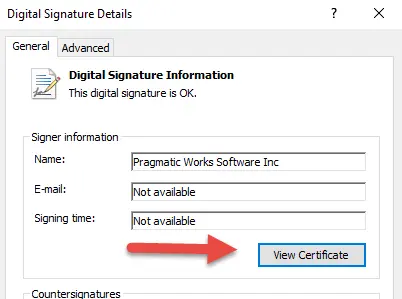
Click on Details.
In the prompted Digital Signature Details window, click View Certificate.
In the prompted Certificate window > select Install Certificate.
Click Next until Finish is displayed > Finish.
Restart your computer.
Open QuickBooks Desktop.
Try to download the updates again.
7. Configure the Windows Firewall settings
Windows Firewall is a system security application that controls the ports for incoming and outgoing data from QuickBooks. If it detects any errors that could harm system files and folders, Windows Firewall blocks them from running on the computer and can trigger QuickBooks error 15101. To resolve this issue, configure the Windows Firewall settings for QB to enable software updates.
8. Repair QuickBooks Desktop
If the QuickBooks Desktop installation went wrong or the program files or folders are corrupted, it can cause problems when running the software. To verify the damages and identify the issues, you must run the QuickBooks Install Diagnostic Tool. When the tool finishes, try to update your QuickBooks Desktop again.
9. Re-install QuickBooks
Reinstalling QuickBooks Desktop deletes all existing program files and folders, replacing them with fresh software files and directories. This process fixes issues like update error code 15101 in QuickBooks, addressing corrupted program files or faulty installations, ensuring smooth software operation and payroll tax table updates.
Conclusion
In conclusion, whether you are trying to download QuickBooks product updates or the payroll tax table updates, both are crucial for uninterrupted financial management and accurate payroll processing.
The above troubleshooting steps, such as running updates with admin rights, repairing the QuickBooks desktop, and verifying digital signature certificates, can help resolve QuickBooks error 15101.
For further assistance, it is recommended that you consult your QuickBooks professionals regarding +1(866)500-0076. Talk to an expert now!
Frequently Asked Questions
How to fix QuickBooks error 15101?
To resolve QuickBooks error 15101, follow these steps: download the update with administrator rights, verify the correct installation of QuickBooks and that the files are free of corruption using the QuickBooks Install Diagnostic Tool, and download a copy of the signing certificate. If this doesn’t work, configure the Windows Firewall settings for QuickBooks and reinstall the software.
How do I contact Intuit QuickBooks error support?
Visit our Contact Us page and provide your contact information to receive a callback from the Intuit support team. You can also contact us at +1(866)500-0076 to connect with professionals promptly.
What is error code 15102 in QuickBooks Desktop?
Error code 15102 in QuickBooks Desktop occurs when the user fails to download or reset software updates. You may also see a warning message on the screen, such as “Failed to reset updates” or a similar message. To resolve this issue, please refer to the troubleshooting guide on our website.
How to fix the QuickBooks registration error?
To fix a QuickBooks registration error, download and run the QuickBooks Tool Hub to fix installation issues, use the Quick Fix my Program tool, or try the QB 3371 Error Fix from the Installation Issues tab in the Tool Hub.
Can’t install your QuickBooks Desktop, and wondering what to do? If so, read this guide to understand why this happens and the steps to resolve the issue.
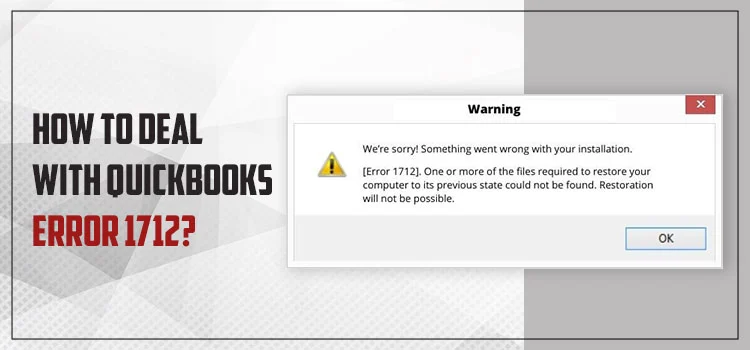
QuickBooks error 1712 occurs due to conflicts with Windows components or issues with the operating system, such as damage or conflicts with other QuickBooks processes. The error may also appear with a warning message stating,
“We’re sorry! Something went wrong with your installation.”
Today, in this blog, we will discuss what hampers software installation and the steps to address these issues. Let’s explore this guide in detail…
What Causes Install Error 1712 in QuickBooks?
Explore the pointers below to understand why you encounter error 1712 when installing QuickBooks Desktop one-by-one:
Outdated Windows
Missing and damaged system files
Incorrect installation or damaged program files
The background QB processes might be lingering with the QB installation
The user might not be an admin
Windows components might be damaged or corrupted
Windows Firewall might be blocking
Third-party programs might be hampering the QB install
Best Ways to Troubleshoot QuickBooks Error 1712 When Installing
Now that you are well aware of the root causes behind QuickBooks error 1712 when trying to install the software. Proceed with the methods below to troubleshoot the same error and ensure the software installation is seamless:
1. Update Windows
Let’s learn how to update Windows to the latest available release:
Launch the Windows Start menu.
In the search field, type Settings and press Enter.
Hit Check for Windows updates.
If updates are available, click Download & Install.
The device will automatically download and install the updates.
When prompted, restart your computer to apply the updates.
2. Run the SFC scan
SFC scans Windows files and folders to identify and resolve issues immediately. Here’s how to run the scan with these steps:
Press Windows + X to open the Windows Power User menu.
Choose Command Prompt (Admin) from the menu.
Note: You can also run System File Checker (SFC) from Windows PowerShell (Admin).
Click Yes on the User Account Control (UAC) prompt.
Type SFC /scannow in the command prompt window and press Enter.
The System File Checker tool will automatically check the integrity of Windows system files and repair them when issues are detected.
When the process finishes, reboot your computer.
3. Repair your QuickBooks Desktop
Learn how to repair QuickBooks Desktop and resolve QuickBooks error 1712 when installing:
Note: Download QuickBooks Tool Hub (1.6.0.8).
a. Run Quick Fix my Program
The Quick Fix my Program will shut down all processes running in the background and then perform a quick repair on the program.
Open QuickBooks Tool Hub.
Go to Program problems in the left pane.
Hit Quick Fix my Program.
Start QB desktop and open your data file.
b. Run the QuickBooks Install Diagnostic Tool
If something went wrong during the installation, it could cause problems when trying to use it. Run the QuickBooks Install Diagnostic Tool to fix common install issues.
4. End QuickBooks processes from the Task Manager
Let’s end all the background processes that are lingering with the QuickBooks installation and resolve QuickBooks error 1712:
Press Ctrl+Shift+Esc to open the Task Manager.
Go to the Processes tab.
Look for the QuickBooks-related entries such as QBW32.EXE.
Select the program and click End Task to terminate it.
Once done, try to install QuickBooks Desktop again.
5. Create a new Windows user with Administrator rights
Here’s how you can add a user, then assign a role to it.
Navigate to the Company menu.
Select Users.
Hit on Set Up Users and Roles.
Type an admin password and click OK
Go to the User List tab.
Click New.
Enter a user name and an optional password.
Select the user’s roles in the Available Roles section.
Click Add, then OK.
6. Manually fix Windows components
Damaged or corrupted Windows components can make it challenging to install QuickBooks and may trigger error code 1712 during the installation process.
a. Repair or reinstall Microsoft .NET Framework
For Windows 10 or Newer
Exit all open programs.
Launch the Windows Start menu.
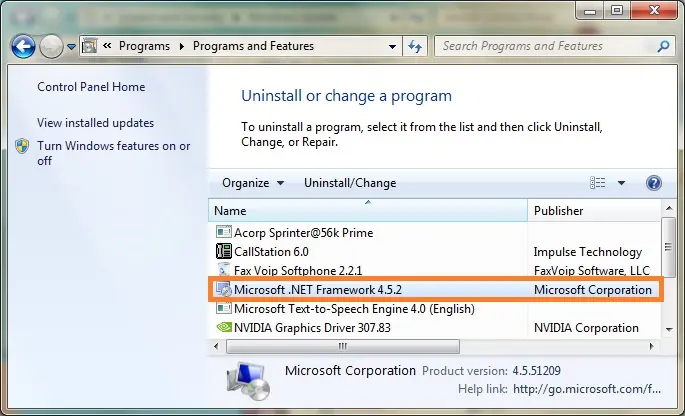
In the search, type Control Panel and press Enter.
Navigate to Programs and Features.
Click on Uninstall a Program. Don’t worry, we’re not installing anything.
Hit Turn Windows features on or off.
Look for .NET Framework on the list.
Mark the settings for both .NET Framework 4.5 (or later) and .NET Framework 3.5 SP1.
Note: The steps to resolve .NET Frameworks 4.5, 4.6, 4.7, and 4.8 are the same.
Check NET Framework 4.5 (or later)
If you haven’t selected the .NET Framework 4.5 (or later) checkbox:
Mark the .NET Framework 4.5 (or later) to turn it on.
Click OK to save the changes.
Restart your computer.
If the .NET Framework 4.5 (or later) checkbox is already selected:
Mark the checkbox for .NET Framework 4.5 (or later) to turn it off. Don’t turn it back on.
Click OK to save the changes.
Restart your computer.
When signed back into Windows, follow the same steps to turn on .NET Framework 4.5 again.
Check NET Framework 3.5 SP1
If the .NET Framework 3.5 SP1 checkbox isn’t checked:
Check the box to enable .NET Framework 3.5 SP1.
Click OK to save your changes.
Restart your computer.
If the .NET Framework 3.5 SP1 checkbox is already checked:
Uncheck the box to disable .NET Framework 3.5 SP1. Do not recheck it.
Click OK to save your changes.
Restart your computer.
After logging back in, follow the steps to re-enable .NET Framework 3.5 SP1.
Error occurs when enabling or disabling .NET Framework, contact an IT professional or Microsoft. The issue may be related to your operating system, not QuickBooks.
b. Repair Microsoft MSXML
Register MSXML in a 64-bit operating system with the following steps.
Open the Windows Start menu.
Type cmd in the search bar.
Right-click on CMD and select Run as Administrator.
Enter cd\windows\syswow64 in the C: prompt.
Type regsvr32 MSXML6.dll.
Press Enter.
When done, try installing QuickBooks Desktop.
Register MSXML in a 32-bit operating system with the following steps.
Open the Run command.
In the prompt, type cmd and press Enter.
Type regsvr32 MSXML6.dll and press Enter.
When done, try installing QuickBooks again.
7. Configure the Windows Firewall settings
Windows Firewall is a security feature that manages system ports for incoming and outgoing data on your computer. If something is flagged as a potential threat, it may prevent it from running, including QuickBooks Desktop. To fix this accidental block, you need to adjust the Windows Firewall settings for QuickBooks on your computer.
8. Use Selective Startup to install QuickBooks Desktop
The steps below will help you install QuickBooks Desktop in selective startup so that no other application interferes with the installation, and the QuickBooks install error 1712 is resolved:
a. Switch to Selective startup
Selective startup ensures that no other apps interfere when installing QuickBooks Desktop or other applications. If you are comfortable performing these steps, consider reaching out to an IT expert or a Windows expert.
Press Windows + R to open the Run command.
Type msconfig in the Run prompt.
Click OK.
Go to the General tab.
Choose Selective startup and Load system services.
Go to the Services tab.
Mark the Hide all Microsoft Services option.
Click Disable all.
Uncheck the box for Hide all Microsoft services.
From the list of services, select Windows Installer.
Click OK.
Select Restart in the System Configuration window.
Select Restart on the System Configuration window.
Conclusion
We understand the importance of installing QuickBooks in running your accounting and financial processes, as well as managing your entire business. However, QuickBooks error 1712 can make it difficult even to install it on your computer.
We hope that trying the methods above one by one helped you install the software smoothly. For further assistance, we recommend consulting a QuickBooks ProAdvisor. Call +1(866)500-0076 and speak to an expert now!
Frequently Asked Questions
How to fix QuickBooks installation errors?
Download and run the QuickBooks Tool Hub and use the QuickBooks Install Diagnostic Tool within it to find and fix common problems automatically. If the error persists, try turning off your antivirus, re-downloading the installer, or performing a clean installation by completely uninstalling and then reinstalling QuickBooks.
Why is the QuickBooks install not working?
The QuickBooks installation might not be working due to a variety of factors, including a damaged or corrupted installer file, antivirus or Windows Firewall blocking QuickBooks, or an outdated Windows OS or system files causing the problem.
What is error code 1712 when installing QuickBooks?
Error code 1712 when installing QuickBooks appears when missing or corrupted Windows components, such as an incomplete or damaged Windows restoration, which prevents a successful installation.
How do I fix QuickBooks Desktop installation errors?
To resolve QuickBooks Desktop installation errors, begin by downloading and running the QuickBooks Tool Hub. Then, select the QuickBooks Install Diagnostic Tool from the Installation Issues tab and restart your computer. If that doesn’t work, use the Tool Hub’s Quick Fix my Program feature and update your Windows operating system.
Why won’t my QuickBooks update install?
If your QuickBooks isn’t updating, take a few important steps: Restart your computer and run QuickBooks as an administrator. If the problem persists, run the Quick Fix my Program tool and the QuickBooks Install Diagnostic tool using the QuickBooks Tools Hub.
Whether you’re running reports or filing your taxes, having printed copies allows you to save records both manually and within your software. However, you might encounter an issue when trying to save a document as a PDF or print it, along with an on-screen warning message:
“Error: QuickBooks can’t complete the current action due to a missing component: Missing PDF file component.”
This QuickBooks missing PDF component issue can appear in various forms and trigger different error messages. We understand how frustrating it can be to deal with such problems. To help you out, we’ve created this detailed guide explaining the possible error messages, their causes, and the effective methods to fix the issue.
Printing and PDF Errors You May Encounter
The following is a list of error messages that may appear when you attempt to print or save as a PDF. Fortunately, these issues can be easily resolved using the QuickBooks Print & PDF Repair Tool, which is detailed in the troubleshooting section.
There is a problem connecting to your currently selected printer, Microsoft XPS Document Writer on the XPS port.
Could not print to the printer.
Error: QuickBooks can’t complete the current action due to a missing component: Missing PDF file component.
QuickBooks PDF Converter Activation Error -20, -30, or -41.
Error 1722 or 1801 when installing PDF Converter.
Problems printing transactions or reports.
The reconcile window disappears or doesn’t show.
Why is QuickBooks Missing the PDF Component?
Here’s why you see the QuickBooks missing PDF component when trying to save as a PDF or printing:
Corrupted or missing PDF components in QuickBooks
Incorrect file permissions in the temp folder
Common system issues might be blocking the QB saving as PDF process
Damages or corruption to the XPS Document Writer
Issues with your PDF template
Outdated Print Spooler service properties
How to Fix ‘QuickBooks Detected that a Component Required to Create PDF’?
We’ve gone over several reasons why QuickBooks detected that a component required to create a PDF error may appear, along with a list of possible error messages that could show up. Below are some steps to help you save as a PDF or print without any issues.
1. Update QuickBooks
A compatible version of QuickBooks Desktop is required to run the software, whether printing, saving as a PDF, or running your reports. Updating QuickBooks Desktop to the latest release ensures that security patches and features are up to date and more.
2. Run QuickBooks Print & PDF Repair Tool
The QuickBooks Print & PDF Repair tool allows you to fix issues with printing, saving, or emailing forms as PDFs from QuickBooks Desktop.
Hit on QuickBooks PDF & Print Repair Tool. The utility will take a minute or more; wait until then.
Once done, try to print, email, or save as a PDF from QuickBooks Desktop again.
If the error doesn’t resolve, proceed to Solution 2.
3. Restart and reset your temp folder permissions
Restarting your computer and resetting your Windows temp folder permissions are standard troubleshooting steps that can resolve various QuickBooks Desktop issues, such as printing.
a. Reset your temp folder permissions
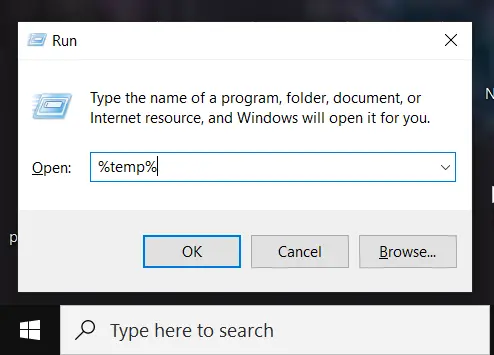
Launch the RUN command by pressing the Windows+R keys together.
In the Run field, type %TEMP%.
Press the Enter key.
Right-click anywhere in an empty area of the temp folder and choose Properties.
Go to Security.
Verify and ensure all the user names and groups in Security have Full Control.
Once you set the permissions to Full Control, try to save as a PDF again.
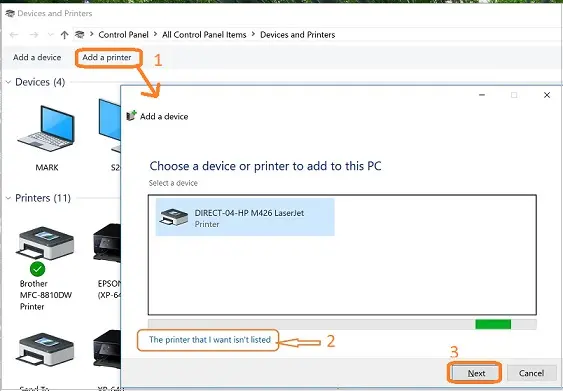
b. Test if you can print to your XPS
QuickBooks uses some parts of the XPS Document Writer, such as the Microsoft Windows product, when saving a PDF file. Test to see whether the XPS Document Writer printer works:
Launch Notepad.
Type Test and go to File. Then, select Print.
Choose the XPS Document Writer and click on Print.
Note: If you don’t see XPS Document Writer, you’ll need to allow your computer to print to your XPS printer.
Name the file and save it to your desktop.
Move to your desktop and view the XPS Document you printed using Notepad.
If you fail when printing using the XPS Document outside of QuickBooks Desktop, you must reach out to IT professional or contact us.
Allow your computer to print to your XPS printer
Open the Window Control Panel.
Switch it to Category View.
Go to Programs.
Click on Turn Windows features on or off in Programs or Features.
In the list of services, check Microsoft XPS Document Writer.
4. Create a new template or form
Use the new template or form when printing or saving as a PDF to resolve issues:
Create a new template for your form. Get more help with creating new templates.
Change the template on your transaction.
Create your pdf.
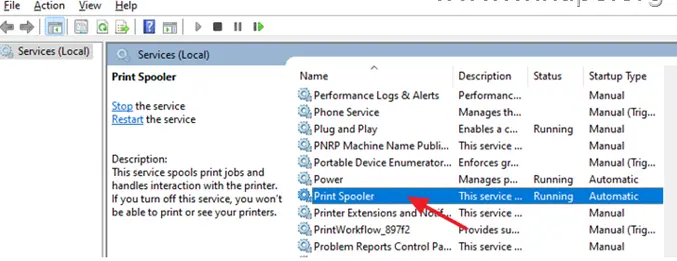
5. Update the Print Spooler service properties
Let’s update the Print Spooler service properties to resolve connectivity and processing issues:
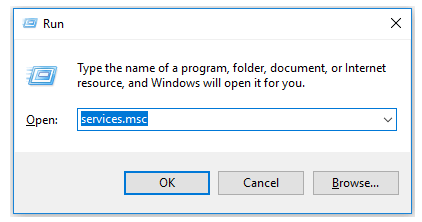
Right-click on Start in the Windows Taskbar.
Select Run.
In the Run field, type Services.msc and click OK.
Now, search for the Print Spooler service.
Right-click on the Print Spooler service and select Properties.
Go to the Startup type tab.
Choose Automatic, then Apply, and then OK.
Right-click on the Print Spooler service and click Start to start the service.
6. Update & repair Adobe Acrobat Reader
QuickBooks uses Adobe Acrobat Reader as a component for printing and saving as a PDF. If it’s corrupted or outdated, you might encounter the missing PDF component issue in QuickBooks.
a. Update Adobe Reader/Acrobat
For Windows:
Open Adobe Acrobat.
Go to Menu > Help and click on Check for updates.
If the updates are available, click Download.
Follow the instructions on your screen to download the update.
When prompted, select Quit Acrobat.
Click Retry to finish the update.
Once the update is installed successfully, click Close from the Update successful dialog box.
For Mac:
Launch Adobe Acrobat.
Go to Help at the top.
Click on Check for updates.
If updates are available, click Yes.
On the Update successful dialog box, click OK.
b. Repair Adobe Reader/Acrobat
If updating Adobe Reader/Acrobat didn’t resolve the problem, you’ll need to repair your Adobe installation.
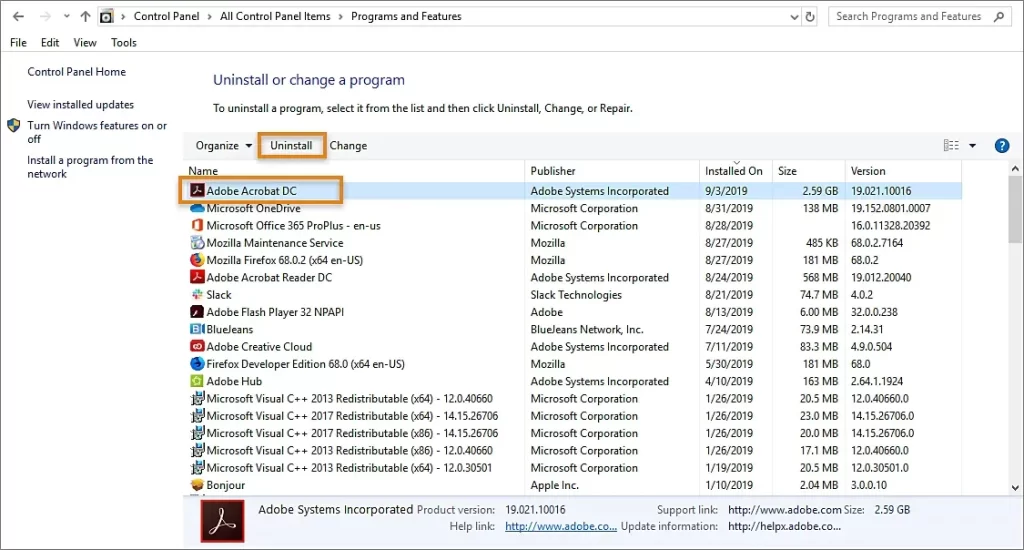
Exit Acrobat/Reader.
Close all open web browser windows.
Click on Start at the bottom of your screen.
In the search, type Control Panel and press Enter.
Go to Programs and Features.
Choose Acrobat or Adobe Reader, then click Uninstall/Change.
Click Next on the Setup dialog box.
Select Repair and click Next.
Choose Install.
Once the process finishes, click Finish.
Restart your computer.
Open QuickBooks Desktop and try to print again.
Tip: If repairing Adobe Reader doesn’t resolve the issue, try uninstalling and reinstalling the program.
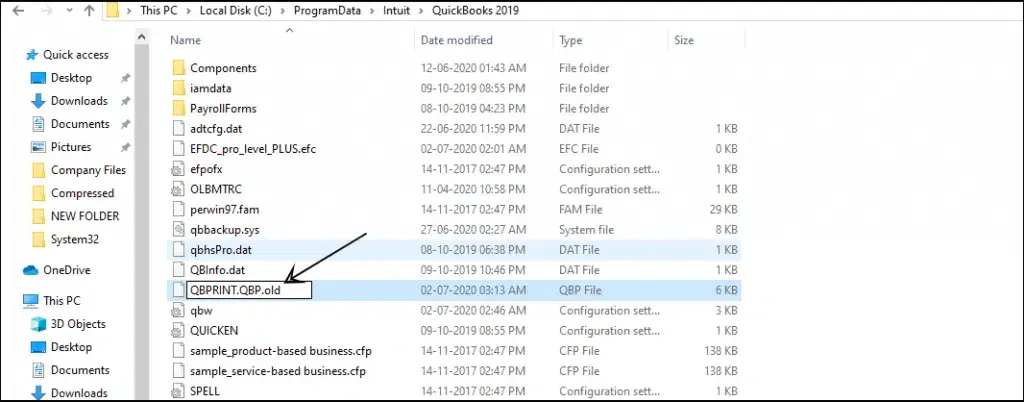
7. Rename the QBPrint.qbp file
Renaming the QBPrint.qbp file forces QuickBooks to create a new file. This way you will lose all custom printer setups, but also resolve printing errors caused by a corrupted file.
Locate the QBPrint.qbp file.
Quick tip: You might need to display hidden files and folders or search for files using Windows to find these files in Windows.
Windows 10: C:\ProgramData\Intuit\QuickBooks 20XX
Note: 20XX represents the version of your QuickBooks
Server 2012: C:\Program Data\Intuit\QuickBooks year and C:\Users\**remote user**AppData\Roaming\Intuit\ YEAR VERSION\TSPrinterSettings
Note: Terminal Service users report finding duplicate copies of the Qbprint.qbp file with the stored client data files; double-check all folders for odd instances.
Right-click the QBprint.qbp file for your QuickBooks version and select Rename.
Add the word .old to the file name (i.e., QBPrint.qbp.old).
Open QuickBooks Desktop.
From the File menu, select Printer Setup.
Select any transaction in the Form Name list and select OK. This will create a new QBprint.qbp file.
Note: You do not have to do this for every transaction.
Try to open and print any transaction.
8. Test, reinstall, and adjust permissions for XPS Document Writer
Note: The steps below are only for Windows, not Terminal Services.
If you failed when printing using the XPS Document writer outside QuickBooks, you must reach out to an IT professional or contact us.
You can try the steps below with an IT professional:
First, enable the XPS service on your computer.
Press the Windows+R keys together on your keyboard.
Type optionalfeatures and click OK.
Look for Microsoft XPS Document Writer in the list and select it.
Click OK.
Now, try printing again using XPS Document Writer and print outside QuickBooks to test it.
Modify the security software settings.
Settings in your security programs, such as Norton Antivirus or McAfee Firewall, can block .xps file creation. Review your security software settings to ensure .xps files aren’t restricted.
Modify the Windows user permissions for your XPS XPS Document Writer.
If a Windows user lacks permission to print to the XPS Document Writer, QuickBooks can’t convert the file to a .pdf. You might need to sign in with Admin Rights to adjust these permissions.
Conclusion
Finally, we are ending this blog with a list of possible factors that may be causing “QuickBooks detected that a component required to create PDF,” along with detailed steps on how to fix it. By following the above troubleshooting steps, you should have resolved the issue and be able to save the file as a PDF successfully.
To fix a missing PDF component in QuickBooks, first run the QuickBooks PDF & Print Repair Tool from the QuickBooks Tool Hub. If that doesn’t work, try repairing your QuickBooks installation via the Control Panel, and ensure that Microsoft XPS Document Writer is enabled in Windows features.
Why is QuickBooks unable to complete the current action?
QuickBooks is unable to complete an action due to outdated software, corrupted company files, or missing or damaged components, especially when using PDF functions. You can also try running the QuickBooks Tool Hub to diagnose and repair the installation, update the program, or check Windows settings.
Why am I getting a PDF error in QuickBooks?
PDF errors in QuickBooks are often caused by outdated software, corrupted components, or Windows setting issues, or if the Windows component, such as Windows XPS Document Writer, gets damaged or missing.
How to create a PDF in QuickBooks?
To create a PDF in QuickBooks, you can either use the built-in “Save as PDF” or “Download” options for specific forms and reports, or use your system’s “Print to PDF” functionality.
The drop-down menu allows you to select customers, vendors, accounts, and other options when running specific operations in QuickBooks Desktop or Online. However, if your “drop-down menus are not working in QuickBooks“, it may stop you from completing transactions such as invoicing or printing checks.
An incompatible browser or incorrect DPI settings in Windows or QuickBooks can cause such display issues. In this detailed guide, we will explore the reasons the error occurs and the steps to troubleshoot it for seamless functioning.
Why Are Drop down Menus Not Working in QuickBooks?
Below is a list of multiple reasons why the drop-down menus are not working in QuickBooks. Let’s explore them one by one:
For QuickBooks Online
Using an Incompatible browser
Excessively stored cookies & caches
For QuickBooks Desktop
Outdated QuickBooks Desktop
Possible data damage or corruption to the company file
Incorrect DPI settings
View preferences might be incorrect in QuickBooks
Incorrect display settings of Windows
Incorrect installation or corruption of the program files
How to Fix the Drop-down Menus Issue in QuickBooks Desktop and Online?
Drop-down menu problems are common display issues in both QuickBooks desktop and online. In the section below, we’ll discuss how to fix such problems in both versions. Proceed with caution below:
Fix the drop-down menu issues in QuickBooks Online
Explore the troubleshooting steps mentioned below to resolve the drop-down menu issues in your QuickBooks Online:
1. Use a compatible browser
Generally, QuickBooks supports the current and two previous versions of your browser. Intuit does not support any old versions of your browser.
These are the browsers that are supported on both web and mobile devices:
Note: QuickBooks does not support Internet Explorer any longer.
Google Chrome: version 78 or newer
Mozilla Firefox: version 76 or newer.
Note: To preview and print forms on Mac OS, you’ll also need the Firefox PDF plugin.
Microsoft Edge: version 79 or newer
Safari: version 12 or newer (Mac only)
Opera: version 68 or newer
Samsung: version 10 or newer
2. Try opening in the incognito window
See if opening QuickBooks Online in a private window resolves the issues:
Mozilla Firefox: CTRL + Shift + P
Microsoft Edge: CTRL + Shift + N
Google Chrome: CTRL + Shift + N
Safari: Command + Shift + N
3. Clear the cookies & caches in your browser
The caches & cookies in your browser store files on your system that help load websites or programs faster on your next visit. Over time, this data becomes outdated, further complicating the running of web-based performance tests.
Proceed below to learn how to resolve the cookies & caches on your browser:
a. Firefox
In Firefox, select the menu icon.
Choose Settings.
In the left pane, select the Privacy & Security panel.
Click on Clear Data in the Cookies and Site Data section.
The Clear browsing data and cookies page will open.
Next to the When:, under the drop-down menu, select Everything.
Mark the checkbox for Temporary cached files and pages.
Click on the Clear button.
Exit the Settings page.
All of your changes will be automatically saved.
b. Google Chrome
Launch Google Chrome on your computer.
Go to More at the top right corner.
Select Delete/Clear browsing data.
Choose a specific time range to clear the data, such as Last hour or All time.
Select the information that you want to remove.
Hit on Delete data.
If you are clearing the cookies when signed in to Google Chrome, you won’t be signed out of your Account.
c. Safari for Mac
Open Safari on your Mac.
Go to History at the top.
Select Clear History and click on the pop-up menu.
Choose the specific time you want to clear the browsing data for.
d. Safari for iPad and iPhone
Navigate to Settings at the top.
Select Apps and then Safari.
Move down and click on Clear History, then Website Data.
Choose the timeframe to delete, then tap Clear History. This won’t impact your AutoFill data. If the button is grayed out, there might be no data to clear, or you may need to check your Screen Time web content restrictions.
e. Microsoft Edge
Select Settings and more at the top.
Go to Settings > Privacy, search, andservices.
Click on Clear browsing data.
Next to Clear browsing data now, select Choose what to clear.
Select a specific time range from the drop-down menu under Time range.
Choose the types of browsing data you wish to clear.
For example, you might want to remove the browsing history and cookies while saving the passwords and form fill data.
Select Clear now.
Once you clear the caches, restart your browser to save the changes as expected.
4. Clear the Intuit-specific cookies
Clearing Intuit-specific cookies helps resolve technical glitches with Intuit products like QuickBooks, primarily by removing corrupted website preferences.
a. Google Chrome
Select the More ⋮ icon at the top right.
Go to Settings.
Choose Privacy and security.
Hit on Cookies and other site data.
Select See all cookies and site data.
In the search bar, type “Intuit” to find the Intuit-specific cookies.
Click Remove all shown or the trash can icon.
Now, restart Google Chrome so the changes can take effect.
b. Mozilla Firefox
Select the Menu ☰ icon in the top-right menu bar.
Select Settings > Privacy & Security.
Hit on Manage Data under Cookies and Site Data.
In the search bar, type “Intuit” and press Enter to find the Intuit-specific cookies.
Click Remove All Shown.
Choose Save Changes.
Restart Mozilla Firefox for the changes to take effect.
c. Safari
Launch the Safari browser.
Beside the Apple icon, choose Safari.
Go to Preferences.
Click on Privacy > Manage Website Data.
In the search bar, type “Intuit” to find the Intuit-specific cookies.
Hit on Remove All.
Now, select Remove Now > Done.
Restart the Safari browser for the changes to take effect.
Fix the Drop-down menu issues in QuickBooks Desktop
The steps below will help you fix the issues why the drop-down menu is not working in QuickBooks Desktop:
1. Update QuickBooks Desktop
Admin rights allow you to make necessary changes for an update, such as adjusting system settings, granting permission to download files, or running installations. Ensure you have the correct permissions or run the QuickBooks Desktop updates as an administrator.
2. Verify and Rebuild company file data
The Data Verify utility checks the integrity of your data in your company file and runs the data reconstruction tool to recreate or repair any damaged data. Learn how to run the tool using the steps below:
a. Verify your company data
Navigate to the Window at the top.
Select Close All.
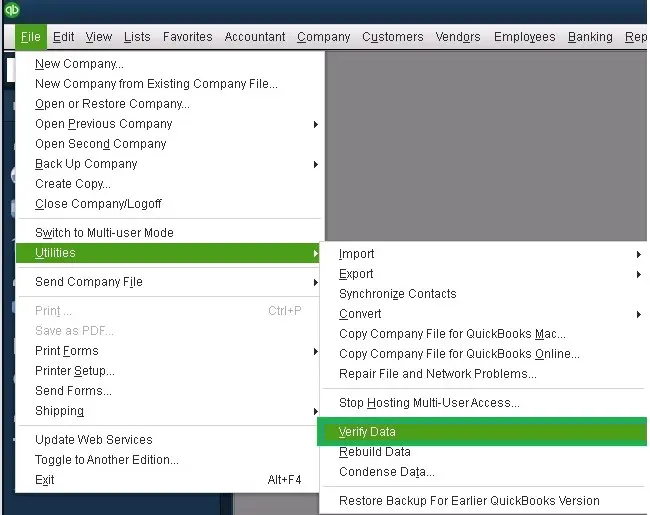
Go to File > Utilities.
Hit on Verify Data. If you see:
QuickBooks detected no problems with your data—your data is safe and protected, and you don’t need to do anything else.
An error message—look for theerror on our website.
Your data has lost integrity—Data damage has been found in the company file, and you need to rebuild it
b. Rebuild the data damages
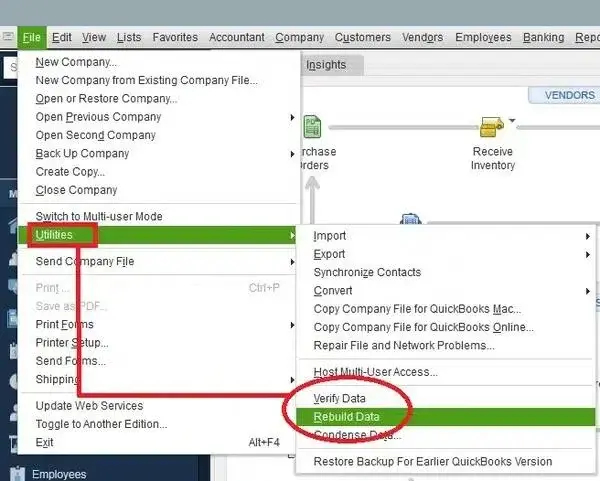
Navigate to File > Utilities and click on Rebuild Data.
QuickBooks will ask you to create a backup before rebuilding the damaged data in your company file. Click OK, as a backup is required before rebuilding.
Choose the location to save the backup copy and click OK. Make sure that you are not replacing the already existing company file. Type a new name in the File name and select Save.
Click OK when you receive the Rebuild has completed message.
Before you adjust the Windows settings, modify the display and view preferences in your QuickBooks.
Exit QuickBooks Desktop.
Launch the Windows Start menu.
In the search field, type QuickBooks.
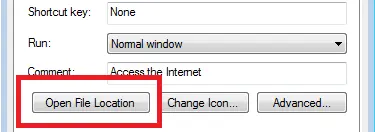
Right-click on the QuickBooks icon and choose Open file location.
Right-click on the QuickBooks.exe file in the folder and choose Properties.
Navigate to the Compatibility tab.
Mark the checkbox for Disable display scaling on high DPI settings. You may also choose Change high DPI settings and then Override high DPI scaling behavior.
Finally, select Apply and click OK.
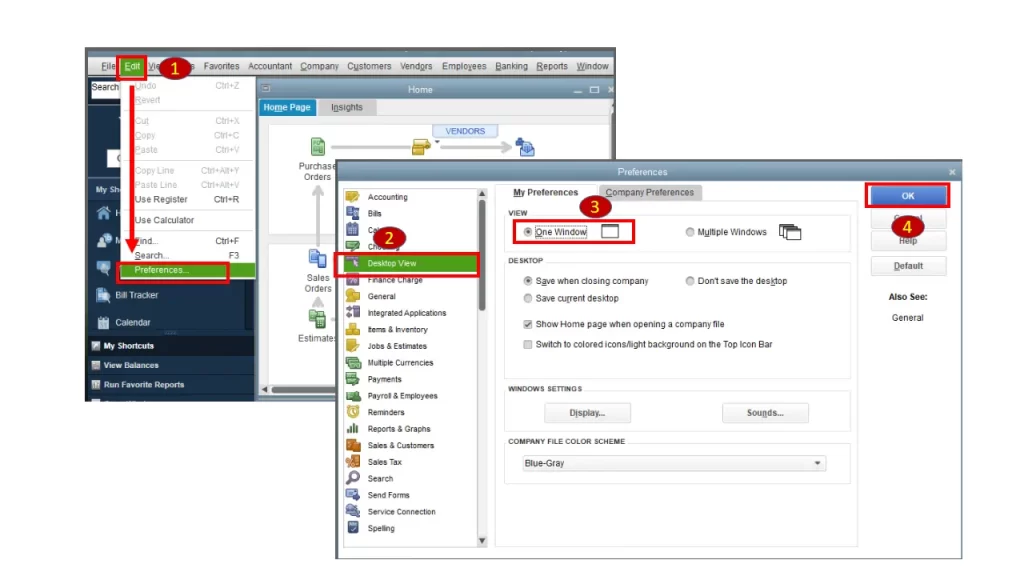
4. Adjust your view preferences in QuickBooks
Let’s adjust the view preferences, which can be the reason why drop-down menus are not working in QuickBooks:
Launch QuickBooks Desktop.
Navigate to the Edit menu.
Choose Preferences.
From the list, choose Desktop View.
Go to the My Preferences tab.
Select the One Window option in the View section.
Finally, click OK.
Exit QuickBooks, then open it again and open the company file. Check again for the display issues. Move to the next solution if drop-down menus are not working in QuickBooks.
5. Change your Windows display settings
QuickBooks functions best with the default Windows DPI settings. Changing these settings could cause display issues.
Important: Remember that modifying your Windows settings affects all applications on your computer, not just QuickBooks.
To reset the default display settings for Windows 10 and 8, follow Microsoft’s instructions:
Ensure your screen resolution is at least 1024 x 768, with 1920 x 1080 recommended for optimal display.
After adjusting, restart your computer, open QuickBooks, and load your company file.
6. Run the QuickBooks Install Diagnostic tool
The QuickBooks Install Diagnostic tool identifies installation issues with your QuickBooks and runs a quick repair to resolve them.
Clean installing QuickBooks Desktop removes damaged or corrupted program files and allows you to install the software fresh. This fixes issues caused by incorrect installations or file corruption, which can lead to drop-down menu problems in QuickBooks.
Conclusion
In conclusion, a drop-down menu is a necessary tool that lets you access different functionality and run the processes accordingly. If your drop-down menus are not working in QuickBooks, the information in the detailed blog must have helped you resolve the problem and ensure a smoother functioning of the software.
For further assistance, we highly recommend consulting with QuickBooks ProAdvisors for a quick resolution. Dial +1(866)500-0076 to talk to an expert now!
Frequently Asked Questions
Why is my drop-down list not working in QuickBooks?
A QuickBooks drop-down list may not work due to browser issues, such as a corrupted cache or a corrupted company file. To fix this, try clearing your browser’s cache, opening a new incognito window, using a different browser, or logging in with a different username and password.
How do I edit a drop-down list in QuickBooks?
To edit a QuickBooks drop-down list, go to the Settings menu, select All lists, choose the list you want to edit, and then select Edit from the action menu.
How to activate the drop-down list in QuickBooks?
To activate a drop-down list in QuickBooks, first determine if you’re creating a new custom list or troubleshooting a non-working one. You can create a custom drop-down by going to Settings > Custom Fields (in QuickBooks Online) and choosing “Drop-downlist” as the data type.
Where is the settings menu in QuickBooks?
In QuickBooks Online, the main settings are accessed by clicking the Gear icon in the top-right corner and selecting Account and Settings. For QuickBooks Desktop, go to the Edit menu, then select Preferences.
Why can’t I scroll down on QuickBooks?
You can’t scroll down in QuickBooks due to browser issues, mouse problems, or display settings, so you should try clearing your browser’s cache, checking your mouse for dirt or a low battery, or adjusting your screen resolution and zoom level.
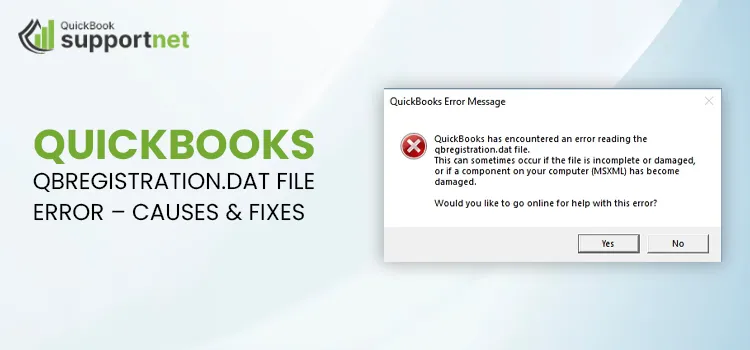
The qbregistration.dat file is essential for storing QuickBooks Desktop’s product registration and license information, ensuring the software is properly authorized. When you encounter a QuickBooks qbregistration.dat error, it typically means this file has become corrupted, damaged, or is missing altogether. This can lead to various error codes, such as Quickbooks Error 3371, and prevent the software from functioning correctly.
This comprehensive guide will walk you through the troubleshooting process, helping you address the qbregistration.dat error swiftly and get your QuickBooks back on track.
What Causes the QuickBooks qbregistration.dat Error?
Read the factors responsible for the qbregistration.dat error in QuickBooks Desktop:
The license data may be corrupted or damaged
Incorrect or corrupted installation of QuickBooks Desktop
Not having enough permissions to QuickBooks for reading the qbregistration.dat file
Damages or corruption to the Windows MSXML components
Antivirus might be blocking QuickBooks Desktop processes
What to Do to Fix the qbregistration.dat Error in QuickBooks Desktop?
Below are several ways to fix the qbregistration.dat error in QuickBooks Desktop. If these steps don’t fix the error, contact us at +1(866)500-0076.
1. Re-create the qbregistration.dat file
Important Note: If you use more than one version of QuickBooks Desktop, you’ll need to add a copy of the italicized text to the qbregistration.dat file. Always paste the additional copy later. Here, you’ll need to replace the bolded items in the new section with the appropriate values for each QuickBooks version.
Locate to the QuickBooks file folder and browse the qbregistration.dat file.
C:\ProgramData\Common Files\Intuit\QuickBooks
Quick tip: If you don’t see the file, display hidden files and folders.
If the qbregistration.dat already exists, rename the file as qbregistration.old.
Launch a Notepad.
Press the Windows+R keys, open the Run command.
Type Notepad in the Run field and press Enter.
Type this in Notepad:
Note: In Notepad, the red bold text will appear normal. Once you type everything in the Notepad, replace the bold items accordingly:
xx.x
Replace with 33.0 if you have QuickBooks Desktop 2023
Replace with 32.0 if you have QuickBooks Desktop 2022
Replace with 31.0 if you have QuickBooks Desktop 2021
Replace with 30.0 if you have QuickBooks Desktop 2020
version
Replace with Pro if you have QuickBooks Pro.
Replace with SuperPro if you have QuickBooks Premier (not Accountant Edition).
Replace with an accountant if you have QuickBooks Premier Accountant Edition.
Replace with Bel if you have QuickBooks Enterprise Solutions (not Accountant Edition).
Replace with belacct if you have QuickBooks Enterprise Solutions Accountant Edition.
000-000
Replace with your QuickBooks installation product number.
0000-0000-0000-000
Replace with your QuickBooks license number.
Name the file as qbregistration.dat and save it.
Navigate to File and click Save.
Select All Files in the Save as type list.
Select the same directory as mentioned in Step 1(C:\ProgramData\Common Files\Intuit\QuickBooks).
2. Enable or disable UAC settings
Make sure QuickBooks has the proper permissions to read or write to the qbregistration.dat file:
Note: Turning off UAC can help troubleshoot QuickBooks Desktop issues, but it’s important to re-enable it afterward to maintain your computer’s security.
Learn how to modify UAC settings (Windows 10).
Press the Windows+R keys on your keyboard.
In the Run window, type Control Panel.
Click OK.
Choose User Accounts and then User Accounts (Classic View).
Hit on Change user account control settings.
Note: Click Yes to continue when prompted by UAC.
Move the slider:
Turn UAC OFF by setting it to Never Notify and select OK.
Turn UAC ON by setting it to Never Notify and select OK.
Note: Click Yes to continue when prompted by UAC.
Restart your computer so the changes can take effect.
3. Repair the Windows MSXML components
MSXML is a core component of Windows, allowing you to install and run software smoothly. Any damage to it can trigger different errors, such as the QuickBooks qbregistration.dat file error. Repair this component with the following steps:
Register MSXML (64-bit operating system) using the steps below
Launch the Windows Start menu.
Type CMD in the search field.
Right-click on CMD and choose Run as Administrator.
In the C: prompt, type cd\windows\syswow64.
Now, type regsvr32 MSXML6.dll and press Enter.
Try installing QuickBooks Desktop.
Register MSXML (32-bit operating system) using the steps below
Press the Windows+R keys to open the Windows Start menu.
In the search field, type cmd.
Press Enter.
Type regsvr32 MSXML6.dll, then press the Enter key.
Try installing QuickBooks Desktop.
4. Modify the antivirus settings
Antivirus software on your computer may accidentally block QuickBooks Desktop.
Find the specific steps on your antivirus program’s official site for configuring permissions.
Some software also includes an email filtering feature; you might need to disable it.
5. Manually uninstall QuickBooks and rename installation folders
Manually uninstalling QuickBooks completely removes everything related to the specific version of the program and ensures a clean installation of QuickBooks Desktop, preventing interruptions to software processes.
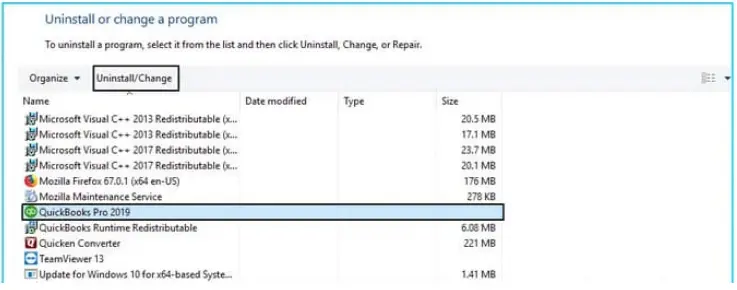
a. Remove QuickBooks
Launch the Windows Start menu.
Type Control Panel in the search field and press Enter.
Go to Programs and Features or click on Uninstall a Program.
Choose the version of QuickBooks Desktop you wish to remove from the list of programs.
Hit on Uninstall/Change, Remove, and then Next.
If you don’t see the same option, make sure to sign in to your computer as an administrator.
b. Rename the folders
Launch the Windows Start menu.
In the Windows search, type File Explorer and press Enter.
Look for the company file folder and open it. Usually, you will find the file in your default QuickBooks folders. These locations would be:
In conclusion, we hope this detailed guide has helped you understand the cause of the qbregistration.dat file error in Quickbooks and provided you with clear, step-by-step instructions to resolve it. By following these solutions, you should be able to get QuickBooks up and running smoothly.
For further assistance, we recommend reaching out to a QuickBooks expert. Dial our +1(866)500-0076 to connect with QuickBooks ProAdvisors, available 24/7!
Frequently Asked Questions
Where is the QBRegistration.dat file?
The QBRegistration.dat file is located in the C:\ProgramData\Common Files\Intuit\QuickBooks folder on your computer. To access it, you may need to enable hidden files and folders in your File Explorer settings because the ProgramData folder is hidden by default.
What is the QBRegistration.dat file?
The QBRegistration.dat file is a critical component of QuickBooks software that stores license and registration information to authenticate the program.
Why does QuickBooks have a problem studying the file qbregistration DAT?
QuickBooks has trouble reading the qbregistration.dat file due to corruption in the file itself, damaged components needed by QuickBooks, or issues with your computer’s settings. Common causes include a corrupted installation and problems with Windows User Account Control (UAC) settings.
How do I create a QBregistration DAT file?
To create a qbregistration.dat file, navigate to C:\ProgramData\Common Files\Intuit\QuickBooks, open Notepad, and copy the specific code provided by Intuit into it, replacing the bolded placeholders with your QuickBooks version and product details. Save the file as qbregistration.dat in the QuickBooks folder, ensuring the “Save as type” is set to “All Files“.
Who says Thanksgiving ends when the turkey’s gone? As the scent of pumpkin pie fades, the sound of shopping carts — both real and virtual — takes over.
In the U.S., the celebration doesn’t stop at gratitude; it shifts gears into giving (yourself) great deals. Black Friday opens the door with in-store shopping sprees, while Cyber Monday keeps the excitement alive online, turning clicks into cartloads.
Each brand joins the festivities in its own way. Take Intuit, for example — offering 30% off all QuickBooks products to help businesses automate tasks, save time, and do more with less.
So, while Thanksgiving brings families together, Cyber Monday brings opportunities to your fingertips. Let’s walk you through the best offers, how much you can save, and which deal suits your goals best.
What is Cyber Monday Sale?
Although Cyber Monday is not a public holiday, it is a major online shopping event that takes place on Monday after Thanksgiving in the U.S.
Historically, the sale started to encourage online sales and features significant discounts on a wide range of products, especially electronics, and is one of the busiest online shopping days of the year. The event is now a global phenomenon with both online-only stores and major retailers offering deals.
QuickBooks Cyber Monday Sale: When Does It Start and End?
Like the normal Cyber Monday sale, the QuickBooks product sale will also take place on the same day, December 1, 2025. The sale usually ends at midnight; however, many retailers extend it into “Cyber Week,” such as Intuit. If you accidentally missed the sale on Cyber Monday, avail it till the entire week.
Expected start date for Black Friday sale: Friday, December 1, 2025.
Expected end date for Black Friday sale: Officially the same day at midnight, 1, 2025. The QuickBooks Cyber Monday sale is extended in Cyber Week till December 7, 2025.
Avail Different QuickBooks Products on Up to 30% Offer
Intuit primarily focuses on delivering the best to its users through an uninterrupted experience with monthly software updates and security patches. It also values how much you invest to keep your business up-to-date with the latest technologies and ways to boost growth.
Hence, the QuickBooks Cyber Monday sale is here with up to 30% off on every product. Whether you run a small business, an enterprise, or need only the Payroll product, Desktop, or Online software, this sale ensures discounts on even the smallest purchase, with business-specific customization and extra coupon-based offers.
Let’s look at the table to see which products are included in the sale:
To claim the QuickBooks Cyber Monday offer, visit Intuit’s official site or the authorized ProAdvisors such as QuickBookSupportNet. Check where the 30% off is available and on which products, and proceed to buy. You can also use the Thanksgiving coupon for an extra offer.
You can also claim up to 30% off and take advantage of the Thanksgiving coupon offer for an extra discount. If you face challenges, reach out to QuickBooks ProAdvisors at +1(866)500-0076 for assistance.
How to Get the Most Out of QuickBooks Cyber Monday Sale?
The steps below will help you make smarter decisions and get the most out of the sale. Follow these steps before purchasing:
1. Compare plans before purchasing
Different ProAdvisors provide exclusive Black Friday offers that may vary from Intuit’s official discounts. To secure the best deal, compare prices on various QuickBooks products and pick the one that fits your business needs.
2. Check compatibility and user limits
If you’re new to QuickBooks, make sure it’s compatible with your operating system, meets your business goals, and supports the number of users you need. This ensures you choose the right plan for your company.
3. Evaluate add-ons (Payroll, Payments, Time Tracking, etc.)
Add-ons enhance any QuickBooks version and extend its functionality to suit your workflow. Review the available add-ons and compare them across all editions before making a final choice.
Happy Cyber Monday, and enjoy saving big on your QuickBooks purchase!
Conclusion
Finally, we are ending this blog with the details you need to avail of the best deal on QuickBooks Cyber Monday sale of the year, saving you a lot of money. Why spend more when you can get the benefits at a lower price? Advance your business with QuickBooks Desktop and Online software, enjoy automation, track real-time changes, and connect with your team in the cloud.
For more details, dial +1(866)500-0076 to talk to a QuickBooks ProAdvisor now!
Frequently Asked Questions
Which one is cheaper, Black Friday or Cyber Monday?
Black Friday often has better deals on larger items like appliances and TVs. In contrast, Cyber Monday typically has the best prices on electronics, particularly smaller ones like laptops, and digital goods. But the QuickBooks offer is available on both sales, both in-store sales and the e-commerce one.
Does QuickBooks have a Cyber Monday sale?
Yes, QuickBooks typically has a Cyber Monday sale, offering significant discounts on its online products for a limited time. Past deals have included percentage-based discounts on the first few months of a subscription, with savings of 30% being common.
Is Cyber Monday a good time to buy a QuickBooks subscription?
Yes, Cyber Monday is a good time to buy a QuickBooks subscription, as the event is known for offering significant discounts on various plans, especially QuickBooks Online.
What you expect from a QuickBooks subscription?
A QuickBooks subscription provides a comprehensive set of accounting and financial management tools for small to medium-sized businesses, primarily through a secure, cloud-based platform.
Once the blessings of the past year are received, the new season begins!
The new season begins with happiness and the new beginnings – Black Friday sale. And what could be a better beginning than investing smartly in your business? Enhance business optimization, save time with automation features, and make bookkeeping, accounting, and payroll processes easier.
Make the mindful decision for your business and get yourQuickBooks software with up to 30% off in the QuickBooks Black Friday sale. Explore which software products are available for purchase and when sales start.
What is QuickBooks Black Friday Sale?
QuickBooks Black Friday sale starts on the annual holiday of Black Friday. It’s an annual promotion offering significant discounts on accounting software and services like QuickBooks Online and Payroll.
These deals typically run for a limited time around the Thanksgiving and Cyber Monday period and provide major savings on subscription plans for small businesses and freelancers.
Black Friday Sale 2025: Enjoy 30% Off on All QuickBooks Products
Intuit focuses on its customers’ needs, challenges, and ever-increasing requirements in the new technological world. Thus, keeps offering new updates and upgrades and ensuring the seamless functioning of the software.
Like, the current edition of QuickBooks Desktop 2024 includes new updates to keep you up to date till 2027. Why wait when you can enhance business management with such advanced features? However, the sale offer isn’t limited to QuickBooks Desktop, but other editions are also available.
Take a look below and see which QuickBooks versions are available to take a new step for your business:
As Black Friday falls on the day after Thanksgiving Day, the Black Friday sale officially starts on November 28, 2025. All you need to do is visit QuickBookSupportNet or Intuit’s official site and grab your favourite QuickBooks products.
This sale period ensures you have enough time for customer to avail themselves of the offers and grab the best deals available on their QuickBooks products. Below are the expected start and end dates for Black Friday this year:
Expected start date for Black Friday sale: Friday, November 28, 2025.
Expected end date for Black Friday sale: Cyber Monday, December 1, 2025
Tips to Get the Most Out of the Sale
The steps below will help you make better decisions and make the most of the sale. Consider the following steps before making a purchase:
1. Compare plans before buying
Different ProAdvisors offer new deals on the Black Friday sale that differ from Intuit’s official offers. To get the best deals, compare prices on different QuickBooks products and choose the one that suits you best.
2. Check compatibility and user limits
If you are a new user and opting for QuickBooks accounting for the first time, we recommend checking its compatibility with your operating system, your business requirements, and its user limits. This helps you make a mindful decision for your business.
3. Consider add-ons (Payroll, Payments, Time Tracking, etc.)
The add-on for any QuickBooks product enhances the existing version and its capabilities to meet your business requirements. Check the add-ons in the QuickBooks version you are choosing and compare them with all the available editions.
Happy Black Friday, and enjoy saving money on your QuickBooks purchases!
Conclusion
Finally, we are ending this blog with all the details on the QuickBooks Black Friday sale: when it starts, how you can avail yourself of it, and which products it applies to. Why miss such a great deal when you can save up to 30% off from your pocket.
Need more information on the sale? Reach out to QuickBooks ProAdvisors available at +1(866)500-0076. Talk to an expert now!
Frequently Asked Questions
Does QuickBooks Online offer a Black Friday sale?
Yes, QuickBooks Online has offered Black Friday sales in the past, with discounts often up to 30% off for the first three to six months of a subscription. They will likely offer a similar sale for Black Friday 2025, though details will be announced closer to the date.
When is the best time to buy a QuickBooks subscription?
Black Friday sale is one of the best times to buy a QuickBooks subscription, as it offers more than 30 deals to save your pocket and help you get started with your business.
Does Intuit offer Black Friday or Cyber Monday discounts on accounting software?
Yes, Intuit’s QuickBooks accounting software typically offers Black Friday and Cyber Monday discounts, including substantial savings on subscriptions such as QuickBooks Online, payroll, and other products.
What can you expect from a QuickBooks subscription?
A QuickBooks subscription provides automated financial management tools, including invoicing, expense tracking, and reporting, that vary by plan but can include features such as bill management, inventory tracking, mobile access, and more.
QuickBooks Workforce is a mobile app for QuickBooks Time that lets both employees and employers streamline payroll and time tracking.
A self-service portal for employees provides access to pay stubs and tax documents, such as W-2s and W-3s, and lets you track your time. Meanwhile, employers can automate their payroll in a way that you don’t have to provide documents to each employee, once access is allowed to your employees. Explore this guide to know the system requirements, how to get started with Intuit Workforce Login, and more.
System Requirements for QuickBooks Desktop Workforce
To continue enjoying access to the QB Workforce mobile app seamlessly with the latest features, bug fixes, and security patches, you must keep the Workforce application up-to-date. See the basic requirements for your app and phone for the best experience in Intuit Workforce.
Important: After May 31, 2024, you must use a version of QuickBooks Workforce that is either older or newer; otherwise, it will no longer function.
Choose the profile icon, then click Manage apps and devices.
Go to the Overview tab and choose Updates available.
Select Update next to the Workforce app.
If you don’t see the option, you use the most recent update.
c. Update your operating system
Having an updated operating system is also essential for software compatibility and keeping operating system components functioning well. Follow the steps below to update your phone:
QuickBooks Workforce: Sign in, Troubleshoot Issues and More
Here’s a full guide on Intuit Workforce payroll login, troubleshooting common issues, and more:
Sign in to Workforce
Workforce allows employers to invite their employees to use the Intuit Workforce employee login to view their pay stubs and other payroll information. Here’s how to sign in:
Check an email from do_not_reply@intuit.com with your employer’s name in the subject line. If you do not see the invite email, check the spam folder or update your employer about the same. There is a possibility of using an incorrect email address.
Open the email and click Accept Invite.
Now, create an Intuit account using your email and a password. If you already have an Intuit account, such as QB Workforce or TurboTax, you can use their credentials too. Once the Intuit Workforce employee login is done, you’re all set to access your stubs or W-2s/W-3s.
Troubleshoot sign-in issues
If you already have an Intuit Workforce Login account, you can still accept a new invite from another employer. Use the same email tied to your existing account.
If you have access to QuickBooks Online, you’ll need a different email for your Workforce account. We suggest using your work email for QuickBooks Online and your personal one for Workforce.
Your employer might have needed to resend your invite. Be sure to accept the most recent email invitation.
If you use other Intuit products like TurboTax or have had a past Workforce account, you’ll see a sign-in screen to enter that email and password. If that’s not the one you gave your employer, use the email address they have on file.
Find out more about multi-factor authentication
You don’t need to set up multi-factor authentication yourself. It adds an extra layer of security beyond your password. When you sign in, you’ll receive a one-time confirmation code via email or text message. Entering this code helps verify your identity and provides stronger protection against unauthorized access or stolen passwords.
Set up and use QuickBooks Workforce
Here’s a clear step-by-step guide to set up and use QuickBooks Workforce, whether you’re an employer inviting employees or an employee accessing your pay stubs and tax forms.
Turn on notifications for pay stubs
Each time a pay stub is available, you will receive an email reminder.
Browse to the workforce.intuit.com login portal.
Go to Settings.
Choose Email Notification.
Click “Send me an email when new pay stubs are available.”
So, we have reached the end of this blog, covering the system requirements for QuickBooks Workforce, how to set it up, and the steps to troubleshoot the issue. You will also learn how to use the Workforce, view or change information, and more.
If you require more information or have any queries, it is recommended that you reach out to QuickBooks professionals. Dial +1(866)500-0076 to connect with a QuickBooks ProAdvisor now!
Frequently Asked Questions
What is QuickBooks Workforce & how does it work?
QuickBooks Workforce is a mobile application that allows employers to invite their employees to the portal to access their pay stubs and tax forms, and to manage their personal information online. The application can easily be integrated with QuickBooks Payroll and notify the employee once the data becomes available.
How to access QuickBooks Workforce?
To access QuickBooks Workforce as an employee, check your Intuit Workforce invitation email from your employer and accept it. Once done, use your email address or password to sign in and access your payroll information, including pay stubs and more.
Does QuickBooks Workforce cost?
No, QuickBooks Workforce does not cost anything on its own if your employer has purchased QuickBooks Payroll or QuickBooks Time. It’s the mobile app version of QuickBooks Time, easy to download on Android or iPhone.
Are payroll and time tracking available in QuickBooks Workforce?
Yes, both payroll and time tracking are available in QuickBooks via the QuickBooks Workforce app, which lets employees track time and view pay stubs. QuickBooks Time, the time-tracking platform, integrates directly with payroll services, which can be managed in QuickBooks Online.