Have you decided to download and run the QuickBooks Database Server Manager? If so, this post will help you throughout. Undoubtedly, the QuickBooks or Intuit personal database manager tool creates network data files for all the company files on your host system. Also, if you run QuickBooks in multi-user mode, the QBDBSM is a must-have tool that allows multiple users to run the company files simultaneously.
In this post, we will discuss everything about the QuickBooks Server Manager, how to download, set up, and run it, what makes it worth using, and much more. So, let’s get started!
If you’re looking for a QuickBooks professional to assist you while installing QuickBooks Database Server Manager, dial the toll-free number +1(866) 500-0076. Get in touch with our QuickBooks live technicians for a one-on-one conversation.
What’s the Intuit QuickBooks Database Server Manager All About?
Intuit has rolled out an excellent feature, QuickBooks Database Server Manager. This tool ensures efficient and seamless multi-user access to work on the same company file. Apparently, if the QuickBooks Database Server is inactive, users won’t be able to run QuickBooks in multi-user mode, which will affect the sharing of company files with other network systems.
It’s because the database server manager develops the required network data (.ND) files for the host computer. Now, before we begin installing the QuickBooks Database Server, take a look at the related facts given below:
If you run multiple versions of QuickBooks Desktop software, you need to install every version of the database server manager QuickBooks.
As noted above, this database server manager develops network data files. These files are essential for creating and sharing the company files over other computers in the network system.
For running QuickBooks in multi-user mode, the activation of the database server manager is crucial.
The database server manager scans the company file, which is crucial for multi-user access.
To automatically detect the creation of new company files, the database server manager QuickBooks also verifies the space in the local storage device.
After the installation of the QuickBooks Database server, each of the QuickBooks versions will add one user.
Basic Requirements for QuickBooks Database Server Manager Download
Find the basic requirements that you must get on your system to seamlessly download and install the QuickBooks Server Database Manager in the section below:
Note – Linux and Windows 10 S modes aren’t supported on the QuickBooks Database server.
The 64-bit version of AfterWindows 11 and 10
Windows Server 2012 of Standard and Essentials version
Standard and Essentials Windows Server 2022
Standard and Essentials Windows Server 2019
Standard and Essentials Windows Server 2012 R2
Windows Server 2016 of Standard and Essentials version
To perform the QuickBooks Database server manager download and installation, you must have a stable and strong internet connection on your system.
Make sure you have a minimum of 4GB RAM disc space for a hassle-free installation.
Also, a processor of a minimum of 2.4 GHz is essential.
The computer’s display must optimized for 1280×1024 screen resolution.
In addition, you must get a maximum of 8GB recommended of RAM on your system to allow 1-5 users to access the same company file in QuickBooks multi-user mode.
Here’s How to Install QuickBooks Database Server Manager
After ensuring the above requirements on your computer system, now start performing the steps below to install QuickBooks Database Server Manager. Carefully perform the below download and installation:
Start this method by first ensuring all the background processes and Windows applications are closed on your computer. Also, make sure to disable or configure the Windows Firewall settings.
Next, navigate to the internet browser and visit the official Intuit website. Afterward, navigate to the QuickBooks Product Download page.
Following this, search for the Setup_QuickBooks.exe file and start downloading the file. Make sure you save this file on your computer’s desktop location.
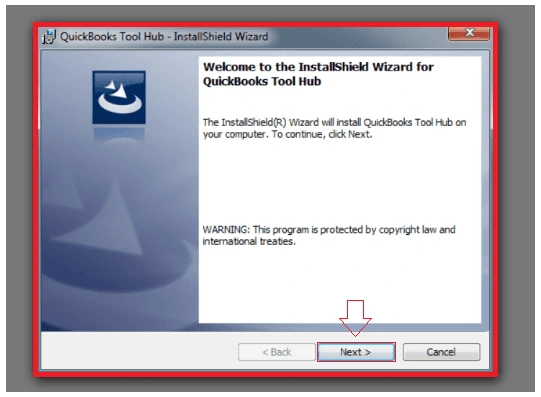
Now, double-click this installer file to open it, and begin performing the on-screen instructions on your computer system. Here, you will also get a license agreement tab. Carefully read the given terms & conditions and agree to the same.
After this, you will be asked to choose the installation type. From here, you must choose the Custom or Network option accordingly.
Following this, you must hit the Next button and make sure you don’t select the Express option.
Once you’ve chosen the most appropriate alternative for network setup, click the Next option.
Here, if you wish to run both the QuickBooks database server manager latest version and the QuickBooks Desktop software, you must select the “I’ll be using QuickBooks Desktop on this computer” option. However, if you only wish to run the Database server manager on the server computer, click the “I will NOT be using QuickBooks Desktop” option.
Finally, you must follow the on-screen instructions and then click the Install button. This will allow the installation of the database server manager to begin.
Configuring the Settings of QB Database Server Manager
So, have you successfully installed the QuickBooks Database server manager latest version on your computer? If so, now you must undertake the below procedure to configure the default settings of the Database server manager:
Begin the configuration by first choosing the Windows button on your keyboard. By this, the Start menu of your Windows system will appear on your screen.
Next, within this Windows Search menu, you must type Services and hit the Enter key on your keyboard.
Following this, open the Services tab, and here, you must select the QuickBooksDBXX option to open.
Afterward, move to the General tab, and look for the Services status section. Now, here, if it’s set as Started or Running, you must change it to the Stop option.
Now, navigate to the Startup type drop-down menu, and from here, you must choose the Automatic alternative.
Next, move to the Logon tab and then opt for the Local System Account alternative. Moving on, move to the Recovery tab, and then choose the Restart the service option.
Following this, from the drop-down menus, you must select the First, Second, and Subsequent failures options.
Finally, you must go back to the General tab and choose the Start button again. This will restart the QB Database Server Manager service.
Easy Steps to Setup QuickBooks Database Server Manager
Now, let’s begin setting up the QuickBooks Database Server Manager so that you can seamlessly start running QuickBooks in multi-user mode. For this, you need to undertake the below stepwise method:
1st Step – Scan your Company File Folders
Initiate scanning your file folder on the server computer by first pressing the Windows button on your keyboard.
Next, type Database in the Search Programs and Files bar. Now, you must open the QuickBooks Database Server Manager.
Afterward, move to the Scan Folders tab, and then choose the Browse option to search for the folder where you wish to store your company files.
Once you select the folder, hit the OK button and hit the Start Scan option.
By this, the scanning process will begin, and you must wait till it successfully ends. Once the scanning is over, now the file folder will display the QuickBooks company files found option.
Click this option, and the QuickBooks company files found tab will appear on your screen. Within this tab, you will be able to access all your QuickBooks company files on your network computers.
2nd Step – Monitor your Drive Tabs
Now, you must move to the Monitored Drives tab within the QB Database server manager.
Afterward, you must tick-mark the boxes next to the hard drives where you have saved all your company files.
Following this, ensure that monitoring won’t be required for mapped drives.
3rd Step – Go through the Database Server Manager
After setting up the Database server manager, you must now go through the additional tabs to ensure seamless multi-user QuickBooks operations. These tabs are:
Database Server Tab – This tab will provide real-time status updates of the QuickBooks Database server tool. Also, this tab will display the latest connections.
System Tab – This tab is dedicated to the information related to the location of the Database Server Manager on your computer.
Features Available in QuickBooks Database Server Manager
Find below the impressive and advanced features available within the QuickBooks Database Server Manager. Take a look and learn how these features can help you run QuickBooks:
The Database server manager has features to help users easily connect their company files with the server network.
It notifies users about the total number of users accessing the company file at a time.
Users can access the Services Administrative option to adjust the service status and configure the settings of the QB database server manager.
The server manager also has automatic update features that automatically download the latest available updates for the Database Server manager.
Another remarkable feature of the server manager is the monitor drive feature that helps users update the tool after adding any new QuickBooks company files to the server.
That’s All!
So, that’s the QuickBooks Database Server Manager in a nutshell! Hopefully, this post has helped you learn about the Database server manager. If you prefer to run QuickBooks in a multi-user mode, we suggest you install this excellent Intuit Database server manager service on your server computer. However, if you find any difficulty or confusion while installing or running this service, consider contacting our QuickBooks Desktop technicians at +1(866) 500-0076. You can also access our Live Chat Support option for more information.
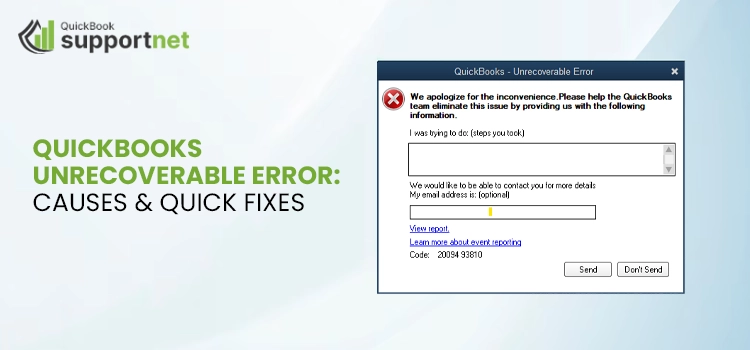
QuickBooks Unrecoverable error is the most common issue that many users might confront while performing different tasks. It might appear while opening the company file, emailing, printing, saving files as PDFs and importing the Accountant’s changes. Sometimes, this issue may also trigger while reconciling or running the rebuild utility. Most often, this issue appears because of damaged data or missing QuickBooks updates. Unfortunately, this issue comes without any prior indication and interrupts the entire ongoing task.
In this post, we have covered all the root causes and simple fixation ways to deal with the Unrecoverable errors in QuickBooks. So, let’s begin reading!
Finding the simple ways to eliminate QuickBooks Unrecoverable error right away? Ring our QuickBooks experts at +1(866) 500-0076, and our QuickBooks professionals will provide you with step-by-step instructions to figure out the issue quickly.
What Causes Unrecoverable Error In QuickBooks Desktop?
Most often, the users might get an Unrecoverable Error in QuickBooks Desktop while accessing the data file. This issue can also appear due to numerous other factors. So, let’s study all of them to fix it smoothly.
Working on an Incompatible QuickBooks version-
Sometimes, users might get the QuickBooks Unrecoverable error when using the QuickBooks version that isn’t available anymore. Therefore, it is necessary to get an up-to-date version of QuickBooks to open the company file easily.
Presence of Data Damage within the Company File-
If the company file you are trying to open contains damaged or corrupt data, it might restrain the users from opening the file. As a result, it starts giving an Unrecoverable error in QuickBooks.
Incomplete Window Updates-
In other cases, the issue may arise when you are working on the older version of the Windows operating system.
Interference of Windows Firewall or Third-Party Applications-
At times, the users might get the Unrecoverable error in QuickBooks if the Windows firewall blocks the access to the data file. It may also be possible that the antivirus application within your system isn’t allowing you to access the file.
Important Tips Before Fixing QuickBooks Desktop Unrecoverable Error
Following are the points that the users must note before fixing the QuickBooks Desktop Unrecoverable error.
The first and foremost step is to get the latest version of the QuickBooks Desktop.
Never skip to get the backup of your QuickBooks company file to safeguard your data.
Ensure that you log in to QuickBooks with the proper administrative rights.
How can you resolve the QuickBooks Unrecoverable Error using these Simple Fixes?
If you are still witnessing QuickBooks Unrecoverable error while performing your financial tasks using this application, then stop worrying. Instead, go through all the solutions carefully and fix the issue smoothly without any further delays.
Solution 1: Launch QuickBooks By Shutting Down Other Windows
If you have previously set to open the large report or windows automatically, then it will start throwing the Unrecoverable error in QuickBooks on the startup. Therefore, it is mandatory to stop all the background processes to run the QuickBooks smoothly. Use the below steps to close all the open windows.
Open your QuickBooks application and then pick the data file from the No Company Open window.
After this, keep pressing the Alt key and then hit the Open tab. You mustn’t leave the key till the time the company file opens up.
Thereon, if QuickBooks prompts you to log in, leave the Alt key and mention the password correctly. Once again, keep holding the Alt key and click the OK tab.
Solution 2: Opening the Company File Using Different QuickBooks User
Sometimes, opening the company file with the help of another QuickBooks user will help you prevent the QuickBooks Unrecoverable error.
Initially, you must hit the Company option and then the Set Up Users and Passwords tab.
Afterwards, switch to the Add User tab and mention the username and password accurately.
You have to modify the user according to the requirements and then tap on the Finish tab.
Thereon, opt for the File menu and then the Close Company/Logoff tab.
Now, you must log in to the data file with the help of the sign-in details. Later on, if the new user is able to work, remove the user who is creating issues and generate them again.
Windows Server 2012 and Later Version
Launch the Server Manager on your workstation and then click the Tools option.
After that, move to the Computer Management option and tap on the Groups option.
Thereon, hit the Groups tab from the Local Users and Groups sub-menu list.
Next, double-tap on the Administrators Groups and the Administrators Properties window will be launched. Then, choose the Add option.
Finally, mention the account that you want to link with the local admin groups and hit the OK tab.
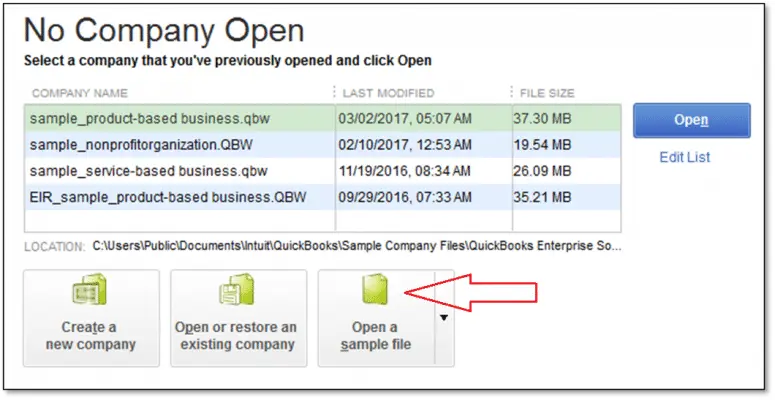
Solution 3: Generating a Sample Company File
Creating the sample company file will help analyse whether the issue is with the company file or the QuickBooks application. Following are the steps for creating the sample file.
Firstly, keep pressing the CTRL key and tap on the QuickBooks icon twice.
After this, you must keep pressing the Ctrl key till the time No Company Open Window displays.
Now, choose the Open a sample file option and then pick any sample from the options given.
Thereon, if you see the file is opening without giving any error, it seems that there is some issues with your file or folder. So, to recover the damaged file, you must run the QuickBooks ADR Tool.
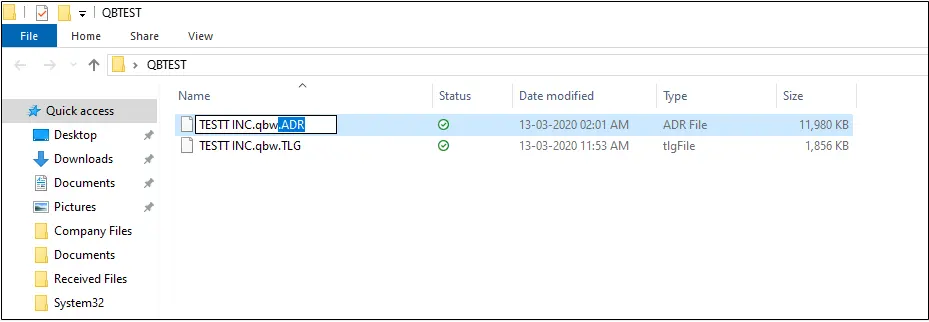
Solution 4: Shifting the Company File To a Different Location
Most often, users might get an Unrecoverable Error in QuickBooks due to a problem with the file in the folder. Therefore, changing the company file location will help you figure out whether the issue is with the location or the file itself. So, use the following steps to change the file location.
Firstly, right-click anywhere on the desktop, click the New and then the Folder option.
After this, name the folder QBTEST and go to the folder that contains your file.
Thereon, right-click on the QuickBooks file and hit the Copy tab.
Now, paste the file into the folder created in the last step.
Next, you must try opening the company file from the new folder.
If you didn’t see any error while launching the file through another location, it states that the folder is damaged. At that time, you must establish a new folder to save the file.
If the same issue arises after changing the location, then try another solution.
Solution 5: Start Running QuickFix My Program Via QuickBooks Tool Hub
You can run the QuickFix MyProgram Tool through the QuickBooks Tool to configure the damage in the program. For that, you must follow the following steps:
Initially, you must download and install the up-to-date version of the QuickBooks Tool Hub.
After this, open the QuickBooks Tool Hub and click the Program Problemstab.
Thereon, browse to the Quick Fix My Program option.
Finally, open the QuickBooks Desktop and then your company file to see if the Unrecoverable error still appears.
Solution 6: Try Reinstalling the QuickBooks Desktop application
Case 1: Unrecoverable error when opening a company file
If you are facing an Unrecoverable error while opening the company file, then you can try the following solutions to fix it.
Solution 1: Take the Help of the QuickFix My Program To Fix the Issue
To address the issues with the QuickBooks program, you must run the QuickFixMy Program tool. Use the steps given in the previous step to resolve the issue.
Solution 2: Avoid the QBCFMonitorService From starting on your PC
Initially, get the latest version of the QuickBooks Tool Hub if you don’t have one.
After this, launch the Run window by pressing the Windows + R keys together. Later on, mention the “services.msc” in the search console.
Thereon, double-click on the QBCFMonitorService from the options and then hit the Properties tab.
Now, browse to the Disabled option from the Startup Type drop-down menu.
Finally, all the changes are imposed by clicking Apply and then the OK option.
Solution 3: Fixing the Damages With the Installation of QuickBooks Desktop
In some cases, the QuickBooks Desktop Unrecoverable Error might occur due to the incomplete or damaged installation. So, to address the issues with the QuickBooks installation, you must run the QuickBooks Install Diagnostic Tool.
Case 2: PDF and Print-Related Issues in QuickBooks Desktop
There are certain instances when the users start getting the error while printing the reports, emails and other documents in QuickBooks Desktop. Therefore, to address this issue, you must implement the following solutions.
Solution 1: Start Using the QuickBooks PDF and Print Repair Tool
If you are getting the QuickBooks Unrecoverable errors while printing the documents, then running the PDF and print repair tool will fix the issue. Therefore, to use this tool, you must read this article.
Solution 2: Change the Temp Folder permissions
To make changes to the temp folder permissions, follow the instructions below.
First of all, open the Run window and insert “%TEMP% to bring up the Temp folder on your computer.
Now, right-click on the Temp folder to pick the Properties option and then the Security.
After that, you must verify that the user names and groups in Security have Full Control.
At last, when the permissions are set, try saving the PDF again in QuickBooks to see if the issue exists.
Next, you must verify if the XPS Document writer is able to print properly. For testing, follow the instructions below.
Primarily, launch the Notepad on your workstation and write Test.
Afterwards, go to the File menu and click the Print option.
Thereon, opt for the XPS Document Writer option and then the Print tab.
You must insert a filename in the search area and then save it to your desktop.
Return to your desktop and verify if the XPS Document Writer is printing from the Notepad.
If you are having difficulty printing to your XPS Document Writer, consult your IT experts instantly.
Solution 3: Construct a New Template or Form
Primarily, prepare a new template of your form on your computer.
After this, modify the template on your transaction using the available options.
Next, you must prepare your .pdf accurately.
Solution 4: Modifying the Properties of Print Spooler Service
Open the Run window, insert “services.msc”, and it will open the Services window.
Now, start looking for the Print Spooler Service, right-click on it to hit the Properties tab.
After that, move to the Startup Type, choose the Automatic, Apply and then the OK tab.
Next, right-click on the Print Spooler Service again and tap on the Start option to commence the service.
With this, you can now easily save or email the company file in the form of a PDF without getting unrecoverable errors.
Case 3: Rectify the Unrecoverable Error occur while running Rebuild Utility
There are times when the users might get Target Chaining Errors while rebuilding company files in QuickBooks Enterprise. Following are the messages that you get when the error pops-up.
Verify.c (4620): CHECKPOINT: 1104: Thu Jul 14 15:36:39 Target Chaining: Target ###### in transaction ######, points to ‘next’ target ###### which is NOT in that transaction
Verify.c (4747): CHECKPOINT: 3544: Fri Jul 01 11:25:45 Target Chaining: Next target pointer error in transaction #####
In other instances, the users may also receive the Unrecoverable Error in QuickBooks Desktop when the data file has the target chaining errors. In other instances, it may appear in the 2.0 version within the Entered/Last Modified column rather. Another cause may be insufficient storage space while running the Rebuild Data Tool. Therefore, to fix the issue, you must perform the following solutions.
Solution: Make Use of the Verify and Rebuild Data Tool
To repair the damages in the company file data, you must run the Verify and Rebuild Data tool in QuickBooks. To do so, go through the following steps.
a. Start Running the Rebuild Data Tool
Initially, launch the QuickBooks application and then click the File menu.
After that, choose the Utilities tab and then hit the Rebuild Data option.
Thereon, click the OK tab and wait for some time to complete the rebuilding process.
b. Use the Verify Tool to ensure that there are no further issues.
Primarily, move to the File menu and choose the Utilities tab.
After that, switch to the Verify Data tab and hit the OK option.
Thereon, you must hold on for the moment to complete the verification.
Case 4: Unrecoverable error while performing bank reconciliation or checking old reconciliation reports
There are certain instances when the users might experience an Unrecoverable Error in QuickBooks while trying to open the PDF file. It may also occur while accessing the version of Adobe Reader that isn’t present any more. So, to fix the issue, you must update them to the latest version of Adobe Reader.
Solution 1: Get the latest version of Adobe Reader
Open the Adobe Reader on your system and hit the Help menu.
After that, click the About Adobe Reader option.
Now, if you are using the versions 8.0, 9.0, or 10.0, then you must update them to the latest version 11.0 from the main Adobe website.
Finally, go through the instructions on the screen for installing Adobe Reader 11.0. Later on, try restarting the computer once you are done installing the latest Adobe Reader.
Solution 2: Making Changes With the Display PDF in Browser Preference
Initially, open the Start menu and choose the Programs/All Programs option.
Afterwards, opt for the Adobe Reader/Acrobat tab and click the Edit menu.
Thereon, you must hit the Preferences tab and then choose the Internet option.
Soon after this, unmark the Display PDF in Browser preference within the Web Browser section.
Finally, when all the settings is done, choose the OK tab to save the changes.
Case 5: Unrecoverable error when importing Accountant’s Changes
Following are the Unrecoverable errors that might appear while importing Accountant’s changes into a client’s data file. So, to resolve these errors, you must follow the solutions below.
Unrecoverable Error 00000 16133
Unrecoverable Error 00000 41897
Unrecoverable Error 00000 41953
Unrecoverable Error 00000 42127
Unrecoverable Error 00000 42394
Unrecoverable Error 00000 31901
Unrecoverable Error 00000 43109
Unrecoverable Error 00000 41765
Unrecoverable Error 00000 16440
Unrecoverable Error 00000 95431
Unrecoverable Error 00000 42045
Unrecoverable Error 00000 37760
Unrecoverable Error 00000 40592
Unrecoverable Error 00000 31609
Solution 1: Resume Further with the Import Process
Initially, go with the Send option whenever the error message pops up on the screen.
After this, hit the OK tab to start the import process once again.
As a result, it will present a list if there are any changes that isn’t done with the client’s file. Herein, you must insert those changes manually.
Solution 2: Thoroughly Review the Data and Re-establish Change File
Primarily, you must restore the latest backup of your data file.
First of all, you must delete the Accountant’s copy restriction from your client file.
To delete the Accountant’s restriction, choose the File menu and then the Send Company File tab.
Thereon, navigate to the Accountant’s Copy and then tap on the Client Activities.
Soon after this, go with the Remove Restrictions and then the Yes, I want to remove the Accountant’s Copy Restrictions. Later on, hit the OK tab for the confirmation.
After that, the issues can be repaired by running the Verify and Rebuild Data Utility tool.
Finally, the users must prepare an Accountant’saccountant’s copy to recreate the changes.
To create the Accountant’s copy, move to the File menu and then the Send Company Files.
After that, tap on the Accountant’s Copy and click the Client Activities tab.
Thereon, move to the Save File tab and then go to the Accountant’s Copy tab.
Herein, you must start mentioning the dividing date and hit the Next tab.
Case 6: Rectify the Data Damages On Your Company File
If you experience an Unrecoverable Error in QuickBooks Desktop due to data damage, then you must stop worrying. Instead, use the below solutions to resolve the issues with your data file.
Solution 1: Configure the Damages With the Help of Rebuild Data Tool
The Rebuild Data is an inbuilt tool that comes along with the QuickBooks Desktop application. After installing the tool, you can use it to fix the minor damages present within the company file data.
Solution 2: Run the QuickBooks File Doctor Tool To Fix the Issue
Even after running the Rebuild Data Utility, you are still facing issues opening the company file, then try to use the File Doctor Tool.
QuickBooks File Doctor Tool
Solution 3: Fixing the Damage Company File By Rebuilding Company Data Manually
Open the QuickBooks application, switch to the File menu and then Utilities from the sub-menu.
After this, browse to the Verify Data tab and allow the tool to resolve the damages.
When you arrive at the Verify Results screen, hit the Expand All tab to get the list of all the errors.
Later on, to get the steps for resolving the error, choose the See Online Article tab.
Case 7: Unrecoverable error when writing checks via QuickBooks Online Bill Pay
Online Bill Pay is a feature in QuickBooks that lets users pay vendor bills. Moreover, it is also used to record the payment so that you can obtain accurate results. However, sometimes, users might start receiving an Unrecoverable error in QuickBooks while using the online bill pay system. However, this feature isn’t available after the 12/12/19.
Taking Everything Into Account!!
QuickBooks Unrecoverable Error might be challenging for the users, but with the correct solutions given in this post, they can fix the issue quickly. Furthermore, if this issue still bothers you while accessing the company file, immediately consult with our QB experts. They will offer you the best assistance to deal with this issue quickly.
No matter how advanced software you use, it is quite common to face performance issues, technical glitches, and other errors. Similarly, QuickBooks is plagued with various errors and problems that make it challenging to manage your accounting and financial data. Dealing with such problems is a tough task. Nevertheless, Intuit developers make sure that you don’t have to go through such critical complaints and let you address them easily using QuickBooks Tool Hub.
This advanced launchpad provides various utilities in one place to handle errors in various instances. This tool has multiple tabs with different tools customized for specific problems. For instance, if you face problems while opening a company file over the network, the QuickBooks File Doctor tool is ideal for troubleshooting. This article gives a detailed overview of QuickBooks Tool Hub 2025, helping you use the available tools for different situations.
To utilize the QuickBooks Tool Hub, understanding the interface and how the different tools work is necessary yet challenging. Connecting with industry experts is recommended for better use of the tool. Dial +1(866) 500-0076 and talk to a QB ProAdvisor now!
Download and Install QuickBooks Tool Hub
Above, we’ve become familiar with the QuickBooks Tool Hub and all the tools and features you can use to troubleshoot various errors. To get the best out of the tool, you will need to close QuickBooks Desktop and ensure you are using the Windows 10, 64-bit or higher version of the operating system.
Exit QB Desktop.
Visit Intuit’s official site and download the most recent version of QuickBooks Tool Hub (1.6.0.8). Save the downloaded file on your Windows desktop or Download folder to ensure you can easily access it.
Note: If you already have the Tool Hub installed, you can which version you use at the bottom of Tool Hub. Go to the Home tab. You will see the version at the bottom.
Locate the file you just downloaded, QuickBooksToolHub.exe, and double-click on it.
Adhere to the on-screen instructions on your screen and agree with the product’s termsand conditions.
When the installation is complete, double-click on the Tool Hub icon on your Windows desktop.
A List of Error Codes You Can Fix Using the Tool Hub
The Tool Hub is a launchpad for various tools that fix different types of errors in the program, such as Quick Fix My Program, which helps you troubleshoot program-related problems. Below is a list of the tools in the QuickBooks Tool Hub and their roles in fixing different types of errors:
Tools
Errors
Quick Fix my File
Possible data damage or other company file errors that occur when opening or hosting on the workstations, such as QuickBooks error -6000 and others.
Run QuickBooks File Doctor
QuickBooks File Doctor works to fix errors related to company files and networks, such as QuickBooks error -6000, QuickBooks error H101 and other H-series errors, missing or blank customer, vendor, or employee lists, network or hosting problems, and more.
Open QBWinlog Folder
Find the QBWin.log or QuickBooks.log files and fix problems related to the log file or folder that contains all information about program messages and errors, including information created by the utility that validates, rebuilds, and compresses data.
QuickBooks Database Server Manager
This tool helps you host your company file in QuickBooks without any issues and ensures that the related issues are fixed.
Quick Fix my Program
Errors or problems you may encounter while installing QuickBooks updates such as QuickBooks error 15XXX, QuickBooks error 12XXX, unrecoverable error, and others.
This tool will help you eliminate problems and all other PDF and printing errors when printing, emailing, or saving as PDF.
QuickBooks Install Diagnostic Tool
Activation, license and product related issues, QuickBooks error 15XXX, QuickBooks error 12XXX, QuickBooks error 1904, QuickBooks error 1722 and other issues when installing or updating the program.
Clean Install Tool
Unrecoverable error, installation issues and fatal application errors.
Explore Features and Products of QuickBooks Desktop Tool Hub in Detail
The QuickBooks Tool Hub is well organized, yet complex to understand because it has multiple tabs and tools for different problems, such as company file issues. It is designated to deal with problems that occur when running updates, opening company files, or running other operations in the desktop version.
In this section, you can access only company file-related tools. Let’s take a closer look at all the tabs in the Tool Hub and discuss the types of errors you can resolve:
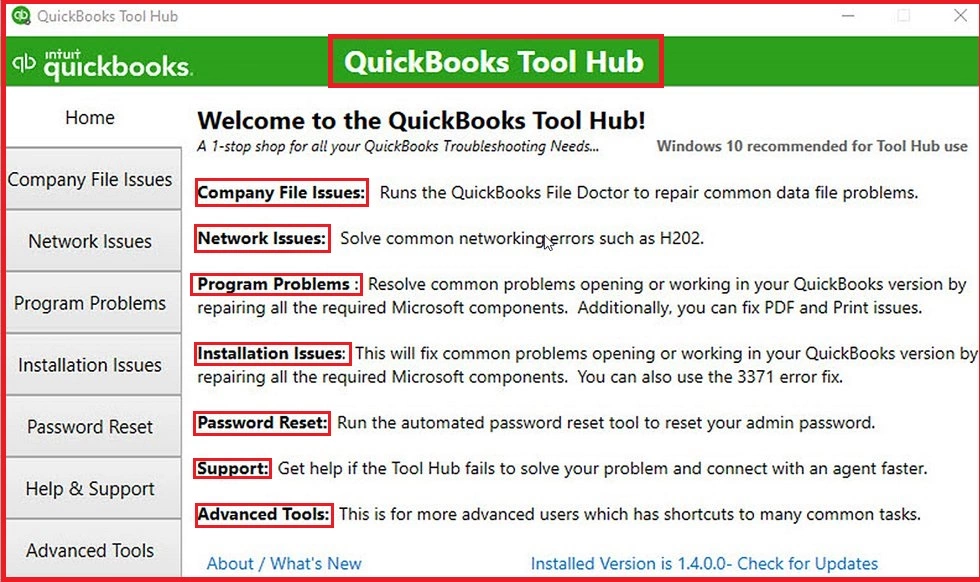
Home
The Home tab in the Tool Hub is a central hub for various troubleshooting and resources. It lists all the tools and features that resolve QuickBooks issues.
If you are wondering which tool to choose for a specific error you are encountering in the program, we recommend you read the description of each tool on the Home tab and use it accordingly.
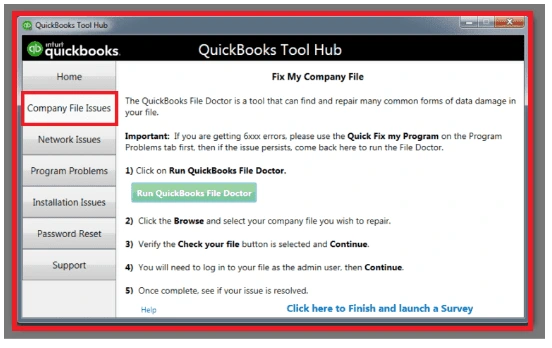
Company File Issues
As the name suggests, the Company File Issues tab in the QuickBooks Tool Hub contains a set of tools that serve to fix various problems or errors related to your company file on the local and server computer. These tools also help you deal with network-related problems when opening the company file. Let’s take a look at what you can access in the tab:
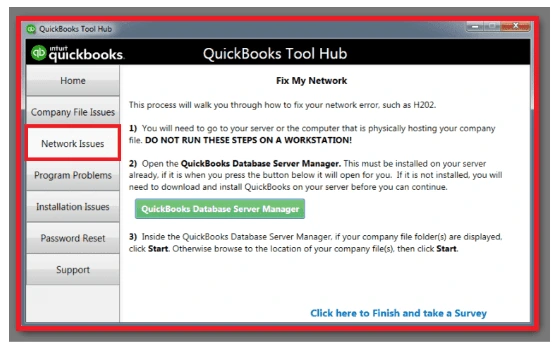
The Network Problems tab serves the QuickBooks Database Server Manager tool to ensure that you can host the company file without any obstacles.
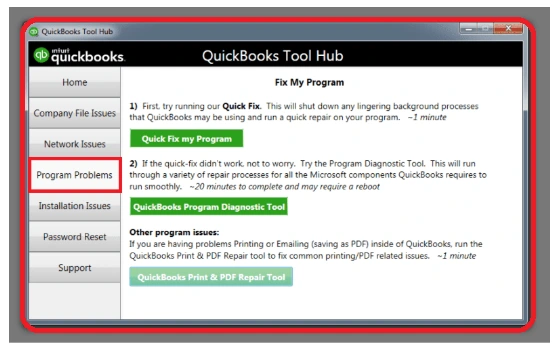
Program Problems
Sudden slowdown or poor performance of your QB program can disrupt all your important work. In such cases, go to Program Issues in the QuickBooks Tool Hub to access several utilities to resolve these problems. Get a brief overview of the available utilities:
Program Problems
Quick Fix my Program
QuickBooks Program Diagnostic Tool
QuickBooks Print & PDF Repair Tool
Installation Issues
Users often encounter problems when installing QuickBooks updates or downloading a new version of the program.
The Installation Problems tab lets you access several utilities designed to resolve problems that interfere with updates or installations. Here is a list of the tools you can access:
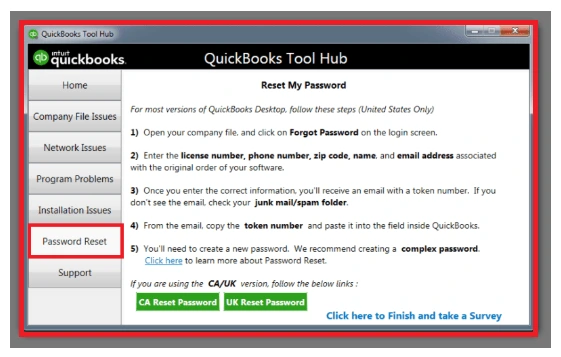
It’s nothing new when we forget our password while logging into a software. But don’t worry – password reset tools can help you reset QuickBooks password in just a few moments.
Password Reset
The steps to reset your password may vary depending on whether you have QuickBooks 2020, QuickBooks 2019 or another.
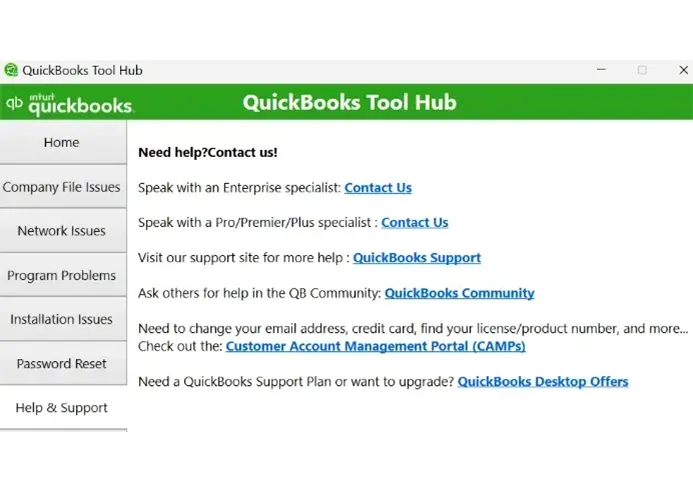
Help & Support
QuickBooks is an advanced tool not only for its features but also for the robust support it offers. If you need any help from an Enterprise or Pro/Premier/Plus expert, the QuickBooks support team will take care of you. Simply visit the Support menu in the QB Tool Hub and find the kind of help you need to connect with the support team.
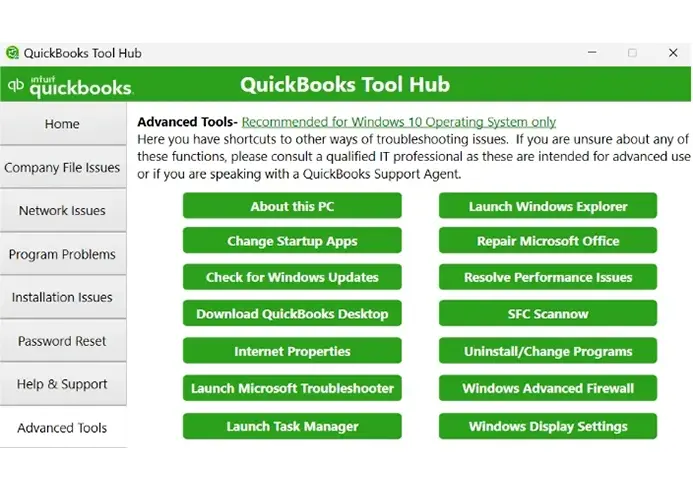
Advanced Tools
The Advanced Tools tab in the Tool Hub ensures that you can address multiple Windows problems from one place by providing several shortcuts that help diagnose and fix more complex problems.
Let’s take a quick overview of what you’ll find under this tab:
QuickBooks Updates that are Slow or Appear to Be Stuck
This feature comes in handy when you get stuck downloading QuickBooks or payroll updates. Simply click on the QuickBooks Tools Hub menu feature and proceed to reach the support team.
Note: If you are installing a tool from QuickBooks Tool Hub, it will download automatically in the background. The tool may take some time to complete the process. Do not close the tool and wait until it runs successfully.
Finally, you’re ready to get started with QuickBooks Tool Hub to troubleshoot the issues and enjoy seamless financial and accounting management.
Summary
Any error code or problem in QuickBooks disrupts your accounting and financial processes running in the program or even hinders you while using payroll to pay your employees and other important tasks. If you are experiencing the same and wondering what to do, the above article is a comprehensive guide that helps you troubleshoot problems using QuickBooks Tool Hub – a launchpad for various utilities by Intuit.
If you don’t find this helpful and you keep getting the same error, we recommend consulting professionals. Dial +1(866) 500-0076 and talk to a QuickBooks ProAdvisor now!
Windows Firewall, or a feature of Microsoft Windows, is a security application that controls the traffic that enters or exists on your device. This traffic is filtered based on various criteria, such as source and destination IP address or source and destination port number. QuickBooks has these port numbers assigned to pass through the Firewall, which can be blocked for security reasons. The Firewall might also be considered a threat or unwanted access to pass through your computer. This blog will cover the possible reasons and instances when the Windows Firewall is blocking QuickBooks with suitable fixes. Let’s go through this comprehensive guide.
Not a techie and wondering what to do to configure Windows Firewall settings? Don’t worry; our technical and QuickBooks professionals are available to handle such critical tasks. Dial +1(866) 500-0076now!
Setting Up the Firewall Windows Settings in QuickBooks Desktop
Disabling the Windows Firewall will leave your computer unprotected and weaken the system security. Along with manual configuration, running different QuickBooks tools will also help you fix the respective issue.
This section will cover the various processes that the Windows Firewall can hinder and step-by-step instructions to address the issue accordingly.
Case I: When Opening a Company File
You may fail to open the company file in QuickBooks and encounter an error message stating,
“Cannot communicate with the company file due to a firewall.“
This is due to the Windows firewall is blocking QuickBooks. To successfully open the company file without interruptions, you must configure the settings or resolve the associated issue. Proceed with the below solutions to do so:
1. Run QuickBooks File Doctor
QuickBooks File Doctor utility will help you fix the firewall settings so you cannot open the company file over the network. Adhere to the following steps to make use of the tool:
a. Get QuickBooks Tool Hub
Exit QuickBooks Desktop.
Get the most recent version of QuickBooks Tool Hub (1.6.0.8). Save the downloaded file on your computer from where you can easily locate.
Note: If you already have Tool Hub on your computer, check the current version from the Home page.
Locate the file you just downloaded QuickBooksToolHub.exe and double-click on it.
Follow the on-screen instructions on your screen and agree with the product’s terms and conditions.
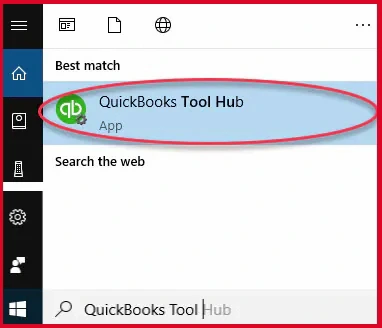
Note: If you can’t find QuickBooks Tool Hub, manually search for it on your Windows.
b. Make Use of QuickBooks File Doctor
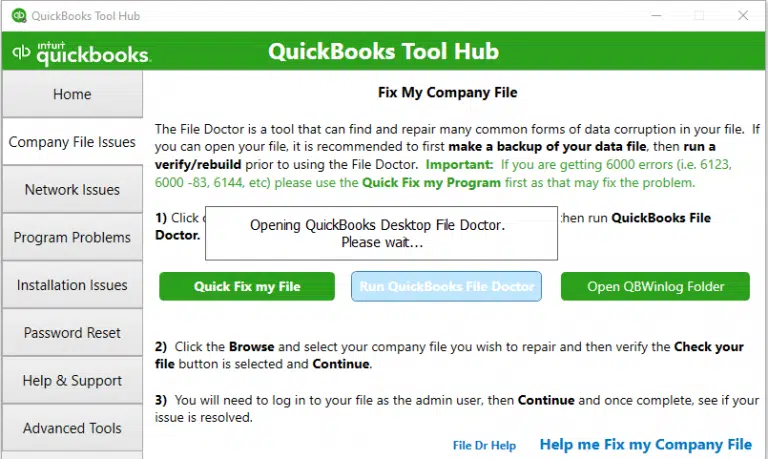
Launch QB Tool Hub and navigate to Company File Issues.
Hit on Run QuickBooks File Doctor. The file doctor tool might take a minute or two to open; wait until then.
Now, choose your company file from the drop-down menu. If you can’t see the file, click on Browse and search to find the file manually.
Select Check your file and network, then tap on Continue.
Type the QuickBooks admin password and select Next.
The scan time depends on your company file size, which usually takes up to 5 minutes. Once the scan is successful, launch QuickBooks and then open the company file. In some cases, the scan may even say it was unsuccessful after addressing the issues.
2. Update QuickBooks Desktop
Sometimes, using an outdated version of QuickBooks hinders regular operations and can also cause connectivity issues. So, it is recommended to keep your QuickBooks updated to the most recent version.
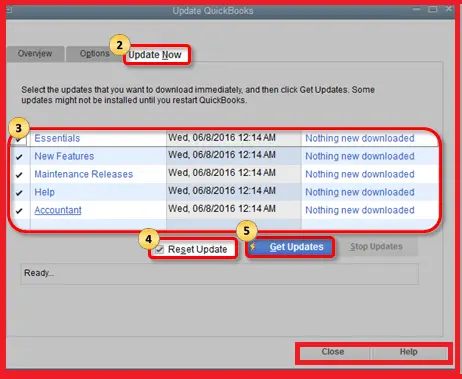
Launch QuickBooks and navigate to the top menu bar.
Move to the Update Now tab and mark the Reset Updates checkbox.
Now, hit the Get Updates button and wait the update downloads.
Restart your computer and open QuickBooks again to let the changes apply.
3. Configure the Windows Firewall Settings Manually
You might fail to open your company file when Windows Firewall is blocking QuickBooks. In that case, you must configure the Windows Firewall settings by adding the firewall port exception or by creating an exception for QuickBooks programs:
Add Firewall port exception for QuickBooks
In case you use multiple versions of QuickBooks on the same computer, perform the below steps to carefully the firewall port exception:
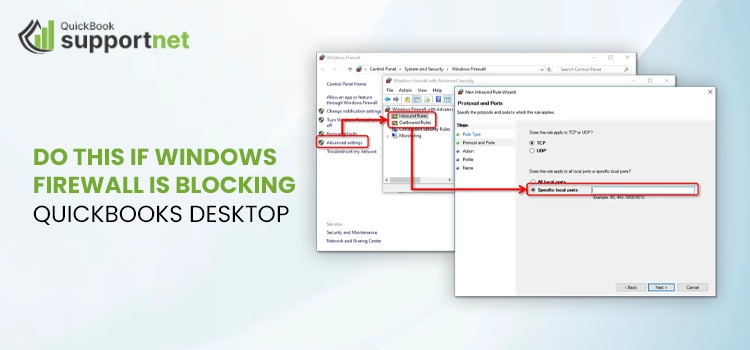
Press the Windows logo icon on your keyboard to open the Windows Start menu.
Search for the Windows Firewall application and hit Enter.
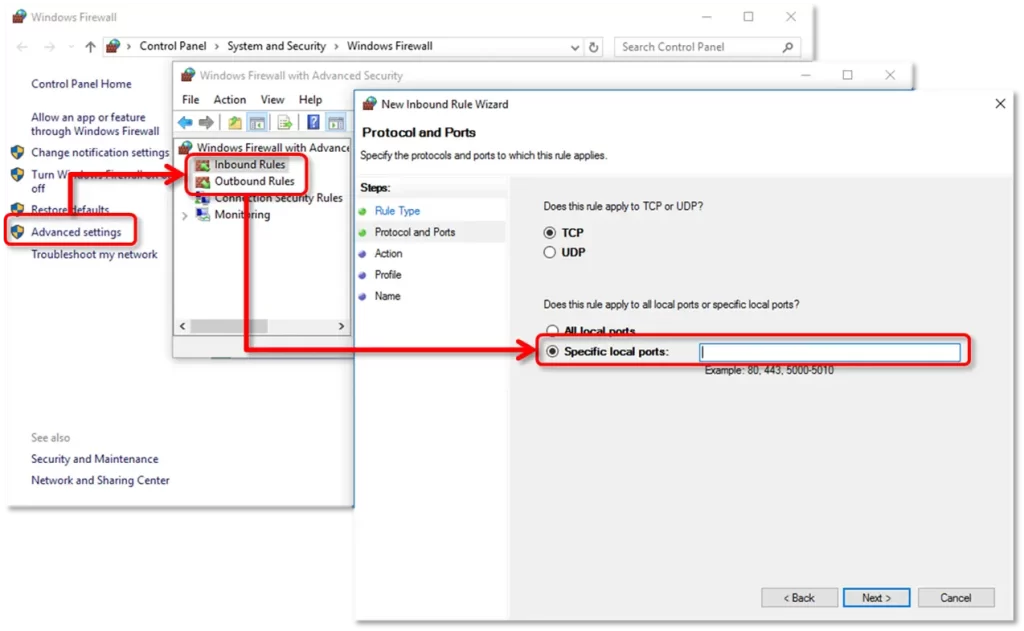
Go to Advanced Settings.
Now, right-click the Inbound Rules, then click on New Rule.
Choose Port and then hit on Next.
Ensure the rule applies to TCP.
Enter the specific port number of your version of QuickBooks in the Specific local port field. – QuickBooks Desktop 2020 and later: 8019, XXXXX. – QuickBooks Desktop 2019: 8019, XXXXX. – QuickBooks Desktop 2018: 8019, 56728, 55378-55382. – QuickBooks Desktop 2017: 8019, 56727, 55373-55377.
Important: QuickBooks Desktop 2019, 2020, and other future versions of QuickBooks use dynamic ports. These are specific firewall ports that are used during the software installation. The assigned port number ensures the QuickBooks Desktop gets exclusive use of the given port.
Get the dynamic port number: – Launch the Windows Start menu. – Search for QuickBooks Database Server Manager and hit the Enter key. – Move to the Port Monitor tab. – Find the QuickBooks Desktop version you use and note down the Port Number. This will be used to create firewall port exception in the further steps.
Note: Remember that you can modify the assigned port number by selecting Renew, but only for QuickBooks Desktop 2019 and later versions. If you do, navigate to the Scan Folders tab and click on Scan Now to reset the firewall permissions.
Enter the port number and select Next.
Choose Allow the Connection, then select Next.
When prompted, ensure all the profiles are marked. Choose Next.
Create this rule while naming it as QBPorts(year).
Once all done, select Finish.
Launch QuickBooks Desktop and try switching it to the multi-user mode. You can also open your QuickBooks over the network using the computer that hosts your company file. If the Windows Firewall still blocks the connection, move on to the next step.
Create Windows Firewall exceptions for QuickBooks programs
QuickBooks uses the executable files (.exe) to run various programs. Follow the steps below to create an exception for each executable file in the table below.
Open the Windows Start menu.
In the search bar, type Windows Firewall and hit the Enter key.
Select Advanced settings and right-click the Inbound Rules. Now, click on New Rule.
Choose the rule type as Program, then click Next.
Select This program path and hit on Browse.
In the table below, locate and pick an executable file. Then, choose Next.
Click on Allow the connection and select Next.
Finally, create this rule by naming it as QBFirewallException(name.exe).
Create outbound rules by repeating the previous procedures. Proceed as before, with the exception of choosing Outbound Rules at step 4.
Note: If case you see these files as Program Files (x86), this just means your using a 64-bit Operating system.
Launch your QuickBooks desktop program and switch it to multi-user mode. If you still encounter problems or any errors, configure your program’s antivirus settings.
Check the antivirus and configure it
Make sure QuickBooks Desktop has normal permissions so that QuickBooks programs are not blocked. The steps vary from program to program in terms of enabling antivirus settings. To do this, check the program’s official site to set permissions for your antivirus software.
After this, restart your computer for changes to save. Once you’ve finished configuring the firewall, restart your computer and reopen QuickBooks.
4. Setting up the Folder Permissions
You must ensure the folder holding your company file is set up to share the company file over the network. Proceed with the below steps to configure the permissions:
a. Set the Folder Permissions Verify if the permissions are set correctly
Launch the Windows Start menu.
Search for File Explorer and hit the Enter key.
Look for the company file folder and right-click on it. Then, choose Properties.
Move to the Security tab and click on Advanced.
Select QBDataServiceUserXX and click Edit.
Now, set the following settings to Allowed: – Traverse Folder/Execute File – List Folder/Read Data – Read Attributes – Read Extended Attributes – Create Files/Write Data – Create Folders/Append Data – Write Attributes – Write Extended Attributes – Read Permissions
If the permissions are not configured correctly:
Right-click the folder that has your company file and select Properties.
Choose Security, then click on Edit.
Select QBDataServiceUserXX and hit on Full Control, then Allow.
Follow the instructions for any of the folders below. Remember that you might not have every one of these directories.
Right-click the company file folder and choose Properties.
Move to the Security tab, select Everyone. Note: If Everyone is in the Group or User Name checkbox, select Add and then type Everyone. Click OK.
Choose Full Control and then click Apply and OK.
b. Configure the Windows access permissions to share the company file
As you deal with your company file over the network, make sure QuickBooks has the appropriate level of access to help avoid problems later.
Open the Windows Start menu.
Locate your company file folder and right-click on it.
Click on Properties then Sharing and then select Share Add.
For your version of QuickBooks, select the corresponding QBDataServiceUserXX.
Now, configure the permission to Full Control and select Share.
5. Run QuickBooks Database Server Manager
Your computer is the main computer that hosts your company files, and the ones connected are workstations. You must ensure that you run QuickBooks Database Server Manager to successfully open the company file on the network.
Note: Install and set up the Database Server Manager on the main computer if you haven’t done so yet
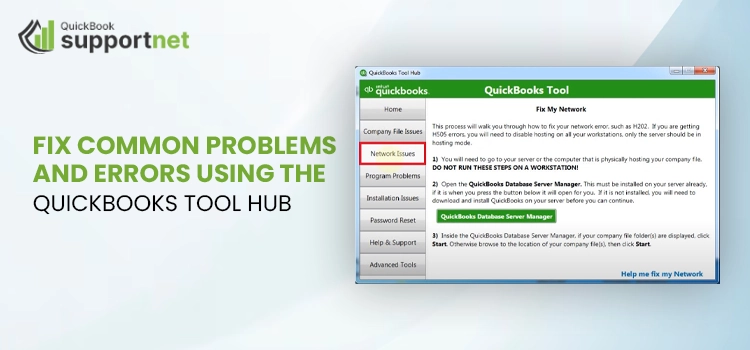
In QB Tool Hub, select Network Issues.
Choose QuickBooks Database Server Manager. You will be prompted to install it if you haven’t yet.
If your company file folder is displayed, select Start Scan in QBDSM. If they aren’t, click Browse to locate the company file and then click Start Scan..
The QuickBooks Database Server Manager will automatically repair the Firewall permissions.
When the scan is finished, select Close.
Note: Locate and open the folder you scanned after you’re finished. Ensure the company file folder has the .ND file. It looks like this: [your company file]qbw.nd.
6. Disable the Hosting on Workstations
Ensure the hosting is disabled on the workstations, as your server computer is the main one that hosts your company files. These computers are connected to the server and don’t host company files.
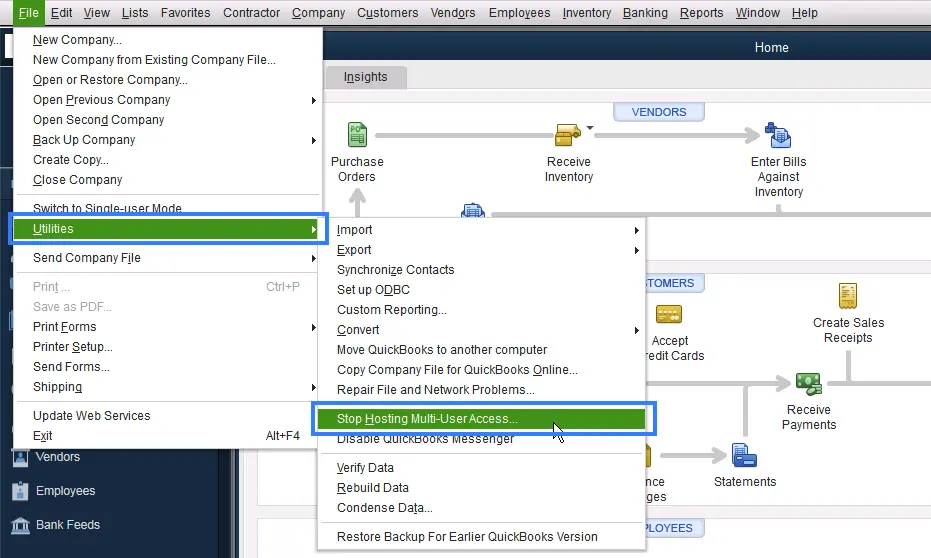
Launch QuickBooks Desktop on one of the workstations.
Instead opening your company file. Navigate to the File menu and choose Utilities.
If the option you see is the Host Multi-User Access option, don’t select it. Move to the next workstation as this isn’t causing the issue.
Select the option only if it says, Stop Hosting Multi-User Access.
Now, check on each workstation and then move to the server computer and try resetting the hosting settings.
Launch QB Desktop on the server computer.
Navigate to File, then Utilities.
If you see the Host Multi-User Access option, select it. Repeat the same process and select Stop Hosting Multi-User Access to reset the hosting settings.
Repeat the process on more time and select Host Multi-User Access to enable the hosting.
Case II: When downloading QB updates
Downloading the QuickBooks Desktop is necessary to get timely security patches and updated features and stay updated with the current features. However, you may encounter errors such as QuickBooks error 12000 and QuickBooks error 15000 when Windows Firewall is blocking QuickBooks.
This may also happen due to an outdated operating system. Perform the below steps to address the problem and get back to updating the program.
1. Update Windows
Bring your operating system to the latest version and then try downloading the QuickBooks update again.
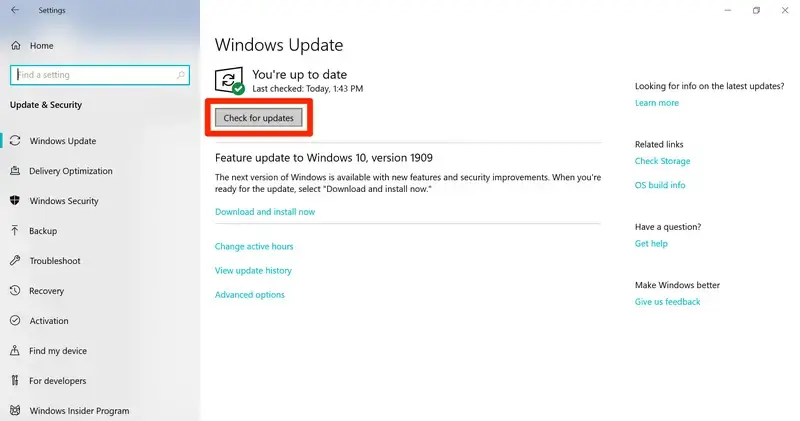
Press the Windows logo to launch the Windows Start menu.
Search for Settings and then hit the Enter key.
Select Update & Security.
Click on Windows Update, then select Check for Updates.
If the updates are available, select Download & Installthe updates.
Finally, reboot your computer to ensure the issues are fixed.
2. Configure the Windows Firewall settings
If Windows Firewall is Blocking QuickBooks during the update, you must configure the settings and allow the applications through the ports. This helps you run the QuickBooks processes such as downloading the newer version of QuickBooks seamlessly.
Proceed to Solution 3 in Case I to find the suitable steps to set up the Windows Firewall for QuickBooks.
Case III: When scheduling a company file backup with Intuit Data Protect
Sometimes, you might fail to schedule a company file backup using Intuit Data Protect due to the firewall and might also see an error message stating,
“Intuit Data Protect Backup Failed: Firewall or connection issue.”
Multiple reasons could be involved, such as incorrectly configured Windows firewall ports, highly stored caches, cookies, etc. We will discuss the steps below to fix the issue where your Windows firewall is blocking QuickBooks.
1. Ensure the Windows firewall isn’t blocking Intuit Data Protect
Intuit Data Protect requires to access the Windows Firewall to backup your company file. Check the firewall settings and ensure the important files are allowed through the ports.
a. Add important files to the Windows firewall
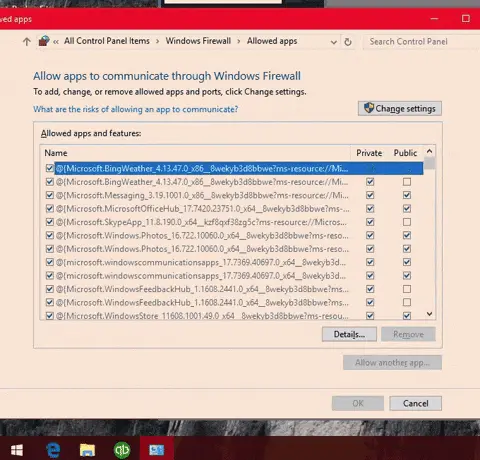
Press the Windows logo key on your keyboard.
Type Windows Firewall into the search field.
Click on Allow an app through Windows Firewall and then Allow another app.
Select Browse and navigate to Program Files(x86)\Common Files\Intuit\Data Protect.
Choose QBIDPservice.exe, then click Open.
Tap on Network types and mark the Private checkbox. Then, click Add.
Repeat the above 5 and 6 steps for the IBUenghost.exe and IntuitDataProtect.exe files. If a message prompts on your screen saying the files already exist, you’re all set.
Note:Except for the Windows Firewall, other third-party software on your computer can also block important files. Ensure these files are allowed through the antivirus ports. If you aren’t aware of how to do so, visit the official website of your antivirus product.
b. Add Intuit Data Protect to your Trusted Sites
Ensure the Intuit website are added as trusted sites in Internet Options.
Press the Windows logo on your keyboard.
Type Internet Options into the search and hit Enter.
Go to Security, then select Trusted sites.
Choose Sites, then add the following sites. You can copy and paste or type them manually. Click Add each time you add a website. – backup.com – *.intuit.net – *.intuit.com – *.intuitdataprotect.com – *.quickbooks.com – workplace.intuit.com – emerald.backup.com
Ensure the Require server verification (https: ) for all sites in this zone checkbox is selected.
Click Close, then select OK.
Make sure you can open the Intuit Data Protect certificate site. You need to be able to open it to avoid errors in your backup.
Try backing up with Intuit Data Protect. If it still doesn’t work, move on to the next solution.
3. Make Sure Intuit Data Protect is up to date
You won’t be able to back up the company file data using Intuit Data Protect if the version is outdated. Therefore, ensure to download the Intuit Data Protect update by following the below steps:
a. Download the Intuit Data Protect update
In QuickBooks, navigate to the Help menu.
Choose Update QuickBooks and then move to the Update Now tab.
Make sure you select Data Protect, then click Get Updates.
b. Install the downloaded update
On your desktop toolbar, select the up arrow ^. You will see it in the lower-right corner near the clock.
Right-click the Intuit Data Protect icon from the Windows toolbar and choose About Intuit Data Protect. This icon looks like a green padlock.
Click on Update.
Once all done, select OK.
Case IV: When using QuickBooks Payments
You must configure the security settings when the Windows Firewall is blocking QuickBooks for uninterrupted payment process. As all the web-based credit card or bank processes uses SSL to transmit data through firewall ports. Incorrectly configured Windows Firewall can blocks ports and hence interrupting the overall payment processes. You may also encounter the following error messages:
Page cannot be displayed
Server response reported an error
Error 404, Error 500, etc
Your request requires escalation
Time out messages
The page you are trying to view is taking too long to respond
Script errors
Blank page
To ensure these payment based service are working without any interruption, you must add these ports as an exception. Here’s how you can do it:
1. Configure the Windows Firewall settings
If the Windows Firewall is interrupting the QuickBooks Payments or other payment applications, you must configure it using the specific port number and create an exception to allow the data exchange on your computer.
For the instructions, we recommend you visit Solution 3 in Case 1, but use the port number given below to create an exception.
Open and allow these internet ports:
8443 (UDP and TCP)
443 (UDP and TCP)
Enable these applications for internet access:
QBW32.exe
QBPOS.exe
EFTSVR.exe
Enable these domains for QuickBooks payments access:
*.intuit.com
*.innovativemerchant.com
*.innovativegateway.com
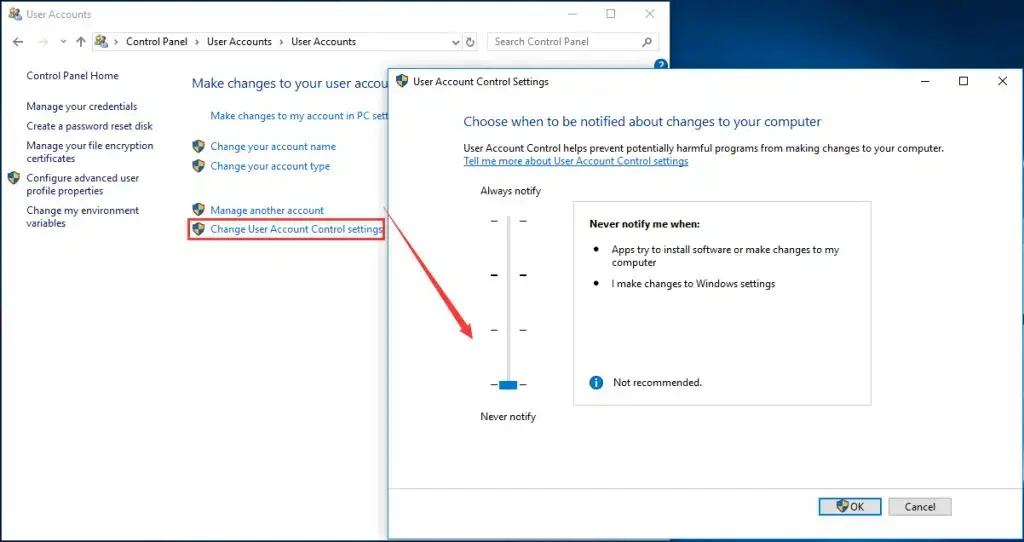
2. Change the User Account settings
The User Account Settings is a Windows security feature that protects your operating system from unauthorized changes. Make changes as an admin; the payment processes may fail if other users make the changes.
For any system changes that require administrator permission, UAC will notify the user whether they want to allow the change or not. So, consider changing the UAC settings by following these steps:
Launch the Run prompt by pressing the Windows+R icon key.
Search for Control Panel and then press the Enter key.
Choose User Accounts and then click on User Accounts (Classic View).
Hit on Change user account control settings.
Now, move the slider: – To disable UAC, set it to Never Notify and click OK. – To turn on UAC, set it to Always Notify and click OK.
Finally, reboot your computer.
Summary
As a security application, the Windows Firewall filters your computer’s incoming and outgoing data to protect the system from security threats, viruses, or unwanted entries. Windows Firewall is blocking QuickBooks as it might have considered the program a threat to your computer. The above solutions will help you configure the Windows Firewall settings and ensure you can run the QB services smoothly.
For further assistance, it is recommended that you connect with technical experts. Dial +1(866) 500-0076 will connect with QuickBooks ProAdvisors and let them handle the issue.
Direct Deposit features in QuickBooks Desktop allow you to transfer money directly to your employee’s bank account, ensuring timely payments. Before starting the feature, you need to set up employees and add the necessary information, such as bank account information. During the process, you may face Internet Connection Error Read Error? Due to Internet connection issues, we may fail to proceed.
This detailed guide covers the possible reasons behind the QuickBooks Internet Connection Error read error and the appropriate steps to address it. So, let’s start cautiously with the steps below and move forward.
Ensure that direct deposits to your employees or contractors are never delayed and that internet connection issues are resolved immediately. Dial +1(866) 500-0076 now to connect with a QuickBooks ProAdvisor!
What Causes Internet Connection Error When Running Payroll?
Let’s discover the possible reasons behind QuickBooks Internet Connection Error read error fails to connect with an internet connection when adding information to direct deposit or working in payroll and triggers:
Your system’s incorrect date and time
Incorrect date and time of your computer
Using the outdated version of QuickBooks or the payroll updates
Not having an active subscription to QuickBooks payroll services
Incorrectly configured Windows Firewall settings
Your QuickBooks Desktop might not have the security certificate for a secure internet connection.
Any damages or corruption to your QuickBooks program
The internet connection settings for QuickBooks might have been configured incorrectly
Excessively stored DNS in your browser
Top Ways to Address Internet Connection Error Read Error in QuickBooks
Connectivity issues when adding information to direct deposit can cause delays in scheduled pay to your employees and disrupt your financial and payroll management. To resolve internet connection error read error QuickBooks, consider following the step-by-step instructions in the section below.
1. Reboot your computer
To deal with hardware and software issues of your computer and QuickBooks Desktop program, rebooting is necessary. Regularly restarting your computer ensures better security and a smoother experience in fixing internet connectivity issues.
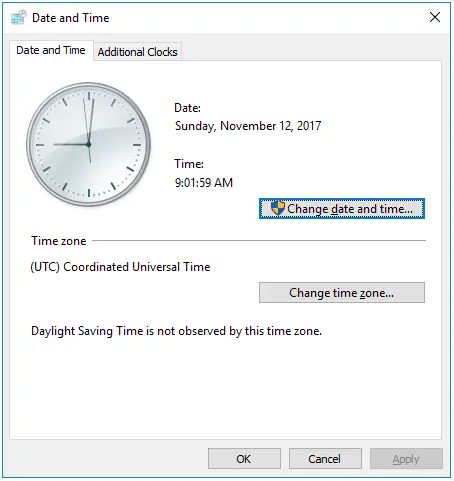
2. Correct date and time of your system
You may fail to add the info to direct deposit in QuickBooks payroll due to internet connectivity issues triggered by incorrect date and time settings on your computer. Perform the below steps to correct the date and time settings of your system:
Press the Windows logo icon to launch the Windows Start menu.
Type Settings in search, then select Settings from the options.
Go to Time & Language.
Select Date & Time from the left pane.
Now, choose the correct time zone and set it.
Once done, restart your computer to take effect the changes.
Updated payroll services ensure that you have updated tax rates. Therefore, it is important to update payroll services:
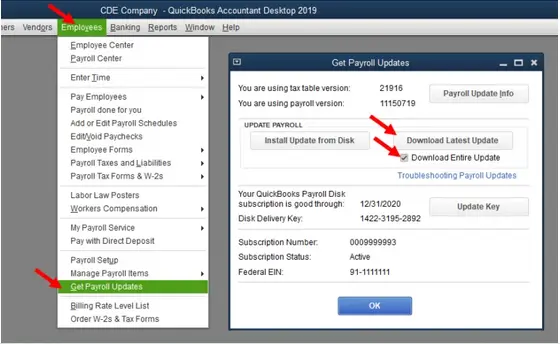
Launch QuickBooks and navigate to the Employees menu.
Hit on Get Payroll Updates, then click on Download Entire Update.
Select Update.
Restart your computer and relaunch QuickBooks.
Now, try again to add your employees direct deposit information.
4. Download the QuickBooks update
The most recent version of QuickBooks program ensures that you have the latest security features along with updated features. Thus, ensure to download the most recent version of QuickBooks Desktop to address the QuickBooks Internet Connection Error Read Error.
5. Ensure your payroll subscription is active
There are three ways to activate the payroll subscription again: get all QuickBooks updates, including payroll, through your company file or directly through your Intuit account. Let’s navigate to the below steps for the reactivation:
Through your company file
Launch QuickBooks Desktop and go to the Employees menu> My Payroll service.
Click on Account/Billing Info.
Sign in to your Intuit account. This will open the QuickBooks Account page.
Select Resubscribe under Status.
Adhere to the on-screen instructions to reactivate your payroll service.
Through your Intuit account
Sign in to your existing Intuit account.
Choose Resubscribe under Status.
Follow the on-screen steps to reactivate the payroll subscription.
Note: The process of fully reactivating your subscription could take up to 24 hours. After the reactivation is finished, your subscription will appear as Active.
6. Set up the Windows Firewall Settings for QuickBooks
Incorrectly configured Windows Firewall settings can block your QuickBooks program and all related services, such as payroll, and trigger the QuickBooks internet connection error read error on your screen.
Create a Firewall port exception for QuickBooks
If you use multiple versions of QuickBooks Desktop, add each version of the program as an exception to the Windows Firewall port by following the steps below:
Launch the Windows Start menu.
Type Windows Firewall in the search field and press Enter.
Go to Advanced settings and right-click on the Inbound Rules.
Choose New Rule.
Select Port, then click Next.
Select the rule type as TCP.
Now, enter the specific ports required for your version of QuickBooks. – QuickBooks Desktop 2020 and later: 8019, XXXXX. – QuickBooks Desktop 2019: 8019, XXXXX. – QuickBooks Desktop 2018: 8019, 56728, 55378-55382. – QuickBooks Desktop 2017: 8019, 56727, 55373-55377.
Important Note: QuickBooks 2019, 2002 and other future versions use dynamic ports, but the older versions have the port number fixed, which are assigned during installation for firewall ports.
Here’s how to get your dynamic port: – Launch the Windows Start menu. – Search for QuickBooks Database Server Manager, then press Enter to open it. – Move to the Port Monitor tab. – Find your QuickBooks version and note down the Port Number. This will be used to create a firewall exception.
Note: To change the assigned port number, select Renew. If you do so, select the Scan Folders tab and click Scan Now to reset the Windows firewall permissions. Remember that you can renew the dynamic ports for QuickBooks Desktop 2019 and later versions.
Enter the port number, then click Next.
Choose Allow the connection and hit Next.
Ensure all the profiles are select in the prompted window, click Next.
Create the rule and name it as ‘QBPorts(year).’
When done, click Finish.
Repeat the above steps to create Outbound Rules. When doing so, select Outbound in Step IV rather than Inbound Rules.
Create Windows Firewall exceptions for QuickBooks programs
QuickBooks uses executable files to run various programs on your computer. Create the exception for these files to ensure you can the program uninterruptedly.
Launch the Windows Start menu and search for Windows Firewall.
Select Windows Firewall from the search results.
Go to Advanced settings.
Right-click Inbound Rules and hit on New Rule.
Choose the rule type as Program, then click Next.
Select This Program Path and click Browse.
Find the executable files in the below table and click Next.
Click Allow the Connection, then select Next.
In the prompted window, ensure all the profiles are marked and hit Next.
Create this rule and name it as QBFirewallException(name.exe).\
Repeat the above steps to create Outbound Rules. When doing so, select Outbound in Step IV rather than Inbound Rules.
Note: If you look at Program Files (x86), it just shows the operating system you use, a 64-bit operating system.
7. Manually Add the QuickBooks Desktop Security Certificate
The QuickBooks Desktop Security Certificate is crucial as it contains information that protects and establishes a secure network connection. Following the below steps will help you add a Security Certificate in QuickBooks Desktop and ensure QuickBooks Internet Connection Error read error is fixed.
Step 1: Locate the File
Find your QuickBooks Desktop icon and right-click on it.
Choose Properties.
Move to the Shortcut tab and select Open File Location.
Click OK.
Note: You can also access the location manually by following the QuickBooks program file folder’s path as given below. Replace Xs with your version of QuickBooks Desktop.
Pro, Premier, or Premier Accountant: C:\Program Files (x86)\Intuit\QuickBooks 20XX
Enterprise or Enterprise Accountant: C:\Program Files (x86)\Intuit\QuickBooks Enterprise Solutions XX.0
Step 2: Install the Certificate
In the File Location window, look for the Application file (.exe file) and right-click on it.
Select Properties. This will open the Properties window.
Go to the Digital Signature tab and choose one of the entries in the Signature list field.
Choose View Certificate in the prompted window.
In the Certificate window, select the General tab and click on Install Certificate.
On the redirected Certificate Import Wizard welcome screen, ensure the Store Location is assigned on Current user, then click Next.
In the Certificate Store window, the Windows have already selected the certificate store based on the type of certificate.
Click Next, then Finish.
8. Review the Internet Connection Settings
Incorrect internet setting in QuickBooks Desktop often hampers your crucial operations such as running payroll and triggers the QuickBooks internet connection error read error.
Open QuickBooks and navigate to the File menu.
Select Internet connection Setup.
Choose the “Use my computer’s internet connection settings to establish a connection when this applications accesses the internet” option.
Click Done, then Next.
9. Flush the DNS
Any HTTP errors and malicious DNS spoofing can cause connectivity issues when running payroll or other operations on your computer. Let’s flush or clear the excessively stored DNS cache files to protect your privacy and the internet connection:
Press the Windows logo+R keys together to launch the Run prompt.
Type CMD in the Run field, then hit Enter.
Now, enter ipconfig/flushdns and choose Enter to clear the DNS files.
10. Install Your QuickBooks Desktop Again
Before getting started
Get the installer of the same version as your QuickBooks.
Keep the license number noted which you will find in the original package or check confirmation email if you bought it online.
Go to Programs and Features, then select Uninstall a Program.
Choose the version of QuickBooks Desktop you want to uninstall.
Click on Uninstall/Change, Remove and then Next. (If you can’t see the option, you must sign out and then sign in to Windows as an admin.)
b. Install QuickBooks Desktop Again
Make sure your computer is connected a strong internet connection.
Locate the QuickBooks program file QuickBooks.exe and double-click on it.
Choose – Express Install: To save all the previous preference and install over the previous version. – Custom and Network Install: This enables you to maintain older versions installed while installing the current version in a different location. The new version does not include your choices from the previous version.
Click Next, then select Install.
Once all done, open QuickBooks.
Summary
This is the end of this article, covering the possible causes and troubleshooting steps for the QuickBooks internet connection error read error. Hopefully, you have fixed the program’s internet connectivity issue and can add the required information to the direct deposit, along with smoothly running other payroll services.
If the error persists or you need expert help, contact our QuickBooks support team and discuss your issues. Dial +1(866) 500-0076 and speak to a consultant now!
QuickBooks, a premier accounting software widely used by small and medium-sized businesses, occasionally faces technical issues. One such problem is the QuickBooks POS Error 140014. This error can disrupt the normal functioning of the software, impacting business operations. In this blog, we’ll dive into what causes this error, how it hampers the user’s productivity, and the steps you can take to resolve it.
Do not overlook the continuous occurrence of QuickBooks issues like error code 140014! It’s better to discuss the issue with our support team by calling at +1-833-460-8006.
How to Define QuickBooks POS Error 140014?
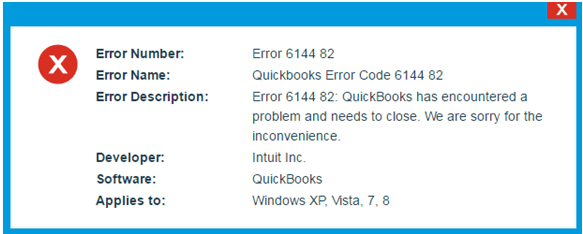
QuickBooks Error 140014 typically occurs during bank transactions or while attempting to access company files. This error can be caused by several factors, including issues with the company file, problems with the connection to the bank, or even outdated software. Users, while facing this issue, get an error message reading, “Error 140014: QuickBooks has encountered a problem and needs to close. We are sorry for the inconvenience.”
This specific message displayed by QuickBooks can vary depending on the exact circumstances and version of the software. Also, it indicates that there is a problem that prevents the software from performing its expected tasks, possibly related to company file issues or connectivity problems with bank feeds.
What Signs Does a User Notice with Error 140014 in QuickBooks?
Recognizing the symptoms of error 140014 in QuickBooks early can help prevent further complications. Here are some of the common signs to watch out for:
Difficulty in connecting to the bank feeds.
QuickBooks performs slowly when accessing certain features.
Error messages stating “Error 140014” appear on the screen.
Sudden crashes when attempting to use specific functionalities.
Why Do Users Encounter QuickBooks Error Message 140014?
QuickBooks Error message 140014 can arrive due to several different issues within the software environment or its interaction with external systems. Below given are some possible causes of this QuickBooks error:
Corrupted Company File: If the company file within QuickBooks is damaged or corrupted, it can prevent the software from accessing the necessary data, leading to errors.
Network Issues: Problems with your network connection, such as interruptions or instability, can disrupt QuickBooks’ ability to communicate with external data sources like bank feeds.
Outdated QuickBooks Software: Using an outdated version of QuickBooks can lead to compatibility issues with other systems, such as online banking interfaces, which can bring a QuickBooks error message 140014.
Bank Feed Settings: Incorrect configuration of the bank feeds or issues with the bank’s servers can also cause this error. Changes in bank policies or technical updates might require updates or reconfiguration on QuickBooks.
Interference from Third-Party Applications: Sometimes, third-party software, especially security programs like firewalls or antivirus, can interfere with QuickBooks operations, blocking it from performing its tasks efficiently.
Multi-user Configuration Errors: If QuickBooks is set up in a multi-user environment, improper configuration or network issues affecting this setup can lead to error 140014 in QuickBooks.
How Does QuickBooks 140014 Error Hamper User’s Productivity?
QuickBooks 140014 Error can significantly impact a user’s productivity in several ways, especially considering the critical role QuickBooks plays in managing financial and accounting tasks for businesses.
Since this error often affects bank transactions or bank feeds, it can prevent users from downloading or synchronizing their financial transactions.
This disruption means users cannot update their accounts, reconcile bank statements, or process payments efficiently.
If the error involves corruption or accessibility issues with the company file, it can halt all operations that depend on this data.
Also, the QuickBooks 140014 error can delay invoicing, payroll processing, and financial reporting, which are crucial for day-to-day operations.
This error may cause QuickBooks to run slowly or crash unexpectedly. Frequent crashes or slowdowns can severely hinder productivity, as users spend more time restarting the software and less time completing tasks.
QuickBooks is often used to generate reports and insights that inform business decisions. If users cannot access accurate and up-to-date financial data due to this error, decision-making processes can be delayed or impaired.
5 Troubleshooting Methods to Fix Error 140014 QuickBooks
If you’re encountering error 140014 QuickBooks, there are several troubleshooting methods you can employ to resolve the issue. These steps aim to address common causes such as corrupted files, connectivity issues, and software malfunctions. Here are five methods to try:
Fixing Method 1 – Use Verify Data and Rebuild Tool
Using the “Verify Data” and “Rebuild Data” tools in QuickBooks can be an effective way to troubleshoot and resolve issues like error 140014. Here’s how to use these tools step-by-step:
Go to the File menu, choose Backup Company, and select Create Local Backup.
Now, follow the prompts to save a backup of your company file. After this, you need to open QuickBooks and go to the File menu.
Right after this, continue to select Utilities and click the Verify Data option.
Allow the tool to run. If it finds issues with your data, it will prompt you to use the Rebuild Data tool.
Continue and move to the Utilities menu under the File tab. Here, choose the Rebuild Data option.
Once the Rebuild is complete, you will see a message confirming the Rebuild has finished.
Now, run the Verify Data tool by repeating the steps to access the Verify Data tool.
Finally, once you complete the running of the Verify Data Tool, close all the tabs and restart your computer. If you still notice the QuickBooks error code 140014, move to the next method.
If you suspect network connectivity issues might be causing error 140014 in your QuickBooks program, you can follow these steps to check and fix connectivity problems:
Initially, verify that all cables, including Ethernet cables and power cords to your modem and router, are secure.
Make sure the Wi-Fi is turned on, and you are connected to the correct network. If using Wi-Fi, try moving closer to the router to improve signal strength.
If you use a wired connection, ensure the Ethernet cable is properly connected to both your computer and router.
Now, on your Windows PC, right-click the network icon in the system tray, select “Troubleshoot problems,” and follow the prompts.
In the next step, power off your modem and router, wait for about a minute and then power them back on.
Also, ensure that your firewall or antivirus settings are not blocking QuickBooks. You may need to configure exceptions for QuickBooks and its service ports in your firewall settings.
Finally, open Command Prompt and type ping google.com to test if your PC can reach the internet.
Fixing Method 3 – Run File Doctor Tool and Fix Error 140014
Using the QuickBooks File Doctor tool is a great approach to resolving common issues like Error 140014, particularly if the error is related to company files or network settings issues. Here’s how to run the File Doctor tool from the QuickBooks Tool Hub:
Begin this process, but first, make sure QuickBooks is closed before you begin.
Go to the Intuit QuickBooks website, download the latest version of the QuickBooks Tool Hub, and complete its installation.
Once installed, open the Tool Hub from the icon on your desktop or the start menu.
Within the QuickBooks Tool Hub, click on the ‘Company File Issues’ tab and hit the green button next to ‘Run QuickBooks File Doctor.’
In the File Doctor tool, you need to select your company file from the drop-down menu. If you can’t see your file, click the ‘Browse and search’ button to find your file manually.
Since Error 140014 is often related to company files, select ‘Check your file’ and then Continue.
Finally, enter your QuickBooks admin password when prompted and then click ‘Next.’ Now, check for the error, and if you still find the same error message 140014, let the next method fix it.
Fixing Method 4 – Reconfigure Bank Feeds
Reconfiguring bank feeds in QuickBooks can help resolve issues like QuickBooks banking error 140014, especially if the error is related to problems with online banking connections. Here are detailed steps to follow for reconfiguring your bank feeds:
First, you need to deactivate the bank feeds for the account that is causing the error. For this, go to the Lists menu, select “Chart of Accounts,” and right-click the account from which you want to remove the bank feeds, and select “Edit Account.”
In the edit window, go to the “Bank Settings” tab and find the option to “Deactivate All Online Services.” Click the same, and hit the “Save & Close. Option”
Now, reconfigure the bank feeds by going to the Banking menu and choosing the “Bank Feeds” option.
Now, click the “Set Up Bank Feeds for an Account” option, manually find your bank account, and enter your banking login credentials.
Finally, once the setup is complete, you can begin downloading the latest transactions by going back to the “Bank Feeds” and selecting “Download Transactions.”
Fixing Method 5 – Get the Updated Version of QuickBooks
Ensure that your current QuickBooks program is up to date with the latest version and patches. Only the outdated software versions are responsible for inviting multiple technical issues and errors. It can be one of the reasons too for encountering QuickBooks banking error 140014.
To update QuickBooks, go to the Help menu and select Update QuickBooks Desktop. Follow the on-screen instructions to check for and install any available updates to ensure your software is current and runs optimally.
For Further Details, Call Us..!
QuickBooks POS error 140014 is frustrating. But, it can often be resolved with some basic troubleshooting steps as given above. Keeping your software updated, ensuring your company files are healthy, and maintaining a reliable network connection can help minimize the occurrence of this error. After implementing these steps, if the problem persists, do not hesitate to contact our QuickBooks technicians via Live Chat Support.
Dealing with QuickBooks errors can be frustrating, especially when they disrupt your payroll processing. QuickBooks Payroll Error 15301 is one such issue that users may encounter, often at the most inconvenient times. This error typically appears during payroll updates or when trying to download a payroll update, indicating problems with the update setup. Here’s a comprehensive guide on how to troubleshoot and resolve error 15301, ensuring minimal disruption to your payroll tasks.
If you’re continuously encountering error 15301-related issues, don’t hesitate to reach out for more personalized assistance. Our dedicated support team is ready to help you resolve this QuickBooks error efficiently. Contact us at 1-855-603-0490.
What’s the QuickBooks Payroll Error 15301 All About?
QuickBooks Payroll Error 15301 is part of a series of errors that involve issues with the digital signature certificate used in QuickBooks. This error can prevent the software from updating, which is crucial for processing payroll accurately.
It might occur due to misconfigured internet settings, outdated software, or interference from other applications. Users generally get a message reading, “Error 15301: QuickBooks has encountered a problem and needs to close. We are sorry for the inconvenience.”
What Symptoms of QuickBooks Error 15301 a User Finds?
Users when encounter QuickBooks error 15301, they might notice the following signs:
Program Crashes: QuickBooks might crash when you attempt to update it or during normal operations, prompting the error message.
Sluggish Performance: Your computer or the QuickBooks application may respond slowly to mouse or keyboard input.
Frequent Freezing: The computer or QuickBooks might freeze for a few seconds at a time, which can be particularly disruptive if it occurs frequently.
Failure to Update: The main functionality that QuickBooks error 15301 affects is the inability to download or apply updates to QuickBooks payroll, which is crucial for processing payroll correctly and accessing the latest features and security enhancements.
How QuickBooks Error Code 15301 Arrives? The Causes!
The error 15301 in QuickBooks can be triggered by several factors, each related to system configurations, software integrity, or network settings. Understanding these causes can help in effectively troubleshooting and resolving the error. Here are some common causes of QuickBooks Error Code 15301:
1. Digital Signature Certificate Missing or Damaged
QuickBooks uses digital signatures to verify the integrity and security of the downloaded files. If there’s an issue with the digital signature certificate, such as it being outdated or corrupted, QuickBooks might not be able to verify and process updates.
2. Corrupted QuickBooks Installation
If the QuickBooks installation files are incomplete or get corrupted, it might lead to various errors, including QuickBooks payroll error 15301.
3. Interference from Antivirus or Firewall
Sometimes, antivirus programs or firewall settings might block QuickBooks from accessing the internet or specific QuickBooks components from running properly, thinking it’s a security threat.
4. Outdated QuickBooks Software
Not regularly updating QuickBooks can lead to compatibility issues and bugs that further leads to errors like QuickBooks update error 15301 when attempting to use new payroll features or updates.
5. Conflict with Other Applications
Sometimes, other applications running in the background can conflict with QuickBooks operations, especially if they use the same resources or interfere with its processes. Eventually, users might encounter QuickBooks payroll error 15301 while updating payroll.
Stepwise Troubleshooting Ways to Fix Error 15301 in QuickBooks
In this section, we will quickly follow the troubleshooting methods to fix this problematic QuickBooks payroll error code 15301. Carefully follow the instructions below:
Step 1: Install a Digital Signature Certificate
Installing a digital signature certificate in QuickBooks to resolve issues like the payroll error 15301 in QuickBooks involves a few detailed steps. Here’s how you can do it:
Before you begin, make sure that QuickBooks is completely closed to ensure the update can be properly applied.
Navigate to the folder where QuickBooks is installed on your computer. Commonly, this is located in the C:\Program Files (x86)\Intuit\QuickBooks folder.
You can also search for QBW32.exe from the Windows start menu or using the search bar.
In the next step, you need to right-click the QBW32.exe file and select ‘Properties‘.
Continue to this step and navigate to the ‘Digital Signatures’ tab. This tab lists all the digital signatures associated with the file.
In the ‘Digital Signatures‘ tab, you need to make sure that ‘Intuit, Inc.’ is listed as a signer.
Now, select ‘Intuit, Inc.’ from the list, and then click on the ‘Details‘ button.
Here, in the Digital Signature Details window, hit the ‘View Certificate‘ option. This opens the certificate that QuickBooks uses.
In this Certificate window, you must click the ‘Install Certificate…’ button.
By this, the Certificate Import Wizard will appear on your screen.
After this, make sure to choose the ‘Automatically select the certificate store based on the type of certificate’ option and click ‘Next’.
Finally, click ‘Finish‘ and after installing the certificate, restart your computer to ensure that all changes are successful.
Step 2: Update your QuickBooks Version to the Latest Release
Updating QuickBooks can minimize multiple software issues including the occurrence of QuickBooks payroll update error 15301. The steps below will help you update your current QuickBooks version.
Initiate this update process by creating a backup of your QuickBooks data.
Also, make sure your computer meets the system requirements for the latest version of QuickBooks. You can find this information on the Intuit QuickBooks website.
After this, you must open your QuickBooks Desktop application.
Once QuickBooks is open, now, move to the ‘Help‘ menu at the top of the screen.
In the next step, you need to hit the ‘Update QuickBooks Desktop‘ from the drop-down menu. By this, you will see the update window.
In this update window, you must navigate to the ‘Options‘ tab. Here, you can configure how QuickBooks receives updates.
Following this, turn on the option to ‘Enable Automatic Updates‘. It ensures QuickBooks automatically downloads and installs future updates without needing your intervention.
Finally, click the ‘Get Updates‘ button to start downloading the latest updates. It will take a while to download the update, which depends on your internet speed and the size of the downloaded update file.
Step 3: Run Reboot.bat to Fix Payroll Update Error 15301 in QuickBooks
By running the Reboot.bat patch file, users can fix the problematic payroll update errors like 15301. Here’s how you can run this file and fix the issue.
Firstly, close QuickBooks and its related tabs. Now, you need to know where the Reboot.bat file is stored on your computer.
Once you locate the file, now right-click the Reboot.bat file and select “Run as administrator” from the context menu.
Now, click “Yes” to allow the script to run with administrative privileges on the User Account Control settings window.
Once the script is running, watch for any on-screen instructions or prompts. Some scripts are designed to run automatically, while others might require user input.
If the script itself doesn’t reboot your system, you may need to manually restart your computer to ensure all changes take effect.
After rebooting, verify whether the QuickBooks error code 15301 is resolved. If the problem persists, try the next strategy.
Step 4: Run the QuickBooks File Doctor Tool
QuickBooks File Doctor Tool is one of the impressive utilities of the QuickBooks Tool Hub, which helps in fixing general network settings issues. Let’s try fixing the error 15301 by follow the below given steps:
Firstly, download and install the latest QuickBooks Tool Hub version from the official QuickBooks or Intuit website.
Once downloaded, open the executable file (QuickBooksToolHub.exe) to install it.
Now, open the QuickBooks Tool Hub by double-clicking its icon on your desktop or searching for it in your Start menu.
In the QuickBooks Tool Hub, select the ‘Company File Issues’ tab, and inside this ‘Company File Issues’ tab, you must click the ‘Run QuickBooks File Doctor’ button.
Now, you must select your QuickBooks company data file from the drop-down menu. If you don’t see your file, click the ‘Browse and search’ to find your file manually.
Right after this, select the file and click ‘Check your file’ and then ‘Continue’.
Here, enter your QuickBooks admin password when prompted and then click ‘Next’.
Lastly, once the tool completes the process, close all the tabs, and restart your computer.
Step 5: Configure Firewall and Internet Security Settings
Configuring your firewall and Internet security settings is crucial for ensuring that QuickBooks operates smoothly while facing update-related errors. Here’s how you can configure your firewall and Internet security settings for QuickBooks:
Firstly, verify that your firewall and internet security settings are configured to allow QuickBooks updates.
If not, add exceptions for QuickBooks and its related processes in your firewall settings.
Now, open your firewall’s configuration settings and search for the section where you can define program permissions.
Continue adding the executable files to the Firewall’s exceptions list, and allow both incoming and outgoing Internet access for these executables.
After this, configure specific Firewall ports. Finally, add new inbound and outbound rules to allow these specific ports.
Contact Us and Ask for Professional Help!
Following these steps should help you resolve QuickBooks Payroll Error 15301 and restore normal function to your payroll operations. Also, regularly updating your QuickBooks installation and running periodic diagnostics can prevent many common issues and ensure your payroll system runs smoothly. If the error persists, consider contacting our QuickBooks technical support via Live Chat.
Ans. You have two options to directly contact our QuickBooks support team. Call us or reach out to us via Live Chat Support for direct help from the experts.
Ans. QuickBooks Error 15301 is an update error that occurs when downloading payroll updates or updating QuickBooks software, typically caused by internet connection issues or incorrect security settings.
Ans. Check your digital signature certificate: Right-click on the QuickBooks program executable, go to Properties > Digital Signatures, and ensure it’s valid, or reinstall it if necessary.
Ans. Configure your firewall to allow specific QuickBooks ports (based on your version) and executables like QBDBMgrN.exe and QBW32.exe to communicate through the firewall.
QuickBooks error 6144 82 is a commonly occurring issue in the program, which prevents an action related to the QuickBooks company file. You might be aware that the issues that belong to the error code series 6000 can affect the company file in one way or another. Similarly, this error code prevents the access to the company file and thus, affects the workflow, wherein, the company file data is needed.
If you have encountered this company file access error and wish to get rid of it, you will certainly find this post helpful. It covers the possible causes and symptoms and the best troubleshooting solutions that can eliminate the QuickBooks Desktop error 6144 82.
QuickBooks error 6144 82 blocks access to the company file. When the error occurs, you will get an error message notification on your screen which says –
“Error 6144 82: QuickBooks has encountered a problem and needs to close. We are sorry for the inconvenience.”
A faulty network setup is the main reason behind the arrival of this error. However, some other possible factors, such as a damaged QuickBooks company file or improper installation of the program, can also promote this error, causing difficulty in accessing the data file. As you troubleshoot these factors that can potentially give rise to the error, you can easily put the error code 6144 82 in QuickBooks to an end.
Potential Reasons That Can Evoke QuickBooks Update Error 6144 82
There are different possible reasons that can potentially block your access to the company file, thereby giving rise to the QuickBooks error 6144 82. The list covers the most common possible reasons:
A weak or unstable network of the server or system used to run QuickBooks.
Maliciously infected Windows system files or program-related files due to virus or malware infection.
Accidental or unintentional deletion of a QuickBooks-related file.
A recent change was made in QuickBooks, which conflicts with the Windows registry.
Partially downloaded or damaged installation of the QuickBooks accounting software.
Improperly configured network settings can also cause this error.
When the name of the company file exceeds the maximum limit (65 characters).
If the company file is moved from its original location, the error can take place.
What Are The Signs That Indicate Error 6144 82 in QuickBooks?
As soon as error 6144 82 occurs in QuickBooks, an error message flashes on your screen, as we discussed earlier. It is also the most apparent sign of the error. Besides this, there are some other signs as well that indicate the arrival of the error, which are:
The system or a current program crashes when running the QuickBooks application.
Windows becomes sluggish or unresponsive to the mouse or keyboard commands.
The system can hang or freeze while running the same program.
The access to the company file gets blocked, which causes inconvenience to the users.
Important Considerations Before Getting Started With The Troubleshooting
Before getting into the strenuous troubleshooting procedures, it is crucial to ensure that you are accessing the company files the right way and have adequate privileges. Also, there are some important considerations you should keep in mind before you indulge yourself in error resolution.
1: Check User Rights And Access Permissions
In the first place, make sure that you have the required access permissions and credentials to open the company file. Also, check and confirm that the file permissions are correct. Improperly configured file permissions or insufficient user access rights can both promote QuickBooks error 6144 82.
2: Establish A Stable Network Connection
Weak or unstable network connectivity on the server or system sometimes causes hurdles in opening the company file. Here, you should check and verify that the network is stable and has good strength. Also, you should check your network devices to confirm that they are working well.
3: Make Sure That You Are Using Latest Version of QuickBooks
An outdated version of the QuickBooks software can also make it prone to multi-faceted errors and compatibility issues. Therefore, it is recommended that users install the latest updates (security patches) for QuickBooks to keep it error-free.
4: Create A Backup of Your Data File
If nothing works for you and troubleshooting becomes the last option, it is wise to create a backup of your financial data before resolving the QuickBooks error message 6144 82. It will save your crucial data against loss or disruption if something goes wrong during the troubleshooting process.
How To Fix QuickBooks Company File Error 6144 82?
After exploring some important aspects of the QuickBooks error 6144 82, we can now move ahead with the core troubleshooting methods. Implement the procedures with the utmost care to attain the best results.
1st Method: Repair Damaged File Using QuickBooks File Doctor
QuickBooks File Doctor is designed to diagnose and repair the damages in QuickBooks company file. Since it the major cause for the QuickBooks error code 6144 82, this Intuit utility can be helpful. You need to install QuickBooks Tool Hub in the first place to run the QBFD tool.
1.1: Install QuickBooks Tool Hub
From Intuit’s official website, download the latest version of QuickBooks Tool Hub.
Next, install the tool hub as per the on-screen prompts.
After the installation is successful, agree to the terms and conditions, and the Intuit Tool Hub will be ready to use.
1.2: Repair QuickBooks Data File
When in QuickBooks Tool Hub, navigate through the list of QuickBooks problems.
Next, locate and click on Company File Issues.
It will help you run the QuickBooks File Doctor tool.
QBFD tool will scan the file for potential damages and repair it automatically.
Based on the size of the data file to be repaired and the strength of your network connection, the time taken in the entire process may vary.
Once the process ends, try accessing your company file and verify the status of the QuickBooks error code 6144 82.
2nd Method: Modify The File and Folder Permissions
In the previous sections, we have seen that incorrect file or folder permissions can also prevent users from accessing the data file. Therefore, you can modify it with these steps:
Right-click on the file or folder for which you want to modify the permissions.
Next, select Properties from the drop-down menu.
In the Security tab, you can modify the required permissions, which are located underneath the tab.
After modifying the file permissions, check to see if you can access them. However, if the QuickBooks banking error 6144 82 persists and you are still unable to access the file, move to the next solution.
QuickBooks Install Diagnostic Tool is designed to diagnose the QuickBooks installation and then repair damage or corruption automatically. You can run it from within the QuickBooks Tool Hub.
Open the QuickBooks Tool Hub in the first place.
When in Tool Hub, select Installation Issues.
After that, you will be able to choose the QuickBooks Install Diagnostic Tool.
Run it, and it will take up to 20 minutes to diagnose and repair the program installation issues.
By making an attempt to open the company file, you can get to know if the QuickBooks error 6144 82 is resolved or not.
4th Solution: Try Opening The File From A New Location (Desktop)
It is not always the company file responsible for the error. Sometimes, the folder containing the QuickBooks company file can also be damaged. To rule out this possibility, move your file to Desktop and check if you can access it from the new location.
Open the folder that contains the QuickBooks company file.
Now, locate the primary data file with .QBW extension.
When locating, right-click on it, select Copy and Paste it on your Desktop.
Next, press and hold the CTRL key and click on the QuickBooks icon.
It will help you to access the No Company Open window in QuickBooks.
Now, select Open or restore an existing company, and then try opening the company file from your Desktop.
If you are able to open the QuickBooks company file, it means the folder containing the company file is damaged, and it needs to be repaired.
5th Solution: Rename .ND and .TLG Files And Run QuickBooks Database Server Manager
The files with .ND (Network Data File) and .TLG (Transaction Log File) enable QuickBooks to open the company file over a network or in multi-user mode. Renaming these files repairs the damage in the file. After renaming, you can run the QuickBooks Database Server Manager to scan and resolve the network issues.
5.1: Renaming .ND and .TLG Files
Go to the folder containing the QuickBooks company file.
Now, navigate through the folder to locate the file with .ND extension.
On finding, right-click on it and select Rename from the drop-down list.
Add .OLD at the end of the file name, and it will become .ND.OLD.
Now, repeat the same process for .TLG file, which is also located in the same folder.
5.2: Run QuickBooks Database Server Manager
Open QuickBooks Tool Hub and select Network Issues from the list.
Also, make sure to install QuickBooks on the server if you haven’t already installed it.
Now, select QuickBooks Database Server Manager and click Start Scan for the problematic company file.
If you don’t see the file, use the Browse option to locate it and then select the Start Scan option.
After the completion of the scanning process, reopen QuickBooks and try logging into your company file.
Wrapping Up!
Now that you are here, we suppose you have thoroughly read this post explaining the solutions for troubleshooting QuickBooks error 6144 82. Accurately implementing the solutions can help you bring this error to an end. However, if you want to save yourself from the complexities of troubleshooting and the time killed in it, you can contact direct help from the QuickBooks Help Desk.
Ans. You can prevent error 6144 82 in QuickBooks by regularly maintaining the program and system resources. Keep your program and system drivers updated at regular intervals. Besides, run regular scans for potential virus or malware infections and operate the QuickBooks application with the best practices.
Ans. When the original company file data gets damaged, you can recover the most recent backup of your financial data with the help of the ADR tool. This tool uses the current transaction log file and a copy of the QuickBooks company file to recover your lost data.
Ans. Running QuickBooks in Windows Safe Mode can prevent it from undesired interruptions that can prevent access to the company file. If you are experiencing QuickBooks error 6144 82, it can help you.
QuickBooks Desktop Point of Sale is discontinued and is no more available for the users. After the discontinuation of the QuickBooks Desktop Point of Sale from October 3, 2023, users can’t buy QuickBooks POS solution from Intuit. Those who decided to continue using this Intuit POS solution are also compromising with the security patches and customer support.
The current users are taking complete responsibility for troubleshooting the technical issues in the POS program. How this discontinuation has affected the users, and what are the important considerations related to this discontinuation are all discussed in this post. Let’s explore!
QuickBooks Desktop Point Of Sale Discontinued – What You Need To Know?
QuickBooks Desktop POS discontinued on October 3, 2023. It is not like the general QuickBooks Desktop product discontinuation, but a complete shut down for the Intuit POS solution. QuickBooks generally discontinues providing support for Desktop versions after three years.
For instance, if you have purchased QuickBooks Desktop 2022, it will be discontinued in 2024. However, this is not the case with QuickBooks Desktop Plus, which is a subscription-based service and you need to pay annual subscription fee, which also includes the cost of product upgrade.
Coming back to QuickBooks Point of Sale, the Intuit has ended the sales of this product, which means that no new users can purchase it. Besides, those who continued with the product won’t get any security updates or improved features in the product. Besides, customer support is also discontinued along with the product.
How Did QuickBooks Desktop POS Discontinuation Impact Users?
Intuit discontinued QuickBooks POS, which means it will not sell the product to new users after the discontinuation. Nor will it release new product updates or maintenance patches or improve existing features of the products for the users. The common implications of this change are:
No Security Updates
QuickBooks releases a new update on a regular interval which eliminates the known issues in the program and add improvements to the existing features. Updating the program periodically means you are using the most error-free version of the program and features to their maximum efficiency. However, when the new updates (security patches) are not released, program becomes prone to multi-faceted threats.
No Feature Enhancements
As discussed, new updates come with enhancements to the existing features. Thus, they boost the efficiency of the program and let users harvest the program to its utmost potential. However, when no improvements are added, it becomes difficult for the users to address their emerging needs properly.
No Customer Service Support
Customer support is one of the most crucial aspects of user-experience. It enables them to speak to an expert on having product related query or experiencing a technical issue in the program. Trained technicians or experts on the other hand, ensure quick relief and answer all the queries to the utmost level of user’s satisfaction. However, discontinued customer support makes the users become self-reliant for the error resolution.
Services Stopped With QuickBooks Desktop POS Discontinuation
QuickBooks Desktop Point of Sale discontinuation not only caused some major inconveniences to the users but also put different services to an end. Check the list for the same:
Intuit Store Exchange
After the end of the QuickBooks Desktop Point Of Sale, the users won’t be able to use the Intuit Store Exchange feature. Besides this, you can use other Store Exchange methods to exchange data between the stores.
QuickBooks Gift Card Service
QuickBooks Desktop Point Of Sales users now won’t be able to access the Gift Card Service after the end of this application. However, if you access any Gift card after the discontinuation policy, it will be redeemed manually. Thus, you can use the Reports Feature to know more details about the balance on the gift cards.
E-commerce Integration with Webgility
Moreover, the users won’t be able to send the income and transaction-related data from each order to automate the accounting and inventory via Webgility. Also, as a user, you can’t access the e-commerce integration feature with Webgility after the QuickBooks Desktop POS discontinuation.
Live Support Facility
The users won’t get any live support facility for the QuickBooks Desktop Point Of Sale after October 3, 2023. All the support channels of QuickBooks customer service, such as call, email, or live chat, will no longer be accessible to you.
No Security Patches Available
Moreover, the Desktop Point of Users will stop releasing the latest updates and upgrades regarding the application. Thus, it will expose the program to various cyber-security threats for retail companies and put data at risk of hacking or misuse.
Mobile Sync
The users won’t be able to sync the QuickBooks Desktop Point of Sale with the mobile application. It will certainly alleviate the flexibility of the users to run the tool on their preferred devices, and therefore, they will have to stick to the limited devices.
Important Considerations For Current QuickBooks Desktop POS Users
Despite various shortcomings, many users feel that the discontinued QuickBooks Desktop POS is sufficient to meet their needs. Therefore, they have continued using the tool to accept payments and track their sales. However, when it comes to error resolution, they need to deal with the issues on their own. It can be annoying sometimes.
Sooner or later, the discontinued version will break down. Also, due to the lack of improvements in the program, it will become difficult to meet the emerging needs of the users. Moreover, the evolving security threats due to non-availability of the updates can disrupt the program with time.
When it happens, repairing or restoring the damaged data can be a costly affair. Besides, migrating the existing data to a new program can also have its own set of challenges. In such a case, users need to consider switching to a more advanced POS solution.
Shopify POS For QuickBooks Users
Shopify and Intuit have developed a smooth data migration process. It allows users to migrate their data to Shopify and adopt it as their new Point of Sale solution. It has all the features of QuickBooks Desktop POS. In addition, it has some additional features that were highly asked by the QuickBooks Desktop merchants. You can seamlessly integrate Shopify with QuickBooks software and sync your accounting information automatically. This is the reason why Intuit prefers Shopify as a POS solution for QuickBooks.
By giving a full read to this post, you can learn everything about the QuickBooks Desktop Point of Sale Discontinuation Policy. Besides, this post also covers how this discontinuation affected users and what users should do about it. For further assistance on this topic or migrating QuickBooks POS data, you may speak to someone from the QuickBooks Help Desk.
Intuit has officially announced the discontinuation of QuickBooks Desktop 2021. All versions of QuickBooks 2021, including Pro, Premier, Enterprise V21, and QuickBooks Desktop 2021 for Mac will be discontinued after May 31, 2024. However, there is no surprise about it, as Intuit retires an older version of the product every year.
If you are using also using QuickBooks 2021, then you will find this post on QuickBooks Desktop 2021 service discontinuation policy useful. It elaborates on how will this discontinuation affect the usage of the program, including add on and support options. Let’s begin!
Let’s Understand QuickBooks 2021 Discontinuation
QuickBooks Desktop 2021 will be discontinued after May 31, 2024. Does it mean that you won’t be able to use the 2021 version of the QuickBooks accounting software? Well! The answer is no. You will still be able to utilize it to manage your day-to-day business accounting. Then what change will this discontinuation bring?
Once, the QuickBooks Desktop 2021 discontinued, you won’t be able to use add-on services. Also, the support services from the QuickBooks Help Desk will also be discontinued for the same version. Furthermore, the support services for the Intuit products with the program will also become unavailable. These services are Payroll, Online Bank Feeds, QuickBooks Desktop Payments, and several others. Also, you won’t be able to download the latest maintenance releases.
All in all, you can use QuickBooks Desktop 2021 even after the discontinuation of the product. However, you can’t integrate add-ons, update QuickBooks, or avail of the technical support for an issue. It can make the program prone to the technical errors and you will have to handle them on your own.
How Does QuickBooks Desktop Service Discontinuation Policy Work?
QuickBooks Desktop discontinuation doesn’t mean the program has been completely shut down. It means that the program will be available for the current users, but Intuit will stop selling the product subscription to the new users. Besides, the current won’t be able to download the latest security patches or get support.
Intuit typically discontinues a product after three years. For instance, QuickBooks Desktop 2021 is going to discontinue in May 31, 2024. Intuit continues to provide support and security patches for three years. Thereafter, users are expected to upgrade to a more advanced version to continue receiving the updates and customer services.
Every year, an older version discontinues. For instance, QuickBooks Desktop 2020 was discontinued on May 31, 2023. Thus, every year, an older version of the program becomes unsupported after completing a tenure of three years.
Products That Will Be Affected Due To QuickBooks 2021 Discontinuation
The list of the products that will become unsupported after May 31, 2024, are:
QuickBooks Desktop Pro 2021.
Premier version of QuickBooks Desktop 2021.
QuickBooks Enterprise Solution 21.
QuickBooks Premier 2021 – Accountant Edition.
QuickBooks Enterprise Accountant 21.
QuickBooks Desktop Mac 2021.
Important Considerations Related To QuickBooks Desktop 2021 Discontinuation
Intuit officially announced the discontinuation of the QuickBooks Desktop 2021 on May 31, 2024. Besides, you will be notified about the same via email or in-product notifications that services are to be discontinued. Now that you have required knowledge about the discontinuation, you need to keep a few important considerations in your mind.
If you want to continue using QuickBooks Desktop 2021, install all the updates rolling out prior to the date of discontinuation. On failing to do so, the program becomes more susceptible to the technical issues, security breaches and online threats.
On the contrary, if you want to continue receiving new security updates and utilize the advanced program feature, it is wise to upgrade to a newer version of the software. You can choose any of the following options here:
Upgrade to QuickBooks Desktop Plus before July 31, 2024.
Switch to the Online version of the QuickBooks accounting software.
Option 1: Upgrading To QuickBooks Desktop Plus
Upgrading to QuickBooks Desktop Plus will enable you to continue using the product without needing to worry about discontinuation or product upgrades. QuickBooks Desktop Plus is an annual subscription-based service. Once you switch to the Plus, you don’t need to upgrade the product every year, as the subscription cost already include it.
Your current subscription to QuickBooks Plus will support the three most recent versions of the program. For instance, you can upgrade your QuickBooks Desktop 2021 to 2022, 2023, or 2024 versions of the program. You also need to keep in mind that you can’t upgrade your unsupported QuickBooks product After July 31, 2024. In failure to do so, you can only purchase QuickBooks Desktop Enterprise, or QuickBooks Online.
When upgrading to QuickBooks Desktop Plus, you can choose a suitable version from Pro, Premier, or Enterprise as your business requires. Pro and Premier are suitable for small to mid-sized firms. Businesses with complex accounting needs can go with the QuickBooks Enterprise option. The subscription-based versions of QuickBooks cost more as compared to the non-subscription versions.
Once, you switch to the QuickBooks Plus, you need to subscribe it every year, otherwise you won’t be able to use the program at all, unlike a non-subscription product.
Option 2: Moving To QuickBooks Online
QuickBooks Online comes with a wide spectrum of advantages, and Intuit also encourages its users to use QuickBooks Online. It gives users the freedom and flexibility to handle their accounting processes remotely and collaborate seamlessly with the employees. You don’t need to worry about the data backups as they are regulated automatically in QuickBooks Online. Furthermore, you can manage online banking, reconcile accounts, and confirm that there is no discrepancy in the records.
You can easily move to QuickBooks Online after QuickBooks Desktop 2021 discontinuation. The migration of the QuickBooks Desktop files to Online takes up to 72 hours, which may vary based on the amount of data transferred. QuickBooks Conversion Tool can help you with this process.
How To Move QuickBooks Desktop to QuickBooks Online?
It is super easy to move your QuickBooks Desktop file to QuickBooks Online. Just stick the below-listed steps to get the task accomplished:
First of all, you need to log into your company file as an admin.
Now, check and confirm that your company file is up to date before exporting it.
Move your QuickBooks Desktop file to QuickBooks Online.
Connect your bank and credit card accounts to your QuickBooks Online account.
Set up QuickBooks Online according to the specific requirements of your business processes.
You can now start using QuickBooks Online and manage your daily accounting tasks with it.
Important Things To Keep In Mind:
Make sure that the QuickBooks Desktop file is up to date before transferring it.
Make sure that the company file is not too long to be exported. The total targets shouldn’t exceed 750,000.
After moving data to QuickBooks Online, you should review the integrity of your financial data.
You can now add your financial account, set up QuickBooks Payroll service and manage your invoices from within the QuickBooks Online application.
In this post, we have discussed about the QuickBooks Desktop 2021 service discontinuation policy in detail. Along side covering the important aspects, it also elaborates on how one can deal with the product discontinuation. If you still have any query in your mind, or need assistance with the described procedures, feel free to reach out to an expert using QuickBooks customer desk number.