Author: admin

Home > Articles by: admin

Dealing with the printing issue while printing the QuickBooks document? You have landed on the right page to fix the error. QuickBooks printing errors are a common issue that could pop up due to misconfiguration in printer settings within QuickBooks, or printer drivers might not be updated. Additionally, you might be using outdated QuickBooks, or the printer’s settings might not match the paper size. 

QuickBooks-is-unable-to-print

In this guide, we will cover everything that even a non-technical QuickBooks user would be able to use these solutions and get the printing error fixed.  

Call a senior QuickBooks specialist +1(866)500-0076 if:

  • You have little or no time to fix the printing issue.
  • You are looking to outsource it for a quick fix.
  • Not enough technical expertise to apply these solutions. 
  • Need a quick fix.  

What to do before you start?

  • Use the recently updated QuickBooks version.
  • Ensure proper connection to the printer.
  • Install and use the latest printer driver.
  • Your printer must not have any error messages or warning lights. 

Learn to fix printing issues in your QuickBooks Desktop

Solution 1: Print from another program

  • Click on Start.
  • Browse to Notepad.
  • Enter some text and navigate to File > Print.
  • Select the correct printer and click on Print.

It is still there is no print, try solution 2.

And, if the other program won’t be able to print the document successfully, try solution 3.

Solution 2: Check the printer setup

Use these steps to check your printer’s setup.

Step 1: Ensure that the printer is set up correctly.

  • Turn OFF your printer and restart your PC.
  • Turn the printer back ON and ensure that to load the printer paper correctly.
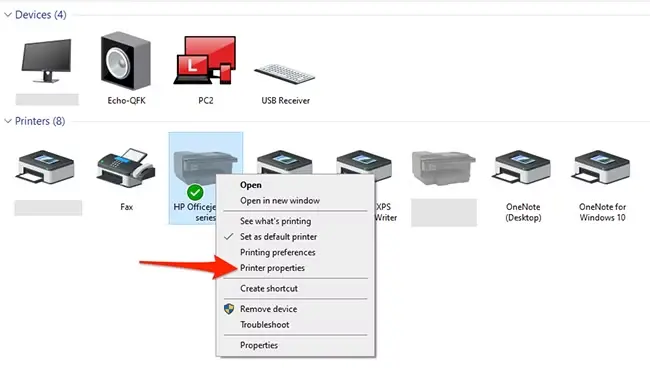
  • Click on Start and open the Control Panel.
Check the printer setup
  • Now, click twice on the Printers and Faxes
  • In case the printer shows its status as Offline, right-click on the printer.
  • Click on Use Printer Online.
  • Click twice on the printer, and if you find any print jobs, click on the Printer option.
  • Select Cancel All Documents.
  • Give a right click on the printer option and select Properties.
Select Printer Properties
  • Choose Print Test Page.

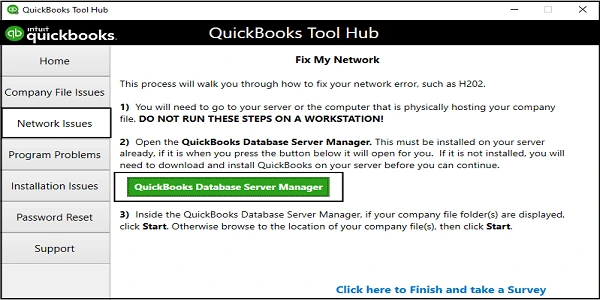
Note: Network issues could be the cause in case it is found that the printer is a network printer, and the test page cannot be printed. 

Read More – No Printer installed Error in QuickBooks

Step 2: Ensure the printer you chose is the right one

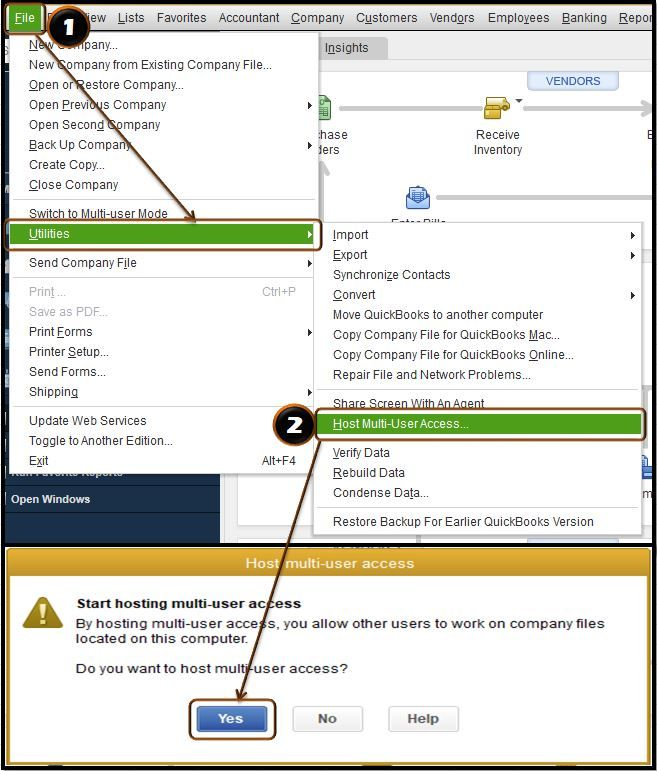
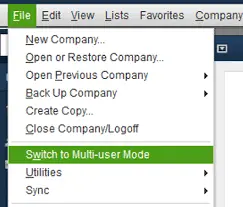
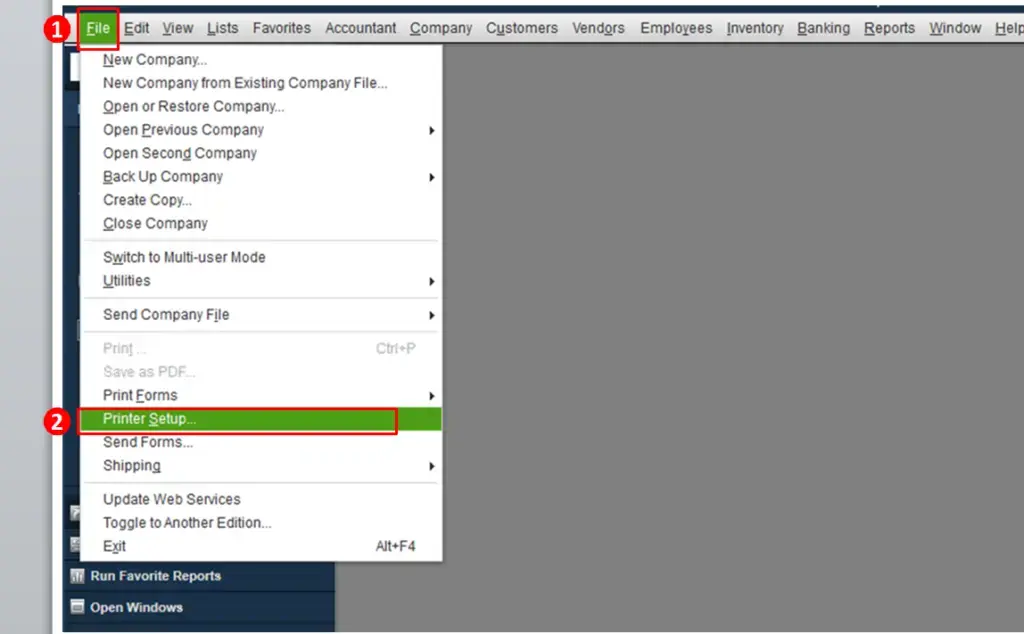
  • In QuickBooks, click on the File menu.
  • Choose Printer Setup and select the form you want to print.
  • Ensure the printer name matches the exact name of the printer you want to use. 
  • If not, you will need to correct the setup within your computer’s Printer Setup first.
  • Click on Help in this area for more help on these settings.

Step 3: Use a different printer to print

  • In QuickBooks, click on the File.
  • Click on Printer Setup and choose the form you want to print.
Click Printer Setup
  • Select a different printer, for example, a Microsoft XP printer.
  • Click on Help in this area for more help with these settings.

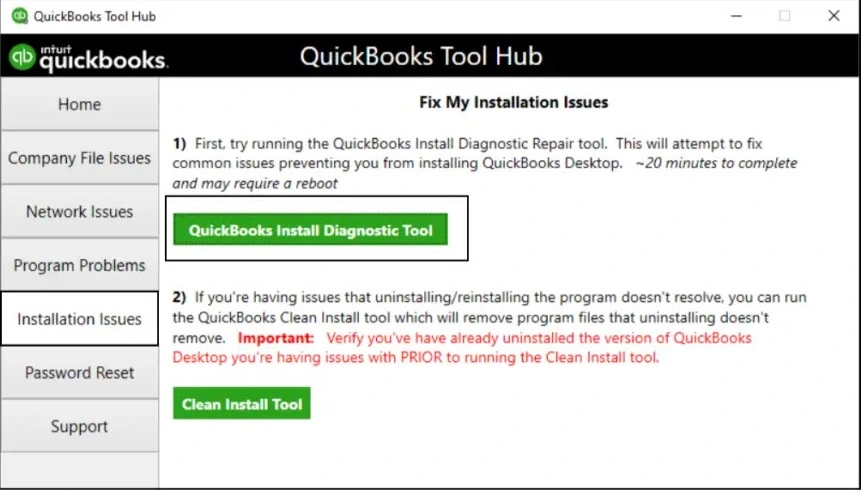
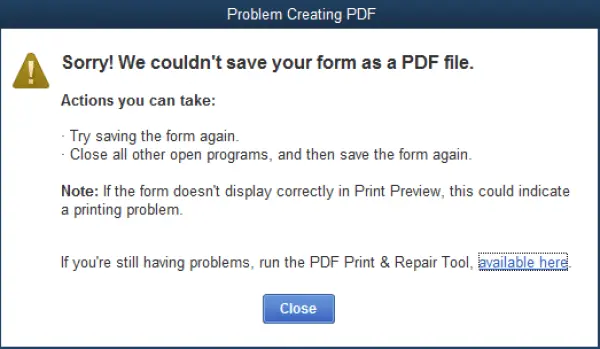
Solution 3: From the QuickBooks Tool Hub, use the Print and PDF tool.

  • Exit from QuickBooks.
  • Download the most recent version of the QuickBooks Tool Hub. 
  • As of now, QuickBooks Tool Hub 1.6.0.8 is the most recent version.
  • Save your downloaded file (QuickBooksToolHub.exe) to an easy-to-reach location. 

Note:- If you already have your QuickBooks Tool Hub application installed, you can check its version. Simply click on the Home tab and look at the bottom of the menu. 

  • Open the QuickBooksToolHub.exe file.
  • Continue with the on-screen instructions and click on Agree to their terms and conditions
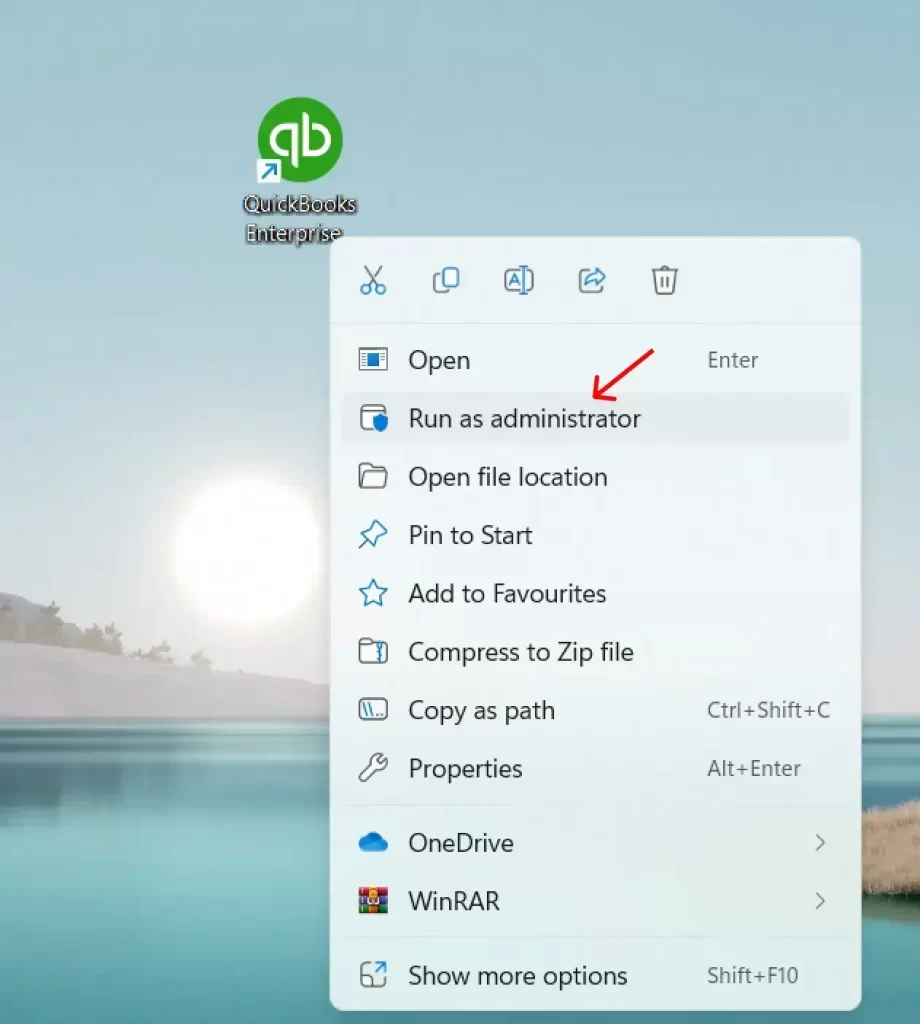
  • Once you have finished the installation, click on the shortcut icon of the QuickBooks Tool Hub on your Windows desktop. 
QuickBooks Tool Hub

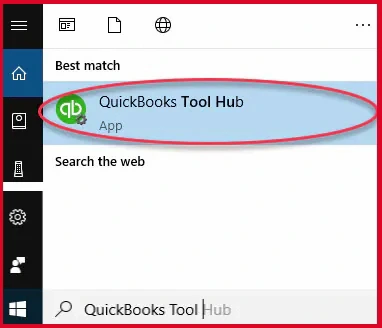
Note:- It could happen that the short icon may not be available on your desktop. In such a case, click on the Windows Start menu and search for QuickBooks Tool Hub and open it.

Learn More – How to Print Pay Stubs in QuickBooks Desktop?

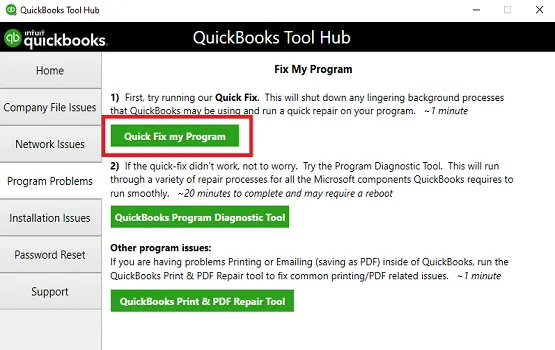
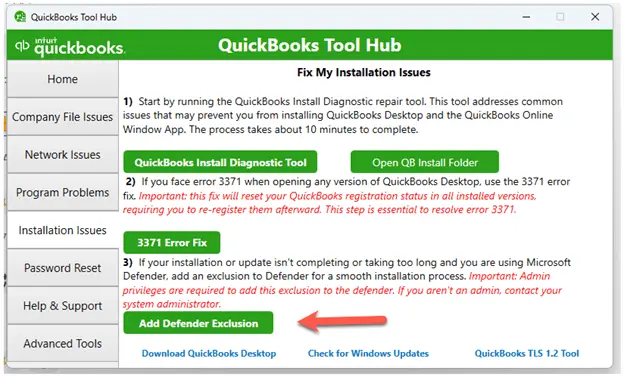
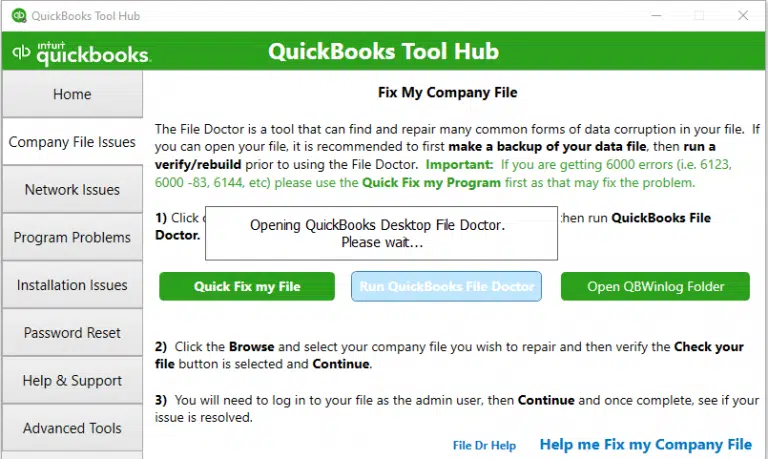
Step 2: Use the Print and PDF Repair tool

  • Within the Tool Hub, click on Program Problems.
  • Click on QuickBooks PDF & Print Repair Tool.
Program Problems
Program Problems
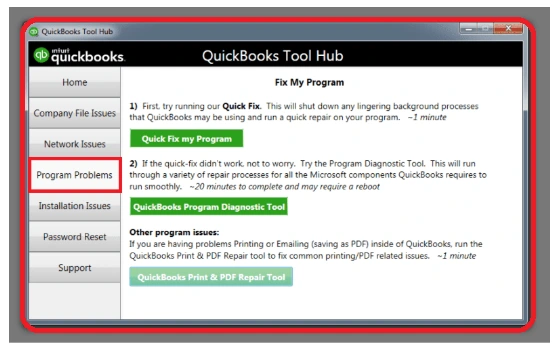
  • You can either print or save the document as a PDF in your QB Desktop again.

If the QuickBooks Tool Hub does not work, manually rename the QBPrint.QBP file.

Find the QBPrint.qbp: 

  • Windows 10 and newer
  • Server 2012 and newer

It may require that you display hidden files and folders, or you can search for files using the Windows Start menu to find the concerned files in Windows. 

Also see – QuickBooks Unable to Create PDF Error

Rename the Qbprint.qbp file

  • For your QuickBooks version, right-click on the QBprint.qbp file and click on Rename.
  • Add extension old to the file, i.e., QBPrint.qbp.old.
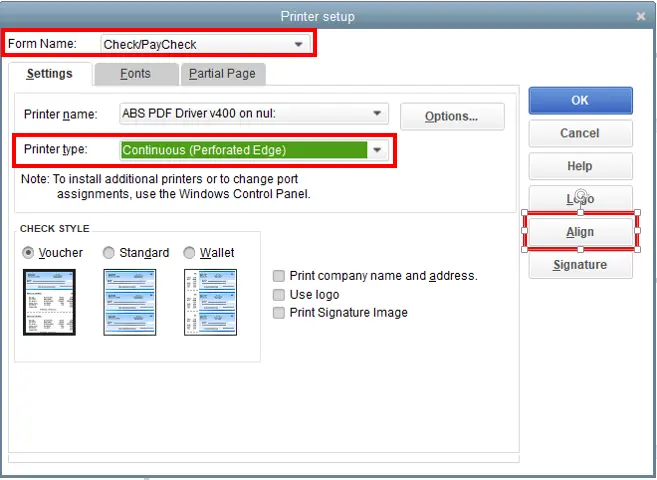
  • Navigate to the File and click on Printer Setup.
Click Printer Setup
  • Choose any one among the transactions that must be in the Form Name list and click on OK.
  • This would create a new Qbprint.qbp file.
create a new Qbprint.qbp file
  • Now, you could open any transaction and print it.
  • Check and confirm if the error is resolved or not. If you are still struggling with the error, try reinstalling the QuickBooks application on your Windows desktop.

Also Read – Print Form 1099 and 1096 in QuickBooks Desktop

Solution 4: Clean install QuickBooks Desktop again

Step 1: Remove QuickBooks

  • Click on the Windows Start menu.
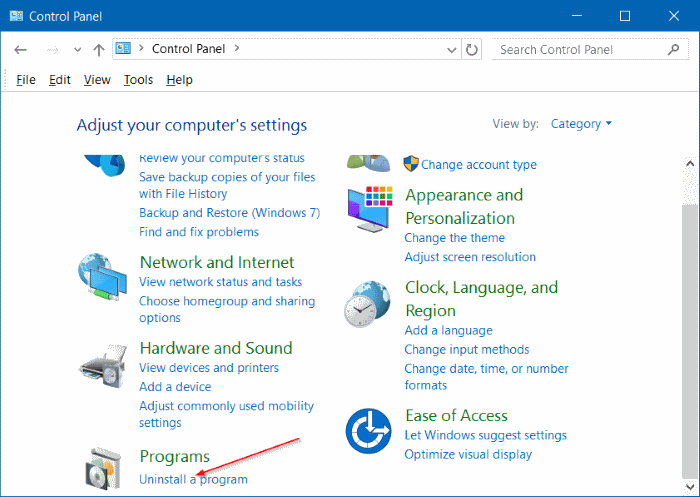
  • Search for the Control Panel and open the folder.
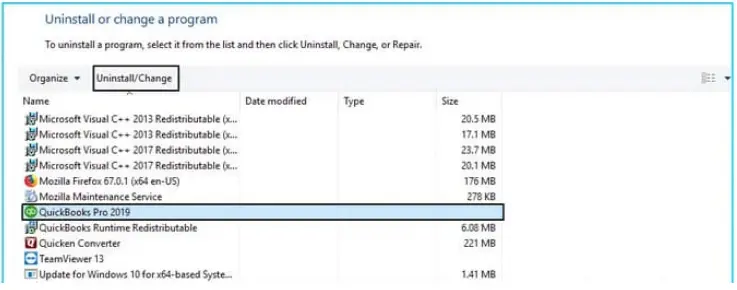
  • Click on Programs and Features or Uninstall a Program.
programs-and-features-control-panel
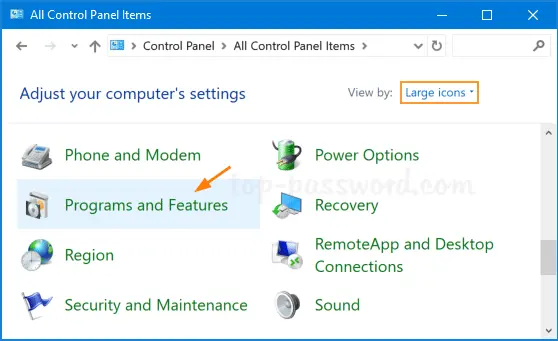
  • Select the version of your QuickBooks Desktop from the list of programs that you would like to uninstall.
  • Click on Uninstall/Change > Remove and hit Next.
uninstall or change a program

In case you do not find any of these options, you need to sign out and then sign back in to your Windows as an admin.

Step 2: Install QuickBooks Desktop again

  • Once you are done with the uninstallation of QuickBooks and in case Windows signs in again, now, install QuickBooks Desktop.
  • Confirm if the QuickBooks printing error has been resolved. In case it is not fixed, contact our Senior QuickBooks specialist immediately.  

Conclusion

QuickBooks printing error is a common error that could pop up due to several issues, including issues in your system, printer box setup, or settings related to the printer. In this guide, we covered every possible fix that would help you get the error fixed. 

However, some of the error requires an advanced solution depending on your system, settings, and printer product. In case you are not able to rectify the issue, reach out to our QuickBooksupportnet specialist at +1(866)500-0076 and get the error resolved ASAP. 

Frequently Asked Questions 

What are the causes behind the QuickBooks printing error?

There are multiple reasons that contribute to QuickBooks printing errors:

  • Outdated Windows and QuickBooks applications.
  • Printer Driver issue
  • The printer may be offline
  • There is a settings issue in the system.
  • Improper connection between the system and the printer. 

How can I fix the PDF and print issues in the QuickBooks Desktop?

To fix the PDF and print issues, follow our guide on QuickBooks PDF missing component

Where can I contact to get the printing issue in QuickBooks fixed quickly?

If you are looking for a quick resolution to get the printing error fixed, dial +1(866)500-0076 and get it fixed. 

Many QuickBooks users were found stuck while downloading/installing QuickBooks files and opening the company file. In such a situation, you may get confused as to why such an interruption comes in a way when everything is from the authorised sources. However, it has been observed that external influences can hamper its functioning. One of the prominent cases QuickBooks users face is disruption by PC antivirus software. 

Create QuickBooks Antivirus Exclusions

Considering this fact, the proven solution to resolve it is to create a QuickBooks Antivirus Exclusions. In this brand-new blog, you will be guided through concrete steps to exclude QuickBooks from the reach of any antivirus. We made it easy for you to create an exclusion for QuickBooks. Follow this complete guide for an immediate solution. You can bookmark this guide for further use.

Why do I Need to Create QuickBooks Desktop Antivirus Exclusion? 

We all know that Antivirus Software is designed to protect a PC from any Virus. And sometimes, it happens that software like QuickBooks gets on the radar of an Antivirus. It halts the functioning of QuickBooks. An Installed Antivirus may cause:

1. Failure of Installations
2. Incompetent performance of the software
3. Major Errors like “QuickBooks not responding
4. Blocking company files

Since we now understand the issue, it is time to hit the nail on the head. Let us apply the best solution for QuickBooks Desktop antivirus exclusion. In simple terms, it means that the installed antivirus no longer disrupts the functioning of QuickBooks.

Follow these 3 Steps before You Create QuickBooks Antivirus Exclusion

Before executing the QuickBooks Enterprise antivirus exclusions, ensure that you have gone through these important steps:

  1. Check the latest version of QuickBooks and update it immediately if required. It results in no future software conflict.
  2. Check the Windows updates for the most recent version before making any Antivirus changes. This step will enable uninterrupted use of any features or tools.
  3. Correctly configure the Windows firewall settings for the smooth functioning of QuickBooks.

Once you have completed all the above steps, there is a list of files that you must exclude from your Antivirus application.

Important QB Files and Folders to Exclude

QB Desktop FilesRespective File Path
QuickBooksMessaging.exe C:\Program Files\Intuit\QuickBooks YEAR 
IntuitSyncManager.exe C:\Program Files\Common Files\Intuit\Sync 
AutoBackupExe.exe C:\Program Files\Intuit\QuickBooks YEAR 
FileManagement.exe C:\Program Files\Intuit\QuickBooks YEAR 
QBW32.exe C:\Program Files\Intuit\QuickBooks YEAR 
QBLaunch.exe C:\Program Files\Common Files\Intuit\QuickBooks 
DBManagerExe.exe C:\Program Files\Intuit\QuickBooks YEAR 
QBUpdate.exe C:\Program Files\Common Files\Intuit\QuickBooks\QBUpdate 
Dbmlsync.exe C:\Program Files\Intuit\QuickBooks YEAR 
QBCFMonitorService.exe C:\Program Files\Common Files\Intuit\QuickBooks 
FileMovement.exe C:\Program Files\Intuit\QuickBooks YEAR 
QBServerUtilityMgr.exe C:\Program Files\Common Files\Intuit\QuickBooks 

Common Antivirus 

Some brand antivirus programs are available in most workstations, so if you have any of them, please create a quickbooks antivirus exclusion 2024

  1. Norton
  2. AVG
  3. Windows Defender
  4. Avast
  5. Sophos

Being popular, these Antivirus programs offer options to customize settings and complete QuickBooks Desktop antivirus exclusions.  

Most Followed Guide to Create QuickBooks Antivirus Exclusion 2024

We have provided you with all the steps to set up the exclusion of QuickBooks from any Antivirus. 

Norton

  • Open the Norton application and click on “Settings”.
Norton application
  • Right-click on the Norton Shortcut on the Desktop and choose the section “Scan and Risks.
choose the section Scan and Risks
  • There will be an option of “Configure” adjacent to “Items to Exclude”. 
option of Configure
  • Lastly, add the respective QuickBooks file and folders. 
respective QuickBooks file

Avast

  • Launch the Avast Antivirus and click on Menu.
  • Move to the Settings section and click on the General Tab > Exceptions.
  • To exclude QuickBooks, click Add Exception.
  • Finally, browse for the QuickBooks path, add it, and then save it. 
Avast Antivirus

Windows Defender

  • Open Windows Security and click on the section “Virus and threat protection”.
  • Then choose “Manage Settings” and scroll to “Exclusion”.
  • Now, you can add the exclusion of QuickBooks files via the “Add an exclusion” option.
Windows Defender
  • The last step is to browse for the QB directory and confirm it. 

McAfee

  • Open McAfee and take the cursor to “Settings”. In Settings, choose the option “Real-Time Scanning.”
McAfee setting
  • Now, click on “Excluded files” and choose “Add file/folders”.
  • Search for the QuickBooks files and folders to add them, and in the last step, “Save” the changes. 
McAfee

Sophos

  • Start the Sophos software and click on the “Protection” tab.
  • In your next move, click “General > Exceptions.” 
Sophos software
  • In the Exceptions, add your QB files and folders.
  • Now, save this setting and operate QuickBooks with no error. 

Pro tips 

  • Ensure you update QuickBooks to the latest version.
  • Rather than relying on the real-time functionality of antivirus software, run the antivirus software manually.
  • You can also set software updates for non-working hours.
  • Ensure you have backed up your company file and important data before making any changes to the system. 

Final Thoughts

Thank you for trusting us! We are known to deliver quality and consistent solutions to any QuickBooks consultation. In this guide, we covered every possible solution to create a QuickBooks Antivirus Exclusions that would have helped you to create QuickBooks antivirus exclusion for various. 

For more information, reach out to our QuickBooksupportnet specialist at +1(866)500-0076

Frequently Asked Questions

1. Why do I need to exclude QuickBooks from the Antivirus reach? 

Sometimes, Antivirus software counts outside software as a Virus and could remove the application from the workstation. Therefore, for the uninterrupted functioning of QuickBooks and to protect important files and folders from the Antivirus, exclusion is necessary.

2. How can a user configure QuickBooks Desktop antivirus exclusions in Windows Firewall?

There are simple steps to configure exclusions

  • Open the QuickBooks Tool Hub and navigate to the Company File Issues.
  • Then, run QuickBooks File Doctor and let the file open.
  • Now, browse and search for a company file. Once you locate the file, click “Check your file and network.”
  • Click “Continue” and enter your QuickBooks admin password. Lastly, click Next.

3. How can I fix the error of the internet connection in QB Online? 

Before making any fix, reload the website. If it is still not working, run the QB Online website in Incognito Mode. Alternatively, check the network connection to confirm the site is excluded from the firewall. Finally, add Intuit to the list of trusted sources in the default web browser.

4. How to contact a QuickBooks expert for a smooth and immediate solution?

If you are looking for a fast resolution, you can contact our expert by dialling: +1(866)500-0076.

5. Are these QuickBooks solutions effective in Windows 11?

Yes, if you have Windows 11 or update to it, you can create a quickbooks antivirus exclusion for Windows 11.  

Moving QuickBooks to a new computer is itself a hectic task for users of QuickBooks accounting software. The roadmap to move QuickBooks may be clear, but it requires keen attention, software awareness, and a bit of technical knowledge to successfully conduct the task of moving QuickBooks to a new computer.

In this dedicated guide on the topic of moving QuickBooks to a new computer, we have covered A-Z steps to finish the task with 100% efficiency. Walk through this guide and move your QuickBooks to your new PC.

Call a Senior QuickBooks Specialist +1(866)500-0076 if:

  • You do not want to risk your QuickBooks data and company files.
  • You do not have enough technical knowledge to conduct this task successfully.
  • Hectic task to perform, and you can outsource it to a senior QuickBooks specialist.
  • Not sure how to perform the task and confused about decision-making about self-attempt or taking from a senior QuickBooks specialist.
  • Dial +1(866)500-0076 if you want to outsource to move QuickBooks to a new computer.

What to do before you start?

  • Take a fresh backup of your company files.
  • Walk through this guide and confirm if you can perform the technical steps below. 
  • Keep handy your license and product number to register QuickBooks on your new PC. 

Learn to move QuickBooks Desktop to another computer.

Move your QuickBooks Desktop using the Migrator Tool

Transfer QuickBooks Desktop to New computer

How the Migrator Tool Works

  • Create a complex password to unlock all the details that are copied to your new PC.
  • Ensure to write down the password since the password is complex. This password is only usable once and only in the case of the migrator tool.
  • The Migrator tool can copy the last three company files that you opened to a USB flash drive. 
  • You are required to use the USB flash drive to move the files with all the technical work performed via the Migrator tool.
  • The Migrator tool would download QuickBooks Desktop version to your new PC and perform the setup function with your files.
  • The tool would not format your drive.

What will you need while performing these functions?

  • Keep a stable internet connection with your new PC.
  • You must have a USB flash drive with free space that is enough to hold your QB files.

Note:- The Migrator tool will notify you regarding the free space you need to get things done. Usually, it is between 150 and 250 MB.

Learn to set up and use the Migrator tool

In this section, we will learn to set up the migrator tool and use it for our purpose.

Step 1: On your Current PC

In QuickBooks:

  • Click on the File and choose Utilities.
  • Click on Move QuickBooks to another computer.
  • Finally, click on the ” I’m Ready option and create a one-time password.
Move Quickbooks to another computer
Move QuickBooks to another computer 2
  • Now, carry on with the on-screen instructions and choose the USB flash drive that you would use.
  • Simply wait for a while and let the files get copied.

Step 2: On your New PC.

  • Insert your USB flash drive, and to let you know, the Migrator tool will not open automatically. The reason is Windows security restrictions.
  • Now, open the flash drive to view the files in it.
  • Double-click on the file Move_QuickBooks.bat to start the migrator.
  • Enter your password that was created and click on Let’s go.
Move Quickbooks to another computer 3
  • Simply hold on for a while and let the Migrator Tool finish its function.

Note:- Your system’s hardware, the size of your company’s file, and disk space are responsible for finishing the above task in a timely manner.

What needs to be done Next?

It is a fact that the tool does not copy some of the information, so you need to take a few more steps to set up everything.

You may need to:

  • Log in to your payroll and payment services and to your Intuit Data Protect.
  • Set up your backup schedule.
  • From your old PC to your new PC, you may need to move over any additional company files.
  • Create a backup of your company file.
Create a backup of your company file

What can the Migrator Tool copy from your old PC?

The tool will copy:

  • QuickBooks Desktop details that include the version and other details needed to install QB Desktop on your new PC.

What would the Migrator Tool not copy to your new computer?

  • Multi-user setup: The configuration to set up multi-user mode would not get copied, and you need to set up a fresh multi-user environment.
  • Payroll and Payment setup: You need to set up your payroll and payment setup again since it won’t be copied to protect your data.
  • Intuit Data Protect: The first step in this case is that you need to uninstall it on your old PC and then sign in again to the application and complete the setup process.
  • Older Company Files: The company files that you have not opened recently would not be copied. To let you know, QuickBooks copies only the three recently opened company files. For any other files, you are required to move them manually or restore from your Intuit Data Protect.
  • Backup Files: Manual backups would not be copied.

Move your company file to another computer

To be Noted:- Moving the company file to another computer would not affect your QuickBooks product license.

  • The first step is to ensure that you install the QuickBooks Desktop application on your new PC.
  • Proceed with the steps to create a backup company file on your previous PC.
  • Give your backup file a unique name so that you can easily identify it. Additionally, this prevents accidental overwrites.
  • Save the backup file at an easy-to-reach location like your Desktop.
Move your company file to another computer
  • Now, move your QuickBooks backup file to your new PC, and you can put your backup either on a flash drive or an external drive.
  • Restore the backup on your new computer and ensure that you have a unique file name.
restore backup files

Move your company file to another location on the same computer.

  • Create a backup of the company file.
  • Give this file a unique name while saving the application. It would help you to easily identify it and prevent accidental overwrites.
  • Now, save the backup data at an easy-to-reach location like your Windows Desktop screen.
Back up QB company file manually

Note:- In case your company file is hosted on a network, you need to save the backup on your PC’s local hard drive.

  • Simply restore the backup to the new folder and ensure to give it a unique name.

Once you restore the backup, use it as your main company file. We recommend that you rename your existing company file with the extension .old.

How to manually move or reinstall your QuickBooks without the use of the Migrator Tool?

  • Reinstall or move your QuickBooks Desktop application:
  • Keep handy your product and license information.
license information
  • Uninstall your current QB application before you try to reinstall the latest QuickBooks application.
  • Download the installation files or insert the QuickBooks software CD into the PC where you want to install the QB Desktop application.
  • Finally, install the QuickBooks Desktop.

Learn to find the migration tool to go back to desktop?

  • Log in to your QuickBooks Online.
  • In the URL, replace anything after /app/ with exportqbodataoqbdt.
find the migration tool
Download tool to download the migration tool
  • Once the download completes, launch the installer and run it.
  • Proceed with the on-screen instructions and get the installation done. 

Conclusion

In short, to move QuickBooks to a new computer, you are required to first install the QuickBooks application on your new PC and then use the Migrator tool using the steps File > Utilities > Move QuickBooks to new computer.

We shared the concrete steps with you to get your task done with a 100% success rate. Since the solution and steps are inclined towards their technical nature. In case you find it hard to apply the steps, do not hesitate to contact a senior QuickBooks specialist at +1(866)500-0076

Users of QuickBooks have some common questions about reinstalling or moving an existing QuickBooks installation. 

To clear your doubts, if you have all the details that are needed to install QuickBooks, but you do not have the installation file, then you are required to download your QuickBooks version file.

Frequently Asked Questions

What if I do not have my license and product numbers?

In case you are unable to find your license and product number, contact a QuickBooks specialist or your vendor to get the information. 

Do I need to register again after I reinstall or move QuickBooks?

  • Yes, you need to register again for the QuickBooks application.
  • Click on the Help in the QuickBooks application.
  • Click on Register QuickBooks and start the process.
  • Once you enter all the required information, Intuit will recognize the registration status of the copy of your QuickBooks and will also record the information for your new PC.

What about my company files while moving or reinstalling the QB application?

This is one of the most important data in the form of company files that would not get copied for the reason of data security. If you are reinstalling QuickBooks and overwriting your existing QB application, it will not affect your company files. You can simply open your company files as you usually do.

Where can I find the migration tool to go back to the desktop?

  • Log in to your QuickBooks Online.
  • In the URL, replace anything after /app/ with exportqbodataoqbdt.
  • It should look like: https://app.qbo.intuit.com/app/exportqbodatatoqbdt
  • Click on Get Started in the Export overview tab.
  • Finally, click on the Download tool to download the migration tool. 
  • Once the download completes, launch the installer and run it.
  • Proceed with the on-screen instructions and get the installation done.

Why do QuickBooks users find the payroll tax table update so important? To understand it in reality, walk through this guide till the end. Before that, let us gain some understanding of the payroll tax table update.

The payroll tax table update is needed to have accurate rates and calculations for federal and supported state taxes, e-file & e-pay options, and payroll tax forms. To update your tax table, you need to have an active payroll subscription.

Call a senior QuickBooks specialist at +1(866)500-0076 if:

  • Do you have any queries regarding tax and insurance?
  • You are looking for an outsourced agency to manage your payroll tasks and tax payments.
  • No time to invest in the payroll tax table update.
  • Tried 2-3 attempts and still have not gotten an update.

Check your current payroll tax table version

  • In QuickBooks, click on Employees and select My Payroll Service.
My payroll Service
  • Now, click on Tax Table Information.
  • Under the option, you are using the tax table version; the first three numbers show your tax table version. It must display in the number 12134003.

Read More – QuickBooks Error PS032

Learn how to get the latest QuickBooks Payroll Tax Table Update.

  • Click on Employees and select the Get Payroll Updates.
Get payroll updates
  • To know your tax table version:
    • Check the number next to You are using tax table version:
    • Confirm if it is the correct version and see the latest payroll news and updates. 

Past Payroll Updates

Payroll Update NumberDate Released
225147/31/2025
225137/3/2025
225126/17/2025
225105/8/2025
225083/21/2025

To get the latest tax table: 

QuickBooks Payroll Tax Table
  • Click on Update.
  • There will be an informational window that will appear when the download is completed 

What is included in Payroll Update 22516?

Tax Table Update

  • Maryland
  • Action Required: Some local income tax rates have changed and took effect from July 1, 2025.
  • Form Updates
  • Alabama: Form A-1 has been updated for Employer’s Quarterly Return of Income Tax Withheld.
  • Kentucky: Form UI-3 has been updated for the Employer’s Quarterly Unemployment Wage & Tax Report.
  • New Mexico: Form RPD-41054 has also been updated.

Learn More – QuickBooks Payroll Service Connection Error

Learn to troubleshoot payroll update issues.

If your tax table version 12134003 is downloaded on or after 24 June 2025, you won’t be able to see the updated figure until the tax table becomes effective on July 1, 2025. 

  • There are two conditions that apply after July 1, 2025, after you have downloaded the product update that has the new tax tables: 
  • Is it that you manually adjusted the TD1 amounts at any time in the past or after you set up a new employee?
  • The latest tax table would not override the previously paid amount in case you have manually updated the TD1 amounts for an employee in the past. You are required to manually update the TD1 amounts going forward.

Also Read – QuickBooks Payroll Update Not Working

Is it possible that any of the employees would set up over the basic TD1 amounts?
QB Desktop will automatically update the TD1 amounts for the employees that has the basic amounts for the previous tax tables.

Current and historical information on TD1, CPP, and EI amounts

Effective Date7/1/20251/1/2025
Tax Table version #1213400312034003
TD1 Amounts
Federal16,129.0016,129.00
AB22,323.0022,323.00
BC12,938.0012,938.00
MB15,591.0015,969.00
NB13,396.0013,396.00
NL11,067.0010,818.00
NS11,744.0011,744.00
NT17,842.0017,842.00
NU19,274.0019,274.00
ON12,747.0012,747.00
PE15050.0014,250.00
QC18,571.0018,571.00
SK19,991.0018,991.00
YT16,129.0016,129.00
ZZ (employees outside Canada)00
Effective Date 7/1/20251/1/2025
Tax Table version #1213400312034003
Canada Pension Plan (CPP) – outside Quebec
Maximum Pensionable Earnings71,300.0071,300.00
Basic Exemption3,500.003,500.00
Contribution Rate5.95%5.95%
Maximum Contribution (EE)4,034.104,034.10
Maximum Contribution (ER)4,034.104,034.10
Employment Insurance (EI) – outside Quebec
Maximum Insurable Earnings65,700.0065,700.00
Premium EI Rate (EE)1.64%1.64%
Premium EI Rate (ER) (1.4*EE)2.296%2.296%
Maximum Premium (EE)1,077.481,077.48
Maximum Premium (ER)1,508.471,508.47
Effective Date1/1/20251/1/2025
Tax Table version #1213400312034003
Quebec Pension Plan (QPP)
Maximum Pensionable Earnings71,300.0071,300.00
Basic Exemption3,500.003,500.00
Contribution Rate6.40%6.40%
Maximum Contribution (EE)4,339.204,339.20
Maximum Contribution (ER)4,339.204,339.20
Employment Insurance (EI – Quebec only)
Maximum Insurable Earnings65,700.0065,700.00
Premium EI Rate (EE)1.31%1.31%
Premium EI Rate (ER) (1.4*EE)1.834%1.834%
Maximum Premium (EE)860.67860.67
Maximum Premium (ER) (1.4*EE)1,204.941,204.94
Quebec Parental Insurance Plan (QPIP)
Maximum Insurable Earnings98,000.0098,000.00
Contribution Rate (EE)0.49%0.49%
Contribution Rate (ER) (1.4*EE)0.69%0.69%
Maximum Contribution (EE)484.12484.12
Maximum Contribution (ER) (1.4*EE)678.16678.16
Commission des normes du travail (CNT)
Maximum earnings subject to CNT98,000.0098,000.00

Learn to set up manual payroll in QuickBooks Desktop.

Set up manual payroll

  • If you want to manually run your payroll in QuickBooks Desktop, you are first required to enable payroll in the QuickBooks settings.
  • QuickBooks Desktop 2018 or later
  • Click on Preferences from the Edit drop-down menu.
  • Click on Payroll & Employees and select Company Preferences.
  • Choose the Full payroll and Manual payroll checkboxes in the QuickBooks Desktop Payroll Features.
  • When you are on the confirmation windows, click on Next < Activate in the Get payday peace of mind window.
  • Click OK and let the changes you made be saved.
  • Finally, hit OK to close the preferences window.

Conclusion

QuickBooks payroll tax table update is a necessary move that allows you to keep your tax information and future transactional approach calculative. We believe that we can share with you the concrete information that you must have to get your task of payroll tax table update done.

If you have any questions regarding tax or payroll tax table updates, contact a senior QuickBooks specialist at +1(866)500-0076.

Frequently Asked Questions

What is a QuickBooks Payroll tax table update?

QuickBooks payroll tax table update is an essential function to perform to get the latest tax rates that ensure your payroll calculations are accurate according to current federal and state laws.

How can I update payroll tax tables?

To continue to do so, you first need an active QuickBooks subscription. On the other hand, make sure to use the active QuickBooks Desktop.

  • Click on the Payroll menu and choose Update Payroll tax table.
  • Continue with the on-screen prompts and perform the downloading and installation of the latest tax table.

You will receive a message that the payroll tax table has been updated.

Where should I contact if the payroll tax table update fails?

If you attempted to update your payroll tax table and it failed, then you need to immediately contact a senior QuickBooks specialist at +1(866)500-0076.

If you’re experiencing the QuickBooks turned black and white issue while using the software, you’re not alone. 

Display problems, such as the screen turning completely black or becoming stuck in black and white, can prevent normal functioning. These issues may arise due to various factors, including incorrect DPI settings, outdated video card drivers, or other system-related causes. 

This guide explores the causes and provides solutions to resolve the QuickBooks black and white screen issue, helping you restore seamless performance.

Why Does the QuickBooks Screen Suddenly Go Black and White?

If you’re experiencing the QuickBooks issue where it turns black and white, several factors may be responsible. Let’s explore each of them one by one:

  • Background processes interfering with QuickBooks
  • Conflicts between QuickBooks and graphics drivers
  • Outdated video card drivers
  • Windows theme affecting DPI settings
  • Incorrect QuickBooks or Windows display resolution
  • Unregistered or corrupted QuickBooks program files

Effective Ways to Fix the QuickBooks Turned Black and White Issue

Follow the troubleshooting steps below to fix the QuickBooks turned black and white issue and ensure proper screen resolution for optimal performance.

1. Run Quick Fix my Program 

The Quick Fix my Program runs a quick repair to the program by closing the processes in the background. Proceed with the below steps to learn how to run the utility: 

Quick Fix my Program

2. Edit the QBW.ini file to remove QuickBooks black boxes

Editing the QBW.ini file changes that and restores the classic display settings, which should fix the problem.

  • Exit QuickBooks Desktop.
  • Open the Windows Start menu.
  • Copy and paste the relevant file to your QuickBooks in the search bar: 
QuickBooks 2020C:\ProgramData\Intuit\QuickBooks 2020\QBW.ini
Enterprise Solutions 20.0C:\ProgramData\Intuit\QuickBooks Enterprise Solutions 20.0\QBW.ini
QuickBooks 2019C:\ProgramData\Intuit\QuickBooks 2019\QBW.ini
Enterprise Solutions 19.0C:\ProgramData\Intuit\QuickBooks Enterprise Solutions 19.0\QBW.ini
QuickBooks 2018C:\ProgramData\Intuit\QuickBooks 2018\QBW.ini
Enterprise Solutions 18.0C:\ProgramData\Intuit\QuickBooks Enterprise Solutions 18.0\QBW.ini
  • Move to the end of your file, copy and paste to the following text into the file: [COLORS]

Classic=0 

  • Save the QBW.ini file.
  • Open QB Desktop.

3. Update the Video Card Drives 

Updating the video card drive ensures that the graphics card can communicate correctly with QuickBooks and display its interface properly.

  • Launch the Run command by pressing the Windows + R keys. 
  • In the Run prompt, type dxdiag and press Enter.
  • Choose Display 1. Note down the Manufacturer/Model.
  • Now, get the necessary updates:  

4. Change the Windows Theme to Basic 

Your Windows theme might have changed the DPI settings, causing the QuickBooks turned black and white issue. Turn it into the basics with the following steps: 

  • Right-click anywhere on your desktop. 
  • Hit on Personalize.
  • Select one of the Windows Basic Themes. 
  • Restart your computer.
  • Open QuickBooks.

5. Change the Windows display settings

QuickBooks performs optimally with Windows’ default DPI settings. Altering these may cause display problems.

Important: Changing Windows settings impacts all programs on your computer, not only QuickBooks.

  • Refer to Microsoft’s instructions to restore default display settings for Windows 10 and Windows 8.
  • Ensure your screen resolution is at least 1024 x 768; 1920 x 1080 is recommended for optimal display.
  • After adjusting, restart your computer, then open QuickBooks and your company file. 

6. Change the screen resolution 

If all else fails, adjust the display settings by modifying the screen resolution with these steps:

  • Click the Start icon, type regedit in the search bar, and press Enter to open the Registry Editor.
  • Navigate to HKEY_LOCAL_MACHINE\SOFTWARE\Microsoft\Windows NT\CurrentVersion\Windows by clicking the arrow next to each folder.
  • Increase the GDIProcessHandleQuota value from 10000 to 65535.
  • Close the Registry Editor after making the change.
  • Restart your computer.
  • Once the QuickBooks black boxes disappear, reset the GDIProcessHandleQuota value back to 10000.

7. Re-register the QB program files 

Let’s make sure that the program’s components are properly registered with the operating system and that the QuickBooks display works properly:

  • Open the folder containing your QuickBooks Company file, locate the bat files, right-click them, and choose Run as Administrator.
run as administrator
  • Confirm the bat files run with Windows Administrator privileges.
  • A command window will display, showing the file path scrolling; it will close once the bat file utility finishes.
  • To terminate the QBW32.exe process in Task Manager, follow these steps:
    • Click the Windows icon, type “taskmgr” in the search bar, and press Enter to open Task Manager.
    • Navigate to the Processes tab and locate QuickBooks (32-bit) or QBW32.exe.
    • Right-click each instance and select End Process to stop it. 

Conclusion 

In conclusion, display issues can significantly disrupt common processes, including financial and accounting tasks in QuickBooks. By following the steps outlined, such as updating video card drivers and adjusting display settings, you can easily resolve the QuickBooks turned black and white issue. 

For additional support, we recommend consulting a QuickBooks professional. Dial our toll-free number
+1(866)500-0076 to speak with an expert today!

Frequently Asked Questions 

Why does QuickBooks turn black and white? 

QuickBooks can turn black and white due to a variety of reasons, such as an outdated application, a failed update, a conflict with a Windows theme, high DPI settings, or outdated video drivers. It’s a common display issue that can make it challenging to run the common QuickBooks processes.

Why is QuickBooks screen gray?

A gray QuickBooks screen can be caused by display settings, such as incorrect screen resolution or high DPI, an outdated or corrupt graphics driver, or compatibility issues with your operating system. 

Other causes include problems with your internet connection or browser for QuickBooks Online, or a corrupted company file for QuickBooks Desktop.

What causes QuickBooks black box? 

A QuickBooks black box can occur due to various reasons, including an outdated version of QuickBooks, corrupt display drivers, an incompatible Windows OS, high-DPI or screen resolution settings, conflicts with Windows themes, or an outdated Windows OS. 

How do I get out of dark mode in QuickBooks?

To get out of dark mode in QuickBooks Online, click the Gear icon > Themes under the Your Company section, and then turn off the Dark Mode switch. 

How do I switch QuickBooks back to Classic View?

To switch your QuickBooks Online (QBO) to Classic View, click the Gear icon (Settings) in the QuickBooks Online toolbar, then select the large Switch button at the bottom of the appearing menu to revert to the classic interface. A new window will open for optional feedback, and upon closing it, you will be returned to the classic layout. 

QuickBooks error PS032 is one of the PSXXX series errors that appear when trying to update the payroll services. You may also see a warning message on your screen stating, 

[PS032] QuickBooks is having trouble installing your payroll update.

PS032 Message

In QuickBooks, the payroll tax table can be hampered due to a variety of factors, which include Windows Firewall or internal issues such as outdated QuickBooks. 

To help you complete your payroll accurately, we have listed possible factors that trigger error code PS032 and solutions to address the root causes, ensuring a seamless payroll update. Get started with this detailed guide carefully. 

What Causes Payroll Update Error PS032 in QuickBooks? 

Explore the list of different factors that hinder the payroll tax table update in QuickBooks and trigger the error code PS032:

  • Not having an active payroll subscription 
  • QuickBooks is not registered or activated 
  • Using an outdated version of QuickBooks 
  • Microsoft Defender might be blocking QuickBooks 
  • Background QB processes lingering with payroll updates 
  • Damages or corruption to the CPS folder 
  • UAC settings may hamper the payroll updates
  • Windows Firewall might be blocking QuickBooks Desktop 
  • Incorrect installation or corrupted program files 

Ways to Troubleshoot QuickBooks Error PS032 When Updating Payroll 

In this section, we’ll discuss various troubleshooting methods that will help you pinpoint the root cause of QuickBooks error PS032. Be sure to perform the fixes below to ensure payroll updates are working properly:

1. Check your payroll service subscription

Not having a payroll subscription means you won’t be able to run payroll services and receive updates. Check your payroll subscription with the steps below: 

  • Exit your company files and QuickBooks.
  • Restart your computer.
  • Open QuickBooks Desktop. 
  • Go to Employees > My Payroll Service > Manage Service Key.
My payroll service
  • Verify that the Service Name and Status display as ‘Active‘.
    Click Edit and ensure the service key number is correct. 
  • If it’s incorrect, enter the accurate service key. 
  • Click Next
  • Remove the mark in the Open Payroll Setup box > Finish.
  • This will help you get the entire payroll update. 

If you still encounter issues, go to the next solution. 

2. Register and update your QuickBooks Desktop

You must register QuickBooks Desktop to receive the latest security and feature updates, which include software improvements. 

  • Press F2 on your keyboard. 
  • Launch the Product Information window.
  • Check if Activated is displayed beside the license number.  
License Information and a product key

Note: If it doesn’t say Activated, you must register QuickBooks Desktop. 

If you encounter QuickBooks error PS032, proceed to Solution 3. 

3. Add Defender exclusion and run Quick Fix my Program

Make sure Microsoft Defender is not blocking QuickBooks Desktop with the steps below, and fix it using Quick Fix my Program to resolve the QuickBooks error PS032 when updating payroll:

a. Create a Microsoft Defender exclusion of QuickBooks files

To resolve this issue, QuickBooks Tool Hub has added a feature to exclude specific QuickBooks files from Microsoft Defender scans. By including these files in an exclusion list, Defender skips scanning them during installation, ensuring updates proceed at normal speed. Follow these steps to use this feature:

Note: You must be logged in to Windows as an administrator to add exclusions. If you’re not an admin, the Add Defender Exclusion option will be disabled, and you’ll need to request that your admin add the exclusion for you.

  • Hit Cancel to stop the update. 
  • Exit QuickBooks.
  • Launch the QuickBooks Tool Hub. 
    • If you don’t already have the QuickBooks Tool Hub, make sure to download and install the latest release available. 
  • In the left pane, select Installation issues.
  • Click on Add Defender Exclusion.
Defender exclusion
  • Restart your computer.
  • Open QuickBooks and try to get the updates again. 

b. Run Quick Fix my Program 

Quick Fix my Program
  • Open QuickBooks and get the most recent updates. 
  • Try to download and install the latest tax table.

4. Rename the CPS folder 

Repair the CPS folder by renaming it to resolve error code PS032: 

  • Launch the Windows File Explorer.
  • Select This PC
  • Go to the Local Disk C.
  • Now, run Program Files (x86), then the Intuit folder.
  • Open the QuickBooks Desktop folder of the same version as QuickBooks. 
  • Select Components, then Payroll folder.  
  • Right-click on the CPS folder and select Rename
  • Type a new folder name and press Enter to successfully rename it.

5. Temporarily disable UAC

Disable UAC settings when downloading payroll updates to make required changes on your computer and resolve QuickBooks error PS038.

  • Press the Windows +R keys to open the Run command. 
  • In the Run prompt, type Control Panel and click OK
  • Choose User Accounts > User Accounts (Classic View).
  • Hit on Change user account control settings

Note: Click Yes on the UAC prompt to continue. 

  • Move the slider: 
    • Set UAC settings to Never Notify and click OK to turn it off. 
    • Set to Always Notify and click OK to enable UAC ON

Note: When prompted by UAC, click Yes to continue. 

  • Restart your computer.

6. Run the QuickBooks Install Diagnostic Tool 

If something goes wrong during installation, problems may arise when updating payroll services or other features. Use the QuickBooks Installation Diagnostic Tool to troubleshoot this issue:

  • Launch the QuickBooks Tool Hub. 
  • Go to the Installation Issues menu.
  • Hit on the QuickBooks Install Diagnostic Tool. The tool might take up to 20 minutes; let the utility run until then.  
QuickBooks Install Diagnostic Tool
  • When the tool finishes, restart your computer and open QuickBooks Desktop, then open the company file. 
  • Update QuickBooks to the latest release to make sure you have the most recent fixes and security updates.

7. Configure the Windows Firewall settings 

Windows Firewall, a built-in Windows security tool, regulates incoming and outgoing network traffic via system ports using predefined rules. When it identifies a potential threat, such as malicious software or suspicious data, it may block the related application, file, or folder, resulting in a QuickBooks error PS032.

To resolve this issue, configure the Windows Firewall to permit QuickBooks Desktop by adding exceptions for its specific files, folders, and ports. This enables QuickBooks to communicate effectively and complete updates without restrictions.

Conclusion 

In conclusion, payroll updates are crucial for accurate payroll tax calculations and timely payment of taxes without delay or penalties. However, it’s a bigger challenge when you can’t update the payroll tax table and encounter QuickBooks error PS032.

Following the above steps, such as updating QuickBooks, disabling UAC settings, and other methods, will help you resolve the error and get the updates seamlessly.

For further assistance, dial +1(866)500-0076 and connect with a QuickBooks ProAdvisor now!

Frequently Asked Questions 

What is error code PS033 in QuickBooks?

QuickBooks Error code PS033 is part of the PSXXX series of errors that appear when attempting to obtain payroll tax table updates. Not having an active subscription, insufficient permissions to receive updates, UAC, and other factors may be causing your update failure. Identify these causes and resolve them promptly.

How do I fix a payroll error in QuickBooks?

To fix a payroll error in QuickBooks, first determine whether the paycheck has been processed or not. For unprocessed direct deposit paychecks, you can edit or delete them.

For processed paychecks (whether by direct deposit or paper check), you must cancel them, which creates a negative adjustment check to offset the original amount.

Why am I getting payroll error code PS032?

You may receive the payroll error code PS032 due to various factors, such as an outdated QuickBooks Desktop, no active payroll subscription, updates blocked by antivirus or Windows Firewall, or incorrect UAC settings. 

How to fix the QuickBooks payroll update not working issue?

To resolve the issue where the QuickBooks Payroll update is not working, check your internet connection, system storage, and the version of QuickBooks you’re using. Additionally, run the update with administrator rights, repair QuickBooks Desktop, and ensure your payroll subscription is active to receive payroll updates.

How to manually update QuickBooks payroll?

To manually update QuickBooks Payroll, typically go to Employee > Get Payroll Updates > Update Now to download the latest tax tables. For QuickBooks Desktop, you can also manually install software updates via the Help > Update QuickBooks Desktop

Is QBDBMgrN Not Running on This Computer? You must be wondering why this happens and what you should do. But don’t worry—we’re here to help!

The QBDBMgrN is a core component (or service) of QuickBooks Database Server Manager, which enables hosting company files over a network. If it’s not running, it typically means you lack the permissions to start the service, or something is blocking it on your host computer.

Explore the possible causes and detailed steps below to help you quickly identify the issue and resolve it promptly. Let’s get started!

Why is QBDBMgrN Not Running on This Computer? 

Explore multiple reasons why QBDBMgrN not running on this computer in QuickBooks and is causing errors when hosting: 

  • Hosting settings might be turned off 
  • Incorrectly configured hosting services 
  • Damages or corruption to QBDataServiceUserXX
  • QuickBooks Database Server Manager might not be running on the main computer 
  • Common network connectivity issues or data damage 
  • Outdated Firewall 
  • Not having enough permissions to share the company file 
  • The incorrect installation of QuickBooks or the file might be damaged 
  • Windows Firewall might be blocking QuickBooks

What to Do When QBDBMgrN Not Running on The Server Computer? 

Below is a list of several troubleshooting methods that will help you resolve the root cause and share or open your company file on the network:

1. Turn on hosting 

Enable the hosting setting on the server computer: 

  • Go to the File menu. 
  • Select Utilities, then Host multi-user access.
Host Multi-User Access
  • Click Yes on the Host multi-user access window.

2. Recreate QBDataServiceUserXX

Important: If you receive an error stating that your Windows user account doesn’t have the appropriate permissions, log in as a Windows admin or ask assistance from an IT professional.
  • Shut down QuickBooks.  
  • Press Windows+R to open the Run dialog.  
  • Enter services.msc and hit Enter.  
  • Right-click the relevant service for your edition, then select Properties.  
    • QuickBooks 2020: QuickBooksDB30
    • QuickBooks 2019: QuickBooksDB29
    • QuickBooks 2018: QuickBooksDB28
  • Switch to the Log On tab, and configure the service as This Account.  

Note: Avoid Local System. It only functions in certain configurations.  

  • Remove qbdataserviceuserXX:  
    • Press Windows+R to launch the Run dialog.  
    • Input Control Panel, then click OK.  
    • Choose User Accounts, followed by Remove user account.  
    • Pick the qbdataserviceuserXX corresponding to your edition, then Delete.  
  • Restart QuickBooks.  

Note: If hosting is active, disable it before re-enabling. If inactive, enable it.  

  • When prompted to launch Database Server Manager, click OK.  
  • Launch Database Server Manager and scan the file. This regenerates the qbdataserviceuser.

3. Run QuickBooks Database Server Manager and QuickBooks File Doctor in the Tool Hub

Note: Make sure to download and install QuickBooks Tool Hub to the latest release (1.6.0.8). For the best experience, it is recommended to use Tool Hub on Windows 10, 64-bit.

a. Run QuickBooks Database Server Manager 

The server computer is the main computer that hosts your company’s files; others are just connected to it, known as workstations.  

  • Go to Network Issues
  • Click on QuickBooks Database Server Manager
QuickBooks Database Server Manger
  • If QuickBooks isn’t on the server, you will be prompted to install.
  • If you see your company file in QuickBooks Database Server Manager, select Start Scan. If you don’t, click Browse, find and locate to your company file, then select Start Scan
  • The Server Manager repairs the firewall issues automatically. 
  • When done, click Close.
  • Make sure the QB is in multi-user mode and the workstation is in single-user mode. 

b. Run QuickBooks File Doctor

QuickBooks File Doctor runs a quick scan of your data file to identify potential damage and network connectivity issues, then quickly repairs them.

4. Update your Firewall

An outdated firewall can block common software operations such as hosting, and can be the reason why you see QBDBMgrN not running on this computer: 

  • Launch the Run command. 
  • In the Run prompt, type Control firewall.cpl.
  • Press Enter.
  • Open Windows Firewall and select Update your Firewall as below.
Update your Firewall
  • Click on Update Now and Use Recommended Settings, then check if an update is available.
  • Restart your computer. 

If you are still getting the error, restart QuickBooks Database Server Manager.

5. Check the services on your server

The hosting services must be running on the server for successful hosting. Proceed with the steps below to verify the status and make sure the QBDBMgrN not running on this computer issue is fixed:  

  • Open the Windows Start menu on the main computer. 
  • Type Run and press Enter
  • Type services.msc into the Run window.
services.msc
  • Press Enter
  • Look for QuickBooksDBXX and double-click on it. Here, XX stands for QuickBooks version QuickBooks plus 10. Example: QuickBooks 2023 is QuickBooksDB33.
  • Go to Startup Type.
  • Select Automatic
  • Select the service status as Running or Started. If it’s neither, select Start.
Check service on your server
  • Go to the Recovery tab.
  • Select Restart the Service from these drop-downs: First failure, Second failure, and Subsequent failures.
Select Restart the Service
  • Select Apply and click OK
  • Repeat the steps for QBCFMonitorService.

When done, open QuickBooks on each workstation. Go to File> Switch to Multi-user Mode.

Switch to multi-user mode

6. Add services to your Windows admin group on your server

If you haven’t already allowed the admin access, give QuickBooksDBXX and QBCFMonitorService admin folder and Windows permissions on your server computer. To do so, set Windows access permissions to share company files.

7. If you’re trying to install or update QuickBooks

If you see the QBDBMgrN not running on this computer issue when trying to install or update QuickBooks, perform the steps below to resolve the problem: 

a. Remove QuickBooks Desktop 

  • Open Control Panel. 
  • Go to Programs and Features.
  • Select Uninstall a Program.
control-panel-uninstall-program
  • From the installed programs, select QuickBooks Desktop.
  • Click on Uninstall/Change
uninstall or change a program
  • Follow on the on-screen instructions. 

b. Rename the installation folders

Notes:
If you cannot find the Application Data or Program Data folder, display hidden files and folders or search for files in Windows. If you use other Intuit apps on your computer, uninstall or rename the QuickBooks version folder found in the Intuit folder: C:\Program Data\Intuit.
  • Locate to the QB installation folders below: 
C:\Program Data\IntuitC:\Program Data\Intuit
C:\Program Data\Common Files\IntuitC:\Program Data\Common Files\Intuit
C:\Users\[Username]\AppData\Local\IntuitC:\Users\\AppData\Local\Intuit
C:\Program Files\IntuitC:\Program Files\Intuit
C:\Program Files\Common Files\IntuitC:\Program Files\Common Files\Intuit
  • Launch the Run command.
  • Enter or simply copy, paste the location and Enter
  • Right-click on each and select Rename
  • Add .OLD at the end of the folder name. 

c. Install QuickBooks Desktop 

  • Connect your computer to an active internet. 
  • Locate QuickBooks.exe.
installation type
  • Select
    • Express Install: Saves all preferences and installs over your existing QuickBooks version. To access the prior version, use the custom install for reinstallation.
    • Custom and Network Options: Installs the new version in a separate location, keeping previous versions. Prior version preferences are not transferred to the new version.  
  • Select Next > Install
  • When done, click Open QuickBooks

Doing so will resolve all related issues and replace the old files or folders with the new ones. 

8. If you’re trying to update QuickBooks Database Server Manager on the server computer

If you see the QBDBMgrN not running on this computer issue when trying to install or update QuickBooks Database Server Manager, perform the steps below to resolve the problem:

a. Uninstall the QuickBooks Database Server Manager

  • Open the Run command.
  • Type appwiz.cpl in the Run prompt. 
  • Click OK.
  • Select QuickBooks Database Server Manager.
  • Hit on Uninstall/Change and follow the onscreen instructions.

b. Rename the installation folders

Notes: If the Application Data or Program Data folder isn’t visible, enable hidden files and folders or use Windows search to locate them.If other Intuit apps are installed, only uninstall or rename the QuickBooks version folder within the Intuit folder at C:\Program Data\Intuit.
  • Locate the installation folders in the chart below: 
C:\Program Data\IntuitC:\Program Data\Intuit
C:\Program Data\Common Files\IntuitC:\Program Data\Common Files\Intuit
C:\Users\[Username]\AppData\Local\IntuitC:\Users\\AppData\Local\Intuit
C:\Program Files\IntuitC:\Program Files\Intuit
C:\Program Files\Common Files\IntuitC:\Program Files\Common Files\Intuit
  • Open the Run command. 
  • Copy and paste to the folder and press Enter
  • Right-click on the folder and click Rename
  • Add .OLD to replace the file with the new one. 

c. Reinstall QuickBooks Database Server Manager

Here’s how to reinstall QuickBooks Database Server Manager and set up file sharing.

9. Configure the Windows Firewall settings

The Windows Firewall is a security system application that controls the ports for existing and incoming data. If it is considered a threat to your computer, it might block your QuickBooks and all the related and ongoing operations, such as updating QuickBooks, hosting the data file, and more. Configure the Windows Firewall ports for your QB Desktop to ensure you run the business process easily.

Conclusion 

Experiencing the ‘QBDBMgrN Not Running on this computer’ error in QuickBooks can be a real headache, but it’s often fixable.

By systematically troubleshooting these areas—restarting the service, updating your firewall, or using the QuickBooks Tool Hub—you can get your multi-user access back on track and your business running smoothly. Don’t give up; a solution is within reach!

For further assistance, dial +1(866)500-0076 to connect with a QB ProAdvisor and consult your issues!

Frequently Asked Questions 

Why is QuickBooks Database Server Manager not working? 

QuickBooks Database Server Manager may not work due to firewall or antivirus interference, outdated QuickBooks software, a corrupted or disabled service, a damaged Network Descriptor (.nd) file, or incorrect multi-user hosting settings

How do I open QBDBMgrN in QuickBooks? 

To open the QuickBooks Database Server Manager (which handles QBDBMgrN), open the Windows Start Menu, type “Database,” and open the application from the search results. If the service is not running, you can restart it by opening services.msc, locating the QuickBooksDBXX service, right-clicking it, and selecting “Restart”.  

What is QBDBMgrN service in QuickBooks? 

The QBDBMgrN service, or QuickBooks Database Server Manager, is a QuickBooks utility that allows multiple users to access a QuickBooks company file simultaneously. It serves as a network server for QuickBooks, enabling access to the company’s database and files by more than one user at the same time. 

QuickBooks error 179 is a bank-related error that pops up when your banks reject your login attempt, whether you are already signed in or due to a request not being accepted. It could happen that you may forget to exit from the bank’s application correctly, or the bank’s application does not acknowledge your logout request. 

The bank’s server can take up to 15 minutes to consider your request to log out. There are multiple steps to fix the QuickBooks desktop error 179. You can perform any of the steps that you find fit to resolve the error.

Common Causes Behind the QB Error Code 179

  • Already have a sign-in in another browser or device.
  • Not logged out completely.
  • Bank Server Issue.
  • Unstable Internet Connection.

Learn to fix the QuickBooks Error 179

If you have a first-time account and are dealing with an error 179, we would like you to wait for a while before you update QuickBooks again. Sometimes, the account updates overnight with fresh bank updates. 

  • Ensure to log out of the bank website or app for more than 15 minutes.
  • Ensure to log out from the bank website or an application for than 15 minutes. 
  • Remove the history of your browser’s cache and cookies.
  • You can try other browser troubleshooting options.
  • Completely shut down the bank application on your mobile phone. You do not need to sign out of the app; just close the program. 
  • In case of a joint account, ensure that none of the members use the bank account’s website or an application.
  • You should have only one QuickBooks Online account connected to your bank account. 

Note: We have shared with you the standard fixes that have resolved the error code 179 for most users. If you are still facing the error, try to fix it by changing your bank’s password. When you do so, it will log out the sessions and give a fresh login. 

Sometimes, QuickBooks users can face a browser issue while visiting the Intuit website. In such cases, there are troubleshooting steps you may need to perform to fix the issue. For the best experience, we recommend that you use a supported, up-to-date browser.

Solution 1: Performing basic browser troubleshooting

We will start with basic steps:

  • Use an incognito browser or any private browser.
  • Relaunch your browser.
  • Clear the cache and cookies from your browser.
  • Add Intuit to the list of trusted sites.

Solution 2: Performing troubleshooting for download issues

You can press Ctrl J in any browser if you are facing any issues finding or downloading the file. Even if this won’t work, you should try to change the default location of the files downloaded in the system. You need to follow the steps shared in this guide for your browser type. 

If you are using Google Chrome

  • Click on the three dots (Menu) on Chrome’s toolbar.
  • Click on Settings and choose Show Advanced Settings.
  • Click on the Downloads section:
    • Click on Change: If you are proceeding with the default location selection, click on Change to save your downloaded files.
    • Click on Ask where to save each file before downloading if you wish to choose a specific location for your downloads. 

For Mozilla Firefox

  • Click on the Tools > Options.

Select the General tab:

  • Click on Browse if you want to change the location of the downloaded files.
  • Click on Always ask me where to save files in case you want to choose a specific location for each download.

For Safari

  • Click on Preferences > General.
  • Click on Other in Save Downloaded Files.
  • Choose your desired location and close the program.

For Microsoft Edge

  • Click on the three dots in the upper right corner and select Settings. 
  • Now, select Advanced Settings and click on View advanced settings.
  • Choose and turn ON Ask me what to do with each download under the Downloads section. 

Solution 3: Use QuickBooks File Doctor

  • Close QuickBooks.
  • Download QuickBooks Tool Hub.
  • Complete the installation and agree to their terms and conditions.
  • Double-click on the QuickBooks Tool Hub icon and launch it.
qb tool hub
QuickBooks File Doctor Tool
  • Let the File Doctor complete its process. 
  • Now, restart your computer.  

Open QuickBooks and confirm whether the issue is resolved or if it still requires another solution. In case the error code 179 of QuickBooks Desktop is not resolved, proceed with the next solution.

Solution 4: Repair your Windows Registry Issue related to QuickBooks Error Code 179.

You must know that the Windows registry controls and stores the options and settings of QuickBooks Desktop. If there is any minor issue with the registry, it can cause QuickBooks code error 179.

  • Click on the Windows Start menu.
  • Search for Command Prompt.
  • Hit Enter and open the Command window.
  • Now, type Regedit in the CMD window.
  • Open the Registry Entry and right-click on the computer icon to back up. 
  • Now, click on the Export button. The backup will be created for all the applications that have been installed on your computer. 
  • You can find these backups in a backup folder with a .reg extension.
  • You can launch QuickBooks and confirm whether the error is fixed or not. 

Conclusion

This guide covers a broad concept of the bank-related errors of QuickBooks error 179. We hope to see your error fixed. Depending on various factors, the error’s resolution may not be identified. In such a situation, you can contact a QuickBooks expert at +1(866)500-0076 if you are not able to fix the error. 

Talk to our senior QuickBooks specialist and get rid of the unnecessary headache caused by the Error 179 QuickBooks. We understand the value of your time and energy!

Frequently Asked Questions

What does QuickBooks Error 179 mean?

The error code 179 means that you are not able to log in to your bank’s online account due to multiple reasons, including server issues, log-out issues, or browser issues.

Can I fix the QuickBooks banking error 179 by myself?

Yes, you can absolutely try to fix the error mentioned in this guide that covers everything related to error code 179. If you are still not able to fix the error, we recommend that you contact a QuickBooks specialist at +1(866)500-0076. 

Can QuickBooks Error Code 179 damage my company’s data?

Not at all. There is no direct connection between the error code and your QuickBooks company file. Still, we would recommend that you make a fresh backup of your company file and then proceed to fix the error either by yourself or by calling the QuickBooks Specialist. 

Is it possible that multiple failed log-ins are the reason behind the QB error 179?

It could be one of the reasons that might trigger error 179. The bank’s server may temporarily block your sign-in based on the account’s security.

QuickBooks Error 6000 -80 occurs when you are trying to open your company file, and it is not opening due to a file location issue or a corrupt file. This is the error of the QB 6000 series and requires you to understand what exactly the issue is. 

QuickBooks Error 6000 80(error message)

The error 6000 -80 code points to data corruption, or an insufficient permission, or you may be using an outdated QuickBooks application. It also includes more reasons that we will be discussing further. 

You must have understood a bit about why QB error code 6000 80 occurs. Now, let’s gain some understanding of the causes behind the error. 

Common Causes Behind the Error Code 6000 80 in QuickBooks

  • Damaged Company File.
  • Insufficient Permission.
  • Incorrect Hosting Configuration.
  • Corrupt or Damaged.TLG Files.
  • Use of Outdated Software.
  • Network Issue.

Call a Senior QuickBooks Specialist if: 

  • You are not a QuickBooks Technical person.
  • You are not an IT professional, or you hesitate to follow technical instructions.
  • Tried multiple attempts and still the error 6000, -80 is not resolved.
  • Do not want to waste time fixing the error and want a quick fix.
  • Do not want to lose your QuickBooks company data.

Preferred Intuit’s Solutions to fix the QuickBooks Desktop Error 6000 80

Solution 1: Run the QuickBooks File Doctor from the QuickBooks Tool Hub

Download and install the QuickBooks Tool Hub

  • Close the QuickBooks application.
  • Download the latest version of QuickBooks Tool Hub 1.6.0.8.
  • Save the downloaded file in an easy-to-reach folder.
  • Launch the downloaded file QuickBooksToolHub.exe.
  • To install the application, proceed with the on-screen instructions.
  • Agree to their Terms and Conditions.
  • Once the installation is finished, double-click on the Tool hub’s icon on your Windows desktop and open it.
qb tool hub

Note:- If your desktop does not have the icon, use the search option and type QuickBooks Tool Hub. It will appear as shown in the image below, and click on the program.

QuickBooks Tool Hub
  • Run the QuickBooks file Doctor.
  • Select the company File Issues tab from the tool hub window.
  • Click on Run QuickBooks File Doctor.
QuickBooks File Doctor Tool

Note:- The File doctor may take one minute to open.

  • In the QuickBooks file doctor, choose your company file. In any case, if the file is not within the drop-down menu, use the Browse and search option to fetch your file.
  • Click Check your file and hit Continue.
  • Now, enter the QuickBooks admin password.
  • Click Next.

Solution 2: Rename.ND and TLG Files

TLG and ND files that are a part of your company files let you access the QuickBooks company file in both the Network and multi-user mode. When these files get damaged, you see such an error while opening your QuickBooks company file. 

So, we will rename these files to fix the error code 6000, -80. QuickBooks creates these files when the user scans it with the QuickBooks Database Server Manager.

Rename the Transactions Log file (.TLG) and Network Data (.ND) file

  • Open the folder containing your company file.
  • Search for the files with the same file name as the company files. Ensure to search with the extension .TLG and ND.
  • company_file.qbw.nd
  • company_file.qbw.tlg
  • Now, right-click on each of the files and click on Rename. Simply add an extension OLD in each file name. For example, you rename your file as company_file.qbw.nd.OLD.

Learn More – QuickBooks Error 6000 95

Solution 3: Use a UNC path 

  • Right-click on the QuickBooks icon.
  • Press and hold the Ctrl key.
  • Click on Run as Administrator
run as administrator

Note:- Hold down the Ctrl key to prevent QuickBooks from automatically opening the company file. 

  • Click on the File menu.
  • Choose the option Open or Restore Company.
no company open
  • Click on Open a company file.
  • Finally, click on Next
  • Click on Network in the left pane and browse your company file.

Note:- If you cannot find the company file’s folder, you are required to set folder permissions.

  • Select the company file and open it. 

Read More – QuickBooks Error 6000 77

Solution 4: Configure Firewall and Security Software

We will use a port exception to fix your QB Error 6000, -80. In this solution, we will add a port exception to your Windows firewall for QuickBooks.

  • Click on the Windows Start.
  • Search for Windows Firewall and open it.
  • Click on Advanced Settings.
  • Right-click on the Inbound Rules tab.
windows Firewall and Security Software
  • Click on New Rule and select Port.
select Port
  • Finally, hit Next and select TCP only.

You would be seeing a field-specific local port. Simply add the ports you need for QuickBooks year version:

  • QuickBooks Desktop 2021
  • QuickBooks Desktop 2022
  • Click Next once you enter the port number.
  • Click on Allow the Connection.
Click on Allow the Connection
  • Hit Next and select all profiles.
  • Click Next and create a new rule.
  • Rename it in the format QBPorts(year) and click on Finish.

Use the above steps to create an outbound rule as well. Instead of selecting Inbound Rules, right-click on Outbound Rules.

Also Read – QuickBooks Error 6190

Solution 5: Create the damaged folder again

  • You need to create a new folder in your C: drive.
  • Open the folder that contains your company file.
  • Browse the file .qbw. Right-click on it and copy the file. 
  • Now, open the new folder that was created and paste the .qbw file into it. 
  • To share your company files, set Windows access permissions.
  • Launch QuickBooks Desktop.
  • Open the company file from the new folder location. 

Bonus Tips to Avoid QuickBooks Error Code 6000, -80 in the Future

  • Save the company file in an easy-to-reach folder.
  • Ensure to keep the QuickBooks Tool Hub active for background common error fix. 
  • Make sure to configure the correct host settings. 
  • Use QuickBooks File Doctor to fix any company file issues as a priority.
  • If you find that the error is not resolved, immediately contact a QuickBooks specialist at +1(866)500-0076.

Conclusion

This error can happen to any QuickBooks user. However, understanding the causes behind the QuickBooks Error 6000 80 may help you proactively avoid it further. With such errors, you may lose your company data, so it is recommended to contact a senior QuickBooks specialist at +1(866)500-0076

Not only will the experts resolve the error, but they will also give an overview of how to get along well with QuickBooks. 

Frequently Asked Questions

What is QuickBooks Error 6000, -80?

When the error 6000, -80 occurs, it means there can be any issue from the list that includes file location issues, corrupt company files, hosting configuration, and more. 

Can I lose my company data due to an error in QuickBooks 6000?

There is a chance that you may lose your QuickBooks company data if you force the resolution with repeated steps or attempts. In such cases, you need to contact a QuickBooks expert. 

Where should I contact to reach QuickBooks professionals?

If you want to get a quick fix of the error code 6000, -80 in QuickBooks, or you do not want to lose data of your company file, contact a senior QuickBooks specialist at **********

Are you encountering QuickBooks error 108 while trying to connect your bank or credit card account to QuickBooks Online or QuickBooks Self-Employed? This error signals that your financial institution has an important message on its website that requires your attention. These messages, often related to new terms of service, maintenance updates, or promotional offers, can disrupt the connection between your bank and QuickBooks. In this blog, we’ll break down what error 108 means, why it occurs, and provide clear, step-by-step guidance to resolve it quickly and get your accounting back on track.

What Causes the Banking Error 108 in QuickBooks? 

Here’s why you are getting QuickBooks bank error 108 when downloading the bank transactions in QuickBooks Online or QuickBooks Self-Employed: 

  • Common or known bank issues 
  • The bank or credit card’s website might be inactive 
  • Unread notifications, updates, or messages on the bank or credit card’s website 
  • The bank connection is outdated 
  • Incorrect bank information in QuickBooks 
  • Excessively stored cookies and caches in your browser 
  • The Windows Firewall or antivirus might be blocking the bank connection

Fix QuickBooks Error 108 When Downloading Bank or Credit Card Transactions 

Let’s explore the different methods to see what actually hampers the bank connection when downloading transactions and how to resolve QuickBooks error 108: 

1. Check for known issues 

Sometimes, you may encounter a banking error due to a known issue, which typically occurs with a specific bank or credit card. Bank connections or downloading bank transactions may be hampered due to this. Visit the Bank feed status issues on your bank or consult with us for the same to see if the error you’re experiencing is already known. If you can get help from the bank, or proceed with the steps below to resolve the problem.

Read More – QuickBooks Error 103

2. Verify your bank or credit card’s website status

You may encounter QuickBooks error 108 due to issues on your bank or credit card’s website. Make sure the website’s status by going to their social media pages, talking to their customer support team. If there’s an issue with the website, wait until it gets resolved and try to access the account’s information and verify it.

3. Review messages on your bank or credit card’s website

Any unread notifications or messages may also hinder the bank connection to QuickBooks and prevent the downloading of bank transactions. Check these updates on the bank or credit card’s website: 

  • Sign in to your bank or the credit card’s website. These should be the same credentials you used to connect the account in QuickBooks. If the credentials are different, disconnect the account from QuickBooks and use the admin bank or credit card’s website credentials to reconnect it. 
  • Review your bank or credit card’s website for any updates, messages, or notifications. 
  • If any action needs to be taken, the message should give you specific steps.
  • Once you have reviewed and addressed all the messages, sign back into your QuickBooks. 

If you don’t find any notifications on your bank’s or credit card’s website, but still receive QuickBooks error 108 when banking, contact your bank for assistance. You may not be able to identify certain types of messages or problems. 

4. Update your bank connections in QuickBooks

Updating the bank connection addresses the notifications on your bank’s website and ensures the connection is refreshed, resolving QuickBooks error 108. 

In QuickBooks Online

  • Sign in to QuickBooks Online as an admin. 
  • Navigate to Bookkeeping, select Transactions> Bank transactions.
  • Finally, click on Update.

In QuickBooks Self-Employed

  • Sign in to your QuickBooks Self-Employed. 
  • Click on the gear icon and choose Bank accounts.
  • Hit Refresh all.

5. Verify your bank account information

Verify the bank account information in your QuickBooks Online. Navigate to the Banking tab and choose the bank account where you are getting an error. Select the Edit menu to update the bank information, such as your account number, routing number, and other details. 

6. Clear your browser cookies and caches

Cookies and caches on the browser are saved to improve browsing speed, but over time, they expire or become corrupted, causing communication errors, authentication problems, and general performance issues. Let’s clear the cookies and caches and resolve the QuickBooks bank error 108: 

a. Firefox

  • Select the menu button and click on Settings.
  • Go to the Privacy & Security panel.
  • Click on Clear Data in the Cookies and Site Data section
  • It will open the Clear browsing data and cookies dialog.
Clear the chrome Cache files
  • Next to When, choose Everything in the drop-down. Make sure that the Only Temporary cached files and pages option is check-marked.
  • If you need more information about managing site data, see Manage local site storage settings.
  • Hit the Clear button.
  • Exit the Settings page. All the changes you have made will be automatically saved.

b. Google Chrome

  • Open Chrome on your computer. 
  • At the top of the browser, select More and then Delete browsing data.
  • Select a time range such as Last hour or All time.
  • Choose the types of information you wish to remove. 
  • Finally, click on Delete data.

If you clear the cookies when signed in to Chrome, don’t worry, you won’t be signed out of your Google Account.

c. Safari for Mac

  • Open the Safari app on your Mac. 
  • Select History> Clear History, then click on the pop-up menu.
  • Choose the date for which you wish to clear the browsing history.

d. Safari for iPad and iPhone

  • Navigate to Settings> Apps, then select Safari
  • Click on Clear History and Website Data.

Clearing your history, cookies, and browsing data from Safari won’t change your AutoFill information.

e. Microsoft Edge

  • Open the Microsoft Edge browser. 
  • Select Settings and more> Settings> Privacy, search, and services.
  • Hit on Clear browsing data, then select Choose what to clear next to Clear browsing data now.
  • Choose a specific time range from the drop-down menu under Time range
  • Select the types of browsing data you wish to clear. For example, you might want to remove the browsing history and cookies but want to keep the passwords and form fill data. 
  • Finally, click on Clear now.

When you clear the browser’s cache, make sure to restart the browser to take the changes into effect.  

7. Temporarily disable your firewall and antivirus

Windows Firewall block QuickBooks Desktop connections, affecting processes like hosting a company file over a network, internet access, or connections between apps and banks, potentially triggering QuickBooks error 108. To resolve this, you must disable the Windows Firewall or antivirus on your system and complete the bank processes. Once done, enable the security applications again to ensure the system’s safety. 

Conclusion 

In conclusion, banking error such as QuickBooks error 108 hampers all the payroll activities, direct deposits, reconciliation, and more. We hope this detailed blog has been helpful in helping you overcome such issues and continue with your accounting processes.

For further assistance, it is recommended to connect with QuickBooks professionals at +1(866)500-0076, available 24/7. Talk to an expert now!

Frequently Asked Questions

Why do I get QB error code 108?

You may encounter QB error code 108 when your bank or credit card company has notifications or messages that block the connection to your QuickBooks. To fix this, log in to your bank or credit card’s website and read all the notifications or messages, then re-establish the connection in QuickBooks by clicking Update in your Banking tab. 

How to fix error 108 in a bank account?

To fix bank error 108, which indicates your bank requires action, manually log in to your bank’s website and address any required messages or alerts, then update the bank connection in your QuickBooks. 

What if I see bank errors 102 and 105 in QuickBooks Online? 

If you encounter QuickBooks Online bank errors 102 and 105, this typically indicates a temporary issue on your bank’s end, such as a server problem or website maintenance, that prevents a successful connection to QuickBooks. 

How do I refresh my bank connection in QuickBooks?

To refresh your bank connection in QuickBooks Online, navigate to Bookkeeping > Bank Transactions, select the bank account, and click “Update.” If the connection has expired or you see an error, you may need to reconfirm consent or sign in again to re-authenticate the connection.

Why does QuickBooks not sync with my bank account? 

QuickBooks may not sync with your bank account due to incorrect login credentials, bank-initiated multi-factor authentication, bank server maintenance, or security alerts from your bank.

Posts pagination